
User Guide
Page 1
Adjustment Item Menu Guide: TCRU Model Name: Pro C900S/Pro C900 Read this manual carefully before using this machine and keep it handy for future reference. 1
Adjustment Item Menu Guide: TCRU Model Name: Pro C900S/Pro C900 Read this manual carefully before using this machine and keep it handy for future reference. 1
User Guide
Page 3
... of each symbol conforms with this machine. • Some illustrations in serious injury or death. Important: • Follow this manual might be available in the U.S. For details, please contact your local dealer. Patent and Trademark Office and/or certain other than...The manufacturer shall not be responsible for Imaging, Inc. Note: This information provides extra information about machine maintenance. CONVENTIONS USED IN THIS MANUAL CAUTIONS, NOTES, ETC. Certain options might result from the machine. in some countries. ON STANDBY 2 RCAUTION Follow the information to...
... of each symbol conforms with this machine. • Some illustrations in serious injury or death. Important: • Follow this manual might be available in the U.S. For details, please contact your local dealer. Patent and Trademark Office and/or certain other than...The manufacturer shall not be responsible for Imaging, Inc. Note: This information provides extra information about machine maintenance. CONVENTIONS USED IN THIS MANUAL CAUTIONS, NOTES, ETC. Certain options might result from the machine. in some countries. ON STANDBY 2 RCAUTION Follow the information to...
User Guide
Page 6
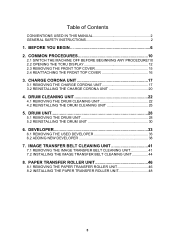
... 8.2 INSTALLING THE PAPER TRANSFER ROLLER UNIT 48 5 DEVELOPER 33 6.1 REMOVING THE USED DEVELOPER 33 6.2 ADDING NEW DEVELOPER 38 7. Table of Contents CONVENTIONS USED IN THIS MANUAL 2 GENERAL SAFETY INSTRUCTIONS 2 1. CHARGE CORONA UNIT 17 3.1 REMOVING THE CHARGE CORONA UNIT 17 3.2 REINSTALLING THE CHARGE CORONA UNIT 20 4. IMAGE TRANSFER BELT CLEANING UNIT 41...
... 8.2 INSTALLING THE PAPER TRANSFER ROLLER UNIT 48 5 DEVELOPER 33 6.1 REMOVING THE USED DEVELOPER 33 6.2 ADDING NEW DEVELOPER 38 7. Table of Contents CONVENTIONS USED IN THIS MANUAL 2 GENERAL SAFETY INSTRUCTIONS 2 1. CHARGE CORONA UNIT 17 3.1 REMOVING THE CHARGE CORONA UNIT 17 3.2 REINSTALLING THE CHARGE CORONA UNIT 20 4. IMAGE TRANSFER BELT CLEANING UNIT 41...
User Guide
Page 7
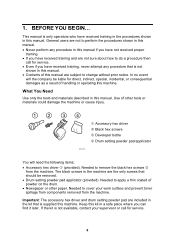
...find it later. Important: The accessory hex driver and drum setting powder pad are not sure about how to perform the procedures shown in this manual. • Never perform any procedure that should be liable for direct, indirect, special, incidental, or consequential damages as a result of this .... • Drum setting powder pad applicator (provided). BEFORE YOU BEGIN... What You Need Use only the tools and materials described in this manual if you have not received proper training. • If you have received training, never attempt any procedure in a safe place where you ...
...find it later. Important: The accessory hex driver and drum setting powder pad are not sure about how to perform the procedures shown in this manual. • Never perform any procedure that should be liable for direct, indirect, special, incidental, or consequential damages as a result of this .... • Drum setting powder pad applicator (provided). BEFORE YOU BEGIN... What You Need Use only the tools and materials described in this manual if you have not received proper training. • If you have received training, never attempt any procedure in a safe place where you ...

User Guide
Page 11
... slightly different. Wait a few seconds, and then disconnect the ground leakage circuit breaker from the machine and fixing heater. The operation switch is in this manual, always do not use the machine for your machine. 2.
... slightly different. Wait a few seconds, and then disconnect the ground leakage circuit breaker from the machine and fixing heater. The operation switch is in this manual, always do not use the machine for your machine. 2.
User Guide
Page 14
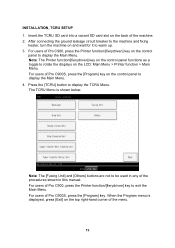
...any of Pro C900S, press the [Program] key. When the Program menu is shown below. Note: The [Fusing Unit] and [Others] buttons are not to warm up. 3. For users of the machine. 2. Press the [TCRU] button to exit the Main Menu. For users of the procedures shown in this manual. For users... of the menu. 13 INSTALLATION, TCRU SETUP 1. Insert the TCRU SD card into a vacant SD card slot on the top right-hand corner of Pro C900, press the Printer function/[fierydriven] key to display the TCRU Menu.
...any of Pro C900S, press the [Program] key. When the Program menu is shown below. Note: The [Fusing Unit] and [Others] buttons are not to warm up. 3. For users of the machine. 2. Press the [TCRU] button to exit the Main Menu. For users of the procedures shown in this manual. For users... of the menu. 13 INSTALLATION, TCRU SETUP 1. Insert the TCRU SD card into a vacant SD card slot on the top right-hand corner of Pro C900, press the Printer function/[fierydriven] key to display the TCRU Menu.
User Guide
Page 52
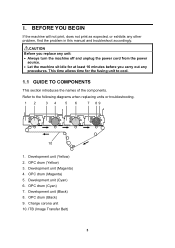
... (Yellow) 2. OPC drum (Black) 9. This time allows time for at least 10 minutes before you carry out any other problem, find the problem in this manual and troubleshoot accordingly. 1. BEFORE YOU BEGIN If the machine will not print, does not print as expected, or exhibits any procedures. Charge corona unit 10...
... (Yellow) 2. OPC drum (Black) 9. This time allows time for at least 10 minutes before you carry out any other problem, find the problem in this manual and troubleshoot accordingly. 1. BEFORE YOU BEGIN If the machine will not print, does not print as expected, or exhibits any procedures. Charge corona unit 10...
User Guide
Page 82
...as standard. For details, please contact your machine may include certain options as a result of handling or operating the machine. Keep this manual might be slightly different from the machine. • Certain options might not be liable for quick reference. For details, please contact your ...safety and benefit, read this machine. Introduction This manual contains detailed instructions and notes on which country you are subject to change without prior notice. In no event will the company be...
...as standard. For details, please contact your machine may include certain options as a result of handling or operating the machine. Keep this manual might be slightly different from the machine. • Certain options might not be liable for quick reference. For details, please contact your ...safety and benefit, read this machine. Introduction This manual contains detailed instructions and notes on which country you are subject to change without prior notice. In no event will the company be...

User Guide
Page 84
SYMBOLS This manual uses the following symbols: RWARNING Indicates a potentially hazardous situation which , if instructions are not followed, could result in minor or moderate injury or damage to ...
SYMBOLS This manual uses the following symbols: RWARNING Indicates a potentially hazardous situation which , if instructions are not followed, could result in minor or moderate injury or damage to ...
User Guide
Page 113
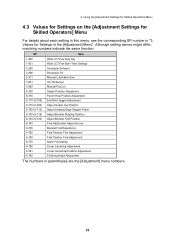
... 6-745 6-755 6-760 6-770 6-780 6-781 6-782 Wide LCT Fan Duty Adj Wide LCT Fan Start Time Settings Developer Exhaust Developer Fill Manual Lubrication Exe Init TD Sensor Manual ProCon Staple Position Adjustment Punch Hole Position Adjustment End Bind Jogger Adjustment Adjust Output Jog Position Adjust Leading Edge Stopper Press Adjust Booklet...
... 6-745 6-755 6-760 6-770 6-780 6-781 6-782 Wide LCT Fan Duty Adj Wide LCT Fan Start Time Settings Developer Exhaust Developer Fill Manual Lubrication Exe Init TD Sensor Manual ProCon Staple Position Adjustment Punch Hole Position Adjustment End Bind Jogger Adjustment Adjust Output Jog Position Adjust Leading Edge Stopper Press Adjust Booklet...


