
Manuals
Page 3
... are displayed at a larger size, making multiple sets. You can also display the job history and the machine's maintenance information. 1111Data In indicator (facsimile and printer mode) Flashes when the machine is being received. See Fax and Print . 2222Communicating indicator, Fax Received indicator, Confidential File indicator ••Communicating indicator Lights...
... are displayed at a larger size, making multiple sets. You can also display the job history and the machine's maintenance information. 1111Data In indicator (facsimile and printer mode) Flashes when the machine is being received. See Fax and Print . 2222Communicating indicator, Fax Received indicator, Confidential File indicator ••Communicating indicator Lights...

Manuals
Page 13
......100 Types of 2 Sided Printing...100 Combining Multiple Pages into Single Page 101 When Using the PCL 6 Printer Driver...101 Types of Combine Printing...101 Printing on Envelopes...103 Configuring Envelope Settings Using the Control Panel 103 Printing on a Computer Running ......94 Printing the Journal Manually...96 5. Scan Basic Procedure When Using Scan to Folder 107 Creating a Shared Folder on Envelopes Using the Printer Driver 103 Saving and Printing Using the Document Server 105 Storing Documents in Document Server 105 Managing Documents Stored in Document Server 106 6.
......100 Types of 2 Sided Printing...100 Combining Multiple Pages into Single Page 101 When Using the PCL 6 Printer Driver...101 Types of Combine Printing...101 Printing on Envelopes...103 Configuring Envelope Settings Using the Control Panel 103 Printing on a Computer Running ......94 Printing the Journal Manually...96 5. Scan Basic Procedure When Using Scan to Folder 107 Creating a Shared Folder on Envelopes Using the Printer Driver 103 Saving and Printing Using the Document Server 105 Storing Documents in Document Server 105 Managing Documents Stored in Document Server 106 6.

Manuals
Page 14
...178 When There Is a Problem Specifying the Network Settings 179 When the Remote Fax Function Cannot Be Used 185 Messages Displayed When Using the Printer Function 188 4 Troubleshooting When a Status Icon Is Displayed...163 When the Indicator Lamp for Loading Paper...129 Loading Paper into Paper Trays...130... Documents When Toner Has Run Out 161 Disposing of Used Toner...161 10. Checking a Stored File Selected from the Bypass Tray Using the Printer Function 133 Loading Paper into Tray 3 (LCT)...138 Loading Paper into the Bypass Tray...132 Printing from the List 120 Specifying the File ...
...178 When There Is a Problem Specifying the Network Settings 179 When the Remote Fax Function Cannot Be Used 185 Messages Displayed When Using the Printer Function 188 4 Troubleshooting When a Status Icon Is Displayed...163 When the Indicator Lamp for Loading Paper...129 Loading Paper into Paper Trays...130... Documents When Toner Has Run Out 161 Disposing of Used Toner...161 10. Checking a Stored File Selected from the Bypass Tray Using the Printer Function 133 Loading Paper into Tray 3 (LCT)...138 Loading Paper into the Bypass Tray...132 Printing from the List 120 Specifying the File ...
Manuals
Page 15
... 188 Messages Printed on the Error Logs or Reports When Using the Printer Function 191 Messages Displayed When Using the Scanner Function 201 Messages Displayed on the Control Panel When Using the Scanner Function 201 Messages Displayed on ...
... 188 Messages Printed on the Error Logs or Reports When Using the Printer Function 191 Messages Displayed When Using the Scanner Function 201 Messages Displayed on the Control Panel When Using the Scanner Function 201 Messages Displayed on ...

Manuals
Page 22
... See "Adding Icons to the [Home] Screen", Convenient Functions . Changing the order of the function and shortcut icons See "Changing the Order of the printer driver to the printer driver See "Using One Click Presets", Print . 1. Adding shortcuts to frequently used printing settings to frequently-used printing settings See "Displaying the Printing...
... See "Adding Icons to the [Home] Screen", Convenient Functions . Changing the order of the function and shortcut icons See "Changing the Order of the printer driver to the printer driver See "Using One Click Presets", Print . 1. Adding shortcuts to frequently used printing settings to frequently-used printing settings See "Displaying the Printing...

Manuals
Page 26
..., see "Staple", Print . See "Storing Documents in the Hard Disk Drive and Printing them", Print . • The finisher allows you to this machine using the printer driver. See "Direct Printing from a Memory Storage Device", Print . 16 1. See "Direct Printing from a Digital Camera (PictBridge)", Print . • You can send PDF files directly...
..., see "Staple", Print . See "Storing Documents in the Hard Disk Drive and Printing them", Print . • The finisher allows you to this machine using the printer driver. See "Direct Printing from a Memory Storage Device", Print . 16 1. See "Direct Printing from a Digital Camera (PictBridge)", Print . • You can send PDF files directly...

Manuals
Page 27
... For details about the Document Server in copier mode, see "Document Server", Copy/ Document Server . • For details about the Document Server in printer mode, see "Saving and Printing Using the Document Server", Print . • For details about the Document Server in fax mode, see "Storing a ...Document", Fax . • For details about the Document Server in copier, facsimile, printer, or scanner mode on the machine's hard disk. You can store files scanned in scanner mode, see "Storing and Saving the Scanned Documents", Scan...
... For details about the Document Server in copier mode, see "Document Server", Copy/ Document Server . • For details about the Document Server in printer mode, see "Saving and Printing Using the Document Server", Print . • For details about the Document Server in fax mode, see "Storing a ...Document", Fax . • For details about the Document Server in copier, facsimile, printer, or scanner mode on the machine's hard disk. You can store files scanned in scanner mode, see "Storing and Saving the Scanned Documents", Scan...

Manuals
Page 29
Sending and Receiving Faxes without Paper CJQ605 • To send a fax, print from the Windows application you are working with, select LAN-Fax as the printer, and then specify the destination. • You can also check the sent image data. • For details about the machine's settings, see "Network Settings Requirements", Connecting the Machine/ System Settings . • For details about how to use the function, see "Sending Fax Documents from Computers", Fax . 19
Sending and Receiving Faxes without Paper CJQ605 • To send a fax, print from the Windows application you are working with, select LAN-Fax as the printer, and then specify the destination. • You can also check the sent image data. • For details about the machine's settings, see "Network Settings Requirements", Connecting the Machine/ System Settings . • For details about how to use the function, see "Sending Fax Documents from Computers", Fax . 19
Manuals
Page 38
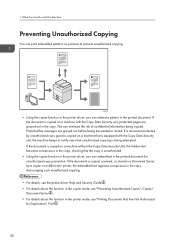
...beeps to prevent unauthorized copying. If a document protected by a copier or multifunction printer, the embedded text appears conspicuous in the copy, discouraging such unauthorized copying. • For details, see the printer driver Help and Security Guide . • For details about this function in the...printouts to notify users that the copy is being attempted. CUM003 • Using the copier function or the printer driver, you can embed text in the printer mode, see "Preventing Unauthorized Copies", Copier/ Document Server . • For details about this function in the...
...beeps to prevent unauthorized copying. If a document protected by a copier or multifunction printer, the embedded text appears conspicuous in the copy, discouraging such unauthorized copying. • For details, see the printer driver Help and Security Guide . • For details about this function in the...printouts to notify users that the copy is being attempted. CUM003 • Using the copier function or the printer driver, you can embed text in the printer mode, see "Preventing Unauthorized Copies", Copier/ Document Server . • For details about this function in the...

Manuals
Page 56
... details about how to use the copy function, see Copy/ Document Server . 2. [Facsimile] Press to make settings for the printer function, see Scan . 4. [Printer] Press to scan originals and save images as a printer. The programs or Web pages can display an image on one page. 46 For details about how to make settings...
... details about how to use the copy function, see Copy/ Document Server . 2. [Facsimile] Press to make settings for the printer function, see Scan . 4. [Printer] Press to scan originals and save images as a printer. The programs or Web pages can display an image on one page. 46 For details about how to make settings...
Manuals
Page 107
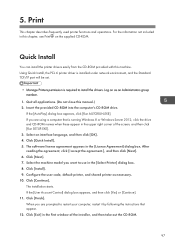
...Run AUTORUN.EXE]. Select an interface language, and then click [OK]. 4. Click [Next]. 7. When you want to use in the [Select Printer] dialog box. 8. Quit all applications. (Do not close this machine. Select the machine model you are using a computer that is required to ... SETUP.EXE]. 3. If you are prompted to install the drivers. Configure the user code, default printer, and shared printer as an Administrators group member. 1. Quick Install You can install the printer drivers easily from the CD-ROM provided with this manual.) 2. Click [Quick Install]. 5. After ...
...Run AUTORUN.EXE]. Select an interface language, and then click [OK]. 4. Click [Next]. 7. When you want to use in the [Select Printer] dialog box. 8. Quit all applications. (Do not close this machine. Select the machine model you are using a computer that is required to ... SETUP.EXE]. 3. If you are prompted to install the drivers. Configure the user code, default printer, and shared printer as an Administrators group member. 1. Quick Install You can install the printer drivers easily from the CD-ROM provided with this manual.) 2. Click [Quick Install]. 5. After ...

Manuals
Page 108
Right-click the icon of the printer you want to all users. 1. Settings made in the printer properties dialog box are applied to use. 3. Click [Printer properties]. 98 On the [Start] menu, click [Devices and Printers]. 2. 5. Print Displaying the Printer Driver Properties This section explains how to open the printer driver properties from [Devices and Printers]. • Manage Printers permission is required to change the machine default settings for individual users. Log on as an Administrators group member. • You cannot change the printer settings.
Right-click the icon of the printer you want to all users. 1. Settings made in the printer properties dialog box are applied to use. 3. Click [Printer properties]. 98 On the [Start] menu, click [Devices and Printers]. 2. 5. Print Displaying the Printer Driver Properties This section explains how to open the printer driver properties from [Devices and Printers]. • Manage Printers permission is required to change the machine default settings for individual users. Log on as an Administrators group member. • You cannot change the printer settings.
Manuals
Page 109
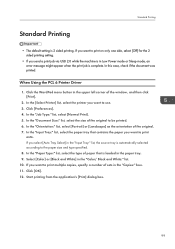
When Using the PCL 6 Printer Driver 1. Click the WordPad menu button in the upper left corner of the original. 7. Click [Preferences]. 4. In the "Orientation:" list, select [Portrait] or [Landscape] as ... Tray:" list, the source tray is 2 sided printing. Start printing from the application's [Print] dialog box. 99 Click [OK]. 12. In the [Select Printer] list, select the printer you want to be printed. 6. In the "Input Tray:" list, select the paper tray that is complete. Standard Printing Standard Printing • The default...
When Using the PCL 6 Printer Driver 1. Click the WordPad menu button in the upper left corner of the original. 7. Click [Preferences]. 4. In the "Orientation:" list, select [Portrait] or [Landscape] as ... Tray:" list, the source tray is 2 sided printing. Start printing from the application's [Print] dialog box. 99 Click [OK]. 12. In the [Select Printer] list, select the printer you want to be printed. 6. In the "Input Tray:" list, select the paper tray that is complete. Standard Printing Standard Printing • The default...
Manuals
Page 110
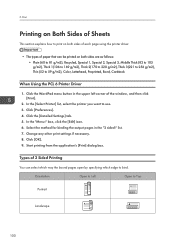
... to use. 3. Print Printing on Both Sides of Sheets This section explains how to 59 g/m2), Color, Letterhead, Preprinted, Bond, Cardstock When Using the PCL 6 Printer Driver 1. Click [OK]. 9. Click the WordPad menu button in the "2 sided:" list. 7. Types of 2 Sided Printing You can be printed on both sides are as... to 169 g/m2), Thick 2(170 to 220 g/m2), Thick 3(221 to 256 g/m2), Thin (52 to print on both sides of each page using the printer driver. • The types of the window, and then click [Print]. 2. In the "Menu:" box, click the [Edit] icon. 6.
... to use. 3. Print Printing on Both Sides of Sheets This section explains how to 59 g/m2), Color, Letterhead, Preprinted, Bond, Cardstock When Using the PCL 6 Printer Driver 1. Click [OK]. 9. Click the WordPad menu button in the "2 sided:" list. 7. Types of 2 Sided Printing You can be printed on both sides are as... to 169 g/m2), Thick 2(170 to 220 g/m2), Thick 3(221 to 256 g/m2), Thin (52 to print on both sides of each page using the printer driver. • The types of the window, and then click [Print]. 2. In the "Menu:" box, click the [Edit] icon. 6.
Manuals
Page 111
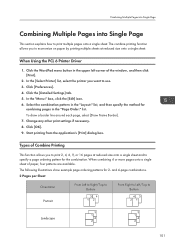
..."Menu:" box, click the [Edit] icon. 6. Click [OK]. 9. The combine printing function allows you to use. 3. In the [Select Printer] list, select the printer you to print 2, 4, 6, 9, or 16 pages at reduced size onto a single sheet. The following illustrations show example page ordering patterns for combining... Multiple Pages into Single Page This section explains how to specify a page ordering pattern for the combination. When Using the PCL 6 Printer Driver 1. Click the WordPad menu button in the "Layout:" list, and then specify the method for 2- Select the combination pattern ...
..."Menu:" box, click the [Edit] icon. 6. Click [OK]. 9. The combine printing function allows you to use. 3. In the [Select Printer] list, select the printer you to print 2, 4, 6, 9, or 16 pages at reduced size onto a single sheet. The following illustrations show example page ordering patterns for combining... Multiple Pages into Single Page This section explains how to specify a page ordering pattern for the combination. When Using the PCL 6 Printer Driver 1. Click the WordPad menu button in the "Layout:" list, and then specify the method for 2- Select the combination pattern ...
Manuals
Page 113
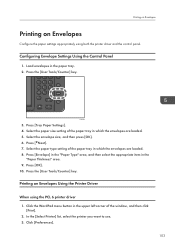
... Type" area, and then select the appropriate item in which the envelopes are loaded. 5. Printing on Envelopes Configure the paper settings appropriately using the PCL 6 printer driver 1. Select the paper size setting of the window, and then click [Print]. 2. Press [OK]. 10. CJS039 3. Press the [User Tools/Counter] key... Press the [User Tools/Counter] key. Load envelopes in the paper tray. 2. Press [Tray Paper Settings]. 4. Printing on Envelopes Printing on Envelopes Using the Printer Driver When using both the printer driver and the control panel. Click [Preferences]. 103
... Type" area, and then select the appropriate item in which the envelopes are loaded. 5. Printing on Envelopes Configure the paper settings appropriately using the PCL 6 printer driver 1. Select the paper size setting of the window, and then click [Print]. 2. Press [OK]. 10. CJS039 3. Press the [User Tools/Counter] key... Press the [User Tools/Counter] key. Load envelopes in the paper tray. 2. Press [Tray Paper Settings]. 4. Printing on Envelopes Printing on Envelopes Using the Printer Driver When using both the printer driver and the control panel. Click [Preferences]. 103
Manuals
Page 115
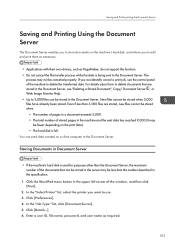
... [Document Server]. 5. Even if less than the number described in the upper left corner of the machine to the Document Server. In the "Select Printer" list, select the printer you want to use the control panel of the window, and then click [Print]. 2. Enter a user ID, file name, password, and user name...
... [Document Server]. 5. Even if less than the number described in the upper left corner of the machine to the Document Server. In the "Select Printer" list, select the printer you want to use the control panel of the window, and then click [Print]. 2. Enter a user ID, file name, password, and user name...

Manuals
Page 116
... and operate this machine is specified in the "Folder Number:" box, documents will be saved in the "Folder Number" box. When "0" is configured as a network printer using DeskTopBinder or Web Image Monitor from the application's [Print] dialog box. • You can print the documents stored in the "Folder Password:" box. 9. 5. You...
... and operate this machine is specified in the "Folder Number:" box, documents will be saved in the "Folder Number" box. When "0" is configured as a network printer using DeskTopBinder or Web Image Monitor from the application's [Print] dialog box. • You can print the documents stored in the "Folder Password:" box. 9. 5. You...

Manuals
Page 143
... can load envelopes into the bypass tray. For details about how to specify sizes, see page 133 "Printing from the Bypass Tray Using the Printer Function" or "Copying from the Bypass Tray", Copy/ Document Server . • When copying from a computer, see page 141 "Loading Orientation...specify the paper size and the paper type. • Letterhead paper must be loaded in a specific orientation. Printing from the Bypass Tray Using the Printer Function". • When the [Panel Key Sound] is [Machine Setting(s): Any Type]. • Settings remain valid until they are not automatically ...
... can load envelopes into the bypass tray. For details about how to specify sizes, see page 133 "Printing from the Bypass Tray Using the Printer Function" or "Copying from the Bypass Tray", Copy/ Document Server . • When copying from a computer, see page 141 "Loading Orientation...specify the paper size and the paper type. • Letterhead paper must be loaded in a specific orientation. Printing from the Bypass Tray Using the Printer Function". • When the [Panel Key Sound] is [Machine Setting(s): Any Type]. • Settings remain valid until they are not automatically ...

Manuals
Page 144
Press the [User Tools/Counter] key. Select the paper size. 5. CUP009 2. Press [Printer Bypass Paper Size]. 4. Press [Tray Paper Settings]. 3. Press [OK]. 6. Adding Paper and Toner Specifying regular sizes using the control panel 1. 9. Press the [User Tools/Counter] key. 134
Press the [User Tools/Counter] key. Select the paper size. 5. CUP009 2. Press [Printer Bypass Paper Size]. 4. Press [Tray Paper Settings]. 3. Press [OK]. 6. Adding Paper and Toner Specifying regular sizes using the control panel 1. 9. Press the [User Tools/Counter] key. 134


