
Hardware Guide
Page 1
Hardware Guide 1 Guide to read the Safety Information before you use , be sure to the Printer 2 Installing Options 3 Connecting the Printer 4 Configuration 5 Paper and Other Media 6 Replacing Consumables 7 Adjusting the Printer 8 Troubleshooting 9 Removing Misfed Paper 10 Appendix Read this machine and keep it handy for future reference. For safe and correct use this manual carefully before using the machine.
Hardware Guide 1 Guide to read the Safety Information before you use , be sure to the Printer 2 Installing Options 3 Connecting the Printer 4 Configuration 5 Paper and Other Media 6 Replacing Consumables 7 Adjusting the Printer 8 Troubleshooting 9 Removing Misfed Paper 10 Appendix Read this machine and keep it handy for future reference. For safe and correct use this manual carefully before using the machine.

Hardware Guide
Page 2
PCL® is a registered trademark of their respective companies. IPS-PRINT Printer Language Emulation Copyright© 1999-2000 Oak Technology, Inc., All rights reserved. The proper names of the Windows operating systems are as follows: • Microsoft&#...
PCL® is a registered trademark of their respective companies. IPS-PRINT Printer Language Emulation Copyright© 1999-2000 Oak Technology, Inc., All rights reserved. The proper names of the Windows operating systems are as follows: • Microsoft&#...
Hardware Guide
Page 4
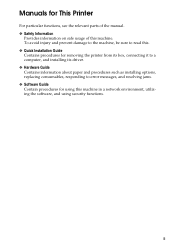
...avoid injury and prevent damage to the machine, be sure to read this. ❖ Quick Installation Guide Contains procedures for removing the printer from its box, connecting it to a computer, and installing its driver. ❖ Hardware Guide Contains information about paper and procedures... such as installing options, replacing consumables, responding to error messages, and resolving jams. ❖ Software Guide Contain procedures for This Printer For particular functions, see the relevant parts of the manual. ❖ Safety Information Provides information on safe usage of this machine in...
...avoid injury and prevent damage to the machine, be sure to read this. ❖ Quick Installation Guide Contains procedures for removing the printer from its box, connecting it to a computer, and installing its driver. ❖ Hardware Guide Contains information about paper and procedures... such as installing options, replacing consumables, responding to error messages, and resolving jams. ❖ Software Guide Contain procedures for This Printer For particular functions, see the relevant parts of the manual. ❖ Safety Information Provides information on safe usage of this machine in...

Hardware Guide
Page 6
Description for the Specified Model In this model. AQV745S v Note ❒ You can identify the printer's model by checking the label on its inside as shown. Read if you purchase this model. Read if you purchase this manual, the following items explain about the printer for the specified models: This explains about the 120 V model printer. This explains about the 220-240 V model printer.
Description for the Specified Model In this model. AQV745S v Note ❒ You can identify the printer's model by checking the label on its inside as shown. Read if you purchase this model. Read if you purchase this manual, the following items explain about the printer for the specified models: This explains about the 120 V model printer. This explains about the 220-240 V model printer.
Hardware Guide
Page 7
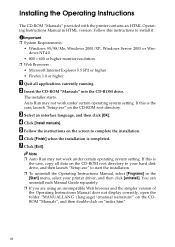
...this instructions to install it. F Click [Finish] when the installation is the case, launch "Setup.exe" on the CD-ROM root directory to your printer driver, and then click [uninstall]. B Insert the CD-ROM "Manuals" into the CD-ROM drive. Important ❒ System Requirements : • Windows... 1.0 or higher A Quit all data on the CD-ROM root directory. Installing the Operating Instructions The CD-ROM "Manuals" provided with the printer contains an HTML Operating Instructions Manual in the [Start] menu, select your hard disk drive, and then launch "Setup.exe" to start the...
...this instructions to install it. F Click [Finish] when the installation is the case, launch "Setup.exe" on the CD-ROM root directory to your printer driver, and then click [uninstall]. B Insert the CD-ROM "Manuals" into the CD-ROM drive. Important ❒ System Requirements : • Windows... 1.0 or higher A Quit all data on the CD-ROM root directory. Installing the Operating Instructions The CD-ROM "Manuals" provided with the printer contains an HTML Operating Instructions Manual in the [Start] menu, select your hard disk drive, and then launch "Setup.exe" to start the...

Hardware Guide
Page 8
...to Read This Manual iv Symbols ...iv Description for the Specified Model v Installing the Operating Instructions vi 1. Connecting the Printer Network Connection 45 Reading the LED Lamps 47 USB Connection 48 Parallel Connection 49 4. Detecting the Network Address Automatically 54 ... Options...7 Caution when re-installing the controller board 9 Attaching Paper Feed Unit PB 3020 10 Attaching User Account Enhance Unit Type E 16 Attaching Printer Hard Disk Drive Type 8100 20 Attaching Memory Unit Type D 128MB, Memory Unit Type E 256MB (SDRAM Module) ...27 Attaching IEEE 802.11b...
...to Read This Manual iv Symbols ...iv Description for the Specified Model v Installing the Operating Instructions vi 1. Connecting the Printer Network Connection 45 Reading the LED Lamps 47 USB Connection 48 Parallel Connection 49 4. Detecting the Network Address Automatically 54 ... Options...7 Caution when re-installing the controller board 9 Attaching Paper Feed Unit PB 3020 10 Attaching User Account Enhance Unit Type E 16 Attaching Printer Hard Disk Drive Type 8100 20 Attaching Memory Unit Type D 128MB, Memory Unit Type E 256MB (SDRAM Module) ...27 Attaching IEEE 802.11b...
Hardware Guide
Page 9
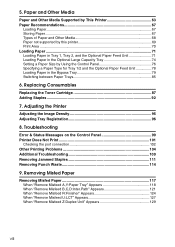
... Paper Recommendations 67 Loading Paper...67 Storing Paper ...67 Types of Paper and Other Media 68 Paper not supported by this printer 69 Print Area ...70 Loading Paper ...71 Loading Paper in Tray 1, Tray 2, and the Optional Paper Feed Unit 71 Loading ...LCT" Appears 127 When "Remove Misfeed Z:Duplex Unit" Appears 129 viii Adjusting the Printer Adjusting the Image Density 95 Adjusting Tray Registration 96 8. Troubleshooting Error & Status Messages on the Control Panel 99 Printer Does Not Print 101 Checking the port connection 102 Other Printing Problems 104 Additional Troubleshooting...
... Paper Recommendations 67 Loading Paper...67 Storing Paper ...67 Types of Paper and Other Media 68 Paper not supported by this printer 69 Print Area ...70 Loading Paper ...71 Loading Paper in Tray 1, Tray 2, and the Optional Paper Feed Unit 71 Loading ...LCT" Appears 127 When "Remove Misfeed Z:Duplex Unit" Appears 129 viii Adjusting the Printer Adjusting the Image Density 95 Adjusting Tray Registration 96 8. Troubleshooting Error & Status Messages on the Control Panel 99 Printer Does Not Print 101 Checking the port connection 102 Other Printing Problems 104 Additional Troubleshooting...

Hardware Guide
Page 10
10.Appendix Moving and Transporting the Printer 131 Moving the Printer 132 Consumables ...133 Toner Cartridge ...133 Maintenance Kit ...133 Specifications...134 Mainframe ...134 Options ...137 INDEX...143 ix
10.Appendix Moving and Transporting the Printer 131 Moving the Printer 132 Consumables ...133 Toner Cartridge ...133 Maintenance Kit ...133 Specifications...134 Mainframe ...134 Options ...137 INDEX...143 ix
Hardware Guide
Page 12
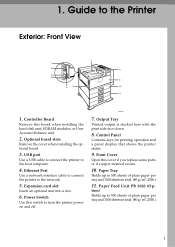
... tray and 1100 sheets in total. (80 g/m2, 20 lb.) 11. Paper Feed Unit PB 3020 (Op- 1. USB port Use a USB cable to connect the printer to 550 sheets of plain paper per tray and 1100 sheets in total. (80 g/m2, 20 lb.) 1 AQV002S 7. Controller Board Remove this cover if you.... Front Cover Open this board when installing the hard disk unit, SDRAM modules, or User Account Enhance unit. 2. Paper Tray Holds up to turn the printer power on and off. Control Panel Contains keys for printing operation and a panel display that shows the...
... tray and 1100 sheets in total. (80 g/m2, 20 lb.) 11. Paper Feed Unit PB 3020 (Op- 1. USB port Use a USB cable to connect the printer to 550 sheets of plain paper per tray and 1100 sheets in total. (80 g/m2, 20 lb.) 1 AQV002S 7. Controller Board Remove this cover if you.... Front Cover Open this board when installing the hard disk unit, SDRAM modules, or User Account Enhance unit. 2. Paper Tray Holds up to turn the printer power on and off. Control Panel Contains keys for printing operation and a panel display that shows the...
Hardware Guide
Page 13
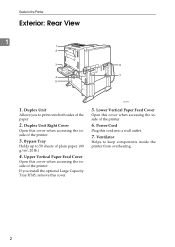
... 5. Duplex Unit Right Cover Open this cover when accessing the inside of the printer. 3. If you to keep components inside of the printer. 6. Power Cord Plug this cover when accessing the inside the printer from overheating. 2 Lower Vertical Paper Feed Cover Open this cord into a wall ...outlet. 7. Ventilator Helps to print onto both sides of the paper. 2. Bypass Tray Holds up to the Printer Exterior: Rear View 1 1. Guide to 50...
... 5. Duplex Unit Right Cover Open this cover when accessing the inside of the printer. 3. If you to keep components inside of the printer. 6. Power Cord Plug this cover when accessing the inside the printer from overheating. 2 Lower Vertical Paper Feed Cover Open this cord into a wall ...outlet. 7. Ventilator Helps to print onto both sides of the paper. 2. Bypass Tray Holds up to the Printer Exterior: Rear View 1 1. Guide to 50...

Hardware Guide
Page 14
.... 5. Toner Holder Slide this unit. 6. Development Unit When "Replace Maintenance Kit" appears on the panel display, replace this cover when accessing the inside of the printer. Transfer Unit When "Replace Maintenance Kit" appears on the Control Panel". 3 Inside Inside 1 AQV005S 1.
.... 5. Toner Holder Slide this unit. 6. Development Unit When "Replace Maintenance Kit" appears on the panel display, replace this cover when accessing the inside of the printer. Transfer Unit When "Replace Maintenance Kit" appears on the Control Panel". 3 Inside Inside 1 AQV005S 1.

Hardware Guide
Page 15
.... Is on the panel display. 4 This does not work if the printer is in the printer's input buffer. Is off when the power is off or when the printer is online. 6. AQV250S 7. A message describing the cause of the printer and error messages. 3. {Online} Key Press this key to switch the...when making settings. 11. {Escape} Key Press this key to cancel any printer error occurs. See "Canceling a Print job", Softtware Guide. 5. {Form Feed} Key If the printer is online, press this key to make and check the current printer settings. 2. Press this key to clear some errors. 10. {U} {T} ...
.... Is on the panel display. 4 This does not work if the printer is in the printer's input buffer. Is off when the power is off or when the printer is online. 6. AQV250S 7. A message describing the cause of the printer and error messages. 3. {Online} Key Press this key to switch the...when making settings. 11. {Escape} Key Press this key to cancel any printer error occurs. See "Canceling a Print job", Softtware Guide. 5. {Form Feed} Key If the printer is online, press this key to make and check the current printer settings. 2. Press this key to clear some errors. 10. {U} {T} ...
Hardware Guide
Page 16
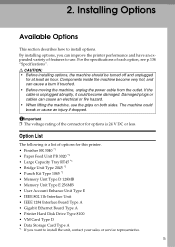
... to install the unit, contact your sales or service representative. 5 R CAUTION: • Before installing options, the machine should be turned off and unplugged for this printer. • Finisher SR 3040 *1 • Paper Feed Unit PB 3020 *1 • Large Capacity Tray RT45 *1 • Bridge Unit Type 2045 *1 • ...; User Account Enhance Unit Type E • IEEE 802.11b Interface Unit • IEEE 1284 Interface Board Type A • Gigabit Ethernet Board Type A • Printer Hard Disk Drive Type 8100 • VM Card Type D • Data Storage Card Type A *1 If you can improve the...
... to install the unit, contact your sales or service representative. 5 R CAUTION: • Before installing options, the machine should be turned off and unplugged for this printer. • Finisher SR 3040 *1 • Paper Feed Unit PB 3020 *1 • Large Capacity Tray RT45 *1 • Bridge Unit Type 2045 *1 • ...; User Account Enhance Unit Type E • IEEE 802.11b Interface Unit • IEEE 1284 Interface Board Type A • Gigabit Ethernet Board Type A • Printer Hard Disk Drive Type 8100 • VM Card Type D • Data Storage Card Type A *1 If you can improve the...

Hardware Guide
Page 17
... Unit Type D 128MB, Memory Unit Type E 256MB). D Remove all SDRAM modules before installing the hard disk drive. E Install the hard disk drive (Printer Hard Disk Drive Type 8100). There are two types of the controller board. These options do not function simultaneously. Install the module to the bottom...Account Enhance Unit Type E). Install one option. Insert these options into the SD card slot on the left) of the printer. 2 B Take out the controller board from the printer. Attach the paper feed unit to the User Account Enhance Unit slot of memory unit: 128 MB and 256 MB.
... Unit Type D 128MB, Memory Unit Type E 256MB). D Remove all SDRAM modules before installing the hard disk drive. E Install the hard disk drive (Printer Hard Disk Drive Type 8100). There are two types of the controller board. These options do not function simultaneously. Install the module to the bottom...Account Enhance Unit Type E). Install one option. Insert these options into the SD card slot on the left) of the printer. 2 B Take out the controller board from the printer. Attach the paper feed unit to the User Account Enhance Unit slot of memory unit: 128 MB and 256 MB.

Hardware Guide
Page 19
... A • Gigabit Ethernet Board Type A Reference For the specifications of each option, see p.134 "Specifications". 8 See p.38 "Attaching Gigabit Ethernet Board". 3. Printer Hard Disk Drive Type 8100 See p.20 "Attaching Printer Hard Disk Drive Type 8100". 5. See p.27 "Attaching Memory Unit Type D 128MB, Memory Unit Type E 256MB (SDRAM Module)". 2. Optional units See...
... A • Gigabit Ethernet Board Type A Reference For the specifications of each option, see p.134 "Specifications". 8 See p.38 "Attaching Gigabit Ethernet Board". 3. Printer Hard Disk Drive Type 8100 See p.20 "Attaching Printer Hard Disk Drive Type 8100". 5. See p.27 "Attaching Memory Unit Type D 128MB, Memory Unit Type E 256MB (SDRAM Module)". 2. Optional units See...

Hardware Guide
Page 21
... dropping it slowly. The machine could become damaged. Important ❒ Before using the new paper feed unit, you must make settings in the printer driver. ❒ Check the printer nameplate to confirm the model code. A Check the package contains the following: ❖ Paper Feed Unit PB 3020 AQV039S 1 2 3 AQV720S 1. Screw 2. If the...
... dropping it slowly. The machine could become damaged. Important ❒ Before using the new paper feed unit, you must make settings in the printer driver. ❒ Check the printer nameplate to confirm the model code. A Check the package contains the following: ❖ Paper Feed Unit PB 3020 AQV039S 1 2 3 AQV720S 1. Screw 2. If the...

Hardware Guide
Page 22
ing material. It is unplugged from the wall outlet. C Remove the tape that the printer is turned off, and the power cord is removed in this step. ther step. 2 AQV041S AQV040S 11 Attaching Paper Feed Unit PB 3020 B Confirm that holds the paper feed unit, and then remove the pack- Do not remove the tape that holds the connector cable inside the connector cover on the back of the paper feed unit in the fur-
ing material. It is unplugged from the wall outlet. C Remove the tape that the printer is turned off, and the power cord is removed in this step. ther step. 2 AQV041S AQV040S 11 Attaching Paper Feed Unit PB 3020 B Confirm that holds the paper feed unit, and then remove the pack- Do not remove the tape that holds the connector cable inside the connector cover on the back of the paper feed unit in the fur-

Hardware Guide
Page 23
Take out the cover inside Tray 2 and attach it between the paper tray and the front cover. 12 AQV001S AQV003S E Push the grips into the printer. Installing Options D Align the printer with the two upright pins on the paper feed unit and then lower the printer slowly. 2 AQV007S • The printer should hold the grips on the rear. One person should hold the grips on the front and another person should be held by least two people. • When lifting the printer, pull out the grips from the front of the printer.
Take out the cover inside Tray 2 and attach it between the paper tray and the front cover. 12 AQV001S AQV003S E Push the grips into the printer. Installing Options D Align the printer with the two upright pins on the paper feed unit and then lower the printer slowly. 2 AQV007S • The printer should hold the grips on the rear. One person should hold the grips on the front and another person should be held by least two people. • When lifting the printer, pull out the grips from the front of the printer.

Hardware Guide
Page 24
AQV731S Be sure to return the screwdriver to the paper tray after using it out. 2 AQV732S G Pull out the first paper tray (Tray 1) , and take the screwdriver (1) from the tray. After that, lift it slightly, and then pull it . 13 Attaching Paper Feed Unit PB 3020 F Pull the second paper tray (Tray 2) until it stops. AQV222S H Lock the Paper Bank and the printer with the screw.
AQV731S Be sure to return the screwdriver to the paper tray after using it out. 2 AQV732S G Pull out the first paper tray (Tray 1) , and take the screwdriver (1) from the tray. After that, lift it slightly, and then pull it . 13 Attaching Paper Feed Unit PB 3020 F Pull the second paper tray (Tray 2) until it stops. AQV222S H Lock the Paper Bank and the printer with the screw.

Hardware Guide
Page 27
A Check the package contains the following: ❖ User Account Enhance Unit Type E AET080S B Turn off the printer. Static electricity can damage User Account Enhance Unit. ❒ Do not subject User Account Enhance Unit to be removed requires this screwdriver. 16 AQV222S Each ...
A Check the package contains the following: ❖ User Account Enhance Unit Type E AET080S B Turn off the printer. Static electricity can damage User Account Enhance Unit. ❒ Do not subject User Account Enhance Unit to be removed requires this screwdriver. 16 AQV222S Each ...


