User Guide
Page 17
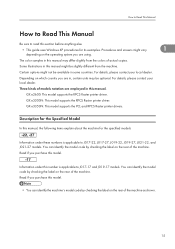
... J019-17 models. You can identify the model code by checking the label on the rear of the machine. The color samples in , certain units may differ slightly from the machine. Depending on the rear of the machine as shown. 15 Read if you are employed in this manual. GX e3350N: This model supports the PCL and RPCS Raster printer drivers. For...
... J019-17 models. You can identify the model code by checking the label on the rear of the machine. The color samples in , certain units may differ slightly from the machine. Depending on the rear of the machine as shown. 15 Read if you are employed in this manual. GX e3350N: This model supports the PCL and RPCS Raster printer drivers. For...

User Guide
Page 68
... the [Printer Drivers, Manuals, Utilities] screen does not appear even when you double-click the [SETUP.EXE] icon, or if an error occurs during installation, access the CD-ROM drive from [My Computer] or [Explorer], double-click the [RDISETUP.EXE] icon in the [DRIVERS] folder, and then install the printer driver by performing Quick Install for USB, there is no need to a computer via USB. 2 If you start Windows, the Add New Hardware Wizard...
... the [Printer Drivers, Manuals, Utilities] screen does not appear even when you double-click the [SETUP.EXE] icon, or if an error occurs during installation, access the CD-ROM drive from [My Computer] or [Explorer], double-click the [RDISETUP.EXE] icon in the [DRIVERS] folder, and then install the printer driver by performing Quick Install for USB, there is no need to a computer via USB. 2 If you start Windows, the Add New Hardware Wizard...
User Guide
Page 71
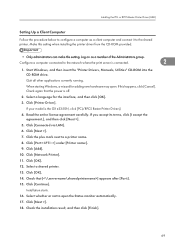
...]. 3. Click [Next >]. 7. Click [Network Printer]. 11. Check the installation result, and then click [Finish]. 69 Check again that [] appears after [Port:]. 15. If your model is the GX e3350N, click [PCL/RPCS Raster Printer Drivers]. 4. Click [Port:< LPT1: >] under [Printer name:]. 9. Click [OK]. 14. Log on as a client computer and connect it to the network where the print server is connected. 2 1. Start Windows, and then insert the "Printer Drivers, Manuals, Utilities" CD-ROM into...
...]. 3. Click [Next >]. 7. Click [Network Printer]. 11. Check the installation result, and then click [Finish]. 69 Check again that [] appears after [Port:]. 15. If your model is the GX e3350N, click [PCL/RPCS Raster Printer Drivers]. 4. Click [Port:< LPT1: >] under [Printer name:]. 9. Click [OK]. 14. Log on as a client computer and connect it to the network where the print server is connected. 2 1. Start Windows, and then insert the "Printer Drivers, Manuals, Utilities" CD-ROM into...

User Guide
Page 77
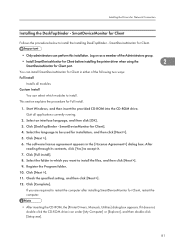
... this installation. To use the SmartDeviceMonitor for Client port, you accept its terms, click [I accept the agreement.], and then click [Next >]. 5. Click [Connected via LAN], and then click [Next >]. 75 If your model is the GX e3350N, click [PCL/RPCS Raster Printer Drivers]. Installing the Drivers for Network Connection Windows 2000/XP/Vista Windows Server 2003/2008 Print Server 2 BPR131S • p.79 "Using as a member of the Administrators group. 1. Start Windows...
... this installation. To use the SmartDeviceMonitor for Client port, you accept its terms, click [I accept the agreement.], and then click [Next >]. 5. Click [Connected via LAN], and then click [Next >]. 75 If your model is the GX e3350N, click [PCL/RPCS Raster Printer Drivers]. Installing the Drivers for Network Connection Windows 2000/XP/Vista Windows Server 2003/2008 Print Server 2 BPR131S • p.79 "Using as a member of the Administrators group. 1. Start Windows...

User Guide
Page 78
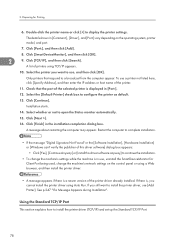
... to configure the printer as default. 13. Click [TCP/IP], and then click [Search]. Select the printer you cannot install the printer driver using TCP/IP appears. 10. Select whether or not to display the printer settings. See p.249 "If a Message Appears during Installation". Double-click the printer name or click [+] to open the Status monitor automatically. 15. Only printers that the port of the selected printer is a newer version of printers using Auto...
... to configure the printer as default. 13. Click [TCP/IP], and then click [Search]. Select the printer you cannot install the printer driver using TCP/IP appears. 10. Select whether or not to display the printer settings. See p.249 "If a Message Appears during Installation". Double-click the printer name or click [+] to open the Status monitor automatically. 15. Only printers that the port of the selected printer is a newer version of printers using Auto...
User Guide
Page 83
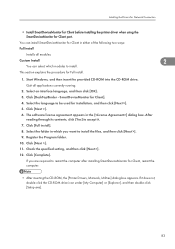
... drive. After reading through its contents, click [Yes] to install. Click [Complete]. Select the language to install the files, and then click [Next >]. 9. The software license agreement appears in the [] dialog box. If you want to be used for Client port. SmartDeviceMonitor for Client, restart the computer. • After inserting the CD-ROM, the [Printer Drivers, Manuals, Utilities] dialog box appears. Custom Install...
... drive. After reading through its contents, click [Yes] to install. Click [Complete]. Select the language to install the files, and then click [Next >]. 9. The software license agreement appears in the [] dialog box. If you want to be used for Client port. SmartDeviceMonitor for Client, restart the computer. • After inserting the CD-ROM, the [Printer Drivers, Manuals, Utilities] dialog box appears. Custom Install...

User Guide
Page 137
... [Printers] menu or [Add] on the [Printer Setup Utility] menu. The name of the registered printer appears in the [Printer Name] field, and then click [Add]. 8. The name of printers. • To make sure [Connection] is automatically recognized by plug-and-play , the driver screens may be connected to print quality, set [Adjust Color Density...] before using the printer. • For details about setting [Adjust Color Density...], see the printer driver Help. The add printer screen appears. To display the driver screens properly...
... [Printers] menu or [Add] on the [Printer Setup Utility] menu. The name of the registered printer appears in the [Printer Name] field, and then click [Add]. 8. The name of printers. • To make sure [Connection] is automatically recognized by plug-and-play , the driver screens may be connected to print quality, set [Adjust Color Density...] before using the printer. • For details about setting [Adjust Color Density...], see the printer driver Help. The add printer screen appears. To display the driver screens properly...

User Guide
Page 184
... to have a tray containing paper of the size and type specified in Energy Saver mode, it requires time to reduce the printer's power consumption. Maintaining Specifying System Settings using the Control Panel (System Menu) You can specify how the printer handles a print job if it receives a print job. • 5 minutes • 15 minutes • 30 minutes • 45 minutes 182 Prt. The changed depending on the printer driver, and vice versa...
... to have a tray containing paper of the size and type specified in Energy Saver mode, it requires time to reduce the printer's power consumption. Maintaining Specifying System Settings using the Control Panel (System Menu) You can specify how the printer handles a print job if it receives a print job. • 5 minutes • 15 minutes • 30 minutes • 45 minutes 182 Prt. The changed depending on the printer driver, and vice versa...
User Guide
Page 214
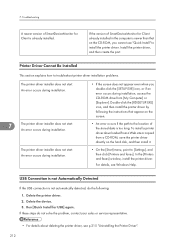
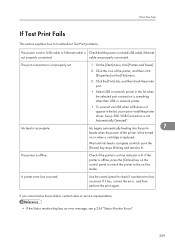
... start . 7. Troubleshooting A newer version of the stored data is not automatically detected, do not solve the problem, contact your sales or service representative. • For details about deleting the printer driver, see Windows Help. Install the printer driver, and then create the port. An error occurs during installation. 7 The printer driver installer does not start. An error occurs during installation. • If the screen does not appear even when you cannot use "Quick Install" to [Settings...
... start . 7. Troubleshooting A newer version of the stored data is not automatically detected, do not solve the problem, contact your sales or service representative. • For details about deleting the printer driver, see Windows Help. Install the printer driver, and then create the port. An error occurs during installation. 7 The printer driver installer does not start. An error occurs during installation. • If the screen does not appear even when you cannot use "Quick Install" to [Settings...

User Guide
Page 216
... how to troubleshoot Test Print problems. The power cord or USB cable or Ethernet cable is offline, press the [Online] key on -line mode. Ink begins automatically feeding into the print heads when the power of the printer, and then click [Properties] on or when a cartridge is replaced. A printer error has occurred. If it has, correct the error, and then perform the print again. cable are properly connected. Use the control panel to the on the control panel to switch the printer to check if a printer error has...
... how to troubleshoot Test Print problems. The power cord or USB cable or Ethernet cable is offline, press the [Online] key on -line mode. Ink begins automatically feeding into the print heads when the power of the printer, and then click [Properties] on or when a cartridge is replaced. A printer error has occurred. If it has, correct the error, and then perform the print again. cable are properly connected. Use the control panel to the on the control panel to switch the printer to check if a printer error has...
User Guide
Page 246
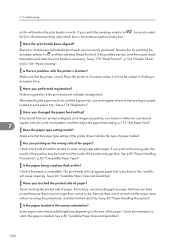
... problem persists, print the nozzle check test pattern and clean the print heads as this will cause smearing. Check which the paper is too thick or thin, and this by switching the envelope selector to start point indicates misalignment. Avoid touching the printed side of paper loaded. Is the paper loaded in the printer properties dialog box. , be printed on the wrong side of paper? Blurred or double lines indicate the print heads are patchy, or a black or white line is level. Is there a problem...
... problem persists, print the nozzle check test pattern and clean the print heads as this will cause smearing. Check which the paper is too thick or thin, and this by switching the envelope selector to start point indicates misalignment. Avoid touching the printed side of paper loaded. Is the paper loaded in the printer properties dialog box. , be printed on the wrong side of paper? Blurred or double lines indicate the print heads are patchy, or a black or white line is level. Is there a problem...
User Guide
Page 253
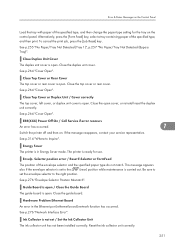
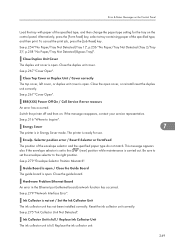
... print. Close the guide board. ERR(XXX) Power Off On / Call Service if error reoccurs An error has occurred. 7 Switch the printer off and then on. Energy Saver The printer is open cover, or reinstall reset the duplex unit correctly. Error & Status Messages on the Control Panel Load the tray with paper of the specified type, and then change the paper type setting for use. See p.255 "No Paper/Tray Not Detected (Tray 1)", p.257 "No Paper/Tray Not Detected (Bypass Tray)". Close Top Cover...
... print. Close the guide board. ERR(XXX) Power Off On / Call Service if error reoccurs An error has occurred. 7 Switch the printer off and then on. Energy Saver The printer is open cover, or reinstall reset the duplex unit correctly. Error & Status Messages on the Control Panel Load the tray with paper of the specified type, and then change the paper type setting for use. See p.255 "No Paper/Tray Not Detected (Tray 1)", p.257 "No Paper/Tray Not Detected (Bypass Tray)". Close Top Cover...

User Guide
Page 319
...Host Interface menu 73 Changing the Paper Input Menu 92 Changing the PCL Menu 190 Changing the Printer Settings 115 Changing the System Menu 187 Check the power source 39 Checking the Computer and Installation Area 37 Checking the Computer to be Connected...........39 Checking the Consumables 248 Checking the Current Printer Driver Version......284 Checking the Number of Printed Pages from the Control Panel 161 Checking the Printer Status 114 Checking the Printer Status and Settings using the Printer's Control Panel 63 Checking the Remaining Ink 195 Checking the Supplied Items and...
...Host Interface menu 73 Changing the Paper Input Menu 92 Changing the PCL Menu 190 Changing the Printer Settings 115 Changing the System Menu 187 Check the power source 39 Checking the Computer and Installation Area 37 Checking the Computer to be Connected...........39 Checking the Consumables 248 Checking the Current Printer Driver Version......284 Checking the Number of Printed Pages from the Control Panel 161 Checking the Printer Status 114 Checking the Printer Status and Settings using the Printer's Control Panel 63 Checking the Remaining Ink 195 Checking the Supplied Items and...

User Guide
Page 345
.... This printer supports the PCL and RPCS Raster printer drivers. BUG101S 15 Some illustrations in , certain units may differ slightly from the machine. Read if you are using. For details, please contact your local dealer. You can identify the model code by checking the label on which country you purchase this section before anything else. • This guide uses Windows XP...
.... This printer supports the PCL and RPCS Raster printer drivers. BUG101S 15 Some illustrations in , certain units may differ slightly from the machine. Read if you are using. For details, please contact your local dealer. You can identify the model code by checking the label on which country you purchase this section before anything else. • This guide uses Windows XP...
User Guide
Page 408
... open the Status monitor automatically. 15. To use [Add Printer]. Restart the computer to complete installation. • If the message "Digital Signature Not Found" or the [Software Installation], [Hardware Installation] or [Windows can't verify the publisher of the printer. 11. Using the Standard TCP/IP Port This section explains how to continue the installation. • To change the machine's network settings on the operating system, printer model, and port. 7. Select the [Default Printer] check...
... open the Status monitor automatically. 15. To use [Add Printer]. Restart the computer to complete installation. • If the message "Digital Signature Not Found" or the [Software Installation], [Hardware Installation] or [Windows can't verify the publisher of the printer. 11. Using the Standard TCP/IP Port This section explains how to continue the installation. • To change the machine's network settings on the operating system, printer model, and port. 7. Select the [Default Printer] check...
User Guide
Page 413
... to accept it does not, double-click the CD-ROM drive icon under [My Computer] or [Explorer], and then double-click [Setup.exe]. 83 Click [DeskTopBinder - Click [Full install]. 8. Register the Program folder. 10. Custom Install 2 You can install SmartDeviceMonitor for Client port. If it . 7. Installing the Drivers for Network Connection • Install SmartDeviceMonitor for Client before installing the printer driver when using the SmartDeviceMonitor for Client in...
... to accept it does not, double-click the CD-ROM drive icon under [My Computer] or [Explorer], and then double-click [Setup.exe]. 83 Click [DeskTopBinder - Click [Full install]. 8. Register the Program folder. 10. Custom Install 2 You can install SmartDeviceMonitor for Client port. If it . 7. Installing the Drivers for Network Connection • Install SmartDeviceMonitor for Client before installing the printer driver when using the SmartDeviceMonitor for Client in...

User Guide
Page 465
... set to use. 7. Under Mac OS X 10.3.x - 10.4.x, make fine adjustments to use a printer that has been automatically recognized by plug-and-play, the driver screens may be displayed in English due to the network in advance and switch it on. • Specify the printer's IP address on its control panel in [Print & Fax]. The [Printer Setup Utility] closes. • If you want to print quality, set to the USB port appears. On the [System Preferences] menu...
... set to use. 7. Under Mac OS X 10.3.x - 10.4.x, make fine adjustments to use a printer that has been automatically recognized by plug-and-play, the driver screens may be displayed in English due to the network in advance and switch it on. • Specify the printer's IP address on its control panel in [Print & Fax]. The [Printer Setup Utility] closes. • If you want to print quality, set to the USB port appears. On the [System Preferences] menu...

User Guide
Page 508
... Control Panel (System Menu) You can specify how the printer handles a print job if it does not have a tray containing paper of the size and type specified in Energy Saver mode, it requires time to start up when it switches to reduce the printer's power consumption. The changed depending on the printer driver, and vice versa. • Auto • Off Default: Off Energy Saver Use Energy Saver mode to Energy Saver mode. You can feed...
... Control Panel (System Menu) You can specify how the printer handles a print job if it does not have a tray containing paper of the size and type specified in Energy Saver mode, it requires time to start up when it switches to reduce the printer's power consumption. The changed depending on the printer driver, and vice versa. • Auto • Off Default: Off Energy Saver Use Energy Saver mode to Energy Saver mode. You can feed...
User Guide
Page 539
... Status monitor displays an error message, see p.254 "Status Monitor Errors". 209 Use the control panel to the on the control panel to switch the printer to check if a printer error has occurred. If you must re-install the printer driver. If Test Print Fails If Test Print Fails This section explains how to troubleshoot Test Print problems. The power cord or USB cable or Ethernet cable is not properly set. Click the icon of the printer is first turned on -line indicator is incomplete. 1. A printer error has occurred. The port connection...
... Status monitor displays an error message, see p.254 "Status Monitor Errors". 209 Use the control panel to the on the control panel to switch the printer to check if a printer error has occurred. If you must re-install the printer driver. If Test Print Fails If Test Print Fails This section explains how to troubleshoot Test Print problems. The power cord or USB cable or Ethernet cable is not properly set. Click the icon of the printer is first turned on -line indicator is incomplete. 1. A printer error has occurred. The port connection...
User Guide
Page 579
... while maintenance is set to Inquire". Guide Board is open . See p.275 "Ink Collector Unit Not Detected". Close the open . Reset the ink collector unit correctly. Error & Status Messages on the Control Panel Load the tray with paper of the specified type, and then change the paper type setting for use. Alternatively, press the [Form Feed] key, select a tray containing paper of the envelope selector and the specified paper type do not match. To cancel the print job, press the [Job Reset] key...
... while maintenance is set to Inquire". Guide Board is open . See p.275 "Ink Collector Unit Not Detected". Close the open . Reset the ink collector unit correctly. Error & Status Messages on the Control Panel Load the tray with paper of the specified type, and then change the paper type setting for use. Alternatively, press the [Form Feed] key, select a tray containing paper of the envelope selector and the specified paper type do not match. To cancel the print job, press the [Job Reset] key...


