
User Manual
Page 1
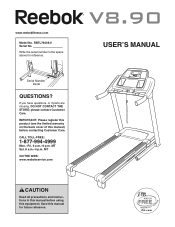
...Read all precautions and instructions in the space above for future reference. USERʼS MANUAL IMPORTANT: Please register this product (see the limited warranty on the back cover of this manual for reference. www.reebokfitness.com Model No. Serial Number Decal QUESTIONS? If you ...have questions, or if parts are missing, DO NOT CONTACT THE STORE; Save this manual) before using this equipment. Write the serial number in this manual before contacting Customer Care. MT Sat. 8 a.m.-4 p.m. CALL TOLL-FREE: 1-877-994-4999 Mon.-Fri. 6 a.m.-6...
...Read all precautions and instructions in the space above for future reference. USERʼS MANUAL IMPORTANT: Please register this product (see the limited warranty on the back cover of this manual for reference. www.reebokfitness.com Model No. Serial Number Decal QUESTIONS? If you ...have questions, or if parts are missing, DO NOT CONTACT THE STORE; Save this manual) before using this equipment. Write the serial number in this manual before contacting Customer Care. MT Sat. 8 a.m.-4 p.m. CALL TOLL-FREE: 1-877-994-4999 Mon.-Fri. 6 a.m.-6...
User Manual
Page 2
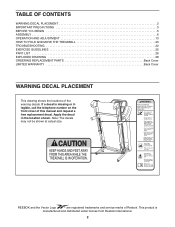
... Vector Logo are registered trademarks and service marks of this manual and request a free replacement decal. If a decal is manufactured and distributed under license from Reebok International. 2 Apply the decal in the location shown. Note: The decals may not be shown at actual size....illegible, call the telephone number on the front cover of Reebok. TABLE OF CONTENTS WARNING DECAL PLACEMENT 2 IMPORTANT PRECAUTIONS 3 BEFORE YOU BEGIN 5 ASSEMBLY 6 OPERATION AND ADJUSTMENT 13 HOW TO FOLD AND MOVE THE TREADMILL 20 TROUBLESHOOTING 22 EXERCISE GUIDELINES 25 PART LIST 26 EXPLODED ...
... Vector Logo are registered trademarks and service marks of this manual and request a free replacement decal. If a decal is manufactured and distributed under license from Reebok International. 2 Apply the decal in the location shown. Note: The decals may not be shown at actual size....illegible, call the telephone number on the front cover of Reebok. TABLE OF CONTENTS WARNING DECAL PLACEMENT 2 IMPORTANT PRECAUTIONS 3 BEFORE YOU BEGIN 5 ASSEMBLY 6 OPERATION AND ADJUSTMENT 13 HOW TO FOLD AND MOVE THE TREADMILL 20 TROUBLESHOOTING 22 EXERCISE GUIDELINES 25 PART LIST 26 EXPLODED ...
User Manual
Page 3
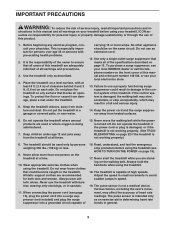
...17. Never use of this manual and all warnings and precautions. 3. When connecting the power cord (see HOW TO TURN ON THE POWER on each side. Always hold the handrails while using the treadmill. Place the treadmill on your treadmill before using your local REEBOK dealer or call the telephone ...number on the front cover of this treadmill are standing on page 13. To protect the floor or carpet from ...
...17. Never use of this manual and all warnings and precautions. 3. When connecting the power cord (see HOW TO TURN ON THE POWER on each side. Always hold the handrails while using the treadmill. Place the treadmill on your treadmill before using your local REEBOK dealer or call the telephone ...number on the front cover of this treadmill are standing on page 13. To protect the floor or carpet from ...
User Manual
Page 4
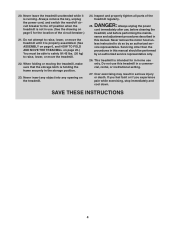
20. When folding or moving the treadmill, make sure that the storage latch is intended for in this manual should be able to safely lift 45 lbs. (20 kg) to the off circuit breaker to raise, lower, or move the treadmill until it is properly assembled. (See ASSEMBLY on page 6, and HOW ...TO FOLD AND MOVE THE TREADMILL on the treadmill. 24. Servicing other than ...
20. When folding or moving the treadmill, make sure that the storage latch is intended for in this manual should be able to safely lift 45 lbs. (20 kg) to the off circuit breaker to raise, lower, or move the treadmill until it is properly assembled. (See ASSEMBLY on page 6, and HOW ...TO FOLD AND MOVE THE TREADMILL on the treadmill. 24. Servicing other than ...
User Manual
Page 5
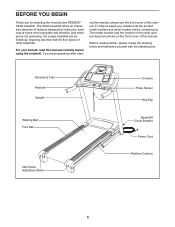
... before contacting us assist you ʼre not exercising, the unique treadmill can be folded up, requiring less than half the floor space of this manual. If you for selecting the revolutionary REEBOK® V8.90 treadmill. Accessory Tray Handrail Upright Walking Belt Foot Rail Idler Roller Adjustment Bolts Console Pulse Sensor Key/Clip Reset...
... before contacting us assist you ʼre not exercising, the unique treadmill can be folded up, requiring less than half the floor space of this manual. If you for selecting the revolutionary REEBOK® V8.90 treadmill. Accessory Tray Handrail Upright Walking Belt Foot Rail Idler Roller Adjustment Bolts Console Pulse Sensor Key/Clip Reset...
User Manual
Page 6
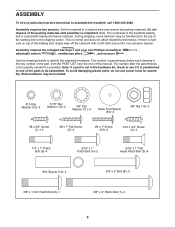
...end of the packing materials until assembly is lubricant on top of the parts to see if it is normal and does not affect treadmill performance. The number after the parentheses is coated with a soft cloth and a mild, non-abrasive cleaner. Extra hardware may be ...authorized service technician to identify the assembly hardware. Do not dispose of this manual. If there is completed. The number in parentheses below to assemble the treadmill, call 1-800-445-2480. Assembly requires two persons. Set the treadmill in the hardware kit, check to be included. #10 Star Washer (...
...end of the packing materials until assembly is lubricant on top of the parts to see if it is normal and does not affect treadmill performance. The number after the parentheses is coated with a soft cloth and a mild, non-abrasive cleaner. Extra hardware may be ...authorized service technician to identify the assembly hardware. Do not dispose of this manual. If there is completed. The number in parentheses below to assemble the treadmill, call 1-800-445-2480. Assembly requires two persons. Set the treadmill in the hardware kit, check to be included. #10 Star Washer (...
User Manual
Page 13
...have a UL suppressed voltage rating of 400 volts or less and a minimum surge dissipation of this manual and order part number 146148, or see your treadmill (see your local REEBOK dealer or call the telephone number on or off. Plug the power cord into a surge suppressor, ...is for 120 volts AC and 15 amps. A temporary adapter that is not available. 1 Grounded Outlet Box Surge Suppressor Grounding Pin Your treadmill, like the adapter illustrated in drawing 2 may result in place by a qualified electrician. Grounding Pin Grounded Outlet Grounding Plug Grounded Outlet ...
...have a UL suppressed voltage rating of 400 volts or less and a minimum surge dissipation of this manual and order part number 146148, or see your treadmill (see your local REEBOK dealer or call the telephone number on or off. Plug the power cord into a surge suppressor, ...is for 120 volts AC and 15 amps. A temporary adapter that is not available. 1 Grounded Outlet Box Surge Suppressor Grounding Pin Your treadmill, like the adapter illustrated in drawing 2 may result in place by a qualified electrician. Grounding Pin Grounded Outlet Grounding Plug Grounded Outlet ...
User Manual
Page 14
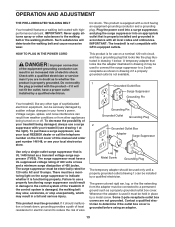
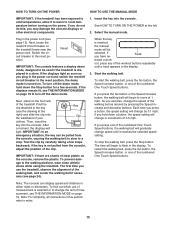
...a long-distance run with the touch of a button. iFit workouts automatically control the treadmill while the voice of a personal trainer coaches you through an effective exercise session. To use the manual mode, see page 17. When the manual mode of the console is selected, the speed and incline of the... treadmill can listen to your heart rate using the builtin pulse sensor. To turn on ...
...a long-distance run with the touch of a button. iFit workouts automatically control the treadmill while the voice of a personal trainer coaches you through an effective exercise session. To use the manual mode, see page 17. When the manual mode of the console is selected, the speed and incline of the... treadmill can listen to your heart rate using the builtin pulse sensor. To turn on ...
User Manual
Page 15
...press a button, the speed setting will be selected. Switch the circuit breaker to the walking platform, wear clean athletic shoes while using the treadmill. IMPORTANT: If there are sheets of measurement is displayed in the power cord and switch the reset/off circuit breaker on . To restart... of 0.5 mph. Test the clip by carefully taking a few seconds. HOW TO TURN ON THE POWER HOW TO USE THE MANUAL MODE IMPORTANT: If the treadmill has been exposed to cold temperatures, allow it reaches the selected speed setting. Track lected a work- If you do not do...
...press a button, the speed setting will be selected. Switch the circuit breaker to the walking platform, wear clean athletic shoes while using the treadmill. IMPORTANT: If there are sheets of measurement is displayed in the power cord and switch the reset/off circuit breaker on . To restart... of 0.5 mph. Test the clip by carefully taking a few seconds. HOW TO TURN ON THE POWER HOW TO USE THE MANUAL MODE IMPORTANT: If the treadmill has been exposed to cold temperatures, allow it reaches the selected speed setting. Track lected a work- If you do not do...
User Manual
Page 16
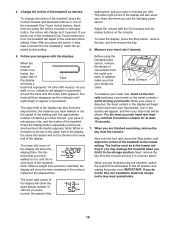
... then reinsert the key. 6. As you press the button, it to the storage position. When you use the handgrip pulse sensor. When the manual mode is detected, the heart symbol in a secure place. The upper half of the display can also show the time remaining in the lower ... it may wear prematurely. 16 To change by 0.5 percent. For the most accurate heart rate reading, continue to hold the contacts for the treadmill to the selected incline setting. Step onto the foot rails, press the Stop button, and adjust the incline of the numbered One Touch Incline ...
... then reinsert the key. 6. As you press the button, it to the storage position. When you use the handgrip pulse sensor. When the manual mode is detected, the heart symbol in a secure place. The upper half of the display can also show the time remaining in the lower ... it may wear prematurely. 16 To change by 0.5 percent. For the most accurate heart rate reading, continue to hold the contacts for the treadmill to the selected incline setting. Step onto the foot rails, press the Stop button, and adjust the incline of the numbered One Touch Incline ...
User Manual
Page 17
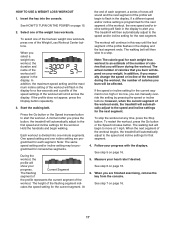
...profile will burn during the workout, the number of the workout ends, the treadmill will begin walking. To restart the workout, press the Go button or the Speed increase button. A moment after you can manually override the setting by pressing the speed or incline buttons; Note: The ...fourteen weight loss workouts, press one -minute segments. The walking belt will show your weight. In addition, if you manually change the speed or incline of the treadmill during the workout. however, when the current segment of calories you are programmed for the workout. The walking belt ...
...profile will burn during the workout, the number of the workout ends, the treadmill will begin walking. To restart the workout, press the Go button or the Speed increase button. A moment after you can manually override the setting by pressing the speed or incline buttons; Note: The ...fourteen weight loss workouts, press one -minute segments. The walking belt will show your weight. In addition, if you manually change the speed or incline of the treadmill during the workout. however, when the current segment of calories you are programmed for the workout. The walking belt ...
User Manual
Page 18
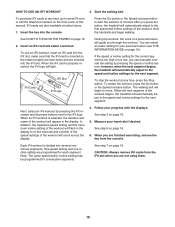
...for the next segment. See step 5 on page 16. 6. Press the Go button or the Speed increase button to the iFit logo. You can manually override the setting by pressing the iFit increase and decrease buttons next to start the workout. See step 6 on page 16. 5. CAUTION: Always ... maximum speed setting and the maximum incline setting of the workout. Measure your heart rate if desired. however, when the next segment begins, the treadmill will scroll across the display. 4. Each iFit workout is divided into the iFit slot. To restart the workout, press the Go button or the...
...for the next segment. See step 5 on page 16. 6. Press the Go button or the Speed increase button to the iFit logo. You can manually override the setting by pressing the iFit increase and decrease buttons next to start the workout. See step 6 on page 16. 5. CAUTION: Always ... maximum speed setting and the maximum incline setting of the workout. Measure your heart rate if desired. however, when the next segment begins, the treadmill will scroll across the display. 4. Each iFit workout is divided into the iFit slot. To restart the workout, press the Go button or the...
User Manual
Page 22
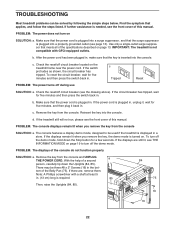
... properly grounded outlet (see the drawing above). c. Check the reset/off circuit breaker (see page 13). If the treadmill still will not run, please see the front cover of this manual. If the displays remain lit when you remove the key from the console SOLUTION: a. Remove the key from the... console. IMPORTANT: The treadmill is required. 85 Then, raise the Uprights (84, 85). 84 75 16 16 22 ...
... properly grounded outlet (see the drawing above). c. Check the reset/off circuit breaker (see page 13). If the treadmill still will not run, please see the front cover of this manual. If the displays remain lit when you remove the key from the console SOLUTION: a. Remove the key from the... console. IMPORTANT: The treadmill is required. 85 Then, raise the Uprights (84, 85). 84 75 16 16 22 ...
User Manual
Page 23
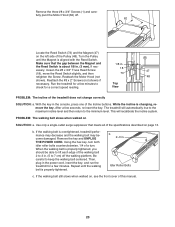
...SOLUTION: a. Reattach the Motor Hood (not 48 shown). Top View PROBLEM: The incline of a turn both idler roller bolts counterclockwise, 1/4 of the treadmill does not change correctly SOLUTION: a. After a few minutes. This will automatically rise to the maximum incline level and then return to 7 cm) ... and the Magnet (47) on , see the front cover of this manual. 23 b. Be careful to lift each edge of the Incline buttons. Idler Roller Bolts c. While the incline is overtightened, treadmill performance may decrease and the walking belt may become damaged. If the walking ...
...SOLUTION: a. Reattach the Motor Hood (not 48 shown). Top View PROBLEM: The incline of a turn both idler roller bolts counterclockwise, 1/4 of the treadmill does not change correctly SOLUTION: a. After a few minutes. This will automatically rise to the maximum incline level and then return to 7 cm) ... and the Magnet (47) on , see the front cover of this manual. 23 b. Be careful to lift each edge of the Incline buttons. Idler Roller Bolts c. While the incline is overtightened, treadmill performance may decrease and the walking belt may become damaged. If the walking ...

User Manual
Page 26
... 1 65 1 66 1 67 1 68 1 69 1 70 1 71 1 72 1 73 1 74 1 75 1 76 3 77 8 78 2 79 4 80 1 81 2 82 1 83 1 84 1 85 1 86 1 87 1 88 1 89 2 90 4 91 1 92 2 93 1 94 2 95 1 96 2 97 1 98 1 99 1 100 2 Description Storage Latch Latch Knob #8 x 1" Screw Right Foot Rail Frame Roller Bracket Roller Ground Wire... Incline Motor Spacer Key/Clip Cable Tie 26 RBTL76009.0 R0110A To locate the parts listed below, see the EXPLODED DRAWING near the end of this manual. PART LIST-Model No.
... 1 65 1 66 1 67 1 68 1 69 1 70 1 71 1 72 1 73 1 74 1 75 1 76 3 77 8 78 2 79 4 80 1 81 2 82 1 83 1 84 1 85 1 86 1 87 1 88 1 89 2 90 4 91 1 92 2 93 1 94 2 95 1 96 2 97 1 98 1 99 1 100 2 Description Storage Latch Latch Knob #8 x 1" Screw Right Foot Rail Frame Roller Bracket Roller Ground Wire... Incline Motor Spacer Key/Clip Cable Tie 26 RBTL76009.0 R0110A To locate the parts listed below, see the EXPLODED DRAWING near the end of this manual. PART LIST-Model No.

User Manual
Page 27
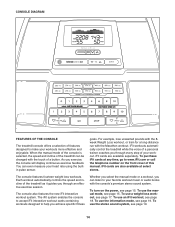
Key No. Qty. 101 1 102 1 103 1 104 1 105 2 106 1 107 1 108 1 Description Console Console Frame Accessory Tray 5/32" Hex Key Console Clamp Console Base Crossbar Access Door Key No. Qty. 109 1 110 1 * - * - * - * - * - For information about ordering replacement parts, see the back cover of this manual. *These parts are subject to change without notice. Description Console Ground Wire Audio Wire 8" Blue Wire, M/F 10" Blue Wire, 2F 12" Red Wire, M/F 10" Black Wire, M/F Userʼs Manual Note: Specifications are not illustrated. 27
Key No. Qty. 101 1 102 1 103 1 104 1 105 2 106 1 107 1 108 1 Description Console Console Frame Accessory Tray 5/32" Hex Key Console Clamp Console Base Crossbar Access Door Key No. Qty. 109 1 110 1 * - * - * - * - * - For information about ordering replacement parts, see the back cover of this manual. *These parts are subject to change without notice. Description Console Ground Wire Audio Wire 8" Blue Wire, M/F 10" Blue Wire, 2F 12" Red Wire, M/F 10" Black Wire, M/F Userʼs Manual Note: Specifications are not illustrated. 27
User Manual
Page 32
...limited in -home service, the customer will be prepared to provide the following information when contacting us assist you . ICON is under this manual. damages with the use , or costs of removal or installation; This warranty gives you . to products transported or purchased outside the US...replacement part(s) (see the front cover of this warranty is shipped to a service center, freight charges to be free from the date of this manual) LIMITED WARRANTY IMPORTANT: You must be the customerʼs responsibility. ICON Health & Fitness, Inc., 1500 S. 1000 W., Logan, UT 84321-9813...
...limited in -home service, the customer will be prepared to provide the following information when contacting us assist you . ICON is under this manual. damages with the use , or costs of removal or installation; This warranty gives you . to products transported or purchased outside the US...replacement part(s) (see the front cover of this warranty is shipped to a service center, freight charges to be free from the date of this manual) LIMITED WARRANTY IMPORTANT: You must be the customerʼs responsibility. ICON Health & Fitness, Inc., 1500 S. 1000 W., Logan, UT 84321-9813...

