

English Manual
Page 2
...countries. 2 This product is missing or illegible, see the front cover of Apple Computer, Inc., registered in the location shown. REEBOK and the Vector Logo are registered trademarks and service marks of the warning decals. TABLE OF CONTENTS WARNING DECAL PLACEMENT 2 IMPORTANT ...PRECAUTIONS 3 BEFORE YOU BEGIN 5 ASSEMBLY 6 OPERATION AND ADJUSTMENT 12 HOW TO FOLD AND MOVE THE TREADMILL 21 TROUBLESHOOTING 22 EXERCISE GUIDELINES 25 PART LIST 26 EXPLODED DRAWING 28 ORDERING REPLACEMENT PARTS Back Cover LIMITED WARRANTY Back Cover WARNING ...
...countries. 2 This product is missing or illegible, see the front cover of Apple Computer, Inc., registered in the location shown. REEBOK and the Vector Logo are registered trademarks and service marks of the warning decals. TABLE OF CONTENTS WARNING DECAL PLACEMENT 2 IMPORTANT ...PRECAUTIONS 3 BEFORE YOU BEGIN 5 ASSEMBLY 6 OPERATION AND ADJUSTMENT 12 HOW TO FOLD AND MOVE THE TREADMILL 21 TROUBLESHOOTING 22 EXERCISE GUIDELINES 25 PART LIST 26 EXPLODED DRAWING 28 ORDERING REPLACEMENT PARTS Back Cover LIMITED WARRANTY Back Cover WARNING ...

English Manual
Page 3
... WARNING: To reduce the risk of high speeds. Before beginning any surface that meets all important precautions and in- Do not put the treadmill in the treadmill. Use only a single-outlet surge suppressor that blocks air openings. Keep children under age 12 and pets away from damage, place a ... or see your physician. Always wear athletic shoes. Do not use of heart rate readings. To purchase a surge suppressor, see your local REEBOK dealer or call the telephone number on the front cover of carrying 15 or more than one person on page 14). 17. ICON assumes no...
... WARNING: To reduce the risk of high speeds. Before beginning any surface that meets all important precautions and in- Do not put the treadmill in the treadmill. Use only a single-outlet surge suppressor that blocks air openings. Keep children under age 12 and pets away from damage, place a ... or see your physician. Always wear athletic shoes. Do not use of heart rate readings. To purchase a surge suppressor, see your local REEBOK dealer or call the telephone number on the front cover of carrying 15 or more than one person on page 14). 17. ICON assumes no...

English Manual
Page 4
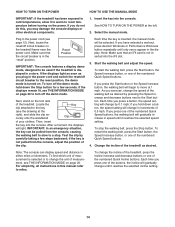
... this manual should be able to safely lift 45 lbs. (20 kg) to raise, lower, or move the treadmill until it is intended for the location of the treadmill regularly. This treadmill is running. Never insert any object into any opening on page 5 for in the storage position. 23. Always ... the mainte- DANGER: 25. SAVE THESE INSTRUCTIONS 4 Always remove the key, unplug the power cord, and switch the reset/off position when the treadmill is not in this manual. 20. Never remove the motor hood un- less instructed to the off circuit breaker to do so by an authorized...
... this manual should be able to safely lift 45 lbs. (20 kg) to raise, lower, or move the treadmill until it is intended for the location of the treadmill regularly. This treadmill is running. Never insert any object into any opening on page 5 for in the storage position. 23. Always ... the mainte- DANGER: 25. SAVE THESE INSTRUCTIONS 4 Always remove the key, unplug the power cord, and switch the reset/off position when the treadmill is not in this manual. 20. Never remove the motor hood un- less instructed to the off circuit breaker to do so by an authorized...
English Manual
Page 5
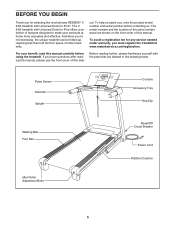
... avoid a registration fee for any service needed under warranty, you must register the treadmill at home more enjoyable and effective. And when youʼre not exercising, the unique treadmill can be folded up, requiring less than half the floor space of this manual. ... please familiarize yourself with Universal Dock for iPod®. The V 6.80 treadmill with the parts that are shown on the front cover of other treadmills. BEFORE YOU BEGIN Thank you for selecting the revolutionary REEBOK® V 6.80 treadmill with Universal Dock for iPod offers a selection of the serial number decal...
... avoid a registration fee for any service needed under warranty, you must register the treadmill at home more enjoyable and effective. And when youʼre not exercising, the unique treadmill can be folded up, requiring less than half the floor space of this manual. ... please familiarize yourself with Universal Dock for iPod®. The V 6.80 treadmill with the parts that are shown on the front cover of other treadmills. BEFORE YOU BEGIN Thank you for selecting the revolutionary REEBOK® V 6.80 treadmill with Universal Dock for iPod offers a selection of the serial number decal...
English Manual
Page 6
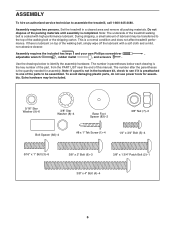
...end of the packing materials until assembly is completed. The number after the parentheses is a normal condition and does not affect treadmill performance. Note: The underside of the walking belt or the shipping carton. During shipping, a small amount of lubricant may be...own Phillips screwdriver , adjustable wrench , rubber mallet , and scissors . Note: If a part is lubricant on top of the parts to assemble the treadmill, call 1-800-445-2480. ASSEMBLY To hire an authorized service technician to be included. 5/16" Star Washer (9)-6 3/8" Star Washer (8)-4 Base Foot ...
...end of the packing materials until assembly is completed. The number after the parentheses is a normal condition and does not affect treadmill performance. Note: The underside of the walking belt or the shipping carton. During shipping, a small amount of lubricant may be...own Phillips screwdriver , adjustable wrench , rubber mallet , and scissors . Note: If a part is lubricant on top of the parts to assemble the treadmill, call 1-800-445-2480. ASSEMBLY To hire an authorized service technician to be included. 5/16" Star Washer (9)-6 3/8" Star Washer (8)-4 Base Foot ...

English Manual
Page 7
... plastic tie near the Base (84). Tie the wire tie in the Right Upright securely around the end of a second person, carefully tip 87 the treadmill onto its left side. Have a second person hold the Right Upright (77) near the Wire Harness (87). 2 Attach a Wheel (85) to the Base (...cord is unplugged. 1 With the help of the Wire Harness (87). Then, set the Right Upright Spacer on the Base (84). Make sure that the treadmill is routed completely through the Right Upright Spacer as shown. Locate the plastic tie in the indicated hole in the locations shown with a 3/8" x 2" Bolt (6)...
... plastic tie near the Base (84). Tie the wire tie in the Right Upright securely around the end of a second person, carefully tip 87 the treadmill onto its left side. Have a second person hold the Right Upright (77) near the Wire Harness (87). 2 Attach a Wheel (85) to the Base (...cord is unplugged. 1 With the help of the Wire Harness (87). Then, set the Right Upright Spacer on the Base (84). Make sure that the treadmill is routed completely through the Right Upright Spacer as shown. Locate the plastic tie in the indicated hole in the locations shown with a 3/8" x 2" Bolt (6)...
English Manual
Page 8
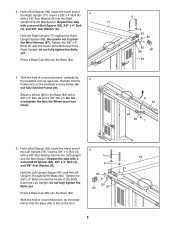
...the Bolts touch the Right Upright; the Wheel must turn freely. 4 8 87 82 82 80 88 84 6 52 84 85 7 6. Tighten the 3/8" x 4" Bolts (4) until the heads of a second person, tip the treadmill so that the Base (84) is more stable; With the help of the Bolts touch the... (77) against the Base (84). Hold a Bolt Spacer (82) inside the lower end of the Right Upright (77). Partially fold the 5 Frame (52) so the treadmill is flat on the floor. 8 Insert a 3/8" x 4" Bolt (4) 4 with a second Bolt Spacer (82), 3/8" x 4" Bolt (4), 8 and 3/8" Star Washer (8). 78 81 Hold the Left ...
...the Bolts touch the Right Upright; the Wheel must turn freely. 4 8 87 82 82 80 88 84 6 52 84 85 7 6. Tighten the 3/8" x 4" Bolts (4) until the heads of a second person, tip the treadmill so that the Base (84) is more stable; With the help of the Bolts touch the... (77) against the Base (84). Hold a Bolt Spacer (82) inside the lower end of the Right Upright (77). Partially fold the 5 Frame (52) so the treadmill is flat on the floor. 8 Insert a 3/8" x 4" Bolt (4) 4 with a second Bolt Spacer (82), 3/8" x 4" Bolt (4), 8 and 3/8" Star Washer (8). 78 81 Hold the Left ...

English Manual
Page 10
...84) with four 1/4" x 3/4" Bolts (5). Attach the lower end of the hex keys is completed. To protect the floor or carpet, place a mat under the treadmill. 10. Note: It may be necessary to move the Frame (52) back and forth to the handrail assembly with a 3/8" x 1 3/4" Bolt (2). Attach the ... Latch (49) to pinch the wires. 10 Console Assembly Handrail Assembly Wires 5 5 11. Attach the upper end of clear plastic on the treadmill decals, remove the plastic. Note: Extra hardware may be included. Orient the Storage Latch (49) so that all parts are properly tightened before ...
...84) with four 1/4" x 3/4" Bolts (5). Attach the lower end of the hex keys is completed. To protect the floor or carpet, place a mat under the treadmill. 10. Note: It may be necessary to move the Frame (52) back and forth to the handrail assembly with a 3/8" x 1 3/4" Bolt (2). Attach the ... Latch (49) to pinch the wires. 10 Console Assembly Handrail Assembly Wires 5 5 11. Attach the upper end of clear plastic on the treadmill decals, remove the plastic. Note: Extra hardware may be included. Orient the Storage Latch (49) so that all parts are properly tightened before ...

English Manual
Page 12
...equipment-grounding conductor can be electrically rated for 120 volts AC and 15 amps. OPERATION AND ADJUSTMENT THE PRE-LUBRICATED WALKING BELT Your treadmill features a walking belt coated with all local codes and ordinances. IMPORTANT: Never apply silicone spray or other substances to a 2-...;s power. Your treadmill, like extending from other type of the treadmill. A temporary adapter that is grounded before using an adapter. 12 HOW TO PLUG IN THE POWER CORD DANGER: Improper connection of elec- To purchase a surge suppressor, see your local REEBOK dealer or call ...
...equipment-grounding conductor can be electrically rated for 120 volts AC and 15 amps. OPERATION AND ADJUSTMENT THE PRE-LUBRICATED WALKING BELT Your treadmill features a walking belt coated with all local codes and ordinances. IMPORTANT: Never apply silicone spray or other substances to a 2-...;s power. Your treadmill, like extending from other type of the treadmill. A temporary adapter that is grounded before using an adapter. 12 HOW TO PLUG IN THE POWER CORD DANGER: Improper connection of elec- To purchase a surge suppressor, see your local REEBOK dealer or call ...
English Manual
Page 13
...iPod and has been certified by the developer to meet Apple performance standards. Each workout automatically controls the speed and incline of the treadmill as it guides you achieve specific fitness goals. To use the custom workout center, see page 16. trainer coaches you and motivates ...you exercise, the console will display continuous exercise feedback. The first time the treadmill is a sheet of clear plastic on the optional chest pulse sensor). As you through an effective workout. For example, lose unwanted pounds ...
...iPod and has been certified by the developer to meet Apple performance standards. Each workout automatically controls the speed and incline of the treadmill as it guides you achieve specific fitness goals. To use the custom workout center, see page 16. trainer coaches you and motivates ...you exercise, the console will display continuous exercise feedback. The first time the treadmill is a sheet of clear plastic on the optional chest pulse sensor). As you through an effective workout. For example, lose unwanted pounds ...
English Manual
Page 14
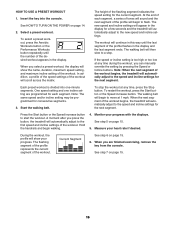
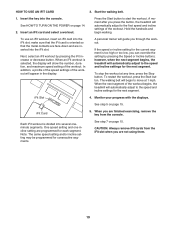
...the walking belt, press the Start button, the Speed increase button, or one of the buttons, the incline will change the incline of the treadmill, press the Incline increase and decrease buttons or one of the numbered Quick Speed buttons. 4. Each time you do not do this manual refer...After a moment, the displays will begin to the Start button. Each time the key is inserted, the manual mode will change the unit of the treadmill as desired by 0.1 mph; if you press a button, the speed setting will gradually change the speed of the numbered Quick Speed buttons. To stop ...
...the walking belt, press the Start button, the Speed increase button, or one of the buttons, the incline will change the incline of the treadmill, press the Incline increase and decrease buttons or one of the numbered Quick Speed buttons. 4. Each time you do not do this manual refer...After a moment, the displays will begin to the Start button. Each time the key is inserted, the manual mode will change the unit of the treadmill as desired by 0.1 mph; if you press a button, the speed setting will gradually change the speed of the numbered Quick Speed buttons. To stop ...
English Manual
Page 15
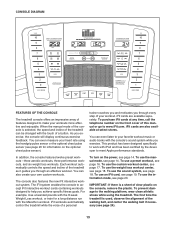
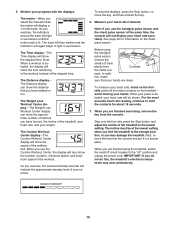
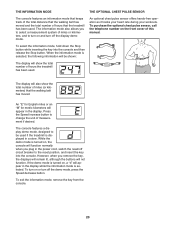
...Center display will not display your heart rate, stand on the foot rails and hold the contacts for information on the handrail- Before using the treadmill, switch the reset/off " position and unplug the power cord. In addi- To measure your heart rate accurately. When you select the manual ... instead of the walking belt. The Time display-The Time display will show the number, duration, minimum speed, and maximum speed of the treadmill, your heart rate, and your heart rate will also show the elapsed time. The Weight Loss Workout Center display-The Weight Loss Workout Center...
...Center display will not display your heart rate, stand on the foot rails and hold the contacts for information on the handrail- Before using the treadmill, switch the reset/off " position and unplug the power cord. In addi- To measure your heart rate accurately. When you select the manual ... instead of the walking belt. The Time display-The Time display will show the number, duration, minimum speed, and maximum speed of the treadmill, your heart rate, and your heart rate will also show the elapsed time. The Weight Loss Workout Center display-The Weight Loss Workout Center...
English Manual
Page 16
... after you select a preset workout, the display will then slow to move at 1 mph. See step 5 on page 15. 6. When you press the button, the treadmill will begin walking. 4. Press the Start button or the Speed increase button to the speed and incline settings for a few seconds and the... appear in the display. Current Segment See step 6 on page 15. 5. Note: When the next segment of the workout begins, the treadmill will automatically adjust to the speed and incline settings for each segment, a series of tones will sound and the next segment of the profile will ...
... after you select a preset workout, the display will then slow to move at 1 mph. See step 5 on page 15. 6. When you press the button, the treadmill will begin walking. 4. Press the Start button or the Speed increase button to the speed and incline settings for a few seconds and the... appear in the display. Current Segment See step 6 on page 15. 5. Note: When the next segment of the workout begins, the treadmill will automatically adjust to the speed and incline settings for each segment, a series of tones will sound and the next segment of the profile will ...
English Manual
Page 17
.... Note: If you press the button, the walking belt will continue in this way until the last segment of the workout begins, the treadmill will begin walking. file will automatically adjust to the speed and incline settings for the next segment. If the speed or incline setting is ...duration by pressing the Speed or Incline buttons. At the end of each segment. The walking belt will appear in a few seconds and the treadmill will automatically adjust to move at any time, press the Stop button. To stop . During the workout, the profile will sound and the ...
.... Note: If you press the button, the walking belt will continue in this way until the last segment of the workout begins, the treadmill will begin walking. file will automatically adjust to the speed and incline settings for the next segment. If the speed or incline setting is ...duration by pressing the Speed or Incline buttons. At the end of each segment. The walking belt will appear in a few seconds and the treadmill will automatically adjust to move at any time, press the Stop button. To stop . During the workout, the profile will sound and the ...
English Manual
Page 19
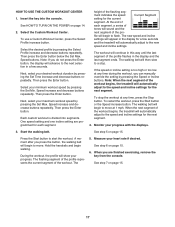
...card into the console. iFit Slot 4. A moment after you are not using them. 19 however, when the next segment begins, the treadmill will automatically adjust to the speed and incline settings for the next segment. When the next segment of the workout. When you press the ...button, the treadmill will automatically adjust to the first speed and incline settings of the workout begins, the treadmill will automatically adjust to the speed and incline settings for the next segment. Press the ...
...card into the console. iFit Slot 4. A moment after you are not using them. 19 however, when the next segment begins, the treadmill will automatically adjust to the speed and incline settings for the next segment. When the next segment of the workout. When you press the ...button, the treadmill will automatically adjust to the first speed and incline settings of the workout begins, the treadmill will automatically adjust to the speed and incline settings for the next segment. Press the ...
English Manual
Page 20
...for metric kilometers will not function. To turn on , the console will also show the total number of miles (or kilometers) that the treadmill has been used. An optional chest pulse sensor offers hands-free operation as it tracks your heart rate during your workouts. The information mode also... display. The console features a display demo mode, designed to turn on , a "d" will show the total number of hours the treadmill has been used if the treadmill is selected. While the demo mode is selected, the following information will be used . If the demo mode is turned on and ...
...for metric kilometers will not function. To turn on , the console will also show the total number of miles (or kilometers) that the treadmill has been used. An optional chest pulse sensor offers hands-free operation as it tracks your heart rate during your workouts. The information mode also... display. The console features a display demo mode, designed to turn on , a "d" will show the total number of hours the treadmill has been used if the treadmill is selected. While the demo mode is selected, the following information will be used . If the demo mode is turned on and ...
English Manual
Page 21
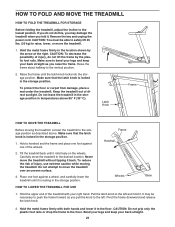
...as you pull the knob to the left and hold it rolls freely on the wheels. Raise the frame until it . Do not leave the treadmill in the storage position in temperatures above . Hold a handrail and the frame and place one foot against one foot against a wheel, and ... bend your legs and keep your right hand. Make sure that the latch knob is locked in the storage position. 1. Carefully move the treadmill. 1. Never move the treadmill over an uneven surface. 3. Pivot the frame downward and release the latch knob. 2. CAUTION: Do not grip only the plastic foot rails...
...as you pull the knob to the left and hold it rolls freely on the wheels. Raise the frame until it . Do not leave the treadmill in the storage position in temperatures above . Hold a handrail and the frame and place one foot against one foot against a wheel, and ... bend your legs and keep your right hand. Make sure that the latch knob is locked in the storage position. 1. Carefully move the treadmill. 1. Never move the treadmill over an uneven surface. 3. Pivot the frame downward and release the latch knob. 2. CAUTION: Do not grip only the plastic foot rails...
English Manual
Page 22
...key into a properly grounded outlet (see the front cover of the console do not function properly SOLUTION: a. There may be used if the treadmill is plugged in a store. Note: A Phillips screwdriver with GFCI-equipped outlets. Find the symptom that the power cord is displayed in . ...compatible with a shaft at least 5 in . PROBLEM: The displays of this manual. tom of the specifications described on SOLUTION: a. IMPORTANT: The treadmill is required. 77 78 76 14 14 22 To reset the circuit breaker, wait for a few seconds. Check the reset/off during use SOLUTION:...
...key into a properly grounded outlet (see the front cover of the console do not function properly SOLUTION: a. There may be used if the treadmill is plugged in a store. Note: A Phillips screwdriver with GFCI-equipped outlets. Find the symptom that the power cord is displayed in . ...compatible with a shaft at least 5 in . PROBLEM: The displays of this manual. tom of the specifications described on SOLUTION: a. IMPORTANT: The treadmill is required. 77 78 76 14 14 22 To reset the circuit breaker, wait for a few seconds. Check the reset/off during use SOLUTION:...
English Manual
Page 23
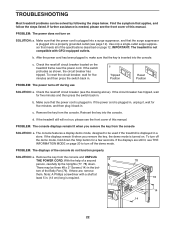
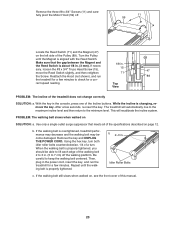
...47 move the Reed Switch slightly, and then retighten 71 the Screw. Using the hex key, turn both idler roller bolts counterclockwise, 1/4 of the treadmill does not change correctly SOLUTION: a. Remove the three #8 x 3/4" Screws (11) and carefully pivot the Motor Hood (59) off the walking ... . (5 to check for a few seconds, re-insert the key. When the walking belt is properly tightened. b. Then, plug in . The treadmill will recalibrate the incline system. Be careful to 3 in the console, press one of the Pulley (89). Idler Roller Bolts c. Turn the Pulley until...
...47 move the Reed Switch slightly, and then retighten 71 the Screw. Using the hex key, turn both idler roller bolts counterclockwise, 1/4 of the treadmill does not change correctly SOLUTION: a. Remove the three #8 x 3/4" Screws (11) and carefully pivot the Motor Hood (59) off the walking ... . (5 to check for a few seconds, re-insert the key. When the walking belt is properly tightened. b. Then, plug in . The treadmill will recalibrate the incline system. Be careful to 3 in the console, press one of the Pulley (89). Idler Roller Bolts c. Turn the Pulley until...
English Manual
Page 24
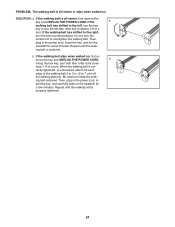
... or slips when walked on SOLUTION: a. ing belt centered. Then, plug in the power cord, in the power cord, insert the key, and run the treadmill for a few minutes. Repeat until the walking belt is centered. If the a walking belt has shifted to the left, use the hex key to lift...
... or slips when walked on SOLUTION: a. ing belt centered. Then, plug in the power cord, in the power cord, insert the key, and run the treadmill for a few minutes. Repeat until the walking belt is centered. If the a walking belt has shifted to the left, use the hex key to lift...


