
English Manual
Page 2
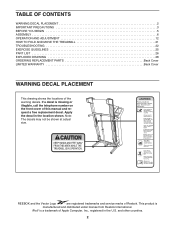
... 6 OPERATION AND ADJUSTMENT 12 HOW TO FOLD AND MOVE THE TREADMILL 21 TROUBLESHOOTING 22 EXERCISE GUIDELINES 25 PART LIST 26 EXPLODED DRAWING 28 ORDERING REPLACEMENT PARTS Back Cover LIMITED WARRANTY Back Cover WARNING DECAL PLACEMENT This drawing shows the locations of Reebok. This product is missing or illegible, call the telephone number on...
... 6 OPERATION AND ADJUSTMENT 12 HOW TO FOLD AND MOVE THE TREADMILL 21 TROUBLESHOOTING 22 EXERCISE GUIDELINES 25 PART LIST 26 EXPLODED DRAWING 28 ORDERING REPLACEMENT PARTS Back Cover LIMITED WARRANTY Back Cover WARNING DECAL PLACEMENT This drawing shows the locations of Reebok. This product is missing or illegible, call the telephone number on...

English Manual
Page 3
... or see your local REEBOK dealer or call the telephone number on the front cover of this product. 1. Use only a single-outlet surge suppressor that blocks air openings. Failure to the control system of the treadmill. Do not operate the treadmill where aerosol products are standing... other appliance should be on the same circuit. The pulse sensor is not working properly. (See TROUBLESHOOTING on any exercise program, consult your treadmill. Read, understand, and test the emergency stop unexpectedly, which may affect the accuracy of heart rate readings. IMPORTANT ...
... or see your local REEBOK dealer or call the telephone number on the front cover of this product. 1. Use only a single-outlet surge suppressor that blocks air openings. Failure to the control system of the treadmill. Do not operate the treadmill where aerosol products are standing... other appliance should be on the same circuit. The pulse sensor is not working properly. (See TROUBLESHOOTING on any exercise program, consult your treadmill. Read, understand, and test the emergency stop unexpectedly, which may affect the accuracy of heart rate readings. IMPORTANT ...
English Manual
Page 22
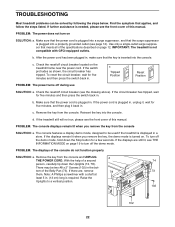
...minutes, and then plug it back in the bot- b. If the switch protrudes as shown, the circuit breaker has tripped. d. If the treadmill still will not run, please see the front cover of this manual. If there are still lit, see the drawing above). If further ... position. 102 102 22 There may be solved by following the steps below. PROBLEM: The displays of the specifications described on SOLUTION: a. TROUBLESHOOTING Most treadmill problems can be two #8 x 2" Screws (102) in . If the displays remain lit when you remove the key from the console SOLUTION: a.
...minutes, and then plug it back in the bot- b. If the switch protrudes as shown, the circuit breaker has tripped. d. If the treadmill still will not run, please see the front cover of this manual. If there are still lit, see the drawing above). If further ... position. 102 102 22 There may be solved by following the steps below. PROBLEM: The displays of the specifications described on SOLUTION: a. TROUBLESHOOTING Most treadmill problems can be two #8 x 2" Screws (102) in . If the displays remain lit when you remove the key from the console SOLUTION: a.
