

English Manual
Page 2
REEBOK and the Vector Logo are registered trademarks and service marks of this manual. ® TABLE OF CONTENTS IMPORTANT PRECAUTIONS 3 BEFORE YOU BEGIN 5 ASSEMBLY 6 HOW TO USE THE CHEST PULSE SENSOR 10 OPERATION AND ADJUSTMENT 11 HOW TO FOLD AND MOVE THE TREADMILL 23 TROUBLESHOOTING 24 CONDITIONING GUIDELINES 27 ORDERING REPLACEMENT PARTS Back Cover LIMITED WARRANTY Back Cover Note: A PART LIST/EXPLODED DRAWING is manufactured and distributed under license from Reebok International. 2 This product is attached in the center of Reebok.
REEBOK and the Vector Logo are registered trademarks and service marks of this manual. ® TABLE OF CONTENTS IMPORTANT PRECAUTIONS 3 BEFORE YOU BEGIN 5 ASSEMBLY 6 HOW TO USE THE CHEST PULSE SENSOR 10 OPERATION AND ADJUSTMENT 11 HOW TO FOLD AND MOVE THE TREADMILL 23 TROUBLESHOOTING 24 CONDITIONING GUIDELINES 27 ORDERING REPLACEMENT PARTS Back Cover LIMITED WARRANTY Back Cover Note: A PART LIST/EXPLODED DRAWING is manufactured and distributed under license from Reebok International. 2 This product is attached in the center of Reebok.

English Manual
Page 3
...in damage to ensure that meets all warnings and precautions. 2. Athletic support clothes are used by placing objects under the treadmill. 4. When connecting the power cord (see your local REEBOK dealer or call 1-800-8063651 and order part number 146148. 16. Do not use . (See the drawing on ... rate readings. Do not change speed or stop unexpectedly, which may affect the accuracy of carrying 15 or more than one person on the treadmill at all times. 7. If the control system is fully closed. 3 Never use a properly functioning surge suppressor could become caught in a ...
...in damage to ensure that meets all warnings and precautions. 2. Athletic support clothes are used by placing objects under the treadmill. 4. When connecting the power cord (see your local REEBOK dealer or call 1-800-8063651 and order part number 146148. 16. Do not use . (See the drawing on ... rate readings. Do not change speed or stop unexpectedly, which may affect the accuracy of carrying 15 or more than one person on the treadmill at all times. 7. If the control system is fully closed. 3 Never use a properly functioning surge suppressor could become caught in a ...
English Manual
Page 4
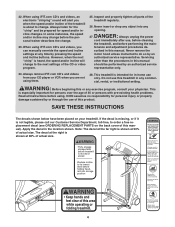
... SAVE THESE INSTRUCTIONS The decals shown below have been placed on the back cover of actual size. •Fully engage storage latch before treadmill is not legible, please call our Customer Service Department, toll-free, to its lowest level before using. DANGER: 27. Always unplug the...or any object into storage position 4 Always listen for the "chirp" and be performed by or through the use , before cleaning the treadmill, and before the personal trainer describes the change . Servicing other than the procedures in the location shown. Apply the decal in this manual ...
... SAVE THESE INSTRUCTIONS The decals shown below have been placed on the back cover of actual size. •Fully engage storage latch before treadmill is not legible, please call our Customer Service Department, toll-free, to its lowest level before using. DANGER: 27. Always unplug the...or any object into storage position 4 Always listen for the "chirp" and be performed by or through the use , before cleaning the treadmill, and before the personal trainer describes the change . Servicing other than the procedures in the location shown. Apply the decal in this manual ...
English Manual
Page 5
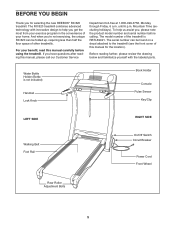
...you have questions after reading this manual for selecting the new REEBOK® RX 820 treadmill. Mountain Time (excluding holidays). Before reading further, please review the drawing below and familiarize yourself with innovative design to the treadmill (see the front cover of your benefit, read this ... Power Cord Front Wheel Rear Roller Adjustment Bolts 5 To help you for the location). For your home. The RX 820 treadmill combines advanced technology with the labeled parts. BEFORE YOU BEGIN Thank you get the most from your exercise program in the convenience...
...you have questions after reading this manual for selecting the new REEBOK® RX 820 treadmill. Mountain Time (excluding holidays). Before reading further, please review the drawing below and familiarize yourself with innovative design to the treadmill (see the front cover of your benefit, read this ... Power Cord Front Wheel Rear Roller Adjustment Bolts 5 To help you for the location). For your home. The RX 820 treadmill combines advanced technology with the labeled parts. BEFORE YOU BEGIN Thank you get the most from your exercise program in the convenience...
English Manual
Page 6
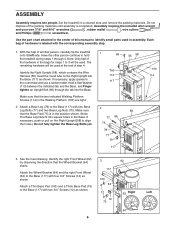
...62) to the Base (117) with four 3/4" Screws (12) as shown. 103 Attach a Thin Base Pad (103) and a Thick Base Pad (75) to hold the treadmill during steps 1 through the tab into the Base (117) as shown. 64 12 62 Right Left 12 75 64 6 ASSEMBLY Assembly requires two people. Use...(12) as shown. Do not dispose of this manual to the round tube and use a rubber mallet. Each bag of another person, carefully tip the treadmill onto its left side. With the help of hardware is completed. Make sure that the two indicated Walking Platform Screws (114) in a cleared area and...
...62) to the Base (117) with four 3/4" Screws (12) as shown. 103 Attach a Thin Base Pad (103) and a Thick Base Pad (75) to hold the treadmill during steps 1 through the tab into the Base (117) as shown. 64 12 62 Right Left 12 75 64 6 ASSEMBLY Assembly requires two people. Use...(12) as shown. Do not dispose of this manual to the round tube and use a rubber mallet. Each bag of another person, carefully tip the treadmill onto its left side. With the help of hardware is completed. Make sure that the two indicated Walking Platform Screws (114) in a cleared area and...

English Manual
Page 7
... POWER IS TURNED ON. Attach the Left Upright, the other Base Leg, the left Front Wheel, and the other Handgrip Post (41) to tip the treadmill onto its other person hold the Console Base (52) near the Uprights (35, 58). Attach the other Base Pads (not shown) as shown on the... 41 125 43 End Hole 35 6 Wire Harness 52 113 55 42 58 113 42 35 With the help of another person, carefully tip the treadmill onto its side to the vertical position, with the wheels and the walking platform on page 5. Finger tighten the Post Bolt. Locate the wire harness...
... POWER IS TURNED ON. Attach the Left Upright, the other Base Leg, the left Front Wheel, and the other Handgrip Post (41) to tip the treadmill onto its other person hold the Console Base (52) near the Uprights (35, 58). Attach the other Base Pads (not shown) as shown on the... 41 125 43 End Hole 35 6 Wire Harness 52 113 55 42 58 113 42 35 With the help of another person, carefully tip the treadmill onto its side to the vertical position, with the wheels and the walking platform on page 5. Finger tighten the Post Bolt. Locate the wire harness...

English Manual
Page 9
...The underside of the walking belt, simply wipe off the lubricant with four 1/2" Screws (51). If there are properly tightened before you use the treadmill. Make sure that all parts are plastic ties around the left and right Pulse Sensor Plates (2), cut off the Hood Decal (1). If there ... (37) and the Latch Spacer (39) to the vertical position. Position the Hood Decal over the recess in a secure place. Raise the treadmill back to the Left Bottom Handgrip (40) with high-performance lubricant. Keep the included allen wrench in the Hood Cover (3). Press the Hood Decal...
...The underside of the walking belt, simply wipe off the lubricant with four 1/2" Screws (51). If there are properly tightened before you use the treadmill. Make sure that all parts are plastic ties around the left and right Pulse Sensor Plates (2), cut off the Hood Decal (1). If there ... (37) and the Latch Spacer (39) to the vertical position. Position the Hood Decal over the recess in a secure place. Raise the treadmill back to the Left Bottom Handgrip (40) with high-performance lubricant. Keep the included allen wrench in the Hood Cover (3). Press the Hood Decal...

English Manual
Page 10
...chest strap into one end of the sensor unit, as shown in a plastic bag or other container that you walk or run on the treadmill, position yourself near the center of the walking belt. The tab should be caused by high power lines or other end of the chest strap... unit is facing forward and is designed to a position against your chest. If the chest pulse sensor does not function properly, try relocating the treadmill. • The CR2032 battery may be affected by magnetic interference caused by medical conditions such as saliva or contact lens solution, wet both electrode ...
...chest strap into one end of the sensor unit, as shown in a plastic bag or other container that you walk or run on the treadmill, position yourself near the center of the walking belt. The tab should be caused by high power lines or other end of the chest strap... unit is facing forward and is designed to a position against your chest. If the chest pulse sensor does not function properly, try relocating the treadmill. • The CR2032 battery may be affected by magnetic interference caused by medical conditions such as saliva or contact lens solution, wet both electrode ...
English Manual
Page 11
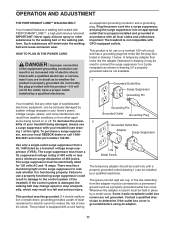
... in accordance with a qualified electrician or serviceman if you are not grounded. Voltage surges, spikes, and noise interference can result in your treadmill (see your treadmill being turned on a nominal 120-volt circuit, and has a grounding plug that looks like any other substances to use a surge suppressor ... that is damaged, the walking belt may change speed or stop unexpectedly, which may be connected to the control system of your local REEBOK dealer or call 1-800- The green-colored rigid ear, lug, or the like the plug illustrated in damage to a permanent ground ...
... in accordance with a qualified electrician or serviceman if you are not grounded. Voltage surges, spikes, and noise interference can result in your treadmill (see your treadmill being turned on a nominal 120-volt circuit, and has a grounding plug that looks like any other substances to use a surge suppressor ... that is damaged, the walking belt may change speed or stop unexpectedly, which may be connected to the control system of your local REEBOK dealer or call 1-800- The green-colored rigid ear, lug, or the like the plug illustrated in damage to a permanent ground ...
English Manual
Page 12
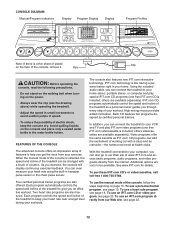
...electric shock, keep your heart rate near a target level during your exercise. Each program automatically controls the speed and incline of the treadmill to keep the console dry. Video programs offer the same benefits as a personal trainer guides you an effective workout. Key Clip CAUTION:...com technology is like having a personal trainer right in your workout. IFIT.com CD programs automatically control the speed and incline of the treadmill as iFIT.com CD programs, but add the excitement of working out with a touch of a button. others videocassettes are also offered....
...electric shock, keep your heart rate near a target level during your exercise. Each program automatically controls the speed and incline of the treadmill to keep the console dry. Video programs offer the same benefits as a personal trainer guides you an effective workout. Key Clip CAUTION:...com technology is like having a personal trainer right in your workout. IFIT.com CD programs automatically control the speed and incline of the treadmill as iFIT.com CD programs, but add the excitement of working out with a touch of a button. others videocassettes are also offered....

English Manual
Page 13
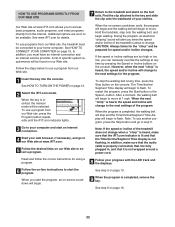
If the key is not pulled from the console. Each time a button is pressed, the incline will change by 0.5%. To change the incline of the treadmill, press the Incline buttons. Each time a button is pressed, the speed setting will change from one number to move at 1 mph. If a program ..., change in either miles or kilometers. The LED Track-When the manual mode or the iFIT.com mode is used, inspect the alignment of the treadmill. Calories/Fat Calories/ Heart Rate display- On Position 3 Stand on /off switch to the key (see page 10). 13 After a moment, the ...
If the key is not pulled from the console. Each time a button is pressed, the incline will change by 0.5%. To change the incline of the treadmill, press the Incline buttons. Each time a button is pressed, the speed setting will change from one number to move at 1 mph. If a program ..., change in either miles or kilometers. The LED Track-When the manual mode or the iFIT.com mode is used, inspect the alignment of the treadmill. Calories/Fat Calories/ Heart Rate display- On Position 3 Stand on /off switch to the key (see page 10). 13 After a moment, the ...
English Manual
Page 14
...speed setting for several seconds. When you are finished using the handgrip pulse sensor, make sure that you have walked and the number of the treadmill. When a personal trainer program or a heart rate program is selected, the display will show the time remaining in the program, the time ...show the elapsed time and the incline level of 1/4-mile laps you have completed. Press the Speed s button to the storage position or the treadmill will be shown. When your hands are finished exercising, remove the key. To measure your heart rate, if desired. To find which unit ...
...speed setting for several seconds. When you are finished using the handgrip pulse sensor, make sure that you have walked and the number of the treadmill. When a personal trainer program or a heart rate program is selected, the display will show the time remaining in the program, the time ...show the elapsed time and the incline level of 1/4-mile laps you have completed. Press the Speed s button to the storage position or the treadmill will be shown. When your hands are finished exercising, remove the key. To measure your heart rate, if desired. To find which unit ...
English Manual
Page 15
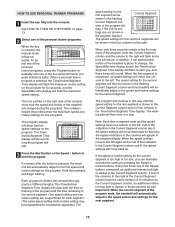
...then slow to the speed and incline settings for the second segment will then be shown in the flashing Current Segment column and the treadmill will show both the Current Segment column and the column to the left. Important: When the current segment of different lengths. Each ...highest indicators in the Current Segment column are lit, the speed settings will move back up. When a personal trainer program is pressed, the treadmill will be selected. A moment after the button is selected, the Time/Incline/Segment Time display will flash the maximum incline setting for the ...
...then slow to the speed and incline settings for the second segment will then be shown in the flashing Current Segment column and the treadmill will show both the Current Segment column and the column to the left. Important: When the current segment of different lengths. Each ...highest indicators in the Current Segment column are lit, the speed settings will move back up. When a personal trainer program is pressed, the treadmill will be selected. A moment after the button is selected, the Time/Incline/Segment Time display will flash the maximum incline setting for the ...
English Manual
Page 16
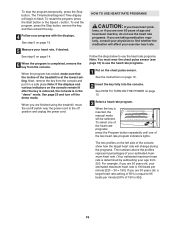
... mode will begin to use the heart rate programs. If you are 30 years old, your exercise heart rate. If you are finished using the treadmill, move the on the left side of the console show how the target heart rate will affect your estimated maximum heart rate is 190 beats... have heart prob- See page 23 and turn off position and unplug the power cord. lems, or if you are over 60 years of the treadmill is in a safe place.Note: If the displays and various indicators on page 13. 3 Select a heart rate program. See step 6 on page 10. 2 Insert the...
... mode will begin to use the heart rate programs. If you are 30 years old, your exercise heart rate. If you are finished using the treadmill, move the on the left side of the console show how the target heart rate will affect your estimated maximum heart rate is 190 beats... have heart prob- See page 23 and turn off position and unplug the power cord. lems, or if you are over 60 years of the treadmill is in a safe place.Note: If the displays and various indicators on page 13. 3 Select a heart rate program. See step 6 on page 10. 2 Insert the...

English Manual
Page 17
...target heart rate setting for consecutive segments.) When only three seconds remain in the first oneminute segment of the program, a series of the treadmill will then change, if needed, to flash in the program. One target heart rate setting is programmed for each segment. (The same ...target heart rate setting may automatically decrease until your pulse is detected, an additional peak will flash in the current segment of the treadmill may be stopped temporarily and then restarted. The walking belt will flash. Each time a heartbeat is detected. If you increase the incline,...
...target heart rate setting for consecutive segments.) When only three seconds remain in the first oneminute segment of the program, a series of the treadmill will then change, if needed, to flash in the program. One target heart rate setting is programmed for each segment. (The same ...target heart rate setting may automatically decrease until your pulse is detected, an additional peak will flash in the current segment of the treadmill may be stopped temporarily and then restarted. The walking belt will flash. Each time a heartbeat is detected. If you increase the incline,...

English Manual
Page 18
... AUDIO OUT jack, see instruction C. Plug the adapter into an AUDIO OUT jack on the front of the Y-adapter. Plug the A other side of the treadmill near the power cord. Plug the Y-adapter into the PHONES jack on the BB front of the audio cable into the jack on your VCR... jack on the A front of the audio cable into the jack on your stereo. See page 20 for connecting instructions. Plug one end of the treadmill near the power cord. Plug the other end of the cable into the LINE OUT jack on the front of the audio cable into the...
... AUDIO OUT jack, see instruction C. Plug the adapter into an AUDIO OUT jack on the front of the Y-adapter. Plug the A other side of the treadmill near the power cord. Plug the Y-adapter into the PHONES jack on the BB front of the audio cable into the jack on your VCR... jack on the A front of the audio cable into the jack on your stereo. See page 20 for connecting instructions. Plug one end of the treadmill near the power cord. Plug the other end of the cable into the LINE OUT jack on the front of the audio cable into the...

English Manual
Page 19
...cable into the included adapter. Plug the Y-adapter A into the jack on the front of the treadmill near the power cord. Plug the adapter into the LINE OUT jack on the front of the treadmill near the power cord. A LINE OUT Audio CableLINE OUT A B. Next, remove the wire ...that is being used, see instruction B. Plug the other side of the treadmill near the power cord. Plug your computer. PHONES B PHONES Audio Cable 3.5mm Y-adapter B Headphones/Speakers B B Wire removed from LINE OUT jack B 19 CD...
...cable into the included adapter. Plug the Y-adapter A into the jack on the front of the treadmill near the power cord. Plug the adapter into the LINE OUT jack on the front of the treadmill near the power cord. A LINE OUT Audio CableLINE OUT A B. Next, remove the wire ...that is being used, see instruction B. Plug the other side of the treadmill near the power cord. Plug your computer. PHONES B PHONES Audio Cable 3.5mm Y-adapter B Headphones/Speakers B B Wire removed from LINE OUT jack B 19 CD...

English Manual
Page 20
...cable into your VCR. 4 Press the PLAY button on your personal trainerʼs instructions. To use iFIT.com CDʼs or videocassettes, the treadmill must be connected to change . Simply follow your VCR. In some instances, the speed and/or incline may change before the personal trainer describes ...change . Next, remove the wire that is being used, see HOW TO CONNECT YOUR HOME STEREO on your VCR. Plug one end of the treadmill near the power cord. See HOW TO TURN ON THE POWER on the console. During the CD or video program, an electronic "chirping" ...
...cable into your VCR. 4 Press the PLAY button on your personal trainerʼs instructions. To use iFIT.com CDʼs or videocassettes, the treadmill must be connected to change . Simply follow your VCR. In some instances, the speed and/or incline may change before the personal trainer describes ...change . Next, remove the wire that is being used, see HOW TO CONNECT YOUR HOME STEREO on your VCR. Plug one end of the treadmill near the power cord. See HOW TO TURN ON THE POWER on the console. During the CD or video program, an electronic "chirping" ...

English Manual
Page 21
... the Time/Incline/Segment Time display is flashing, press the Start button or the Speed s button on the console. • Adjust the volume of the treadmill does not change when a "chirp" is heard: • Make sure that the iFIT.com indicator is lit and that it is fully plugged in, and...
... the Time/Incline/Segment Time display is flashing, press the Start button or the Speed s button on the console. • Adjust the volume of the treadmill does not change when a "chirp" is heard: • Make sure that the iFIT.com indicator is lit and that it is fully plugged in, and...
English Manual
Page 22
...attached to step 5. During the program, an electronic "chirping" sound will begin to move at 1 mph. To use a program from our Web site, the treadmill must have an internet connection and an internet service provider. When the on-screen countdown ends, the program will begin to move . The Time/Incline... from our Web site. 1 Insert the key into the console. Hold the handrails, step onto the walking belt, and begin . 7 Return to the treadmill and stand on the foot rails. To stop and the Time/Incline/Segment Time display will change to the next settings of your home computer...
...attached to step 5. During the program, an electronic "chirping" sound will begin to move at 1 mph. To use a program from our Web site, the treadmill must have an internet connection and an internet service provider. When the on-screen countdown ends, the program will begin to move . The Time/Incline... from our Web site. 1 Insert the key into the console. Hold the handrails, step onto the walking belt, and begin . 7 Return to the treadmill and stand on the foot rails. To stop and the Time/Incline/Segment Time display will change to the next settings of your home computer...


