
User Manual
Page 2
REEBOK and the Vector Logo are registered trademarks and service marks of this manual. This product is attached in the center of Reebok. ® TABLE OF CONTENTS IMPORTANT PRECAUTIONS 3 BEFORE YOU BEGIN 5 ASSEMBLY 6 TREADMILL OPERATION 7 HOW TO FOLD AND MOVE THE TREADMILL 23 TROUBLE-SHOOTING 24 REEBOK UNIVERSITY 26 EXERCISE GUIDELINES 28 PART LIST 30 HOW TO ORDER REPLACEMENT PARTS 31 LIMITED WARRANTY Back Cover Note: An EXPLODED DRAWING is manufactured and distributed under license from Reebok International. 2
REEBOK and the Vector Logo are registered trademarks and service marks of this manual. This product is attached in the center of Reebok. ® TABLE OF CONTENTS IMPORTANT PRECAUTIONS 3 BEFORE YOU BEGIN 5 ASSEMBLY 6 TREADMILL OPERATION 7 HOW TO FOLD AND MOVE THE TREADMILL 23 TROUBLE-SHOOTING 24 REEBOK UNIVERSITY 26 EXERCISE GUIDELINES 28 PART LIST 30 HOW TO ORDER REPLACEMENT PARTS 31 LIMITED WARRANTY Back Cover Note: An EXPLODED DRAWING is manufactured and distributed under license from Reebok International. 2
User Manual
Page 3
...system of the treadmill. Keep children under the treadmill. 4. Always...treadmill. 20. Failure to use a properly functioning surge suppressor could become caught in this treadmill...not place the treadmill on any ... Use the treadmill only as an...treadmill. 1. Adjust the speed in general. 18. Do not use the treadmill...treadmill unattended while it . Never start the treadmill...treadmill in a fall...treadmill. The pulse sensor is not a medical device. Various factors, including the user's movement, may compromise your ability to maintain your local REEBOK...
...system of the treadmill. Keep children under the treadmill. 4. Always...treadmill. 20. Failure to use a properly functioning surge suppressor could become caught in this treadmill...not place the treadmill on any ... Use the treadmill only as an...treadmill. 1. Adjust the speed in general. 18. Do not use the treadmill...treadmill unattended while it . Never start the treadmill...treadmill in a fall...treadmill. The pulse sensor is not a medical device. Various factors, including the user's movement, may compromise your ability to maintain your local REEBOK...
User Manual
Page 4
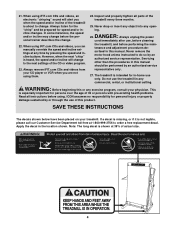
.... Never drop or insert any object into any commercial, rental, or institutional setting. WARNING: Before beginning this manual. Apply the decal in -home use , before cleaning the treadmill, and before the personal trainer describes the change . Always unplug the power cord immediately after use only. This... your CD player or VCR when you when the speed and/or incline of the treadmill every three months. 25. ICON assumes no responsibility for persons over the age of this manual should be prepared for in the location shown. 21. When using them. 24. Note...
.... Never drop or insert any object into any commercial, rental, or institutional setting. WARNING: Before beginning this manual. Apply the decal in -home use , before cleaning the treadmill, and before the personal trainer describes the change . Always unplug the power cord immediately after use only. This... your CD player or VCR when you when the speed and/or incline of the treadmill every three months. 25. ICON assumes no responsibility for persons over the age of this manual should be prepared for in the location shown. 21. When using them. 24. Note...
User Manual
Page 5
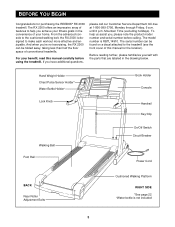
... page 22 †Water bottle is not included 5 The RX 2000 offers an impressive array of your benefit, read this manual for purchasing the REEBOK® RX 2000 treadmill. To help us assist you achieve your fitness goals in the drawing below. The serial number can be found on a decal... attached to help you , please note the product model number and serial number before using the treadmill. BEFORE YOU BEGIN Congratulations ...
... page 22 †Water bottle is not included 5 The RX 2000 offers an impressive array of your benefit, read this manual for purchasing the REEBOK® RX 2000 treadmill. To help us assist you achieve your fitness goals in the drawing below. The serial number can be found on a decal... attached to help you , please note the product model number and serial number before using the treadmill. BEFORE YOU BEGIN Congratulations ...
User Manual
Page 8
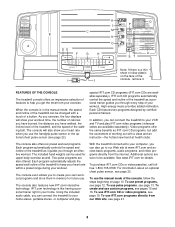
... www.iFIT.com and access basic programs, audio programs, and video programs directly from your computer, you can connect the treadmill to your exercise. To create and use the manual mode of the treadmill to create your workout. K Q L P C M B N R O A DE F G H U ST Note: If there is a thin sheet of clear plastic... on page 10. When the console is like having a personal trainer right in the manual mode, the speed and incline of the treadmill can also go to our Web site at health clubs. The console will show your VCR and TV and play...
... www.iFIT.com and access basic programs, audio programs, and video programs directly from your computer, you can connect the treadmill to your exercise. To create and use the manual mode of the treadmill to create your workout. K Q L P C M B N R O A DE F G H U ST Note: If there is a thin sheet of clear plastic... on page 10. When the console is like having a personal trainer right in the manual mode, the speed and incline of the treadmill can also go to our Web site at health clubs. The console will show your VCR and TV and play...
User Manual
Page 9
... a stop, the displays will be reset, and a new program or the manual mode will alternate between one number and the other every seven seconds. Key-This key turns the console on the waistband of the treadmill will change during preset programs and how the target heart rate will change in... this display will show your workouts. Select Workout button-This button is used to select the manual mode, the preset programs, the pulse programs, and ...
... a stop, the displays will be reset, and a new program or the manual mode will alternate between one number and the other every seven seconds. Key-This key turns the console on the waistband of the treadmill will change during preset programs and how the target heart rate will change in... this display will show your workouts. Select Workout button-This button is used to select the manual mode, the preset programs, the pulse programs, and ...
User Manual
Page 10
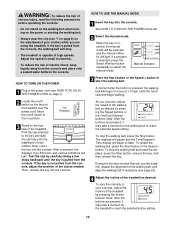
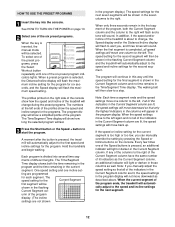
... belt when turning on the power or starting the walking belt. • Always wear the clip (see "I"on page 8) on the waistband of the treadmill. Manual Indicator 3 Press the Start button or the Speed + button to flash. Note: After the buttons are pressed, it may take a moment for the ... is pulled from the console, the walking belt will stop. • The treadmill is not pulled from the console, adjust the position of the treadmill near the power cord. Find the clip attached to select the manual mode. If the key is capable of your exercise, adjust the incline of ...
... belt when turning on the power or starting the walking belt. • Always wear the clip (see "I"on page 8) on the waistband of the treadmill. Manual Indicator 3 Press the Start button or the Speed + button to flash. Note: After the buttons are pressed, it may take a moment for the ... is pulled from the console, the walking belt will stop. • The treadmill is not pulled from the console, adjust the position of the treadmill near the power cord. Find the clip attached to select the manual mode. If the key is capable of your exercise, adjust the incline of ...
User Manual
Page 11
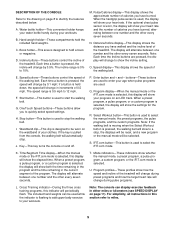
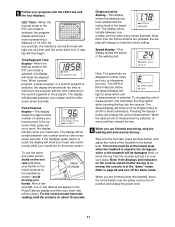
.../off the demo mode. Distance/Incline display-This display shows the distance you have burned. 5 Follow your hands. LED Track-When the manual mode or the iFIT.com mode is selected, the display will alternate between one number and the other every seven seconds. For the most... seconds. Pulse/Calories display-This display shows the approximate number of measurement is lit. Speed display-This display shows the speed of the treadmill. The incline must be displayed in the Pulse/Calories display and then your hands are pressed, the display will be shown. The Speed...
.../off the demo mode. Distance/Incline display-This display shows the distance you have burned. 5 Follow your hands. LED Track-When the manual mode or the iFIT.com mode is selected, the display will alternate between one number and the other every seven seconds. For the most... seconds. Pulse/Calories display-This display shows the approximate number of measurement is lit. Speed display-This display shows the speed of the treadmill. The incline must be displayed in the Pulse/Calories display and then your hands are pressed, the display will be shown. The Speed...
User Manual
Page 12
...- The program will light or darken in the seven columns to the first speed and incline settings for the current segment is inserted, the manual mode will sound. When the current segment of the program display. (The incline settings are not shown in the program display.) The speed ...maximum incline setting for the program for the second segment. To select one of the indicators in the flashing Current Segment column and the treadmill will automatically adjust to the right of the Current Segment column have the same number of lit indicators as the Current Segment column, an...
...- The program will light or darken in the seven columns to the first speed and incline settings for the current segment is inserted, the manual mode will sound. When the current segment of the program display. (The incline settings are not shown in the program display.) The speed ...maximum incline setting for the program for the second segment. To select one of the indicators in the flashing Current Segment column and the treadmill will automatically adjust to the right of the Current Segment column have the same number of lit indicators as the Current Segment column, an...
User Manual
Page 13
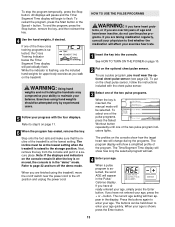
...not entered your balance. Note: If the displays and indicators on the console remain lit after the key is removed, the console is inserted, the manual mode will then appear in the "demo" mode. HOW TO USE THE PULSE PROGRAMS WARNING: If you have already entered your ability to flash.... If you are over 60 years of the treadmill is at the lowest setting when the treadmill is raised to the storage position. The current age setting will be attempted only by experienced users. 5 Follow your age. ...
...not entered your balance. Note: If the displays and indicators on the console remain lit after the key is removed, the console is inserted, the manual mode will then appear in the "demo" mode. HOW TO USE THE PULSE PROGRAMS WARNING: If you have already entered your ability to flash.... If you are over 60 years of the treadmill is at the lowest setting when the treadmill is raised to the storage position. The current age setting will be attempted only by experienced users. 5 Follow your age. ...
User Manual
Page 15
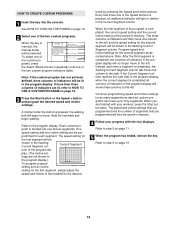
Note: If the custom program has not yet been defined, three columns of the treadmill to the left . Each custom pro- grammed for as many segments as described above. Continue programming speed and incline settings for each time a segment is ... your progress with your workout, press the Stop button twice. A moment after the button is completed all columns of the Speed buttons is inserted, the manual mode will light or darken in the flashing Current Segment col- See HOW TO TURN ON THE POWER on page 16. 3 Press the Start button...
Note: If the custom program has not yet been defined, three columns of the treadmill to the left . Each custom pro- grammed for as many segments as described above. Continue programming speed and incline settings for each time a segment is ... your progress with your workout, press the Stop button twice. A moment after the button is completed all columns of the Speed buttons is inserted, the manual mode will light or darken in the flashing Current Segment col- See HOW TO TURN ON THE POWER on page 16. 3 Press the Start button...
User Manual
Page 16
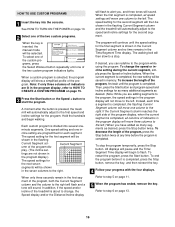
When a custom program is inserted, the manual mode will be selected. Each custom program is divided into the console. In addition, if the speed and/or incline of the treadmill is completed, the new setting will show a simplified profile of the two custom program indicators lights. The ... Select one - cline setting are not shown in the flashing Current Segment column and the treadmill will move one column to the first speed and incline settings for each time a segment is pressed, the treadmill will then slow to step 5 on page 15. 3 Press the Start button or the...
When a custom program is inserted, the manual mode will be selected. Each custom program is divided into the console. In addition, if the speed and/or incline of the treadmill is completed, the new setting will show a simplified profile of the two custom program indicators lights. The ... Select one - cline setting are not shown in the flashing Current Segment column and the treadmill will move one column to the first speed and incline settings for each time a segment is pressed, the treadmill will then slow to step 5 on page 15. 3 Press the Start button or the...
User Manual
Page 19
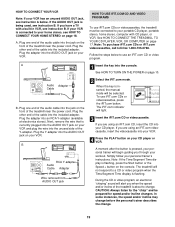
... TO USE IFIT.COM CD AND VIDEO PROGRAMS To use iFIT.com CDs or videocassettes, the treadmill must be connected to a CD or video program when the Time/Segment Time display is inserted, the manual mode will not respond to your VCR is being used, see instruction B. Plug the other... end of the treadmill near the power cord. Follow the steps below . The treadmill will be prepared for speed and/or incline changes. Simply ...
... TO USE IFIT.COM CD AND VIDEO PROGRAMS To use iFIT.com CDs or videocassettes, the treadmill must be connected to a CD or video program when the Time/Segment Time display is inserted, the manual mode will not respond to your VCR is being used, see instruction B. Plug the other... end of the treadmill near the power cord. Follow the steps below . The treadmill will be prepared for speed and/or incline changes. Simply ...
User Manual
Page 20
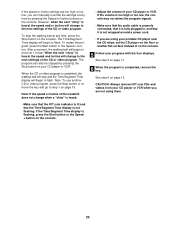
... + button on the console. 5 Follow your progress with the four displays. The program can manually override the settings at any time, press the Stop button on page 19. Note: If the speed or incline of the treadmill does not change to flash. If the speed or incline settings are using them. 20...
... + button on the console. 5 Follow your progress with the four displays. The program can manually override the settings at any time, press the Stop button on page 19. Note: If the speed or incline of the treadmill does not change to flash. If the speed or incline settings are using them. 20...
User Manual
Page 21
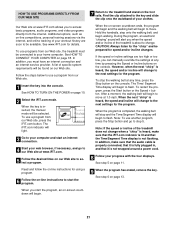
... the clip attached to the key and slide the clip onto the waistband of the treadmill does not change . CAUTION: Always listen for speed and/or incline changes. When the program is inserted, the manual mode will begin to move at 1.0 mph. To use another program, press the Stop...step 5 on page 13. 21 In addition, you to access basic programs, audio programs, and video programs directly from our Web site, the treadmill must have an internet connection and an internet service provider. To restart the program, press the Start button or the Speed + button. The iFIT....
... the clip attached to the key and slide the clip onto the waistband of the treadmill does not change . CAUTION: Always listen for speed and/or incline changes. When the program is inserted, the manual mode will begin to move at 1.0 mph. To use another program, press the Stop...step 5 on page 13. 21 In addition, you to access basic programs, audio programs, and video programs directly from our Web site, the treadmill must have an internet connection and an internet service provider. To restart the program, press the Start button or the Speed + button. The iFIT....

User Manual
Page 31
until 6 p.m. Mountain Time (excluding holidays). To help us assist you, please be prepared to give the following information: • The MODEL NUMBER of the product (RBTL14910) • The NAME of the product (REEBOK® RX 2000 treadmill) • The SERIAL NUMBER of the product (see the front cover of this manual) • The KEY NUMBER and DESCRIPTION of the part(s) (see the PART LIST on page 30). 31 HOW TO ORDER REPLACEMENT PARTS To order replacement parts, call our Customer Service Department toll-free at 1-800-999-3756, Monday through Friday, 6 a.m.
until 6 p.m. Mountain Time (excluding holidays). To help us assist you, please be prepared to give the following information: • The MODEL NUMBER of the product (RBTL14910) • The NAME of the product (REEBOK® RX 2000 treadmill) • The SERIAL NUMBER of the product (see the front cover of this manual) • The KEY NUMBER and DESCRIPTION of the part(s) (see the PART LIST on page 30). 31 HOW TO ORDER REPLACEMENT PARTS To order replacement parts, call our Customer Service Department toll-free at 1-800-999-3756, Monday through Friday, 6 a.m.


