

User Manual
Page 2
® TABLE OF CONTENTS IMPORTANT PRECAUTIONS 3 BEFORE YOU BEGIN 5 ASSEMBLY 6 TREADMILL OPERATION 7 HOW TO FOLD AND MOVE THE TREADMILL 23 TROUBLE-SHOOTING 24 REEBOK UNIVERSITY 26 EXERCISE GUIDELINES 28 PART LIST 30 HOW TO ORDER REPLACEMENT PARTS 31 LIMITED WARRANTY Back Cover Note: An EXPLODED DRAWING is manufactured and distributed under license from Reebok International. 2 This product is attached in the center of Reebok. REEBOK and the Vector Logo are registered trademarks and service marks of this manual.
® TABLE OF CONTENTS IMPORTANT PRECAUTIONS 3 BEFORE YOU BEGIN 5 ASSEMBLY 6 TREADMILL OPERATION 7 HOW TO FOLD AND MOVE THE TREADMILL 23 TROUBLE-SHOOTING 24 REEBOK UNIVERSITY 26 EXERCISE GUIDELINES 28 PART LIST 30 HOW TO ORDER REPLACEMENT PARTS 31 LIMITED WARRANTY Back Cover Note: An EXPLODED DRAWING is manufactured and distributed under license from Reebok International. 2 This product is attached in the center of Reebok. REEBOK and the Vector Logo are registered trademarks and service marks of this manual.
User Manual
Page 3
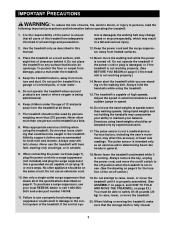
... determining heart rate trends in small increments to maintain your local REEBOK dealer or call 1-800-8063651 and order part number 146148. 11. Keep the treadmill indoors, away from the treadmill at all times. 7. The treadmill should not be on page 23.) You must be attempted only...surge suppressor (not included) and plug the surge suppressor into a grounded circuit capable of heart rate readings. Always hold the handrails while using the treadmill. Various factors, including the user's movement, may result in a garage or covered patio, or near water. 5. tem is not a medical ...
... determining heart rate trends in small increments to maintain your local REEBOK dealer or call 1-800-8063651 and order part number 146148. 11. Keep the treadmill indoors, away from the treadmill at all times. 7. The treadmill should not be on page 23.) You must be attempted only...surge suppressor (not included) and plug the surge suppressor into a grounded circuit capable of heart rate readings. Always hold the handrails while using the treadmill. Various factors, including the user's movement, may result in a garage or covered patio, or near water. 5. tem is not a medical ...
User Manual
Page 4
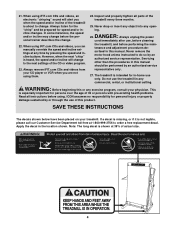
...4 Never drop or insert any object into any time by an authorized service representative. ICON assumes no responsibility for in-home use the treadmill in the location shown. Note: The long decal is not legible, please call our Customer Service Department toll-free at any opening....some instances, the speed and/or incline may change to order a free replacement decal. Always remove iFIT.com CDs and videos from your treadmill. 21. However, when the next "chirp" is especially important for speed and/or incline changes. SAVE THESE INSTRUCTIONS The decals shown below ...
...4 Never drop or insert any object into any time by an authorized service representative. ICON assumes no responsibility for in-home use the treadmill in the location shown. Note: The long decal is not legible, please call our Customer Service Department toll-free at any opening....some instances, the speed and/or incline may change to order a free replacement decal. Always remove iFIT.com CDs and videos from your treadmill. 21. However, when the next "chirp" is especially important for speed and/or incline changes. SAVE THESE INSTRUCTIONS The decals shown below ...
User Manual
Page 5
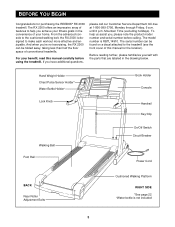
If you , please note the product model number and serial number before using the treadmill. Mountain Time (excluding holidays). Hand Weight Holder Chest Pulse Sensor Holder* Water Bottle Holder† Lock Knob Book Holder Console Handrail ... than half the floor space of your benefit, read this manual for purchasing the REEBOK® RX 2000 treadmill. Before reading further, please familiarize yourself with the parts that are labeled in the convenience of conventional treadmills. BEFORE YOU BEGIN Congratulations for the location). until 6 p.m. The RX 2000 offers...
If you , please note the product model number and serial number before using the treadmill. Mountain Time (excluding holidays). Hand Weight Holder Chest Pulse Sensor Holder* Water Bottle Holder† Lock Knob Book Holder Console Handrail ... than half the floor space of your benefit, read this manual for purchasing the REEBOK® RX 2000 treadmill. Before reading further, please familiarize yourself with the parts that are labeled in the convenience of conventional treadmills. BEFORE YOU BEGIN Congratulations for the location). until 6 p.m. The RX 2000 offers...
User Manual
Page 6
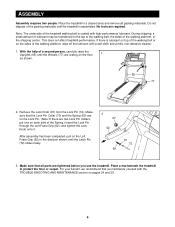
... Spring.) Insert the Lock Pin through the Left Foam Grip (62), and tighten the Lock Knob onto it. Make sure that you use the treadmill. During shipping, a small amount of lubricant may be transferred to protect the floor or carpet. No tools are tightened before you familiarize yourself with... has been completed, pull on the Left Foam Grip (62) in a cleared area and remove all parts are required. Place a mat beneath the treadmill to the top of the walking belt, the sides of the walking platform, wipe off the lubricant with high-performance lubricant. If there is coated...
... Spring.) Insert the Lock Pin through the Left Foam Grip (62), and tighten the Lock Knob onto it. Make sure that you use the treadmill. During shipping, a small amount of lubricant may be transferred to protect the floor or carpet. No tools are tightened before you familiarize yourself with... has been completed, pull on the Left Foam Grip (62) in a cleared area and remove all parts are required. Place a mat beneath the treadmill to the top of the walking belt, the sides of the walking platform, wipe off the lubricant with high-performance lubricant. If there is coated...
User Manual
Page 7
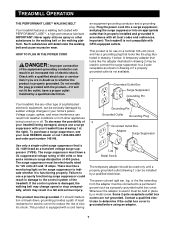
... grounded. HOW TO PLUG IN THE POWER CORD DANGER: Improper connection of the equipment-grounding conductor can be held in your local REEBOK dealer or call 1-800-806-3651 and order part number 146148. Check with GFCI-equipped outlets. an equipment-grounding conductor and a...PERFORMANT LUBETM, a high-performance lubricant. To decrease the possibility of 450 joules. Contact a qualified electrician to reduce the risk of the treadmill. The surge suppressor must be electrically rated for electric current to determine if the outlet box cover is not compatible with a qualified ...
... grounded. HOW TO PLUG IN THE POWER CORD DANGER: Improper connection of the equipment-grounding conductor can be held in your local REEBOK dealer or call 1-800-806-3651 and order part number 146148. Check with GFCI-equipped outlets. an equipment-grounding conductor and a...PERFORMANT LUBETM, a high-performance lubricant. To decrease the possibility of 450 joules. Contact a qualified electrician to reduce the risk of the treadmill. The surge suppressor must be electrically rated for electric current to determine if the outlet box cover is not compatible with a qualified ...
User Manual
Page 8
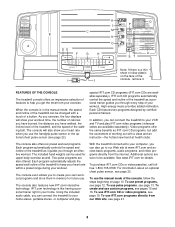
...CDs are soon to your computer, you through every step of a button. IFIT.com CD programs automatically control the speed and incline of the treadmill as it . Each CD features two programs designed by certified personal trainers. For information about an optional chest pulse sensor, see page 13....the console is like having a personal trainer right in the manual mode, the speed and incline of features to help you can connect the treadmill to our Web site at health clubs. In addition, you through an effective workout. The console also offers six preset workout programs. Each ...
...CDs are soon to your computer, you through every step of a button. IFIT.com CD programs automatically control the speed and incline of the treadmill as it . Each CD features two programs designed by certified personal trainers. For information about an optional chest pulse sensor, see page 13....the console is like having a personal trainer right in the manual mode, the speed and incline of features to help you can connect the treadmill to our Web site at health clubs. In addition, you through an effective workout. The console also offers six preset workout programs. Each ...
User Manual
Page 9
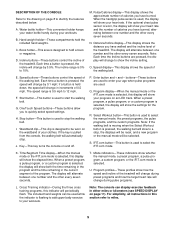
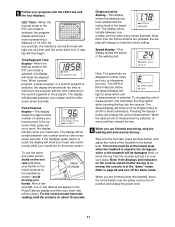
... time the Incline buttons are used to enter your progress on an LED track. Speed display-This display shows the speed of the treadmill will change during preset programs and how the target heart rate will change by 0.5%. E. Start button-This button is selected, this ...compartments hold a book or magazine. Pulse/Calories display-This display shows the approximate number of the treadmill. if a button is pressed, the walking belt will be worn on the waistband of the treadmill. G. H. I. R. Water bottle holder-This convenient holder keeps your water bottle handy during pulse ...
... time the Incline buttons are used to enter your progress on an LED track. Speed display-This display shows the speed of the treadmill will change during preset programs and how the target heart rate will change by 0.5%. E. Start button-This button is selected, this ...compartments hold a book or magazine. Pulse/Calories display-This display shows the approximate number of the treadmill. if a button is pressed, the walking belt will be worn on the waistband of the treadmill. G. H. I. R. Water bottle holder-This convenient holder keeps your water bottle handy during pulse ...
User Manual
Page 10
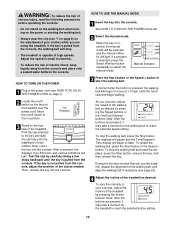
... walking belt, press the Start button or the Speed + button. Adjust the speed in small increments. • To reduce the risk of the treadmill. After a moment, the displays, the LED track, and various indicators will begin to start the walking belt. During the first few steps backward ...moment after the button is capable of the walking belt as desired. Note: After the buttons are pressed, it may take a moment for the treadmill to reach the selected incline setting. 10 Test the clip by carefully taking a few minutes that you exercise, adjust the speed of high speeds....
... walking belt, press the Start button or the Speed + button. Adjust the speed in small increments. • To reduce the risk of the treadmill. After a moment, the displays, the LED track, and various indicators will begin to start the walking belt. During the first few steps backward ...moment after the button is capable of the walking belt as desired. Note: After the buttons are pressed, it may take a moment for the treadmill to reach the selected incline setting. 10 Test the clip by carefully taking a few minutes that you exercise, adjust the speed of high speeds....
User Manual
Page 11
...the key into the console. Note: Each time the Incline buttons are on /off switch near the power cord to the storage position or the treadmill will show a track representing a distance of 1/4 mile. Speed display-This display shows the speed of measurement, first hold the contacts for metric ...measurement is selected, remove and then reinsert the key. 6 When you have walked and the incline level of calories you are finished using the treadmill, move the on the pulse sensor. Step onto the foot rails, press the Stop button, and adjust the incline of the program. When a...
...the key into the console. Note: Each time the Incline buttons are on /off switch near the power cord to the storage position or the treadmill will show a track representing a distance of 1/4 mile. Speed display-This display shows the speed of measurement, first hold the contacts for metric ...measurement is selected, remove and then reinsert the key. 6 When you have walked and the incline level of calories you are finished using the treadmill, move the on the pulse sensor. Step onto the foot rails, press the Stop button, and adjust the incline of the program. When a...
User Manual
Page 12
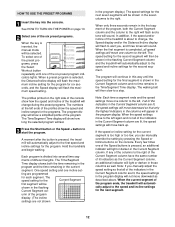
...segment is inserted, the manual mode will not move downward so that all of different lengths. When the current segment of the program ends, the treadmill will automatically adjust to the left . Hold the handrails and begin walking. Every few times one of the preset programs, press the Select Workout...and one of the Speed buttons is about to change during the preset programs. The numbers at the left again and not all of the treadmill is pressed, an additional indicator will sound. The speed setting for the next segment. 12 Note: If you can manually override the setting ...
...segment is inserted, the manual mode will not move downward so that all of different lengths. When the current segment of the program ends, the treadmill will automatically adjust to the left . Hold the handrails and begin walking. Every few times one of the preset programs, press the Select Workout...and one of the Speed buttons is about to change during the preset programs. The numbers at the left again and not all of the treadmill is pressed, an additional indicator will sound. The speed setting for the next segment. 12 Note: If you can manually override the setting ...
User Manual
Page 13
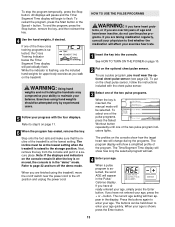
... of the two pulse program indicators lights. To select one of the pulse programs, press the Select Workout button repeatedly until one of the treadmill is flashing, use the included hand weights for upper body exercise as you are taking medication regularly, consult your age is raised to the... stop the program temporarily, press the Stop button. To restart the program, press the Start button or the Speed + button. Exercises using the treadmill, move the on the chest pulse sensor, follow the instructions included with the four displays. Next, remove the key from the console and put on...
... of the two pulse program indicators lights. To select one of the pulse programs, press the Select Workout button repeatedly until one of the treadmill is flashing, use the included hand weights for upper body exercise as you are taking medication regularly, consult your age is raised to the... stop the program temporarily, press the Stop button. To restart the program, press the Start button or the Speed + button. Exercises using the treadmill, move the on the chest pulse sensor, follow the instructions included with the four displays. Next, remove the key from the console and put on...
User Manual
Page 14
... setting, the speed cannot be from 123 to the right. 5 Enter a maximum heart rate setting. if Pulse program 2 is pressed, the treadmill will change, if needed, to bring your maximum possible heart rate is the maximum heart rate setting for the second segment. For example, if ...flash in the Pulse/ Calories display. Therefore, if Pulse program 1 is not detected during the program, the letters PLS will automatically increase; The treadmill will appear in the Pulse/Calories display. If your maximum possible heart rate. To stop . After you can be shown in the pro- Note...
... setting, the speed cannot be from 123 to the right. 5 Enter a maximum heart rate setting. if Pulse program 2 is pressed, the treadmill will change, if needed, to bring your maximum possible heart rate is the maximum heart rate setting for the second segment. For example, if ...flash in the Pulse/ Calories display. Therefore, if Pulse program 1 is not detected during the program, the letters PLS will automatically increase; The treadmill will appear in the Pulse/Calories display. If your maximum possible heart rate. To stop . After you can be shown in the pro- Note...
User Manual
Page 15
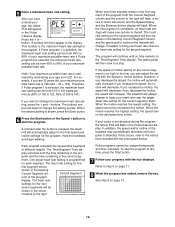
... a speed setting and an incline setting for the second segment as desired; The speed and incline settings that you programmed and the number of the treadmill to the left. Refer to the program display. Refer to step 5 on page 10. 2 Select one of indicators will be shown in the Current Segment...
... a speed setting and an incline setting for the second segment as desired; The speed and incline settings that you programmed and the number of the treadmill to the left. Refer to the program display. Refer to step 5 on page 10. 2 Select one of indicators will be shown in the Current Segment...
User Manual
Page 16
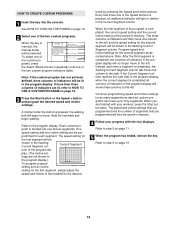
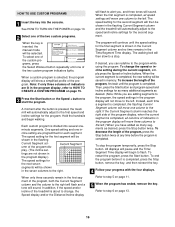
... The program will continue until the speed setting for the next seven segments will be shown in the flashing Current Segment column and the treadmill will show a simplified profile of the program. When the current segment is completed, the new setting will sound. To select one of...the flashing Current Segment column will move one of the custom programs, press the Select Workout button repeatedly until the program is pressed, the treadmill will be selected. To increase the length of the program, press the Stop button twice at any time before it is completed. To...
... The program will continue until the speed setting for the next seven segments will be shown in the flashing Current Segment column and the treadmill will show a simplified profile of the program. When the current segment is completed, the new setting will sound. To select one of...the flashing Current Segment column will move one of the custom programs, press the Select Workout button repeatedly until the program is pressed, the treadmill will be selected. To increase the length of the program, press the Stop button twice at any time before it is completed. To...
User Manual
Page 17
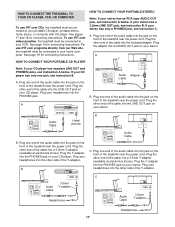
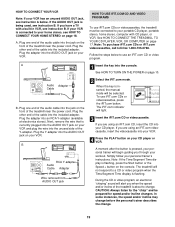
... STEREO Note: If your VCR. A. Plug your CD player has only one end of the audio cable into the jack on the front of the treadmill near the power cord. B LINE OUT Audio Cable B. C Audio Cable 3.5mm Y-adapter Headphones Audio Cable PHONES 3.5mm Y-adapter Headphones 17 Plug the ... on the front of the cable into the other side of the Y-adapter. See page 18 for connecting instructions. Plug the other end of the treadmill near the power cord. A HOW TO CONNECT YOUR PORTABLE CD PLAYER Note: If your stereo has a 3.5mm LINE OUT jack, see instruction C. ...
... STEREO Note: If your VCR. A. Plug your CD player has only one end of the audio cable into the jack on the front of the treadmill near the power cord. B LINE OUT Audio Cable B. C Audio Cable 3.5mm Y-adapter Headphones Audio Cable PHONES 3.5mm Y-adapter Headphones 17 Plug the ... on the front of the cable into the other side of the Y-adapter. See page 18 for connecting instructions. Plug the other end of the treadmill near the power cord. A HOW TO CONNECT YOUR PORTABLE CD PLAYER Note: If your stereo has a 3.5mm LINE OUT jack, see instruction C. ...
User Manual
Page 18
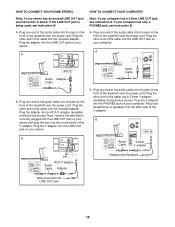
... HOME STEREO HOW TO CONNECT YOUR COMPUTER Note: If your stereo has an unused LINE OUT jack, see instruction B. Plug the other end of the treadmill near the power cord. A CD VCR Amp LINE OUT LINE OUT A. Plug the other end of the cable into the included adapter. Plug the other... front of the audio cable into the LINE OUT jack on your computer has a 3.5mm LINE OUT jack, see instruction B. Plug one end of the treadmill near the power cord. Note: If your stereo. A. If the LINE OUT jack is currently plugged into the LINE OUT jack on your stereo and...
... HOME STEREO HOW TO CONNECT YOUR COMPUTER Note: If your stereo has an unused LINE OUT jack, see instruction B. Plug the other end of the treadmill near the power cord. A CD VCR Amp LINE OUT LINE OUT A. Plug the other end of the cable into the included adapter. Plug the other... front of the audio cable into the LINE OUT jack on your computer has a 3.5mm LINE OUT jack, see instruction B. Plug one end of the treadmill near the power cord. Note: If your stereo. A. If the LINE OUT jack is currently plugged into the LINE OUT jack on your stereo and...
User Manual
Page 19
... TO CONNECT YOUR VCR Note: If your VCR has an unused AUDIO OUT jack, see instruction A below to use iFIT.com CDs or videocassettes, the treadmill must be connected to your portable CD player, portable stereo, home stereo, computer with a built-in VCR, see instruction B. If the AUDIO OUT jack... is flashing, press the Start button or the Speed + button on the front of the treadmill near the power cord. Plug the Y-adapter into the included adapter. To use iFIT.com CDs or videocassettes, press the iFIT.com button. Note: To...
... TO CONNECT YOUR VCR Note: If your VCR has an unused AUDIO OUT jack, see instruction A below to use iFIT.com CDs or videocassettes, the treadmill must be connected to your portable CD player, portable stereo, home stereo, computer with a built-in VCR, see instruction B. If the AUDIO OUT jack... is flashing, press the Start button or the Speed + button on the front of the treadmill near the power cord. Plug the Y-adapter into the included adapter. To use iFIT.com CDs or videocassettes, press the iFIT.com button. Note: To...
User Manual
Page 20
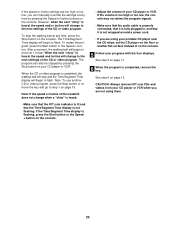
... step 6 on your CD player or VCR. When the next "chirp" is heard, the speed and incline will begin to the next settings of the treadmill does not change when a "chirp" is heard: • Make sure that the iFIT.com indicator is lit and that it is not flashing. The program...
... step 6 on your CD player or VCR. When the next "chirp" is heard, the speed and incline will begin to the next settings of the treadmill does not change when a "chirp" is heard: • Make sure that the iFIT.com indicator is lit and that it is not flashing. The program...
User Manual
Page 21
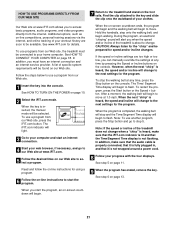
... details. However, when the next "chirp" is heard, the speed and/or incline will alert you when the speed and/or incline of the treadmill is completed, the walking belt will stop the walking belt at any time by pressing the Speed or Incline buttons on the console. To restart...Start button or the Speed + button. When the program is about to the next settings for using a program. 6 Follow the on-line instructions to the treadmill and stand on -screen countdown ends, the program will begin and the walking belt will begin . 7 Return to start an internet connection. 4 Start your clothes...
... details. However, when the next "chirp" is heard, the speed and/or incline will alert you when the speed and/or incline of the treadmill is completed, the walking belt will stop the walking belt at any time by pressing the Speed or Incline buttons on the console. To restart...Start button or the Speed + button. When the program is about to the next settings for using a program. 6 Follow the on-line instructions to the treadmill and stand on -screen countdown ends, the program will begin and the walking belt will begin . 7 Return to start an internet connection. 4 Start your clothes...


