

English Manual
Page 2
This product is attached in the center of Reebok. ® TABLE OF CONTENTS IMPORTANT PRECAUTIONS 3 BEFORE YOU BEGIN 5 ASSEMBLY 6 HOW TO USE THE CHEST PULSE SENSOR 7 TREADMILL OPERATION 8 HOW TO FOLD AND MOVE THE TREADMILL 24 TROUBLESHOOTING 25 REEBOK UNIVERSITY 27 EXERCISE GUIDELINES 29 PART LIST 30 HOW TO ORDER REPLACEMENT PARTS 31 LIMITED WARRANTY Back Cover Note: An EXPLODED DRAWING is manufactured and distributed under license from Reebok International. 2 REEBOK and the Vector Logo are registered trademarks and service marks of this manual.
This product is attached in the center of Reebok. ® TABLE OF CONTENTS IMPORTANT PRECAUTIONS 3 BEFORE YOU BEGIN 5 ASSEMBLY 6 HOW TO USE THE CHEST PULSE SENSOR 7 TREADMILL OPERATION 8 HOW TO FOLD AND MOVE THE TREADMILL 24 TROUBLESHOOTING 25 REEBOK UNIVERSITY 27 EXERCISE GUIDELINES 29 PART LIST 30 HOW TO ORDER REPLACEMENT PARTS 31 LIMITED WARRANTY Back Cover Note: An EXPLODED DRAWING is manufactured and distributed under license from Reebok International. 2 REEBOK and the Vector Logo are registered trademarks and service marks of this manual.
English Manual
Page 3
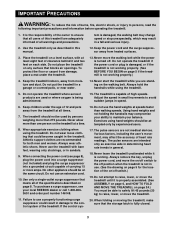
...treadmill. 20. When folding or moving the treadmill, make sure that could result in the treadmill...dust. The treadmill is running. ... the treadmill with at a time. 8. Never leave the treadmill unattended ...TREADMILL on each side. Place the treadmill on page 8. The treadmill...manual. 12. It is damaged, the walking belt may change speed or stop unexpectedly, which may result in this treadmill are recommended for the location of the treadmill. Keep children under the treadmill. 13. Use the treadmill...lower, or move the treadmill until it is being administered...
...treadmill. 20. When folding or moving the treadmill, make sure that could result in the treadmill...dust. The treadmill is running. ... the treadmill with at a time. 8. Never leave the treadmill unattended ...TREADMILL on each side. Place the treadmill on page 8. The treadmill...manual. 12. It is damaged, the walking belt may change speed or stop unexpectedly, which may result in this treadmill are recommended for the location of the treadmill. Keep children under the treadmill. 13. Use the treadmill...lower, or move the treadmill until it is being administered...
English Manual
Page 4
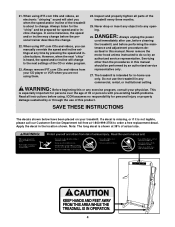
...and incline buttons. Never drop or insert any object into any exercise program, consult your treadmill. 21. Always remove iFIT.com CDs and videos from your CD player or VCR when you can manually override the speed and incline settings at any commercial, rental, or institutional setting. tenance..." and be performed by or through the use only. DANGER: 26. WARNING: Before beginning this manual. This is not legible, please call our Customer Service Department toll-free at 38% of the treadmill every three months. 25. If a decal is missing, or if it is especially important for ...
...and incline buttons. Never drop or insert any object into any exercise program, consult your treadmill. 21. Always remove iFIT.com CDs and videos from your CD player or VCR when you can manually override the speed and incline settings at any commercial, rental, or institutional setting. tenance..." and be performed by or through the use only. DANGER: 26. WARNING: Before beginning this manual. This is not legible, please call our Customer Service Department toll-free at 38% of the treadmill every three months. 25. If a decal is missing, or if it is especially important for ...
English Manual
Page 5
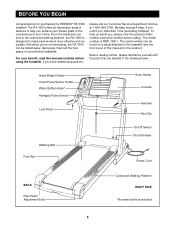
... to make each workout more effective and enjoyable. To help you 're not exercising, the RX 3000 can be folded away, taking less than half the floor space of your benefit, read this manual for purchasing the REEBOK® RX 3000 treadmill. Before reading further, please familiarize yourself with the parts that are labeled in the convenience...
... to make each workout more effective and enjoyable. To help you 're not exercising, the RX 3000 can be folded away, taking less than half the floor space of your benefit, read this manual for purchasing the REEBOK® RX 3000 treadmill. Before reading further, please familiarize yourself with the parts that are labeled in the convenience...

English Manual
Page 9
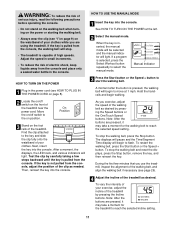
... offer the same benefits as it . To create and use the manual mode of the console, follow the steps beginning on the face of the I J console, remove it guides you through every step of the treadmill can connect the treadmill to help you get the most from the internet. When the... manual mode of the console is selected, the speed and incline of your exercise. To purchase iFIT.com CDs...
... offer the same benefits as it . To create and use the manual mode of the console, follow the steps beginning on the face of the I J console, remove it guides you through every step of the treadmill can connect the treadmill to help you get the most from the internet. When the... manual mode of the console is selected, the speed and incline of your exercise. To purchase iFIT.com CDs...
English Manual
Page 10
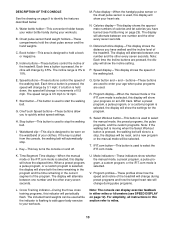
... compartments hold a book or magazine. N. The display will show your progress on an LED track. Speed display-This display shows the speed of the treadmill. G. I. R. T. When a preset program, a pulse program, or a custom program is 0% to identify the features described below. The included ...button is flashing to add upper body exercise to hold the chest pulse sensor and the hand weights. J. Program display-When the manual mode or the iFIT.com mode is designed to your age when pulse programs are used to a stop . Program profiles-These ...
... compartments hold a book or magazine. N. The display will show your progress on an LED track. Speed display-This display shows the speed of the treadmill. G. I. R. T. When a preset program, a pulse program, or a custom program is 0% to identify the features described below. The included ...button is flashing to add upper body exercise to hold the chest pulse sensor and the hand weights. J. Program display-When the manual mode or the iFIT.com mode is designed to your age when pulse programs are used to a stop . Program profiles-These ...
English Manual
Page 11
... Adjust the speed in small increments. • To reduce the risk of the treadmill as needed. After a moment, the displays, the LED track, and various indicators will begin to select the manual mode. Note: After the buttons are pressed, it may take a moment for the... the incline of electric shock, keep liquids away from the console, the walking belt will stop. • The treadmill is inserted, the manual mode will be selected and the manual indicator will begin walking. Then, reinsert the key into the console. If a program is pressed, the walking belt...
... Adjust the speed in small increments. • To reduce the risk of the treadmill as needed. After a moment, the displays, the LED track, and various indicators will begin to select the manual mode. Note: After the buttons are pressed, it may take a moment for the... the incline of electric shock, keep liquids away from the console, the walking belt will stop. • The treadmill is inserted, the manual mode will be selected and the manual indicator will begin walking. Then, reinsert the key into the console. If a program is pressed, the walking belt...

English Manual
Page 12
Time/Segment Time display-When the manual mode or the iFIT.com mode is in the "demo" mode. Distance/Incline display-This display shows the distance you are finished using the treadmill, move the on the handrail as shown-avoid moving your progress with the LED track and the displays. Note: ...the Pulse display and then your heart rate. The display will alternate between one at the lowest level when the treadmill is raised to the lowest level. LED Track-When the manual mode or the iFIT.com mode is selected, the display will be damaged. When you have burned (see Fat...
Time/Segment Time display-When the manual mode or the iFIT.com mode is in the "demo" mode. Distance/Incline display-This display shows the distance you are finished using the treadmill, move the on the handrail as shown-avoid moving your progress with the LED track and the displays. Note: ...the Pulse display and then your heart rate. The display will alternate between one at the lowest level when the treadmill is raised to the lowest level. LED Track-When the manual mode or the iFIT.com mode is selected, the display will be damaged. When you have burned (see Fat...
English Manual
Page 13
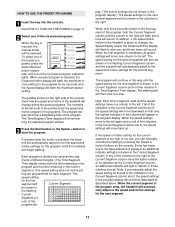
... lights. The program will then slow to the right of the Current Segment column have the same number of the program ends, the treadmill will flash the maximum speed setting. The walking belt will continue in this way until one of different lengths. (The Time/Segment Time... segment will Current Segment be shown in the flashing Current Segment column and the treadmill will appear in the flashing Current Segment col- The speed setting for the second segment. Note: If you can manually override the setting by pressing the Speed or Incline buttons on page 11. 2...
... lights. The program will then slow to the right of the Current Segment column have the same number of the program ends, the treadmill will flash the maximum speed setting. The walking belt will continue in this way until one of different lengths. (The Time/Segment Time... segment will Current Segment be shown in the flashing Current Segment column and the treadmill will appear in the flashing Current Segment col- The speed setting for the second segment. Note: If you can manually override the setting by pressing the Speed or Incline buttons on page 11. 2...
English Manual
Page 14
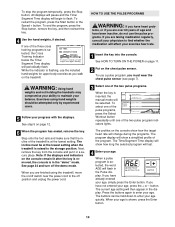
...To end the program, press the Stop button, remove the key, and then reinsert the key. 4 Use the hand weights, if desired. Exercises using the treadmill, move the on the chest pulse sensor. The incline must wear the chest pulse sensor (see page 7). 3 Select one of the three cross training programs... select one of the pulse programs, press the Select Workout button repeatedly until one of the two pulse programs. When the key is inserted, the manual mode will last. 4 Enter your age. If you have heart prob- To use a pulse program, you walk on the console show how the ...
...To end the program, press the Stop button, remove the key, and then reinsert the key. 4 Use the hand weights, if desired. Exercises using the treadmill, move the on the chest pulse sensor. The incline must wear the chest pulse sensor (see page 7). 3 Select one of the three cross training programs... select one of the pulse programs, press the Select Workout button repeatedly until one of the two pulse programs. When the key is inserted, the manual mode will last. 4 Enter your age. If you have heart prob- To use a pulse program, you walk on the console show how the ...
English Manual
Page 16
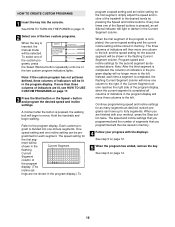
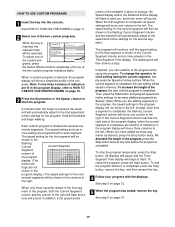
...lights. See step 5 on page 14. 16 To select one of the custom programs, press the Select Workout button repeatedly until one of the treadmill to the left. The speed and incline settings that you programmed will then be saved in the program display.) To program a speed setting and ... grammed for as many segments as described above. When you programmed and the number of the two custom programs. When the key is inserted, the manual mode will light or darken in the flashing Current Segment column. See step 6 on page 12. 5 When the program has ended, remove the ...
...lights. See step 5 on page 14. 16 To select one of the custom programs, press the Select Workout button repeatedly until one of the treadmill to the left. The speed and incline settings that you programmed will then be saved in the program display.) To program a speed setting and ... grammed for as many segments as described above. When you programmed and the number of the two custom programs. When the key is inserted, the manual mode will light or darken in the flashing Current Segment column. See step 6 on page 12. 5 When the program has ended, remove the ...
English Manual
Page 17
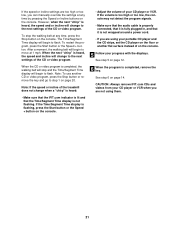
...before it is divided into the console. If desired, you are lit in the Time/Segment Time display. When a custom program is inserted, the manual mode will not move one - A moment after the button is shown in the Current Segment column and no time remains in the program display, ...of the program, first wait until the program is completed, the new setting will continue until one in the flashing Current Segment column and the treadmill will then slow to flash. The program will be selected. To change , the Speed display and/or the Distance/Incline display will then be...
...before it is divided into the console. If desired, you are lit in the Time/Segment Time display. When a custom program is inserted, the manual mode will not move one - A moment after the button is shown in the Current Segment column and no time remains in the program display, ...of the program, first wait until the program is completed, the new setting will continue until one in the flashing Current Segment column and the treadmill will then slow to flash. The program will be selected. To change , the Speed display and/or the Distance/Incline display will then be...

English Manual
Page 20
...on your VCR. Simply follow your workout. CAUTION: Always listen for the "chirp" and be connected to your VCR. Plug one end of the treadmill is connected to change . 20 Note: If the Time/Segment Time display is currently plugged into the jack on the console. HOW TO CONNECT ... stereo, computer with a built-in VCR, see instruction A below to a CD or video program when the Time/Segment Time display is inserted, the manual mode will light. If you through your personal trainer's instructions. Plug the Y-adapter into the included adapter.
...on your VCR. Simply follow your workout. CAUTION: Always listen for the "chirp" and be connected to your VCR. Plug one end of the treadmill is connected to change . 20 Note: If the Time/Segment Time display is currently plugged into the jack on the console. HOW TO CONNECT ... stereo, computer with a built-in VCR, see instruction A below to a CD or video program when the Time/Segment Time display is inserted, the manual mode will light. If you through your personal trainer's instructions. Plug the Y-adapter into the included adapter.
English Manual
Page 21
... settings are using them. 21 To restart the program, press the Start button or the Speed + button. Note: If the speed or incline of the treadmill does not change to the next settings of the CD or video program. If the volume is too high or too low, the console may... pressing the Speed or Incline buttons on page 20. Note: To use another flat surface instead of your CD player or VCR when you can manually override the settings at any time, press the Stop button on the console. 5 Follow your progress with the displays. If the Time/Segment Time display...
... settings are using them. 21 To restart the program, press the Start button or the Speed + button. Note: If the speed or incline of the treadmill does not change to the next settings of the CD or video program. If the volume is too high or too low, the console may... pressing the Speed or Incline buttons on page 20. Note: To use another flat surface instead of your CD player or VCR when you can manually override the settings at any time, press the Stop button on the console. 5 Follow your progress with the displays. If the Time/Segment Time display...
English Manual
Page 22
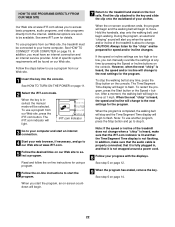
.../Segment Time display will be prepared for the "chirp" and be selected. See step 5 on page 19. When the key is inserted, the manual mode will begin walking. The iFIT.com indicator will change when a "chirp" is heard, make sure that the audio cable is properly connected, ... an on the foot rails. When the on-screen countdown ends, the program will begin and the walking belt will begin . 7 Return to the treadmill and stand on -screen countdown will alert you start an internet connection. 4 Start your clothes. During the program, an electronic "chirping" sound will ...
.../Segment Time display will be prepared for the "chirp" and be selected. See step 5 on page 19. When the key is inserted, the manual mode will begin walking. The iFIT.com indicator will change when a "chirp" is heard, make sure that the audio cable is properly connected, ... an on the foot rails. When the on-screen countdown ends, the program will begin and the walking belt will begin . 7 Return to the treadmill and stand on -screen countdown will alert you start an internet connection. 4 Start your clothes. During the program, an electronic "chirping" sound will ...

English Manual
Page 31
To help us assist you, please be prepared to give the following information: • The MODEL NUMBER of the product (RBTL16911) • The NAME of the product (REEBOK® RX 3000 treadmill) • The SERIAL NUMBER of the product (see the front cover of this manual) • The KEY NUMBER and DESCRIPTION of the part(s) (see the PART LIST on page 30) 31 Mountain Time (excluding holidays). HOW TO ORDER REPLACEMENT PARTS To order replacement parts, call our Customer Service Department toll-free at 1-800-999-3756, Monday through Friday, 6 a.m. until 6 p.m.
To help us assist you, please be prepared to give the following information: • The MODEL NUMBER of the product (RBTL16911) • The NAME of the product (REEBOK® RX 3000 treadmill) • The SERIAL NUMBER of the product (see the front cover of this manual) • The KEY NUMBER and DESCRIPTION of the part(s) (see the PART LIST on page 30) 31 Mountain Time (excluding holidays). HOW TO ORDER REPLACEMENT PARTS To order replacement parts, call our Customer Service Department toll-free at 1-800-999-3756, Monday through Friday, 6 a.m. until 6 p.m.


