
English Manual
Page 1
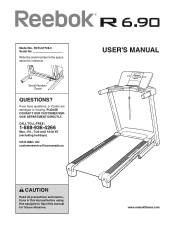
RCTL67708.0 Serial No. Save this equipment. If you have questions, or if parts are damaged or missing, PLEASE CONTACT OUR CUSTOMER SERVICE DEPARTMENT DIRECTLY. Model No. Serial Number Decal QUESTIONS? www.reebokfitness.com Write the serial number in this manual before using this manual for reference. CALL TOLL-FREE: 1-888-936-4266 Mon.-Fri., 7:30 until 16:30 ET (excluding holidays) OR E-MAIL US: [email protected] USER'S MANUAL CAUTION Read all precautions and instructions in the space above for future reference.
RCTL67708.0 Serial No. Save this equipment. If you have questions, or if parts are damaged or missing, PLEASE CONTACT OUR CUSTOMER SERVICE DEPARTMENT DIRECTLY. Model No. Serial Number Decal QUESTIONS? www.reebokfitness.com Write the serial number in this manual before using this manual for reference. CALL TOLL-FREE: 1-888-936-4266 Mon.-Fri., 7:30 until 16:30 ET (excluding holidays) OR E-MAIL US: [email protected] USER'S MANUAL CAUTION Read all precautions and instructions in the space above for future reference.

English Manual
Page 2
...Vector Logo are registered trademarks and service marks of the warning decals. iPod® is manufactured and distributed under license from Reebok International. and other countries. Apply the decal in the U.S. iPod® is missing or illegible, see the front cover...PRECAUTIONS 3 BEFORE YOU BEGIN 5 ASSEMBLY 6 OPERATION AND ADJUSTMENT 12 HOW TO FOLD AND MOVE THE TREADMILL 21 TROUBLESHOOTING 22 EXERCISE GUIDELINES 25 PART LIST 26 EXPLODED DRAWING 28 ORDERING REPLACEMENT PARTS Back Cover LIMITED WARRANTY Back Cover WARNING DECAL PLACEMENT This drawing shows the locations of...
...Vector Logo are registered trademarks and service marks of the warning decals. iPod® is manufactured and distributed under license from Reebok International. and other countries. Apply the decal in the U.S. iPod® is missing or illegible, see the front cover...PRECAUTIONS 3 BEFORE YOU BEGIN 5 ASSEMBLY 6 OPERATION AND ADJUSTMENT 12 HOW TO FOLD AND MOVE THE TREADMILL 21 TROUBLESHOOTING 22 EXERCISE GUIDELINES 25 PART LIST 26 EXPLODED DRAWING 28 ORDERING REPLACEMENT PARTS Back Cover LIMITED WARRANTY Back Cover WARNING DECAL PLACEMENT This drawing shows the locations of...

English Manual
Page 4
...in use this manual. Do not attempt to do so by an authorized service representative only. 26. nance and adjustment procedures described in this treadmill in a commercial, rental, or institutional setting. 27. Servicing other than the procedures in this manual should be able to safely lift 45 ... object into any opening on page 5 for in the storage position. 23. vice representative. Inspect and properly tighten all parts of the circuit breaker.) 21. This treadmill is not in serious injury or death. Always remove the key, unplug the power cord, and switch the reset/off ...
...in use this manual. Do not attempt to do so by an authorized service representative only. 26. nance and adjustment procedures described in this treadmill in a commercial, rental, or institutional setting. 27. Servicing other than the procedures in this manual should be able to safely lift 45 ... object into any opening on page 5 for in the storage position. 23. vice representative. Inspect and properly tighten all parts of the circuit breaker.) 21. This treadmill is not in serious injury or death. Always remove the key, unplug the power cord, and switch the reset/off ...
English Manual
Page 5
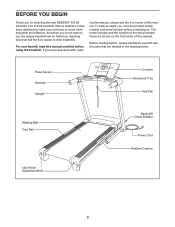
... us . And when you for selecting the new REEBOK® R 6.90 treadmill. For your workouts at home more enjoyable and effective. The model number and the location of this manual. Before reading further, please familiarize yourself with the parts that are shown on the front cover of the ...serial number decal are labeled in the drawing below. ing this manual, please see the front cover of features designed to make your benefit, read - The R 6.90 treadmill offers a selection of this manual...
... us . And when you for selecting the new REEBOK® R 6.90 treadmill. For your workouts at home more enjoyable and effective. The model number and the location of this manual. Before reading further, please familiarize yourself with the parts that are shown on the front cover of the ...serial number decal are labeled in the drawing below. ing this manual, please see the front cover of features designed to make your benefit, read - The R 6.90 treadmill offers a selection of this manual...
English Manual
Page 6
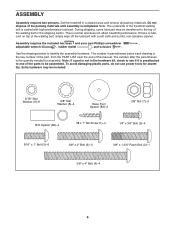
... not in parentheses below to see if it is the key number of the part, from the PART LIST near the end of the packing materials until assembly is normal and does not affect treadmill performance. Do not dispose of this manual. The number in the hardware kit, check to... identify the assembly hardware. Set the treadmill in a cleared area and remove all packing materials. This...
... not in parentheses below to see if it is the key number of the part, from the PART LIST near the end of the packing materials until assembly is normal and does not affect treadmill performance. Do not dispose of this manual. The number in the hardware kit, check to... identify the assembly hardware. Set the treadmill in a cleared area and remove all packing materials. This...

English Manual
Page 11
...92 Wire 12 3. Raise the Frame (52) to pinch the wires. Lower the Frame (52) (see HOW TO LOWER THE TREADMILL FOR USE on the treadmill decals, remove the plastic. Hold the receiver so the antenna is oriented as shown and is completed. Be careful not to the position... before you purchase the optional chest pulse sensor (see pages 23 and 24). To protect the floor or carpet, place a mat under the treadmill. Make sure that all parts are in a secure place; Attach the receiver to the Base (84) with a 3/8" x 2" Bolt (6) and a 3/8" Nut (7). Make sure that the ...
...92 Wire 12 3. Raise the Frame (52) to pinch the wires. Lower the Frame (52) (see HOW TO LOWER THE TREADMILL FOR USE on the treadmill decals, remove the plastic. Hold the receiver so the antenna is oriented as shown and is completed. Be careful not to the position... before you purchase the optional chest pulse sensor (see pages 23 and 24). To protect the floor or carpet, place a mat under the treadmill. Make sure that all parts are in a secure place; Attach the receiver to the Base (84) with a 3/8" x 2" Bolt (6) and a 3/8" Nut (7). Make sure that the ...

English Manual
Page 25
Remember, proper nutrition and adequate rest are rounded off to make exercise a regular and enjoyable part of rest between workouts. You can use stored fat calories for longer than 20 minutes.) Breathe regularly and deeply as an exercise aid in determining ...
Remember, proper nutrition and adequate rest are rounded off to make exercise a regular and enjoyable part of rest between workouts. You can use stored fat calories for longer than 20 minutes.) Breathe regularly and deeply as an exercise aid in determining ...
English Manual
Page 26
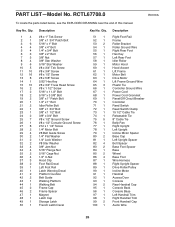
RCTL67708.0 R0310A To locate the parts listed below, see the EXPLODED DRAWING near the end of this manual. Qty. 1 4 2 1 3 6 4 4 5 4 6 3 7 3 ... Platform Cushion Belt Guide Walking Platform Walking Belt Frame Cap Frame Spacer Magnet Latch Cap Storage Latch French Latch Decal Key No. Key No. PART LIST-Model No. Qty. 51 1 52 1 53 2 54 1 55 1 56 1 57 1 58 1 59 1 60 1... 74 1 75 5 76 1 77 1 78 1 79 1 80 2 81 1 82 4 83 2 84 1 85 2 86 4 87 1 88 1 89 1 90 1 91 1 92 1 93 1 94 2 95 1 96 1 97 1 98 1 99 2 100 1 Description Right Foot Rail Frame Roller Bracket Roller Ground Wire Right Rear...
RCTL67708.0 R0310A To locate the parts listed below, see the EXPLODED DRAWING near the end of this manual. Qty. 1 4 2 1 3 6 4 4 5 4 6 3 7 3 ... Platform Cushion Belt Guide Walking Platform Walking Belt Frame Cap Frame Spacer Magnet Latch Cap Storage Latch French Latch Decal Key No. Key No. PART LIST-Model No. Qty. 51 1 52 1 53 2 54 1 55 1 56 1 57 1 58 1 59 1 60 1... 74 1 75 5 76 1 77 1 78 1 79 1 80 2 81 1 82 4 83 2 84 1 85 2 86 4 87 1 88 1 89 1 90 1 91 1 92 1 93 1 94 2 95 1 96 1 97 1 98 1 99 2 100 1 Description Right Foot Rail Frame Roller Bracket Roller Ground Wire Right Rear...

English Manual
Page 27
Description 101 1 102 1 103 1 104 1 105 1 Pulse Bar Top Tray Key/Clip Pulse Bar Bottom Console Ground Wire 106 3 107 1 108 2 109 1 Wire Tie Incline Wire Caution Decal Key Switch Note: Specifications are not illustrated. 27 Qty. Description Key No. For information about ordering replacement parts, see the back cover of this manual. *These parts are subject to change without notice. Qty. Key No.
Description 101 1 102 1 103 1 104 1 105 1 Pulse Bar Top Tray Key/Clip Pulse Bar Bottom Console Ground Wire 106 3 107 1 108 2 109 1 Wire Tie Incline Wire Caution Decal Key Switch Note: Specifications are not illustrated. 27 Qty. Description Key No. For information about ordering replacement parts, see the back cover of this manual. *These parts are subject to change without notice. Qty. Key No.
English Manual
Page 32
... Printed in lieu of any economic loss, loss of property, loss of revenues or profits, loss of enjoyment or use and service conditions. Parts and labor are limited in their scope and duration to repairing or replacing, at ICONʼs option, the product through one (1) year from... forth herein. This warranty gives you . Accordingly, the above is in China © 2010 ICON IP, Inc. ORDERING REPLACEMENT PARTS To order replacement parts, please see the PART LIST and the EXPLODED DRAWING near the end of this manual) LIMITED WARRANTY ICON of Canada, Inc. (ICON) warrants this product...
... Printed in lieu of any economic loss, loss of property, loss of revenues or profits, loss of enjoyment or use and service conditions. Parts and labor are limited in their scope and duration to repairing or replacing, at ICONʼs option, the product through one (1) year from... forth herein. This warranty gives you . Accordingly, the above is in China © 2010 ICON IP, Inc. ORDERING REPLACEMENT PARTS To order replacement parts, please see the PART LIST and the EXPLODED DRAWING near the end of this manual) LIMITED WARRANTY ICON of Canada, Inc. (ICON) warrants this product...


