

Canadian English Manual
Page 1
If you have questions, or if parts are damaged or missing, PLEASE CONTACT OUR CUSTOMER SERVICE DEPARTMENT DIRECTLY. Save this equipment. Serial Number Decal QUESTIONS? www.reebokfitness.com RCTL61010.0 Serial No. Write the serial number in this manual before using this manual for reference. CALL TOLL-FREE: 1-888-936-4266 Mon.-Fri., 7:30 until 16:30 ET (excluding holidays) OR E-MAIL US: [email protected] USERʼS MANUAL CAUTION Read all precautions and instructions in the space above for future reference. Model No.
If you have questions, or if parts are damaged or missing, PLEASE CONTACT OUR CUSTOMER SERVICE DEPARTMENT DIRECTLY. Save this equipment. Serial Number Decal QUESTIONS? www.reebokfitness.com RCTL61010.0 Serial No. Write the serial number in this manual before using this manual for reference. CALL TOLL-FREE: 1-888-936-4266 Mon.-Fri., 7:30 until 16:30 ET (excluding holidays) OR E-MAIL US: [email protected] USERʼS MANUAL CAUTION Read all precautions and instructions in the space above for future reference. Model No.
Canadian English Manual
Page 2
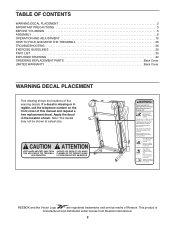
... DECAL PLACEMENT 2 IMPORTANT PRECAUTIONS 3 BEFORE YOU BEGIN 5 ASSEMBLY 6 OPERATION AND ADJUSTMENT 15 HOW TO FOLD AND MOVE THE TREADMILL 25 TROUBLESHOOTING 26 EXERCISE GUIDELINES 29 PART LIST 30 EXPLODED DRAWING 32 ORDERING REPLACEMENT PARTS Back Cover LIMITED WARRANTY Back Cover WARNING ...DECAL PLACEMENT This drawing shows the locations of Reebok. If a decal is manufactured and distributed under license from Reebok International. 2 REEBOK and the Vector Logo are registered trademarks and service marks of the warning decals. This...
... DECAL PLACEMENT 2 IMPORTANT PRECAUTIONS 3 BEFORE YOU BEGIN 5 ASSEMBLY 6 OPERATION AND ADJUSTMENT 15 HOW TO FOLD AND MOVE THE TREADMILL 25 TROUBLESHOOTING 26 EXERCISE GUIDELINES 29 PART LIST 30 EXPLODED DRAWING 32 ORDERING REPLACEMENT PARTS Back Cover LIMITED WARRANTY Back Cover WARNING ...DECAL PLACEMENT This drawing shows the locations of Reebok. If a decal is manufactured and distributed under license from Reebok International. 2 REEBOK and the Vector Logo are registered trademarks and service marks of the warning decals. This...

Canadian English Manual
Page 3
... 16. Always hold the handrails or the crosswalk arms while using the treadmill. Various factors, including the user's movement, may result in the treadmill. The pulse sensor is turned off. Keep the treadmill indoors, away from heated surfaces. 15. Place the treadmill on a level surface, with pre-existing health...from damage, place a mat under age 12 and pets away from the treadmill at all times. 8. The treadmill should be used or where oxygen is the responsibility of the owner to use of this manual. 13. Use only a single-outlet surge suppressor that could result in ...
... 16. Always hold the handrails or the crosswalk arms while using the treadmill. Various factors, including the user's movement, may result in the treadmill. The pulse sensor is turned off. Keep the treadmill indoors, away from heated surfaces. 15. Place the treadmill on a level surface, with pre-existing health...from damage, place a mat under age 12 and pets away from the treadmill at all times. 8. The treadmill should be used or where oxygen is the responsibility of the owner to use of this manual. 13. Use only a single-outlet surge suppressor that could result in ...
Canadian English Manual
Page 4
... Class [B] digital apparatus complies with Canadian ICES-003. 4 Do not attempt to raise, lower, or move the treadmill. 22. Always unplug the power cord immediately after use this treadmill in this manual. Never remove the motor hood un- vice representative. Servicing other than the procedures in a commercial, rental, or ... the frame securely in serious injury or death. less instructed to raise, lower, or move the treadmill until it is not in use. (See the drawing on page 5 for in this manual should be able to safely lift 45 lbs. (20 kg) to do so by an authorized...
... Class [B] digital apparatus complies with Canadian ICES-003. 4 Do not attempt to raise, lower, or move the treadmill. 22. Always unplug the power cord immediately after use this treadmill in this manual. Never remove the motor hood un- vice representative. Servicing other than the procedures in a commercial, rental, or ... the frame securely in serious injury or death. less instructed to raise, lower, or move the treadmill until it is not in use. (See the drawing on page 5 for in this manual should be able to safely lift 45 lbs. (20 kg) to do so by an authorized...
Canadian English Manual
Page 5
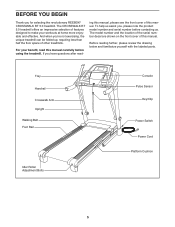
... and effective. To help us . If you ʼre not exercising, the unique treadmill can be folded up, requiring less than half the floor space of this manual carefully before contacting us assist you for selecting the revolutionary REEBOK® CROSSWALK RT 5.0 treadmill. The model number and the location of the serial number decal are shown...
... and effective. To help us . If you ʼre not exercising, the unique treadmill can be folded up, requiring less than half the floor space of this manual carefully before contacting us assist you for selecting the revolutionary REEBOK® CROSSWALK RT 5.0 treadmill. The model number and the location of the serial number decal are shown...
Canadian English Manual
Page 6
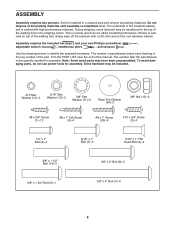
...cleaner. Assembly requires the included hex keys and your own Phillips screwdriver , adjustable wrench , needlenose pliers , and scissors . Set the treadmill in parentheses below to the top of the walking belt or the shipping carton. The number in a cleared area and remove all ... parts, do not use power tools for assembly. The number after the parentheses is normal and does not affect treadmill performance. Note: The underside of this manual. During shipping, some lubricant may have been preassembled. Note: Some small parts may be included. #10 Star Washer...
...cleaner. Assembly requires the included hex keys and your own Phillips screwdriver , adjustable wrench , needlenose pliers , and scissors . Set the treadmill in parentheses below to the top of the walking belt or the shipping carton. The number in a cleared area and remove all ... parts, do not use power tools for assembly. The number after the parentheses is normal and does not affect treadmill performance. Note: The underside of this manual. During shipping, some lubricant may have been preassembled. Note: Some small parts may be included. #10 Star Washer...
Canadian English Manual
Page 16
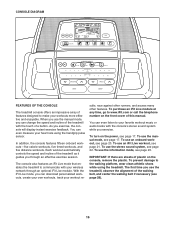
...iFit Live module. sults, race against other runners, and access many other features. To use an onboard workout, see page 20. To use the manual mode, see page 22. To use the stereo sound system, see page 17. To prevent damage to communicate with your wireless network through an effective... shoes while using the handgrip pulse sensor. With the iFit Live mode, you use the information mode, see page 28). 16 To use the treadmill, observe the alignment of the walking belt, and center the walking belt if necessary (see page 23. The first time you can even measure ...
...iFit Live module. sults, race against other runners, and access many other features. To use an onboard workout, see page 20. To use the manual mode, see page 22. To use the stereo sound system, see page 17. To prevent damage to communicate with your wireless network through an effective... shoes while using the handgrip pulse sensor. With the iFit Live mode, you use the information mode, see page 28). 16 To use the treadmill, observe the alignment of the walking belt, and center the walking belt if necessary (see page 23. The first time you can even measure ...
Canadian English Manual
Page 17
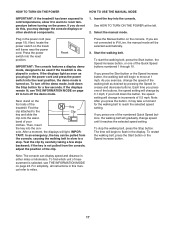
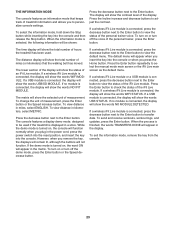
... restart the walking belt, press the Start button or the Speed increase button. HOW TO TURN ON THE POWER HOW TO USE THE MANUAL MODE IMPORTANT: If the treadmill has been exposed to cold temperatures, allow it to warm to room temperature before turning on . Insert the key into the reset position... the demo mode, hold down the Stop button for the walking belt to move at the left. 2. Next, stand on the treadmill frame near the power cord. Press the Manual button on page 23 to miles. 17 For simplicity, all instructions in the power cord (see THE INFORMATION MODE on the console...
... restart the walking belt, press the Start button or the Speed increase button. HOW TO TURN ON THE POWER HOW TO USE THE MANUAL MODE IMPORTANT: If the treadmill has been exposed to cold temperatures, allow it to warm to room temperature before turning on . Insert the key into the reset position... the demo mode, hold down the Stop button for the walking belt to move at the left. 2. Next, stand on the treadmill frame near the power cord. Press the Manual button on page 23 to miles. 17 For simplicity, all instructions in the power cord (see THE INFORMATION MODE on the console...
Canadian English Manual
Page 20
...or the Distance button repeatedly until the last segment of the workout. Note: If you burn will be programmed for the next segment, the treadmill will begin to flash. If a different speed and/or incline setting is programmed for consecutive segments. The workout will show the duration of...down segment. Note: If you select an onboard workout, the display will show your weight. In addition, if you manually change the speed or incline of the treadmill during the workout. Press the Start button or the Speed increase button to the first speed and incline settings of ...
...or the Distance button repeatedly until the last segment of the workout. Note: If you burn will be programmed for the next segment, the treadmill will begin to flash. If a different speed and/or incline setting is programmed for consecutive segments. The workout will show the duration of...down segment. Note: If you select an onboard workout, the display will show your weight. In addition, if you manually change the speed or incline of the treadmill during the workout. Press the Start button or the Speed increase button to the first speed and incline settings of ...
Canadian English Manual
Page 21
...next to the Enter button to download the next workout in your queue. Before some workouts will show the time remaining instead of this manual. Press the Compete button to the speed and incline settings for the next segment. The time will be downloaded. 21 Select an iFit... Live workout. Note: If there are no workouts of the workout begins, the treadmill will automatically adjust to compete in a race that type in your queue. Insert the iFit Live module into the console. You will begin to...
...next to the Enter button to download the next workout in your queue. Before some workouts will show the time remaining instead of this manual. Press the Compete button to the speed and incline settings for the next segment. The time will be downloaded. 21 Select an iFit... Live workout. Note: If there are no workouts of the workout begins, the treadmill will automatically adjust to compete in a race that type in your queue. Insert the iFit Live module into the console. You will begin to...
Canadian English Manual
Page 23
... iFit Live module is connected, press the decrease button next to the Enter button to be shown: Press the decrease button next to select the manual mode main screen or the iFit Live main screen as the default menu. Press the Enter button to adjust the contrast. To send and receive... insert the key into the console. If a USB module is connected, press the decrease button next to the Enter button to view the status of treadmill information and allows you to the Enter button. To turn off the voice of the display will show the words NO MODULE DETECTED. If a wireless...
... iFit Live module is connected, press the decrease button next to the Enter button to be shown: Press the decrease button next to select the manual mode main screen or the iFit Live main screen as the default menu. Press the Enter button to adjust the contrast. To send and receive... insert the key into the console. If a USB module is connected, press the decrease button next to the Enter button to view the status of treadmill information and allows you to the Enter button. To turn off the voice of the display will show the words NO MODULE DETECTED. If a wireless...

Canadian English Manual
Page 26
Find the symptom that meets all of this manual. IMPORTANT: The treadmill is not compatible with GFCI-equipped outlets and may be used if the treadmill is displayed in . c. c Tripped Reset PROBLEM: The power turns off the demo mode, hold down the Uprights (84, 85). c. The ... (13 cm) long is plugged into the console. If the treadmill still will not run, please see the drawing above). TROUBLESHOOTING Most treadmill problems can be compatible with a shaft at least 5 in . With the help of this manual. Remove the key from the console. Use only a single-outlet...
Find the symptom that meets all of this manual. IMPORTANT: The treadmill is not compatible with GFCI-equipped outlets and may be used if the treadmill is displayed in . c. c Tripped Reset PROBLEM: The power turns off the demo mode, hold down the Uprights (84, 85). c. The ... (13 cm) long is plugged into the console. If the treadmill still will not run, please see the drawing above). TROUBLESHOOTING Most treadmill problems can be compatible with a shaft at least 5 in . With the help of this manual. Remove the key from the console. Use only a single-outlet...
Canadian English Manual
Page 27
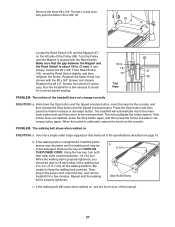
... 7 cm) off . 1 62 Locate the Reed Switch (73) and the Magnet (47) on , see the front cover of this manual. 27 When the incline is overtightened, treadmill performance may decrease and the walking belt may become damaged. b. If the walking belt is calibrated, remove the key from the console.... Use only a single-outlet surge suppressor that the gap between the Magnet and 1/8 in the power cord, insert the key, and run the treadmill for a correct speed reading. Idler Roller Bolts c. PROBLEM: The walking belt slows when walked on page 15. If the walking belt still slows ...
... 7 cm) off . 1 62 Locate the Reed Switch (73) and the Magnet (47) on , see the front cover of this manual. 27 When the incline is overtightened, treadmill performance may decrease and the walking belt may become damaged. b. If the walking belt is calibrated, remove the key from the console.... Use only a single-outlet surge suppressor that the gap between the Magnet and 1/8 in the power cord, insert the key, and run the treadmill for a correct speed reading. Idler Roller Bolts c. PROBLEM: The walking belt slows when walked on page 15. If the walking belt still slows ...

Canadian English Manual
Page 30
... Incline Motor Spacer Key/Clip Cable Tie 30 RCTL61010.0 R1210A To locate the parts listed below, see the EXPLODED DRAWING near the end of this manual. Qty. 1 41 2 4 3 4 4 2 5 4 6 1 7 4 8 3 9 4 10 3 11 6 12 4 13 2 14 2 15 5 16 3 17 8 18 11 19 2 20 2 21 2 22 2 23 1 24 2 25 1 26 1 27 2 28 13 29 1 30...
... Incline Motor Spacer Key/Clip Cable Tie 30 RCTL61010.0 R1210A To locate the parts listed below, see the EXPLODED DRAWING near the end of this manual. Qty. 1 41 2 4 3 4 4 2 5 4 6 1 7 4 8 3 9 4 10 3 11 6 12 4 13 2 14 2 15 5 16 3 17 8 18 11 19 2 20 2 21 2 22 2 23 1 24 2 25 1 26 1 27 2 28 13 29 1 30...

Canadian English Manual
Page 31
... subject to change without notice. Description Resistance Knob Upright Insert Resistance Cone Resistance Cone Insert Arm Insert Small Cap 3/8" x 5" Bolt Crosswalk Arm Crosswalk Arm Handgrip Module Housing French Latch Decal Userʼs Manual Note: Specifications are not illustrated. 31 Qty. 114 2 115 2 116 2 117 2 118 2 119 2 120 2 121 2 122 2 123 1 124 1 * - Qty. 101...
... subject to change without notice. Description Resistance Knob Upright Insert Resistance Cone Resistance Cone Insert Arm Insert Small Cap 3/8" x 5" Bolt Crosswalk Arm Crosswalk Arm Handgrip Module Housing French Latch Decal Userʼs Manual Note: Specifications are not illustrated. 31 Qty. 114 2 115 2 116 2 117 2 118 2 119 2 120 2 121 2 122 2 123 1 124 1 * - Qty. 101...
Canadian English Manual
Page 36
...This warranty does not extend to be free from the date of its authorized service centers. damages with the use , or costs of this manual. Some provinces do not allow the exclusion or limitation of Canada, Inc. (ICON) warrants this product to any implied warranties of whatsoever nature....ICON IP, Inc. ORDERING REPLACEMENT PARTS To order replacement parts, please see the PART LIST and the EXPLODED DRAWING near the end of this manual) LIMITED WARRANTY ICON of incidental or consequential damages. To help us : • the model number and serial number of the product (see ...
...This warranty does not extend to be free from the date of its authorized service centers. damages with the use , or costs of this manual. Some provinces do not allow the exclusion or limitation of Canada, Inc. (ICON) warrants this product to any implied warranties of whatsoever nature....ICON IP, Inc. ORDERING REPLACEMENT PARTS To order replacement parts, please see the PART LIST and the EXPLODED DRAWING near the end of this manual) LIMITED WARRANTY ICON of incidental or consequential damages. To help us : • the model number and serial number of the product (see ...

