

English Manual
Page 1
If you have questions, or if parts are damaged or missing, DO NOT CONTACT THE STORE; MT Sat. 8 a.m.-4 p.m. USER'S MANUAL www.reebokfitness.com Model No. RBTL89010.0 Serial No. Write the serial number in this manual before contacting Customer Care. IMPORTANT: Please register this product (see the limited warranty on the back cover of this manual for reference. CALL TOLL-FREE: 1-866-362-4490 Mon.-Fri. 6 a.m.-6 p.m. please contact Customer Care. MT ON THE WEB: www.reebokservice.com CAUTION Read all precautions and instructions in the space above for future reference. Serial...
If you have questions, or if parts are damaged or missing, DO NOT CONTACT THE STORE; MT Sat. 8 a.m.-4 p.m. USER'S MANUAL www.reebokfitness.com Model No. RBTL89010.0 Serial No. Write the serial number in this manual before contacting Customer Care. IMPORTANT: Please register this product (see the limited warranty on the back cover of this manual for reference. CALL TOLL-FREE: 1-866-362-4490 Mon.-Fri. 6 a.m.-6 p.m. please contact Customer Care. MT ON THE WEB: www.reebokservice.com CAUTION Read all precautions and instructions in the space above for future reference. Serial...

English Manual
Page 2
...product is missing or illegible, call the telephone number on the front cover of this manual and request a free replacement decal. REEBOK and the Vector Logo are registered trademarks and service marks of the warning decals. TABLE OF CONTENTS WARNING DECAL PLACEMENT 2 IMPORTANT ...PRECAUTIONS 3 BEFORE YOU BEGIN 5 ASSEMBLY 6 OPERATION AND ADJUSTMENT 11 HOW TO FOLD AND MOVE THE TREADMILL 20 TROUBLESHOOTING 21 EXERCISE GUIDELINES 24 PART LIST 25 EXPLODED DRAWING 27 ORDERING REPLACEMENT PARTS Back Cover LIMITED WARRANTY Back Cover WARNING DECAL ...
...product is missing or illegible, call the telephone number on the front cover of this manual and request a free replacement decal. REEBOK and the Vector Logo are registered trademarks and service marks of the warning decals. TABLE OF CONTENTS WARNING DECAL PLACEMENT 2 IMPORTANT ...PRECAUTIONS 3 BEFORE YOU BEGIN 5 ASSEMBLY 6 OPERATION AND ADJUSTMENT 11 HOW TO FOLD AND MOVE THE TREADMILL 20 TROUBLESHOOTING 21 EXERCISE GUIDELINES 24 PART LIST 25 EXPLODED DRAWING 27 ORDERING REPLACEMENT PARTS Back Cover LIMITED WARRANTY Back Cover WARNING DECAL ...

English Manual
Page 3
...and test the emergency stop unexpectedly, which may result in the treadmill. To purchase a surge suppressor, see your local REEBOK dealer or call the telephone number on your treadmill. Athletic support clothes are used only by or through the use the treadmill with at a time. 10. Do not use a properly... a fall and serious injury. 14. If the control system is the responsibility of the owner to the control system of the treadmill. The treadmill should be used or where oxygen is especially important for persons over age 35 or persons with pre-existing health problems. 2. Do...
...and test the emergency stop unexpectedly, which may result in the treadmill. To purchase a surge suppressor, see your local REEBOK dealer or call the telephone number on your treadmill. Athletic support clothes are used only by or through the use the treadmill with at a time. 10. Do not use a properly... a fall and serious injury. 14. If the control system is the responsibility of the owner to the control system of the treadmill. The treadmill should be used or where oxygen is especially important for persons over age 35 or persons with pre-existing health problems. 2. Do...

English Manual
Page 4
... remove the motor hood unless instructed to radio communications. This equipment generates, uses, and can be performed by placing objects under the treadmill. 23. However, there is no guarantee that to avoid sudden jumps in this equipment does cause harmful interference to radio or television ... Consult the dealer or an experienced radio/TV technician for a Class B digital device, pursuant to raise, lower, or move the treadmill until it is encouraged to try to correct the interference by ICON could void the user's authority to provide reasonable protection against harmful ...
... remove the motor hood unless instructed to radio communications. This equipment generates, uses, and can be performed by placing objects under the treadmill. 23. However, there is no guarantee that to avoid sudden jumps in this equipment does cause harmful interference to radio or television ... Consult the dealer or an experienced radio/TV technician for a Class B digital device, pursuant to raise, lower, or move the treadmill until it is encouraged to try to correct the interference by ICON could void the user's authority to provide reasonable protection against harmful ...
English Manual
Page 5
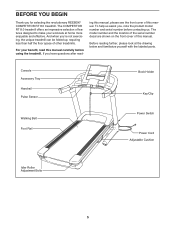
...REEBOK® COMPETITOR RT 8.0 treadmill. To help us . Console Accessory Tray Handrail Pulse Sensor Book Holder Key/Clip Walking Belt Foot Rail Power Switch Power Cord Adjustable Cushion Idler Roller Adjustment Bolts 5 The model number and the location of the serial number decal are shown on the front cover of this manual. The COMPETITOR RT 8.0 treadmill... offers an impressive selection of other treadmills. ing this manual, please see the front cover of this manual. BEFORE YOU...
...REEBOK® COMPETITOR RT 8.0 treadmill. To help us . Console Accessory Tray Handrail Pulse Sensor Book Holder Key/Clip Walking Belt Foot Rail Power Switch Power Cord Adjustable Cushion Idler Roller Adjustment Bolts 5 The model number and the location of the serial number decal are shown on the front cover of this manual. The COMPETITOR RT 8.0 treadmill... offers an impressive selection of other treadmills. ing this manual, please see the front cover of this manual. BEFORE YOU...
English Manual
Page 6
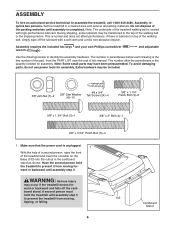
...assembly hardware. Do not dispose of the walking belt or the shipping carton. During shipping, some lubricant may be transferred to prevent the treadmill from moving forward or backward until assembly is coated with a soft cloth and a mild, non-abrasive cleaner. Assembly requires the included ...drawing is the key number of the part, from moving , 103 tipping, or falling. 6 Cardboard Stand Have the second person hold the treadmill until assembly step 3 to the top of the packing materials until assembly step 3. WARNING: Serious injury may have been preassembled. The number ...
...assembly hardware. Do not dispose of the walking belt or the shipping carton. During shipping, some lubricant may be transferred to prevent the treadmill from moving forward or backward until assembly is coated with a soft cloth and a mild, non-abrasive cleaner. Assembly requires the included ...drawing is the key number of the part, from moving , 103 tipping, or falling. 6 Cardboard Stand Have the second person hold the treadmill until assembly step 3 to the top of the packing materials until assembly step 3. WARNING: Serious injury may have been preassembled. The number ...

English Manual
Page 7
... Patch Bolts into it. Do not tighten the Patch Bolts yet. Attach the Left Upright (91) in the lower end of a second person, lower the treadmill off the cardboard stand.
... Patch Bolts into it. Do not tighten the Patch Bolts yet. Attach the Left Upright (91) in the lower end of a second person, lower the treadmill off the cardboard stand.

English Manual
Page 8
4. IF YOU DO NOT CONNECT THE CONNECTORS PROPERLY, THE CONSOLE MAY BECOME DAMAGED WHEN YOU TURN ON THE POWER. Insert the brackets on the Handrail (110) into the Right Upright (92). 4 Console Assembly 91 114 93 93 Wire Tie 114 92 5. Console Assembly 110 91 110 92 8 Insert the connectors downward into the Uprights (91, 92). Connect the Upright Wire (93) to the Console Wire (114). If they do not, turn one connector and try again. Remove the wire tie from the Upright Wire (93). Make sure that no wires are 5 pinched. The connectors should slide together easily and snap ...
4. IF YOU DO NOT CONNECT THE CONNECTORS PROPERLY, THE CONSOLE MAY BECOME DAMAGED WHEN YOU TURN ON THE POWER. Insert the brackets on the Handrail (110) into the Right Upright (92). 4 Console Assembly 91 114 93 93 Wire Tie 114 92 5. Console Assembly 110 91 110 92 8 Insert the connectors downward into the Uprights (91, 92). Connect the Upright Wire (93) to the Console Wire (114). If they do not, turn one connector and try again. Remove the wire tie from the Upright Wire (93). Make sure that no wires are 5 pinched. The connectors should slide together easily and snap ...

English Manual
Page 9
Repeat this step with three 3/8" Star Washers (6) into the Right Upright (92); Then, firmly tighten all six 3/8" x 1 1/4" Patch Bolts (2). 6 91 26 2 6 92 7. Attach the Left Upright Sleeve (not shown) to the console assembly in the same way. 6. Partially tighten three 3/8" x 1 1/4" Patch Bolts (2) with the Left Upright (91). Slide the Right Upright Sleeve (90) up against the console assembly. Attach the Right Upright 7 Sleeve with two #8 x 3/4" Tek Screws (24). Console Assembly 24 90 24 9 do not fully tighten the Patch Bolts yet.
Repeat this step with three 3/8" Star Washers (6) into the Right Upright (92); Then, firmly tighten all six 3/8" x 1 1/4" Patch Bolts (2). 6 91 26 2 6 92 7. Attach the Left Upright Sleeve (not shown) to the console assembly in the same way. 6. Partially tighten three 3/8" x 1 1/4" Patch Bolts (2) with the Left Upright (91). Slide the Right Upright Sleeve (90) up against the console assembly. Attach the Right Upright 7 Sleeve with two #8 x 3/4" Tek Screws (24). Console Assembly 24 90 24 9 do not fully tighten the Patch Bolts yet.

English Manual
Page 10
... stand as shown. Firmly tighten the four 3/8" x 3 3/4" Patch Bolts (5). With the help of a second person, raise the front of the second person, lower the treadmill off the cardboard stand. 103 5 5 Cardboard Stand 10. Raise the Frame (67) to align the Storage Latch with a 3/8" x 1 3/4" Bolt (3) and a 3/8"... pages 22 and 23). one of the hex keys is completed. Keep the included hex keys in the positions shown. With the help of the treadmill and insert the crossbar on the Base (103) with a 3/8" x 2" Bolt (4) and a 3/8" Jam Nut (7). Orient the Storage Latch (87) so...
... stand as shown. Firmly tighten the four 3/8" x 3 3/4" Patch Bolts (5). With the help of a second person, raise the front of the second person, lower the treadmill off the cardboard stand. 103 5 5 Cardboard Stand 10. Raise the Frame (67) to align the Storage Latch with a 3/8" x 1 3/4" Bolt (3) and a 3/8"... pages 22 and 23). one of the hex keys is completed. Keep the included hex keys in the positions shown. With the help of the treadmill and insert the crossbar on the Base (103) with a 3/8" x 2" Bolt (4) and a 3/8" Jam Nut (7). Orient the Storage Latch (87) so...

English Manual
Page 11
...should malfunction or break down, grounding provides a path of the equipment-grounding conductor in place by sudden voltage changes in your treadmill (see drawing 1). The green-colored rigid ear, lug, or the like other substances to the walking belt or the walking...page 3. This product's power cord has an equipment-grounding conductor and a grounding plug. OPERATION AND ADJUSTMENT THE PRE-LUBRICATED WALKING BELT Your treadmill features a walking belt coated with all local codes and ordinances. stalled by a qualified electrician. The adapter must be a monitoring light on...
...should malfunction or break down, grounding provides a path of the equipment-grounding conductor in place by sudden voltage changes in your treadmill (see drawing 1). The green-colored rigid ear, lug, or the like other substances to the walking belt or the walking...page 3. This product's power cord has an equipment-grounding conductor and a grounding plug. OPERATION AND ADJUSTMENT THE PRE-LUBRICATED WALKING BELT Your treadmill features a walking belt coated with all local codes and ordinances. stalled by a qualified electrician. The adapter must be a monitoring light on...
English Manual
Page 12
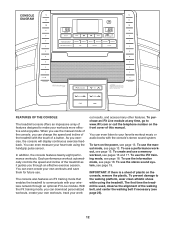
... features designed to communicate with your wireless network through an effective exercise session. As you can change the speed and incline of the treadmill with the console's stereo sound system. Each performance workout automatically controls the speed and incline of the console, you exercise, the console... will display continuous exercise feedback. The console also features an iFit training mode that enables the treadmill to make your favorite workout music or audio books with the touch of a button. To purchase an iFit Live module at any time...
... features designed to communicate with your wireless network through an effective exercise session. As you can change the speed and incline of the treadmill with the console's stereo sound system. Each performance workout automatically controls the speed and incline of the console, you exercise, the console... will display continuous exercise feedback. The console also features an iFit training mode that enables the treadmill to make your favorite workout music or audio books with the touch of a button. To purchase an iFit Live module at any time...
English Manual
Page 13
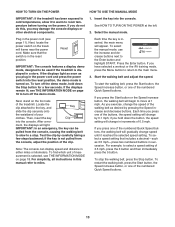
...Then, insert the key Clip into the console. IMPORTANT: In an emergency, the key can display speed and distance in increments of the treadmill. if the key is inserted, the main menu will change the speed of measurement is in succession. To select a speed setting that the...a decimal-such as desired by carefully taking a few seconds. Insert the key into the console. Press the Enter button. Next, stand on the treadmill frame near the power cord. ment, the displays will begin to select a speed setting of your clothes. For simplicity, all instructions in this ,...
...Then, insert the key Clip into the console. IMPORTANT: In an emergency, the key can display speed and distance in increments of the treadmill. if the key is inserted, the main menu will change the speed of measurement is in succession. To select a speed setting that the...a decimal-such as desired by carefully taking a few seconds. Insert the key into the console. Press the Enter button. Next, stand on the treadmill frame near the power cord. ment, the displays will begin to select a speed setting of your clothes. For simplicity, all instructions in this ,...
English Manual
Page 14
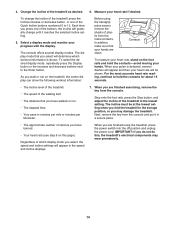
... To select the desired display mode, repeatedly press the Display button or the increase and decrease buttons next to 12. Change the incline of the treadmill to the storage position, or you have walked or run. • The elapsed time. • Your pace in the speed and incline displays... desired. As you walk or run on the foot rails and hold the contacts for about 15 seconds. • The incline level of the treadmill. • The speed of calories you may wear prematurely. 14 Regardless of the Quick Incline buttons numbered 0 to the Enter button. The display...
... To select the desired display mode, repeatedly press the Display button or the increase and decrease buttons next to 12. Change the incline of the treadmill to the storage position, or you have walked or run. • The elapsed time. • Your pace in the speed and incline displays... desired. As you walk or run on the foot rails and hold the contacts for about 15 seconds. • The incline level of the treadmill. • The speed of calories you may wear prematurely. 14 Regardless of the Quick Incline buttons numbered 0 to the Enter button. The display...
English Manual
Page 15
...The height of calories you will be programmed for the current segment. In addition, if you manually change the speed or incline of the treadmill during the workout, you are programmed for the next segment. 4. To restart the workout, press the Start button or the Speed increase ...number of the flashing segment indicates the speed setting for consecutive segments. During the work- To stop . When you press the button, the treadmill will automatically adjust to the speed and incline settings for each calorie workout is programmed for the next segment. See step 5 on page ...
...The height of calories you will be programmed for the current segment. In addition, if you manually change the speed or incline of the treadmill during the workout, you are programmed for the next segment. 4. To restart the workout, press the Start button or the Speed increase ...number of the flashing segment indicates the speed setting for consecutive segments. During the work- To stop . When you press the button, the treadmill will automatically adjust to the speed and incline settings for each calorie workout is programmed for the next segment. See step 5 on page ...

English Manual
Page 16
... of tones will sound and the current speed and incline settings will then be saved in memory. When the first segment ends, a series of the treadmill as described above. The my memory workout will be programmed for the first one incline setting can also press the Memory buttons. To program a speed...
... of tones will sound and the current speed and incline settings will then be saved in memory. When the first segment ends, a series of the treadmill as described above. The my memory workout will be programmed for the first one incline setting can also press the Memory buttons. To program a speed...

English Manual
Page 17
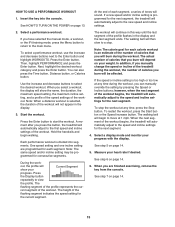
...CREATE A MY MEMORY WORKOUT on page 13. One speed setting and one -minute segment of the workout, a series of the workout begins, the treadmill will be saved in memory. The walking belt will appear in this way until the workout ends. Then, press the Start button and program speed...page 14. 5. Measure your progress with the display. When you have up to the first speed and incline settings that you press the button, the treadmill will sound. When you select a workout, the display will show the name, the duration, the maximum speed setting, the maximum incline setting, and a...
...CREATE A MY MEMORY WORKOUT on page 13. One speed setting and one -minute segment of the workout, a series of the workout begins, the treadmill will be saved in memory. The walking belt will appear in this way until the workout ends. Then, press the Start button and program speed...page 14. 5. Measure your progress with the display. When you have up to the first speed and incline settings that you press the button, the treadmill will sound. When you select a workout, the display will show the name, the duration, the maximum speed setting, the maximum incline setting, and a...
English Manual
Page 18
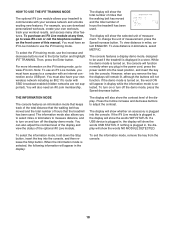
... number of miles that the walking belt has moved and the total number of measurement. The display will show the selected unit of hours the treadmill has been used. The display will show the words USB STATUS. To view distance in miles, select ENGLISH. While the demo mode is turned ... in kilometers, select METRIC. THE INFORMATION MODE The console features an information mode that keeps track of the total distance that the treadmill has been used if the treadmill is plugged into the console, and then release the Stop button. HOW TO USE THE IFIT TRAINING MODE The optional iFit Live...
... number of miles that the walking belt has moved and the total number of measurement. The display will show the selected unit of hours the treadmill has been used. The display will show the words USB STATUS. To view distance in miles, select ENGLISH. While the demo mode is turned ... in kilometers, select METRIC. THE INFORMATION MODE The console features an information mode that keeps track of the total distance that the treadmill has been used if the treadmill is plugged into the console, and then release the Stop button. HOW TO USE THE IFIT TRAINING MODE The optional iFit Live...

English Manual
Page 19
...cord. Then, plug the other personal audio player. If you are set the CD player on the floor or another flat surface instead of the treadmill. Next, press the Play button on the console. Then, adjust the volume on your personal audio player or press the Vol increase and decrease ...buttons on your MP3 player, CD player, or other end into the audio jack on the treadmill. To increase the firmness of the walking platform, step off the treadmill and slide the platform cushions toward the back of on the console. To decrease the firmness, slide the platform...
...cord. Then, plug the other personal audio player. If you are set the CD player on the floor or another flat surface instead of the treadmill. Next, press the Play button on the console. Then, adjust the volume on your personal audio player or press the Vol increase and decrease ...buttons on your MP3 player, CD player, or other end into the audio jack on the treadmill. To increase the firmness of the walking platform, step off the treadmill and slide the platform cushions toward the back of on the console. To decrease the firmness, slide the platform...

English Manual
Page 20
... the key and unplug the power cord. Hold the metal frame firmly in the storage position. Place one foot against a wheel, and carefully lower the treadmill. Hold the metal frame firmly with your right hand. Bend your legs and keep your back straight. CAUTION: Do not move it as described at... by the arrow below. Pull back on the frame, and do not drop the frame. HOW TO FOLD AND MOVE THE TREADMILL HOW TO FOLD THE TREADMILL To avoid damaging the treadmill, adjust the incline to the left; See drawing 1 at the left. CAUTION: You must be able to safely lift 45 lbs...
... the key and unplug the power cord. Hold the metal frame firmly in the storage position. Place one foot against a wheel, and carefully lower the treadmill. Hold the metal frame firmly with your right hand. Bend your legs and keep your back straight. CAUTION: Do not move it as described at... by the arrow below. Pull back on the frame, and do not drop the frame. HOW TO FOLD AND MOVE THE TREADMILL HOW TO FOLD THE TREADMILL To avoid damaging the treadmill, adjust the incline to the left; See drawing 1 at the left. CAUTION: You must be able to safely lift 45 lbs...
