
User Manual
Page 4
Never leave the treadmill unattended while it is properly assembled. (See ASSEMBLY on page 8 and HOW TO FOLD AND MOVE THE TREADMILL on page 24.) You must be performed by an authorized ser- Always remove the key, press the power switch into any opening... folding or moving the treadmill, make sure that the storage latch is not a medical device. Servicing other than the procedures in the storage position. 24. vice representative only. 28. Do not attempt to move the treadmill until it is running. SAVE THESE INSTRUCTIONS 4 Various factors, including the user’'s movement...
Never leave the treadmill unattended while it is properly assembled. (See ASSEMBLY on page 8 and HOW TO FOLD AND MOVE THE TREADMILL on page 24.) You must be performed by an authorized ser- Always remove the key, press the power switch into any opening... folding or moving the treadmill, make sure that the storage latch is not a medical device. Servicing other than the procedures in the storage position. 24. vice representative only. 28. Do not attempt to move the treadmill until it is running. SAVE THESE INSTRUCTIONS 4 Various factors, including the user’'s movement...
User Manual
Page 7
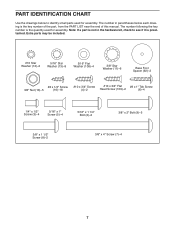
Extra parts may be included. #10 Star Washer (12)–-2 5/16" Star Washer (13)–-8 5/16" Flat Washer (108)–-4 3/8" Star Washer (11)–-6 Base Foot Spacer (92)–-2 #8 x 1/2" Screw 3/8" ..." x 1 1/4" Bolt (2)–-2 3/8" x 2" Bolt (9)–-5 3/8" x 1 1/2" Screw (8)–-2 3/8" x 4" Screw (7)–-4 7 Note: If a part is not in parentheses below to see if it is the quantity used for assembly. PART IDENTIFICATION CHART Use the drawings below each drawing is the key number of the part, from the PART LIST near the end of this...
Extra parts may be included. #10 Star Washer (12)–-2 5/16" Star Washer (13)–-8 5/16" Flat Washer (108)–-4 3/8" Star Washer (11)–-6 Base Foot Spacer (92)–-2 #8 x 1/2" Screw 3/8" ..." x 1 1/4" Bolt (2)–-2 3/8" x 2" Bolt (9)–-5 3/8" x 1 1/2" Screw (8)–-2 3/8" x 4" Screw (7)–-4 7 Note: If a part is not in parentheses below to see if it is the quantity used for assembly. PART IDENTIFICATION CHART Use the drawings below each drawing is the key number of the part, from the PART LIST near the end of this...
User Manual
Page 8
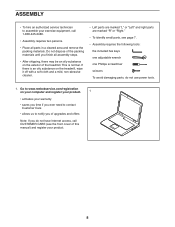
... equipment, call 1-800-445-2480. •• Assembly requires two persons. •• Place all assembly steps. •• After shipping, there may be an oily substance on the exterior of the treadmill. If there is normal. ASSEMBLY •• To hire an authorized service technician to... notify you of upgrades and offers Note: If you do not have Internet access, call CUSTOMER CARE (see page 7. •• Assembly requires the following tools: the included hex keys...
... equipment, call 1-800-445-2480. •• Assembly requires two persons. •• Place all assembly steps. •• After shipping, there may be an oily substance on the exterior of the treadmill. If there is normal. ASSEMBLY •• To hire an authorized service technician to... notify you of upgrades and offers Note: If you do not have Internet access, call CUSTOMER CARE (see page 7. •• Assembly requires the following tools: the included hex keys...
User Manual
Page 16
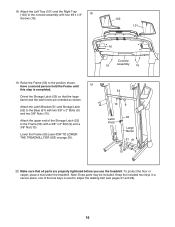
... adjust the walking belt (see HOW TO LOWER THE TREADMILL FOR USE on page 25). 53 10 9 Latch Knob 52 Large Barrel 51 91 10 9 20. Keep the included hex keys in a secure place; one of the Storage Latch (52) to the console assembly with a 3/8" x 2" Bolt (9) and a 3/8" Nut (10). Orient the...protect the oor or carpet, place a mat under the treadmill. Note: Extra parts may be included. Attach the Left Tray (101) and the Right Tray (102) to the Frame (53) with four #8 x 1/2" 18 Screws (16). 102 101 16 Console 16 Assembly 16 19. Lower the Frame (53) (see pages 27 ...
... adjust the walking belt (see HOW TO LOWER THE TREADMILL FOR USE on page 25). 53 10 9 Latch Knob 52 Large Barrel 51 91 10 9 20. Keep the included hex keys in a secure place; one of the Storage Latch (52) to the console assembly with a 3/8" x 2" Bolt (9) and a 3/8" Nut (10). Orient the...protect the oor or carpet, place a mat under the treadmill. Note: Extra parts may be included. Attach the Left Tray (101) and the Right Tray (102) to the Frame (53) with four #8 x 1/2" 18 Screws (16). 102 101 16 Console 16 Assembly 16 19. Lower the Frame (53) (see pages 27 ...