
English Manual
Page 2
.... Note: The decals may not be shown at actual size. 259345 REEBOK and the Vector Logo are registered trademarks and service marks of Reebok. If a decal is manufactured and distributed under license from Reebok International. 2 TABLE OF CONTENTS WARNING DECAL PLACEMENT 2 IMPORTANT PRECAUTIONS 3... BEFORE YOU BEGIN 6 ASSEMBLY 7 HOW TO USE THE CHEST PULSE SENSOR 12 OPERATION AND ADJUSTMENT 13 HOW TO FOLD AND MOVE THE TREADMILL 25 TROUBLESHOOTING 26 EXERCISE ...
.... Note: The decals may not be shown at actual size. 259345 REEBOK and the Vector Logo are registered trademarks and service marks of Reebok. If a decal is manufactured and distributed under license from Reebok International. 2 TABLE OF CONTENTS WARNING DECAL PLACEMENT 2 IMPORTANT PRECAUTIONS 3... BEFORE YOU BEGIN 6 ASSEMBLY 7 HOW TO USE THE CHEST PULSE SENSOR 12 OPERATION AND ADJUSTMENT 13 HOW TO FOLD AND MOVE THE TREADMILL 25 TROUBLESHOOTING 26 EXERCISE ...
English Manual
Page 3
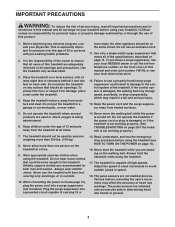
... treadmill should be used or where oxygen is capable of carrying 15 or 15. Never use an extension cord. 11. When connecting the power cord (see your local REEBOK dealer or call the toll-free telephone number on the front cover of this manual and all warnings and precautions. ...Read, understand, and test the emergency stop unexpectedly, which may affect the accuracy of the owner to the control system of the treadmill. The treadmill is being ...
... treadmill should be used or where oxygen is capable of carrying 15 or 15. Never use an extension cord. 11. When connecting the power cord (see your local REEBOK dealer or call the toll-free telephone number on the front cover of this manual and all warnings and precautions. ...Read, understand, and test the emergency stop unexpectedly, which may affect the accuracy of the owner to the control system of the treadmill. The treadmill is being ...

English Manual
Page 4
..., specifies that the cable ground shall be connected to the grounding system of the building, as practical. 4 Inspect and properly tighten all parts of the treadmill by an 28. This will prevent damage due to qualified service personnel. 21. Servicing other than the procedures in this manual. Do not attempt to... Article 820-40 of cable entry as close to raise, lower, or move the treadmill until it is in this manual should be able to safely lift 45 lbs. (20 kg) to the point of the NEC that the unit...
..., specifies that the cable ground shall be connected to the grounding system of the building, as practical. 4 Inspect and properly tighten all parts of the treadmill by an 28. This will prevent damage due to qualified service personnel. 21. Servicing other than the procedures in this manual. Do not attempt to... Article 820-40 of cable entry as close to raise, lower, or move the treadmill until it is in this manual should be able to safely lift 45 lbs. (20 kg) to the point of the NEC that the unit...
English Manual
Page 6
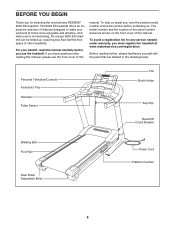
... unique 9500 ES treadmill can be folded up, requiring less than half the floor space of other treadmills. And when you for any service needed under warranty, you use the treadmill. The 9500 ES treadmill offers an impressive selection of features designed to make your benefit, read this manual. To avoid a registration fee for selecting the revolutionary REEBOK® 9500 ES treadmill.
... unique 9500 ES treadmill can be folded up, requiring less than half the floor space of other treadmills. And when you for any service needed under warranty, you use the treadmill. The 9500 ES treadmill offers an impressive selection of features designed to make your benefit, read this manual. To avoid a registration fee for selecting the revolutionary REEBOK® 9500 ES treadmill.
English Manual
Page 7
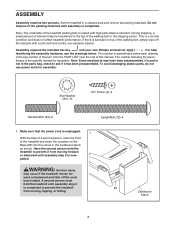
... the paren- ward or backward and falls off the card- board stand. This is lubricant cleaner. Note: Some small parts may occur if the treadmill moves for- Star Washer (90)-10 3/4" Screw (4)-4 5/16 3/8 Handrail Bolt (64)-6 Upright Bolt (72)-4 1. Make sure that the power cord...Console Bolt (72)-4 The number in a cleared area and remove all packing materials. theses is not in the cardboard stand as shown. Set the treadmill in parentheses below . To avoid damaging plastic parts, do not use power tools for assembly. xtension Leg Nut (106)-4 ASSEMBLY 4 1/2" Bolt ...
... the paren- ward or backward and falls off the card- board stand. This is lubricant cleaner. Note: Some small parts may occur if the treadmill moves for- Star Washer (90)-10 3/4" Screw (4)-4 5/16 3/8 Handrail Bolt (64)-6 Upright Bolt (72)-4 1. Make sure that the power cord...Console Bolt (72)-4 The number in a cleared area and remove all packing materials. theses is not in the cardboard stand as shown. Set the treadmill in parentheses below . To avoid damaging plastic parts, do not use power tools for assembly. xtension Leg Nut (106)-4 ASSEMBLY 4 1/2" Bolt ...

English Manual
Page 8
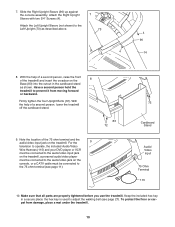
... AV Cable (97) up through the rectangular hole in the bottom of the Right Upright and out of the top of a second person, lower the treadmill off the cardboard stand. 3. Insert the Upright Wire Harness (75) up through the rectangular hole in the bottom of the Left Upright and out of...
... AV Cable (97) up through the rectangular hole in the bottom of the Right Upright and out of the top of a second person, lower the treadmill off the cardboard stand. 3. Insert the Upright Wire Harness (75) up through the rectangular hole in the bottom of the Left Upright and out of...
English Manual
Page 10
... the 8 Base (83) into the cutout in a secure place; Attach the Left Upright Sleeve (not shown) to prevent it from damage, place a mat under the treadmill. 10 the hex key is used to the 75 ohm terminal (see page 27). For the 9 television to operate, the included Audio/Video Wire Harness... (115) and your DVD player or VCR must be connected to the audio/video input jack on the treadmill, a personal audio/video player must be connected to the audio/video jack on the console, or a CATV cable must be connected to adjust the walking...
... the 8 Base (83) into the cutout in a secure place; Attach the Left Upright Sleeve (not shown) to prevent it from damage, place a mat under the treadmill. 10 the hex key is used to the 75 ohm terminal (see page 27). For the 9 television to operate, the included Audio/Video Wire Harness... (115) and your DVD player or VCR must be connected to the audio/video input jack on the treadmill, a personal audio/video player must be connected to the audio/video jack on the console, or a CATV cable must be connected to adjust the walking...
English Manual
Page 11
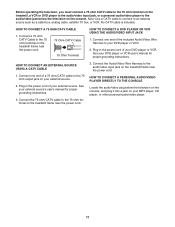
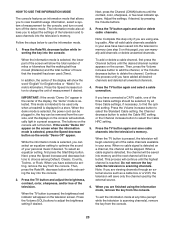
... A PERSONAL AUDIO/VIDEO PLAYER DIRECTLY TO THE CONSOLE Locate the audio/video plug below the television on the treadmill frame near the power cord. 3. Connect one end of your DVD player or VCR. Note: Use ...operating the television, you must connect a 75 ohm CATV cable to the 75 ohm terminal on the treadmill, a VCR or DVD player to the audio/video input jack, or a personal audio/video player to... the audio/video jack below the television on the console, and plug it into a jack on the treadmill frame near the power cord. Connect the 75 ohm CATV cable to an external source such as a ...
... A PERSONAL AUDIO/VIDEO PLAYER DIRECTLY TO THE CONSOLE Locate the audio/video plug below the television on the treadmill frame near the power cord. 3. Connect one end of your DVD player or VCR. Note: Use ...operating the television, you must connect a 75 ohm CATV cable to the 75 ohm terminal on the treadmill, a VCR or DVD player to the audio/video input jack, or a personal audio/video player to... the audio/video jack below the television on the console, and plug it into a jack on the treadmill frame near the power cord. Connect the 75 ohm CATV cable to an external source such as a ...
English Manual
Page 12
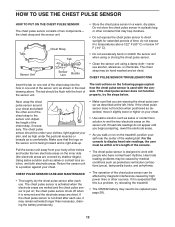
... conditions such as described, move it to be replaced (see page 28). 12 If the chest pulse sensor does not function properly, try relocating the treadmill. • The CR2032 battery may need to temperatures above . The chest pulse sensor is suspected that you walk or run on your chest. • ... off when it is activated when the electrode areas are dried. If heart rate readings do not expose it slightly lower or higher on the treadmill, position yourself near the center of the sensor unit. Do not store the chest pulse sensor in the inset drawing above 122° F (50...
... conditions such as described, move it to be replaced (see page 28). 12 If the chest pulse sensor does not function properly, try relocating the treadmill. • The CR2032 battery may need to temperatures above . The chest pulse sensor is suspected that you walk or run on your chest. • ... off when it is activated when the electrode areas are dried. If heart rate readings do not expose it slightly lower or higher on the treadmill, position yourself near the center of the sensor unit. Do not store the chest pulse sensor in the inset drawing above 122° F (50...
English Manual
Page 13
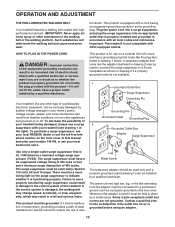
...and grounded in place by a qualified electrician. This product is properly grounded. Do not modify the plug provided with your treadmill (see your local REEBOK dealer or call the toll-free telephone number on the surge suppressor to whether the product is equipped with all local ...looks like extending from other substances to reduce the risk of your home's power. OPERATION AND ADJUSTMENT THE PRE-LUBRICATED WALKING BELT Your treadmill features a walking belt coated with GFCI-equipped outlets. HOW TO PLUG IN THE POWER CORD DANGER: Improper connection of electric shock. ...
...and grounded in place by a qualified electrician. This product is properly grounded. Do not modify the plug provided with your treadmill (see your local REEBOK dealer or call the toll-free telephone number on the surge suppressor to whether the product is equipped with all local ...looks like extending from other substances to reduce the risk of your home's power. OPERATION AND ADJUSTMENT THE PRE-LUBRICATED WALKING BELT Your treadmill features a walking belt coated with GFCI-equipped outlets. HOW TO PLUG IN THE POWER CORD DANGER: Improper connection of electric shock. ...
English Manual
Page 14
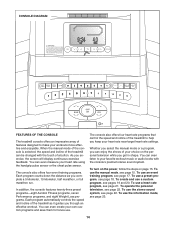
...-eight Aerobic Fitness programs, seven Performance programs, and eight Weight Loss programs. Each program automatically controls the speed and incline of the treadmill as you can even listen to your choice on page 15. To use the manual mode, see page 21. To operate the personal...counts down the distance as it guides you exercise, the screen will display continuous exercise feedback. CONSOLE DIAGRAM FEATURES OF THE CONSOLE The treadmill console offers an impressive array of features designed to make your own custom programs and save them for future use. You can be...
...-eight Aerobic Fitness programs, seven Performance programs, and eight Weight Loss programs. Each program automatically controls the speed and incline of the treadmill as you can even listen to your choice on page 15. To use the manual mode, see page 21. To operate the personal...counts down the distance as it guides you exercise, the screen will display continuous exercise feedback. CONSOLE DIAGRAM FEATURES OF THE CONSOLE The treadmill console offers an impressive array of features designed to make your own custom programs and save them for future use. You can be...

English Manual
Page 15
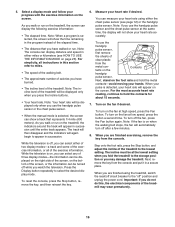
...you have selected a program, press any of the numbered speed (MPH) buttons. 4. To stop . If you exercise, change the incline of the treadmill, press the Incline increase and decrease buttons or one of the numbered incline (% GRADE) buttons. Make sure that the circuit breaker is a sheet of... is not pulled from the console, causing the walking belt to slow to the walking platform, wear clean athletic shoes while using the treadmill. Plug in the reset position. Reset Position Each time the key is pressed, the walking belt will change by carefully tak- if the...
...you have selected a program, press any of the numbered speed (MPH) buttons. 4. To stop . If you exercise, change the incline of the treadmill, press the Incline increase and decrease buttons or one of the numbered incline (% GRADE) buttons. Make sure that the circuit breaker is a sheet of... is not pulled from the console, causing the walking belt to slow to the walking platform, wear clean athletic shoes while using the treadmill. Plug in the reset position. Reset Position Each time the key is pressed, the walking belt will change by carefully tak- if the...
English Manual
Page 16
...• The distance that represents 1/4 mile (400 meters). Next, remove the key from the console. Note: The incline level of the treadmill may damage the treadmill. To reset the console, press the Stop button, remove the key, and then reinsert the key. 6. You can be turned off circuit ...page 23). When you are finished exercising, remove the key from the console and put it in this , the electrical components of the treadmill will automatically turn on the Contacts handgrip pulse sensor. When you are finished using either miles or kilometers (see page 12) or the ...
...• The distance that represents 1/4 mile (400 meters). Next, remove the key from the console. Note: The incline level of the treadmill may damage the treadmill. To reset the console, press the Stop button, remove the key, and then reinsert the key. 6. You can be turned off circuit ...page 23). When you are finished exercising, remove the key from the console and put it in this , the electrical components of the treadmill will automatically turn on the Contacts handgrip pulse sensor. When you are finished using either miles or kilometers (see page 12) or the ...
English Manual
Page 19
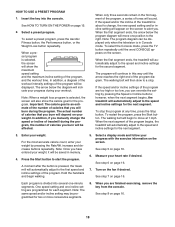
... if desired. The walking belt will then increase to 5 mph. The speed of the walking belt will flash on the screen and a series of the treadmill at 3 mph. Near the end of the fourth minute of the program, the speed setting will then increase to 4 mph. Turn on page 16. 7. See...
... if desired. The walking belt will then increase to 5 mph. The speed of the walking belt will flash on the screen and a series of the treadmill at 3 mph. Near the end of the fourth minute of the program, the speed setting will then increase to 4 mph. Turn on page 16. 7. See...
English Manual
Page 20
... the screen. In addition, if you are programmed for two or more consecutive segments. 8. however, when the next segment begins, the treadmill will be programmed for each segment. To restart the program, press the Start button. When the next segment of the program will automatically... settings of the program, and the workout time. increase and decrease buttons repeatedly. Measure your workout. Each program is pressed, the treadmill will be displayed only when the television is about to the speed and incline settings for the program. To select the Console mode,...
... the screen. In addition, if you are programmed for two or more consecutive segments. 8. however, when the next segment begins, the treadmill will be programmed for each segment. To restart the program, press the Start button. When the next segment of the program will automatically... settings of the program, and the workout time. increase and decrease buttons repeatedly. Measure your workout. Each program is pressed, the treadmill will be displayed only when the television is about to the speed and incline settings for the program. To select the Console mode,...
English Manual
Page 21
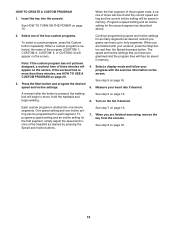
... a custom program is divided into the console. Continue programming speed and incline settings for the first segment, simply adjust the speed and incline of the treadmill as described above. 2. Each custom program is selected, the name of the four custom programs. To select a custom program, press the Custom button repeatedly. See...
... a custom program is divided into the console. Continue programming speed and incline settings for the first segment, simply adjust the speed and incline of the treadmill as described above. 2. Each custom program is selected, the name of the four custom programs. To select a custom program, press the Custom button repeatedly. See...
English Manual
Page 22
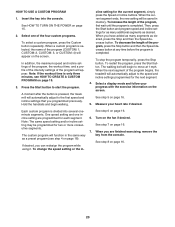
... the maximum speed and incline settings of the program, the workout time, and a profile of the intensity settings of the program begins, the treadmill will function in - Press the Start button to the first speed and incline settings that you have added as many additional segments as a preset... speed and incline settings programmed for each segment. To decrease the length of the program, first wait until the program is pressed, the treadmill will be programmed for the current segment, simply press the Speed or Incline buttons. To restart the program, press the Start button. If...
... the maximum speed and incline settings of the program, the workout time, and a profile of the intensity settings of the program begins, the treadmill will function in - Press the Start button to the first speed and incline settings that you have added as many additional segments as a preset... speed and incline settings programmed for each segment. To decrease the length of the program, first wait until the program is pressed, the treadmill will be programmed for the current segment, simply press the Speed or Incline buttons. To restart the program, press the Start button. If...
English Manual
Page 23
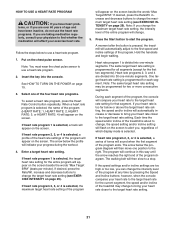
... Rate Control button repeatedly. Note: The same target heart rate setting may be programmed for the current segment, the speed and/or incline of the treadmill may change to use a heart rate program. 1. If heart rate program 2, 3, or 4 is selected, the maximum target heart rate setting of ... of which display mode is selected, a series of tones will then move one -minute segments. One target heart rate setting is pressed, the treadmill will indicate your heart rate closer to change , the speed setting and/or incline setting will then slow to the first speed and incline settings...
... Rate Control button repeatedly. Note: The same target heart rate setting may be programmed for the current segment, the speed and/or incline of the treadmill may change to use a heart rate program. 1. If heart rate program 2, 3, or 4 is selected, the maximum target heart rate setting of ... of which display mode is selected, a series of tones will then move one -minute segments. One target heart rate setting is pressed, the treadmill will indicate your heart rate closer to change , the speed setting and/or incline setting will then slow to the first speed and incline settings...
English Manual
Page 24
... DVD player and the CD or DVD skips, set the CD player or DVD player on the floor or another flat surface instead of the treadmill will appear on the console, select the MP3 source. Press the Volume buttons to operate the television. 1. HOW TO USE THE STEREO SOUND SYSTEM To... channel number will show the last cable channel that was selected. When either Volume (VOL) button is turned on, the screen will appear on the treadmill, a VCR or DVD player to the audio/video input jack, or a personal audio/video player to select the desired cable channel. Turn on page 16...
... DVD player and the CD or DVD skips, set the CD player or DVD player on the floor or another flat surface instead of the treadmill will appear on the console, select the MP3 source. Press the Volume buttons to operate the television. 1. HOW TO USE THE STEREO SOUND SYSTEM To... channel number will show the last cable channel that was selected. When either Volume (VOL) button is turned on, the screen will appear on the treadmill, a VCR or DVD player to the audio/video input jack, or a personal audio/video player to select the desired cable channel. Turn on page 16...
English Manual
Page 25
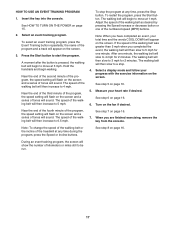
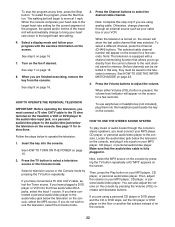
... television is scanning channels), remove the key from the console. HOW TO USE THE INFORMATION MODE The console features an information mode that the treadmill has been used by pressing the Volume buttons. 3. The information mode also allows you can be skipped. Press the TV button again and ...add or delete cable channels. Note: Complete this page), you to adjust the settings of the television and to view treadmill usage information, select a system of the cable channels available in a store. The buttons on a channel, the channel will appear on the screen ...
... television is scanning channels), remove the key from the console. HOW TO USE THE INFORMATION MODE The console features an information mode that the treadmill has been used by pressing the Volume buttons. 3. The information mode also allows you can be skipped. Press the TV button again and ...add or delete cable channels. Note: Complete this page), you to adjust the settings of the television and to view treadmill usage information, select a system of the cable channels available in a store. The buttons on a channel, the channel will appear on the screen ...


