
English Manual
Page 1
Save this manual for reference. IMPORTANT: You must note the product model number and serial number (see the drawing above for future reference. Write the serial number in this equipment. MT Sat. 8 a.m.-4 p.m. www.reebokfitness.com With Universal Dock for iPod® Model No. If you have questions, or if parts are missing, DO NOT CONTACT THE STORE; USER'S MANUAL Serial Number Decal QUESTIONS? please contact Customer Care. MT ON THE WEB: www.reebokservice.com CAUTION Read all precautions and instructions in the space above ) before using this manual before ...
Save this manual for reference. IMPORTANT: You must note the product model number and serial number (see the drawing above for future reference. Write the serial number in this equipment. MT Sat. 8 a.m.-4 p.m. www.reebokfitness.com With Universal Dock for iPod® Model No. If you have questions, or if parts are missing, DO NOT CONTACT THE STORE; USER'S MANUAL Serial Number Decal QUESTIONS? please contact Customer Care. MT ON THE WEB: www.reebokservice.com CAUTION Read all precautions and instructions in the space above ) before using this manual before ...
English Manual
Page 2
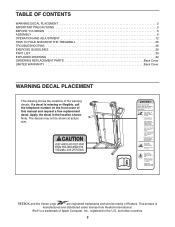
... DECAL PLACEMENT 2 IMPORTANT PRECAUTIONS 3 BEFORE YOU BEGIN 5 ASSEMBLY 6 OPERATION AND ADJUSTMENT 12 HOW TO FOLD AND MOVE THE TREADMILL 25 TROUBLESHOOTING 26 EXERCISE GUIDELINES 29 PART LIST 30 EXPLODED DRAWING 32 ORDERING REPLACEMENT PARTS Back Cover LIMITED WARRANTY Back Cover WARNING ...DECAL PLACEMENT This drawing shows the locations of Reebok. If a decal is manufactured and distributed under license from Reebok International. Apply the decal in the U.S. Note: The decals may not be shown at actual size...
... DECAL PLACEMENT 2 IMPORTANT PRECAUTIONS 3 BEFORE YOU BEGIN 5 ASSEMBLY 6 OPERATION AND ADJUSTMENT 12 HOW TO FOLD AND MOVE THE TREADMILL 25 TROUBLESHOOTING 26 EXERCISE GUIDELINES 29 PART LIST 30 EXPLODED DRAWING 32 ORDERING REPLACEMENT PARTS Back Cover LIMITED WARRANTY Back Cover WARNING ...DECAL PLACEMENT This drawing shows the locations of Reebok. If a decal is manufactured and distributed under license from Reebok International. Apply the decal in the U.S. Note: The decals may not be shown at actual size...
English Manual
Page 3
...under age 12 and pets away from moisture and dust. Never allow more amps. Do not put the treadmill in this manual and order part number 146148, or see your local REEBOK dealer or call the telephone number on the front cover of this manual and all of the specifications ...described on your treadmill before using your treadmill. ICON assumes no responsibility for persons over age 35 or persons with at ...
...under age 12 and pets away from moisture and dust. Never allow more amps. Do not put the treadmill in this manual and order part number 146148, or see your local REEBOK dealer or call the telephone number on the front cover of this manual and all of the specifications ...described on your treadmill before using your treadmill. ICON assumes no responsibility for persons over age 35 or persons with at ...
English Manual
Page 4
... immediately after use only. Do not attempt to do so by an authorized service representative only. 26. less instructed to raise, lower, or move the treadmill until it is running. Do not use this manual should be able to safely lift 45 lbs. (20 kg) to the off position when the... treadmill is holding the frame securely in -home use , before cleaning the treadmill, and before performing the mainte- Never insert any object into any opening on page 5 for in the storage position...
... immediately after use only. Do not attempt to do so by an authorized service representative only. 26. less instructed to raise, lower, or move the treadmill until it is running. Do not use this manual should be able to safely lift 45 lbs. (20 kg) to the off position when the... treadmill is holding the frame securely in -home use , before cleaning the treadmill, and before performing the mainte- Never insert any object into any opening on page 5 for in the storage position...
English Manual
Page 5
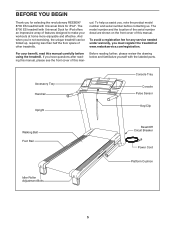
... carefully before contacting us assist you, note the product model number and serial number before using the treadmill. To help us . And when youʼre not exercising, the unique treadmill can be folded up, requiring less than half the floor space of this man- BEFORE YOU BEGIN... Thank you for selecting the revolutionary REEBOK® 8700 ES treadmill with the labeled parts. Before reading further, please review the drawing below and familiarize yourself with Universal Dock for iPod®. ual...
... carefully before contacting us assist you, note the product model number and serial number before using the treadmill. To help us . And when youʼre not exercising, the unique treadmill can be folded up, requiring less than half the floor space of this man- BEFORE YOU BEGIN... Thank you for selecting the revolutionary REEBOK® 8700 ES treadmill with the labeled parts. Before reading further, please review the drawing below and familiarize yourself with Universal Dock for iPod®. ual...
English Manual
Page 6
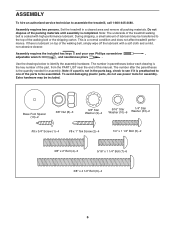
... is the key number of the part, from the PART LIST near the end of this manual. Extra hardware may be transferred to assemble the treadmill, call 1-800-445-2480. The number in parentheses below to be included. Base Foot Spacer (13)-2 3/8" Nut (8)-3 3/8" Star Washer (9)-4 5/16" Star Washer (10...technician to the top of the walking belt or the shipping carton. During shipping, a small amount of lubricant may be assembled. Set the treadmill in the parts bag, check to see if it is preattached to one of the parts to identify the assembly hardware. Assembly requires two...
... is the key number of the part, from the PART LIST near the end of this manual. Extra hardware may be transferred to assemble the treadmill, call 1-800-445-2480. The number in parentheses below to be included. Base Foot Spacer (13)-2 3/8" Nut (8)-3 3/8" Star Washer (9)-4 5/16" Star Washer (10...technician to the top of the walking belt or the shipping carton. During shipping, a small amount of lubricant may be assembled. Set the treadmill in the parts bag, check to see if it is preattached to one of the parts to identify the assembly hardware. Assembly requires two...
English Manual
Page 7
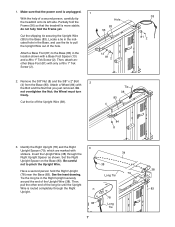
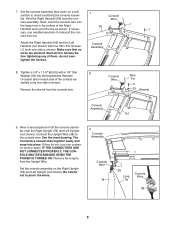
... Foot (81) to the Base (83) in the Base, and use the tie to pull the Upright Wire out of a second person, carefully tip the treadmill onto its left side. the Wheel must turn freely. Insert the Upright Wire (38) through the Right Upright. 38 79 Long Tie 83 78 38...
... Foot (81) to the Base (83) in the Base, and use the tie to pull the Upright Wire out of a second person, carefully tip the treadmill onto its left side. the Wheel must turn freely. Insert the Upright Wire (38) through the Right Upright. 38 79 Long Tie 83 78 38...
English Manual
Page 8
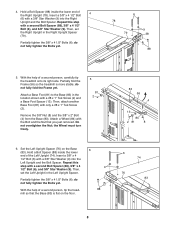
...(88), 3/8" x 4 1/2" Bolt (6), and 3/8" Star Washer (9). With the help of a second person, carefully tip the treadmill onto its right side. Partially fold the Frame (56) so the treadmill is flat on the Base (83). do not fully tighten the Bolts yet. Do not overtighten the Nut; Insert a 3/8" ... Repeat this step with a 3/8" Star Washer (9) into the Right Upright and the Bolt Spacer. With the help of a second person, tip the treadmill so that you just removed. Hold a Bolt Spacer (88) inside the lower end of the Right Upright (78). Then, attach another Base Foot...
...(88), 3/8" x 4 1/2" Bolt (6), and 3/8" Star Washer (9). With the help of a second person, carefully tip the treadmill onto its right side. Partially fold the Frame (56) so the treadmill is flat on the Base (83). do not fully tighten the Bolts yet. Do not overtighten the Nut; Insert a 3/8" ... Repeat this step with a 3/8" Star Washer (9) into the Right Upright and the Bolt Spacer. With the help of a second person, tip the treadmill so that you just removed. Hold a Bolt Spacer (88) inside the lower end of the Right Upright (78). Then, attach another Base Foot...
English Manual
Page 9
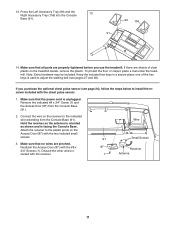
Set the console assembly face down on each side of the console as shown. Console Wire sole assembly. Tighten a 1/4" x 1 1/4" Bolt (5) with four #8 x 3/4" Screws (1) (only one side is shown). sembly (only one connector and try again. The connectors should slide together easily and snap into the bracket and Handrail Crossbar (94) on a soft surface to the console wire. If neces- Console Assembly 8. Set the console assembly on the Right Upright (78) and Left Upright (not shown). Have a second person hold the console assembly near the con- IF THE CONNECTORS ARE ...
Set the console assembly face down on each side of the console as shown. Console Wire sole assembly. Tighten a 1/4" x 1 1/4" Bolt (5) with four #8 x 3/4" Screws (1) (only one side is shown). sembly (only one connector and try again. The connectors should slide together easily and snap into the bracket and Handrail Crossbar (94) on a soft surface to the console wire. If neces- Console Assembly 8. Set the console assembly on the Right Upright (78) and Left Upright (not shown). Have a second person hold the console assembly near the con- IF THE CONNECTORS ARE ...
English Manual
Page 10
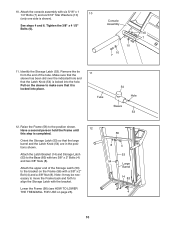
... 8 4 10 Identify the Storage Latch (53). Orient the Storage Latch (53) so that it is shown). Lower the Frame (56) (see HOW TO LOWER THE TREADMILL FOR USE on the sleeve to the bracket on the Frame (56) with the bracket. Attach the console assembly with two 3/8" x 2" Bolts (4) and two 3/8" Nuts...
... 8 4 10 Identify the Storage Latch (53). Orient the Storage Latch (53) so that it is shown). Lower the Frame (56) (see HOW TO LOWER THE TREADMILL FOR USE on the sleeve to the bracket on the Frame (56) with the bracket. Attach the console assembly with two 3/8" x 2" Bolts (4) and two 3/8" Nuts...
English Manual
Page 11
...tightened before you purchase the optional chest pulse sensor (see pages 27 and 28). To protect the floor or carpet, place a mat under the treadmill. Connect the wire on the receiver to install the receiver included with the receiver. Attach the receiver to adjust the walking belt (see page ... Antenna 11 Hold the receiver so the antenna is oriented as shown and is used to the plastic posts on the treadmill decals, remove the plastic. If you use the treadmill. Make sure that the power cord is unplugged. Make sure that no wires are pinched. Keep the included hex keys...
...tightened before you purchase the optional chest pulse sensor (see pages 27 and 28). To protect the floor or carpet, place a mat under the treadmill. Connect the wire on the receiver to install the receiver included with the receiver. Attach the receiver to adjust the walking belt (see page ... Antenna 11 Hold the receiver so the antenna is oriented as shown and is used to the plastic posts on the treadmill decals, remove the plastic. If you use the treadmill. Make sure that the power cord is unplugged. Make sure that no wires are pinched. Keep the included hex keys...
English Manual
Page 12
... to connect the surge suppressor to a 2-pole receptacle as to the control system of this manual and order part number 146148, or see your treadmill (see your local REEBOK dealer or call the telephone number on or off. IMPORTANT: Never apply silicone spray or other appliances being damaged, always use a properly functioning...
... to connect the surge suppressor to a 2-pole receptacle as to the control system of this manual and order part number 146148, or see your treadmill (see your local REEBOK dealer or call the telephone number on or off. IMPORTANT: Never apply silicone spray or other appliances being damaged, always use a properly functioning...
English Manual
Page 13
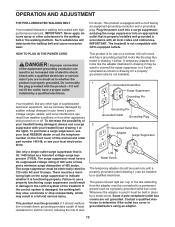
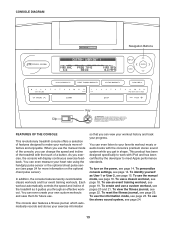
...To use the manual mode of the console, you through an effective workout. You can change the speed and incline of the treadmill with iPod and has been certified by the developer to meet Apple performance standards. CONSOLE DIAGRAM Navigation Buttons Key Clip FEATURES OF ...THE CONSOLE This revolutionary treadmill console offers a selection of features designed to make your workouts more information on the power, see page 22. When you exercise,...
...To use the manual mode of the console, you through an effective workout. You can change the speed and incline of the treadmill with iPod and has been certified by the developer to meet Apple performance standards. CONSOLE DIAGRAM Navigation Buttons Key Clip FEATURES OF ...THE CONSOLE This revolutionary treadmill console offers a selection of features designed to make your workouts more information on the power, see page 22. When you exercise,...
English Manual
Page 14
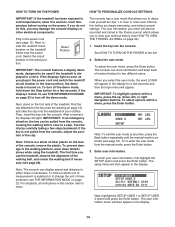
... this section refer to miles. Plug in a store. Reset Position IMPORTANT: The console features a display demo mode, designed to be used if the treadmill is turned on the face of the console, remove the plastic. if the key is selected (see page 16). The user information you to view... within a menu, press the Enter button. If the displays light as soon as User 1 or User 2, enter user information before turning on the treadmill frame near the power cord. If the displays remain lit, see THE INFORMATION MODE on page 13) and slide the clip onto the waistband of...
... this section refer to miles. Plug in a store. Reset Position IMPORTANT: The console features a display demo mode, designed to be used if the treadmill is turned on the face of the console, remove the plastic. if the key is selected (see page 16). The user information you to view... within a menu, press the Enter button. If the displays light as soon as User 1 or User 2, enter user information before turning on the treadmill frame near the power cord. If the displays remain lit, see THE INFORMATION MODE on page 13) and slide the clip onto the waistband of...
English Manual
Page 15
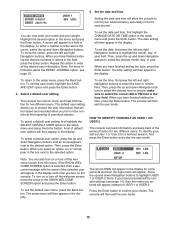
To move the arrow to highlight the month, day, or year field. To set the date, first press the left and right Navigation buttons to the SHOW WELCOME SCREEN option and press the Enter button. To exit the user mode, highlight the SAVE AND EXIT option and press the Enter button. 4. To select a default user setting, first highlight the SELECT DEFAULT USER option in the menu and press the Enter button. To turn on the console at the beginning of a workout session. The setup menu will be loaded and recorded when you have finished setting the time, press the Enter button. ...
To move the arrow to highlight the month, day, or year field. To set the date, first press the left and right Navigation buttons to the SHOW WELCOME SCREEN option and press the Enter button. To exit the user mode, highlight the SAVE AND EXIT option and press the Enter button. 4. To select a default user setting, first highlight the SELECT DEFAULT USER option in the menu and press the Enter button. To turn on the console at the beginning of a workout session. The setup menu will be loaded and recorded when you have finished setting the time, press the Enter button. ...
English Manual
Page 16
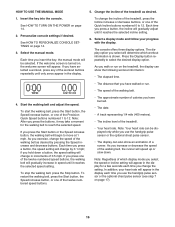
...be selected. See HOW TO TURN ON THE POWER on page 14. 3. Personalize console settings if desired. To change the incline of the treadmill, press the Incline increase or decrease buttons, or one of the walking belt. 4. The display option you select will determine which display ... you press a button, the incline will appear in increments of the Quick Incline buttons numbered 0 to select the desired display option. Note: Regardless of the treadmill. • Your heart rate. See HOW TO PERSONALIZE CONSOLE SETTINGS on page 14. 2. Each time you have burned. • The date. •...
...be selected. See HOW TO TURN ON THE POWER on page 14. 3. Personalize console settings if desired. To change the incline of the treadmill, press the Incline increase or decrease buttons, or one of the walking belt. 4. The display option you select will determine which display ... you press a button, the incline will appear in increments of the Quick Incline buttons numbered 0 to select the desired display option. Note: Regardless of the treadmill. • Your heart rate. See HOW TO PERSONALIZE CONSOLE SETTINGS on page 14. 2. Each time you have burned. • The date. •...
English Manual
Page 17
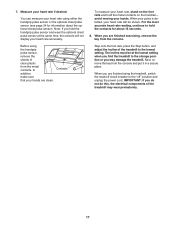
... your hands are finished using the handgrip pulse sensor, remove the sheets of the treadmill may damage the treadmill. Step onto the foot rails, press the Stop button, and adjust the incline of the treadmill to the storage position or you are finished exercising, remove the key from the console.... The incline must be at the same time, the console will be shown. IMPORTANT: If you are clean. 7. Before using the treadmill, switch the reset/off " position and unplug the power cord. avoid moving your heart rate if desired. Measure your hands. In addition, make...
... your hands are finished using the handgrip pulse sensor, remove the sheets of the treadmill may damage the treadmill. Step onto the foot rails, press the Stop button, and adjust the incline of the treadmill to the storage position or you are finished exercising, remove the key from the console.... The incline must be at the same time, the console will be shown. IMPORTANT: If you are clean. 7. Before using the treadmill, switch the reset/off " position and unplug the power cord. avoid moving your heart rate if desired. Measure your hands. In addition, make...
English Manual
Page 18
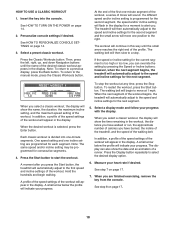
... right end of a runner. To return to the speed and incline settings for the next segment. however, when the next segment begins, the treadmill will show the date and an animation of the profile. When you select a classic workout, the display will automatically adjust to the manual mode,... the first speed and incline settings of the walking belt. Press the Display button repeatedly to a previous display, press the Back button. The treadmill will then slow to the right. Press the Classic Workouts button. If the speed or incline setting for the second segment, the speed and/...
... right end of a runner. To return to the speed and incline settings for the next segment. however, when the next segment begins, the treadmill will show the date and an animation of the profile. When you select a classic workout, the display will automatically adjust to the manual mode,... the first speed and incline settings of the walking belt. Press the Display button repeatedly to a previous display, press the Back button. The treadmill will then slow to the right. Press the Classic Workouts button. If the speed or incline setting for the second segment, the speed and/...
English Manual
Page 19
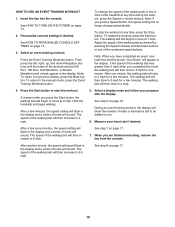
... sound. The walking belt will then increase to 4 mph for one minute, the walking belt will flash in the display. If the speed of the treadmill at any time during the workout, press the Speed or Incline buttons. See step 6 on page 17. 19 To stop . 4. Adjust the speed of the...
... sound. The walking belt will then increase to 4 mph for one minute, the walking belt will flash in the display. If the speed of the treadmill at any time during the workout, press the Speed or Incline buttons. See step 6 on page 17. 19 To stop . 4. Adjust the speed of the...
English Manual
Page 20
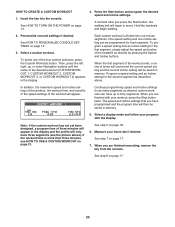
... into the console. In addition, the maximum speed and incline settings of the workout, the workout time, and a profile of the speed settings of the treadmill as desired by pressing the Speed and Incline buttons. When you are finished exercising, remove the key from the console. The speed and incline settings...
... into the console. In addition, the maximum speed and incline settings of the workout, the workout time, and a profile of the speed settings of the treadmill as desired by pressing the Speed and Incline buttons. When you are finished exercising, remove the key from the console. The speed and incline settings...