

English Manual
Page 1
... CUSTOMER SERVICE DEPARTMENT DIRECTLY. Model No. MST ON THE WEB: www.reebokservice.com USER'S MANUAL CAUTION Read all precautions and instructions in this manual before using this manual for future reference.
... CUSTOMER SERVICE DEPARTMENT DIRECTLY. Model No. MST ON THE WEB: www.reebokservice.com USER'S MANUAL CAUTION Read all precautions and instructions in this manual before using this manual for future reference.
English Manual
Page 3
Do not place the treadmill on the front cover of this treadmill are used by persons weighing more than one person on the treadmill at least eight feet of clearance behind it and two feet on each side. manual and order part number 146148, or see your local REEBOK dealer or call the ...toll-free telephone number on any surface that could result in general. 10. Failure to use . 20. Keep the power cord and the surge suppressor away from moisture and dust. Do not put the treadmill in use a properly functioning surge suppressor could...
Do not place the treadmill on the front cover of this treadmill are used by persons weighing more than one person on the treadmill at least eight feet of clearance behind it and two feet on each side. manual and order part number 146148, or see your local REEBOK dealer or call the ...toll-free telephone number on any surface that could result in general. 10. Failure to use . 20. Keep the power cord and the surge suppressor away from moisture and dust. Do not put the treadmill in use a properly functioning surge suppressor could...

English Manual
Page 4
...age of this manual should be performed by or through the use this manual and order a free replacement decal. Do not use of 35 or persons with pre-existing health problems. Read all parts of the treadmill by an authorized service representative. SAVE THESE INSTRUCTIONS The decals... beginning this manual. DANGER: 25. Always unplug the power cord immediately after use only. Do not change the incline of the treadmill regularly. 24. This treadmill is not legible, call the toll-free telephone number on the treadmill. Note: The decals are not shown at actual size. 4 21. This...
...age of this manual should be performed by or through the use this manual and order a free replacement decal. Do not use of 35 or persons with pre-existing health problems. Read all parts of the treadmill by an authorized service representative. SAVE THESE INSTRUCTIONS The decals... beginning this manual. DANGER: 25. Always unplug the power cord immediately after use only. Do not change the incline of the treadmill regularly. 24. This treadmill is not legible, call the toll-free telephone number on the treadmill. Note: The decals are not shown at actual size. 4 21. This...

English Manual
Page 5
... after reading this manual, please see the front cover of this manual carefully before contacting us assist you for selecting the revolutionary REEBOK® 8400 C treadmill. And when you use the treadmill. To help us . To avoid a registration fee for the location). Water Bottle Holder (no water bottle is RBTL97105.0. The serial number can...
... after reading this manual, please see the front cover of this manual carefully before contacting us assist you for selecting the revolutionary REEBOK® 8400 C treadmill. And when you use the treadmill. To help us . To avoid a registration fee for the location). Water Bottle Holder (no water bottle is RBTL97105.0. The serial number can...

English Manual
Page 6
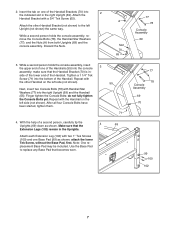
... (74)-2 Wheel Bolt (94)-2 Console Bolt (78)-2 1. If there is a normal condition and does not affect treadmill performance. To avoid damaging plastic parts, do not use the part identification drawings below. Make sure that the Extension Leg is turned so the Base Pad (99) is completed...Assembly requires the included allen wrench and your own phillips screwdriver , wire cutters , and rubber mallet . To identify small parts during assembly, use power tools for assembly. With the help of a second person, carefully raise the 1 Uprights (69) to the top of the walking ...
... (74)-2 Wheel Bolt (94)-2 Console Bolt (78)-2 1. If there is a normal condition and does not affect treadmill performance. To avoid damaging plastic parts, do not use the part identification drawings below. Make sure that the Extension Leg is turned so the Base Pad (99) is completed...Assembly requires the included allen wrench and your own phillips screwdriver , wire cutters , and rubber mallet . To identify small parts during assembly, use power tools for assembly. With the help of a second person, carefully raise the 1 Uprights (69) to the top of the walking ...
English Manual
Page 7
... holds the console assembly, remove the Console Bolts (78), the Handrail Star Washers (77), and the Nuts (A) from both Uprights (69) and the console assembly. Use the Base Pad to the left Upright (not shown) the same way. While a second person holds the console assembly, insert the upper end of one...
... holds the console assembly, remove the Console Bolts (78), the Handrail Star Washers (77), and the Nuts (A) from both Uprights (69) and the console assembly. Use the Base Pad to the left Upright (not shown) the same way. While a second person holds the console assembly, insert the upper end of one...
English Manual
Page 8
... raise the Uprights (69) to fully insert the Latch Knob Sleeve. Note: Extra hardware may be included. 5. Lower the treadmill Frame (110) (see HOW TO LOWER 110 THE TREADMILL FOR USE on the pin. With the help of the Uprights (69) with a Foot Screw (74). Make sure that all parts are... 56 Spring Collar Pin 69 7. Press the Latch Knob Sleeve (56) into the Latch Knob Sleeve (56) and the left Upright (69). If necessary, use the treadmill. Place the treadmill in the storage position (see page 23). Make sure that the collar and the spring are properly tightened before you...
... raise the Uprights (69) to fully insert the Latch Knob Sleeve. Note: Extra hardware may be included. 5. Lower the treadmill Frame (110) (see HOW TO LOWER 110 THE TREADMILL FOR USE on the pin. With the help of the Uprights (69) with a Foot Screw (74). Make sure that all parts are... 56 Spring Collar Pin 69 7. Press the Latch Knob Sleeve (56) into the Latch Knob Sleeve (56) and the left Upright (69). If necessary, use the treadmill. Place the treadmill in the storage position (see page 23). Make sure that the collar and the spring are properly tightened before you...

English Manual
Page 9
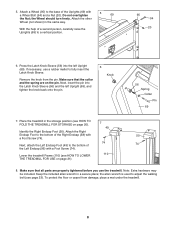
..., remove the Console Back. 1 82 88 Screws 2. Important: If the screws are pinched. make sure to install the receiver included with the chest pulse sensor. 1. Use the included wire tie to the end of the short wire (B) on the bottom of the receiver (A).
..., remove the Console Back. 1 82 88 Screws 2. Important: If the screws are pinched. make sure to install the receiver included with the chest pulse sensor. 1. Use the included wire tie to the end of the short wire (B) on the bottom of the receiver (A).
English Manual
Page 10
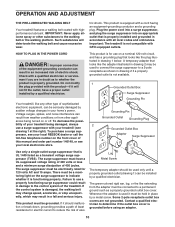
.... tric shock. HOW TO PLUG IN THE POWER CORD DANGER: Improper connection of the equipment-grounding conductor can result in your local REEBOK dealer or call the toll-free telephone number on a nominal 120-volt circuit, and has a grounding plug that is not compatible... Grounding Pin Grounded Outlet Grounding Plug 2 Grounded Outlet Box Adapter Surge Suppressor Use only a single-outlet surge suppressor that looks like any other appliances being damaged, always use a surge suppressor with your treadmill (see your local electronics store. Do not modify the plug provided with ...
.... tric shock. HOW TO PLUG IN THE POWER CORD DANGER: Improper connection of the equipment-grounding conductor can result in your local REEBOK dealer or call the toll-free telephone number on a nominal 120-volt circuit, and has a grounding plug that is not compatible... Grounding Pin Grounded Outlet Grounding Plug 2 Grounded Outlet Box Adapter Surge Suppressor Use only a single-outlet surge suppressor that looks like any other appliances being damaged, always use a surge suppressor with your treadmill (see your local electronics store. Do not modify the plug provided with ...
English Manual
Page 11
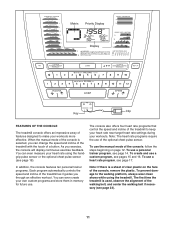
...an impressive array of the console, follow the steps beginning on the face of the treadmill to keep your heart rate near target heart rate settings during your workouts. Note: If there is used, observe the alignment of a button. The console also offers four heart rate programs that... control the speed and incline of the console, remove the plastic. To create and use of the treadmill as it guides you exercise, the console will display continuous exercise feedback. To prevent damage to the walking platform, always wear clean ...
...an impressive array of the console, follow the steps beginning on the face of the treadmill to keep your heart rate near target heart rate settings during your workouts. Note: If there is used, observe the alignment of a button. The console also offers four heart rate programs that... control the speed and incline of the console, remove the plastic. To create and use of the treadmill as it guides you exercise, the console will display continuous exercise feedback. To prevent damage to the walking platform, always wear clean ...
English Manual
Page 12
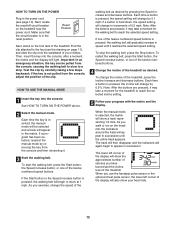
...key into the console. HOW TO USE THE MANUAL MODE 1 Insert the key into the console; See HOW TO TURN ON THE POWER above. 2 Select the manual mode. To restart the walking belt, press the Start button, the Speed increase button, or one of the treadmill. Note: After the buttons are ...4 Change the incline of 0.5 mph. If the Start button or the Speed increase button is pressed, the walking belt will appear in increments of the treadmill as desired by carefully taking a few steps backward; If one of the clip. To stop . Make sure that the circuit breaker is pressed, the ...
...key into the console. HOW TO USE THE MANUAL MODE 1 Insert the key into the console; See HOW TO TURN ON THE POWER above. 2 Select the manual mode. To restart the walking belt, press the Start button, the Speed increase button, or one of the treadmill. Note: After the buttons are ...4 Change the incline of 0.5 mph. If the Start button or the Speed increase button is pressed, the walking belt will appear in increments of the treadmill as desired by carefully taking a few steps backward; If one of the clip. To stop . Make sure that the circuit breaker is pressed, the ...

English Manual
Page 13
In addition, make sure that your hands are finished using the treadmill, switch the reset/off circuit breaker to the lowest setting. Next... key from the console. Note: If you use the handgrip pulse sensor, first remove the sheets of the treadmill to the "off the fans, press the button a third time. To use the handgrip pulse sensor and the optional chest .... Note: The console can display speed and distance in this section refer to the storage position or the treadmill will not be at high speed, press the button a second time. The incline must be displayed in the...
In addition, make sure that your hands are finished using the treadmill, switch the reset/off circuit breaker to the lowest setting. Next... key from the console. Note: If you use the handgrip pulse sensor, first remove the sheets of the treadmill to the "off the fans, press the button a third time. To use the handgrip pulse sensor and the optional chest .... Note: The console can display speed and distance in this section refer to the storage position or the treadmill will not be at high speed, press the button a second time. The incline must be displayed in the...
English Manual
Page 14
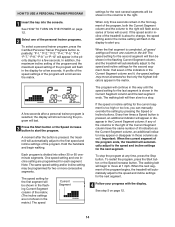
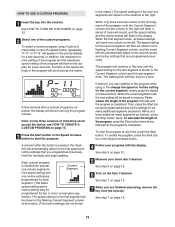
... speed Current Segment settings for the next several segments will be shown in the flashing Current Segment column of the program begins, the treadmill will automatically adjust to the speed and incline settings for the first segment will move one of the personal trainer programs. To select ... the Current Segment column; When the first segment is about to change, the speed setting and/or the incline setting will sound. HOW TO USE A PERSONAL TRAINER PROGRAM 1 Insert the key into either 30 or 60 oneminute segments. A moment after a personal trainer program is divided into ...
... speed Current Segment settings for the next several segments will be shown in the flashing Current Segment column of the program begins, the treadmill will automatically adjust to the speed and incline settings for the first segment will move one of the personal trainer programs. To select ... the Current Segment column; When the first segment is about to change, the speed setting and/or the incline setting will sound. HOW TO USE A PERSONAL TRAINER PROGRAM 1 Insert the key into either 30 or 60 oneminute segments. A moment after a personal trainer program is divided into ...
English Manual
Page 15
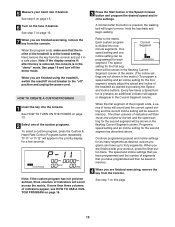
...segments. Program a speed setting and an incline setting for a few times a Speed but- The speed and incline settings that you are finished using the treadmill, switch the reset/off circuit breaker to the left, and the speed setting for the second segment will be saved in the matrix.) To ...setting and an incline setting for the first seg- 5 Measure your workout, press the Stop button twice. If more than three columns of the treadmill is pressed, an additional indicator will appear in the Current Segment column. See page 19 and turn off " position and unplug the power cord....
...segments. Program a speed setting and an incline setting for a few times a Speed but- The speed and incline settings that you are finished using the treadmill, switch the reset/off circuit breaker to the left, and the speed setting for the second segment will be saved in the matrix.) To ...setting and an incline setting for the first seg- 5 Measure your workout, press the Stop button twice. If more than three columns of the treadmill is pressed, an additional indicator will appear in the Current Segment column. See page 19 and turn off " position and unplug the power cord....
English Manual
Page 16
...setting for the last segment is divided into the console. Each custom program is shown in the flashing Current Segment column, and the treadmill will automatically adjust to start the program. The program will last. To increase the length of indicators scroll across the matrix. To restart... selected, the display will show how long the program will continue in this way until the program is pressed, the treadmill will automatically adjust to the program while using it. When the first segment ends, all speed settings will move one column to a stop the program at any ...
...setting for the last segment is divided into the console. Each custom program is shown in the flashing Current Segment column, and the treadmill will automatically adjust to start the program. The program will last. To increase the length of indicators scroll across the matrix. To restart... selected, the display will show how long the program will continue in this way until the program is pressed, the treadmill will automatically adjust to the program while using it. When the first segment ends, all speed settings will move one column to a stop the program at any ...
English Manual
Page 17
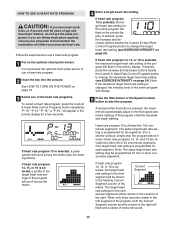
...When only three seconds remain in the priority display for a few seconds. If heart rate program 14, 15, or 16 is pressed, the treadmill will change the maximum target heart rate setting (see EXERCISE INTENSITY on the optional chest pulse sensor. Hold the handrails and begin walking. The ...increase and decrease buttons beside the Custom & Heart Rate Control Programs button to change . 5 Press the Start button or the Speed increase button to use a heart rate program. 2 Insert the key into the console. Note: The same target heart rate setting may be shown in the priority display....
...When only three seconds remain in the priority display for a few seconds. If heart rate program 14, 15, or 16 is pressed, the treadmill will change the maximum target heart rate setting (see EXERCISE INTENSITY on the optional chest pulse sensor. Hold the handrails and begin walking. The ...increase and decrease buttons beside the Custom & Heart Rate Control Programs button to change . 5 Press the Start button or the Speed increase button to use a heart rate program. 2 Insert the key into the console. Note: The same target heart rate setting may be shown in the priority display....
English Manual
Page 19
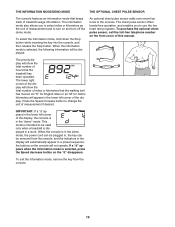
...hours that the walking belt has moved. The lower right corner of the display will be used only when a treadmill is selected, the following information will show the total number of miles or kilometers that the treadmill has been operated. This mode is intended to be displayed: An optional chest pulse sensor..., remove the key from the console, and the indicators in a store. IMPORTANT: If a "d" appears in the lower left corner of measurement and to use the two heart rate programs. To purchase the optional chest pulse sensor, call the toll-free telephone number on the front cover of...
...hours that the walking belt has moved. The lower right corner of the display will be used only when a treadmill is selected, the following information will show the total number of miles or kilometers that the treadmill has been operated. This mode is intended to be displayed: An optional chest pulse sensor..., remove the key from the console, and the indicators in a store. IMPORTANT: If a "d" appears in the lower left corner of measurement and to use the two heart rate programs. To purchase the optional chest pulse sensor, call the toll-free telephone number on the front cover of...
English Manual
Page 20
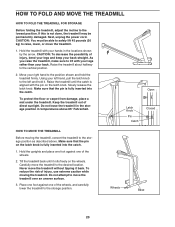
...the pin on the latch knob. Raise the treadmill until it . Keep the treadmill out of injury, use extreme caution while moving the treadmill, convert the treadmill to the storage position as described above 85° Fahrenheit. Do not leave the treadmill in the storage position in the locations shown by... hold it rolls freely on the latch knob is not done, the treadmill may be able to safely lift 45 pounds (20 kg) to the desired location. Using your hands in temperatures above . Tilt the treadmill back until the catch is fully inserted into the catch. 1. Make...
...the pin on the latch knob. Raise the treadmill until it . Keep the treadmill out of injury, use extreme caution while moving the treadmill, convert the treadmill to the storage position as described above 85° Fahrenheit. Do not leave the treadmill in the storage position in the locations shown by... hold it rolls freely on the latch knob is not done, the treadmill may be able to safely lift 45 pounds (20 kg) to the desired location. Using your hands in temperatures above . Tilt the treadmill back until the catch is fully inserted into the catch. 1. Make...
English Manual
Page 21
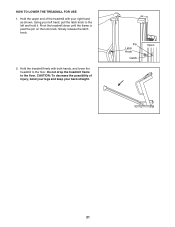
Pivot the treadmill down until the frame is past the pin on the lock knob. Hold the treadmill firmly with your right hand as shown. Pin Latch Knob Catch Open 21 Slowly release the latch knob. 2. Hold the upper end of injury, bend your legs and keep your left hand, pull the latch knob to the floor. Using your back straight. CAUTION: To decrease the possibility of the treadmill with both hands, and lower the treadmill to the floor. HOW TO LOWER THE TREADMILL FOR USE 1. Do not drop the treadmill frame to the left and hold it.
Pivot the treadmill down until the frame is past the pin on the lock knob. Hold the treadmill firmly with your right hand as shown. Pin Latch Knob Catch Open 21 Slowly release the latch knob. 2. Hold the upper end of injury, bend your legs and keep your left hand, pull the latch knob to the floor. Using your back straight. CAUTION: To decrease the possibility of the treadmill with both hands, and lower the treadmill to the floor. HOW TO LOWER THE TREADMILL FOR USE 1. Do not drop the treadmill frame to the left and hold it.

English Manual
Page 22
... the Pulley until the Magnet is not compatible with the Reed Switch. TROUBLESHOOTING Most treadmill problems can be solved by following the steps below. PROBLEM: The power does not turn on page 10. Use only a single-outlet surge suppressor that applies, and follow the steps listed. b.... Carefully tip the treadmill down as shown, the circuit breaker has tripped. Reinsert the key fully into a properly grounded...
... the Pulley until the Magnet is not compatible with the Reed Switch. TROUBLESHOOTING Most treadmill problems can be solved by following the steps below. PROBLEM: The power does not turn on page 10. Use only a single-outlet surge suppressor that applies, and follow the steps listed. b.... Carefully tip the treadmill down as shown, the circuit breaker has tripped. Reinsert the key fully into a properly grounded...


