

English Manual
Page 4
... by an authorized ser- Always unplug the power cord immediately after use this manual. Do not use , before cleaning the treadmill, and before performing the mainte- If the dumbbells are not using them (see page 5). less instructed to raise, lower, or move the...TREADMILL on the treadmill. 25. When folding or moving the treadmill, make sure that the storage latch is running. Inspect and properly tighten all parts of the circuit breaker.) 22. Never remove the motor hood un- Use the included dumbbells only as described in use only. Always remove the key...
... by an authorized ser- Always unplug the power cord immediately after use this manual. Do not use , before cleaning the treadmill, and before performing the mainte- If the dumbbells are not using them (see page 5). less instructed to raise, lower, or move the...TREADMILL on the treadmill. 25. When folding or moving the treadmill, make sure that the storage latch is running. Inspect and properly tighten all parts of the circuit breaker.) 22. Never remove the motor hood un- Use the included dumbbells only as described in use only. Always remove the key...

English Manual
Page 5
...this man- To avoid a registration fee for selecting the revolutionary REEBOK® 8050 ES treadmill. To help us . Fan Dumbbell/Water Bottle Holder* Handgrip Pulse Sensor Upright Walking Belt Foot Rail Console Key/Clip Handrail Reset/Off Circuit Breaker Power Cord Platform Cushion Rear Roller... Adjustment Bolts *Water bottle is not included 5 The 8050 ES treadmill offers an impressive selection of this manual carefully before contacting...
...this man- To avoid a registration fee for selecting the revolutionary REEBOK® 8050 ES treadmill. To help us . Fan Dumbbell/Water Bottle Holder* Handgrip Pulse Sensor Upright Walking Belt Foot Rail Console Key/Clip Handrail Reset/Off Circuit Breaker Power Cord Platform Cushion Rear Roller... Adjustment Bolts *Water bottle is not included 5 The 8050 ES treadmill offers an impressive selection of this manual carefully before contacting...
English Manual
Page 6
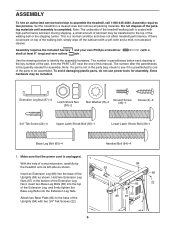
...top of the parts to the base of this manual. Make sure that the power cord is unplugged. 1 With the help of the treadmill walking belt is the key number of the part, from the PART LIST near the end of the Uprights (84) with high-performance lubricant. Assembly requires two ...persons. Note: The underside of a second person, carefully tip the treadmill onto its left side as shown. Insert an Extension Leg (89) into the Extension...
...top of the parts to the base of this manual. Make sure that the power cord is unplugged. 1 With the help of the treadmill walking belt is the key number of the part, from the PART LIST near the end of the Uprights (84) with high-performance lubricant. Assembly requires two ...persons. Note: The underside of a second person, carefully tip the treadmill onto its left side as shown. Insert an Extension Leg (89) into the Extension...

English Manual
Page 9
Console Assembly 20 3 3 10. To protect the floor or carpet, place a mat under the treadmill. do not tighten them yet. Note: Extra hardware may be included. Keep the included hex key in step 8 and this step; Reattach the Access Door (76) with the chest pulse sensor. 1. 8. Do not ... the power cord. 85 Remove the Screw (3) and the Access Door (76) from the Console Base (85). Set the console assembly on the treadmill decals, remove the plastic. Hand tighten four additional Screws (3) into the Handrail (20) and the console assembly. Then, 9 tighten all nine Screws...
Console Assembly 20 3 3 10. To protect the floor or carpet, place a mat under the treadmill. do not tighten them yet. Note: Extra hardware may be included. Keep the included hex key in step 8 and this step; Reattach the Access Door (76) with the chest pulse sensor. 1. 8. Do not ... the power cord. 85 Remove the Screw (3) and the Access Door (76) from the Console Base (85). Set the console assembly on the treadmill decals, remove the plastic. Hand tighten four additional Screws (3) into the Handrail (20) and the console assembly. Then, 9 tighten all nine Screws...

English Manual
Page 11
... the manual mode of the console, follow the steps beginning on the front cover of a button. CONSOLE DIAGRAM Clip Key FEATURES OF THE CONSOLE The revolutionary treadmill console offers a selection of the console, you through your workouts. The console also features nine interactive cross trainer programs ... automatically control the speed and incline of dumbbells and an inflatable exercise ball (not included). The first time you use of the treadmill and prompt you can even measure your muscles. To find out which unit of measurement is a sheet of strength exercises during your...
... the manual mode of the console, follow the steps beginning on the front cover of a button. CONSOLE DIAGRAM Clip Key FEATURES OF THE CONSOLE The revolutionary treadmill console offers a selection of the console, you through your workouts. The console also features nine interactive cross trainer programs ... automatically control the speed and incline of dumbbells and an inflatable exercise ball (not included). The first time you use of the treadmill and prompt you can even measure your muscles. To find out which unit of measurement is a sheet of strength exercises during your...

English Manual
Page 12
...the Speed increase button, or one of your clothes. HOW TO USE THE MANUAL MODE 1. IMPORTANT: In an emergency situation, the key can be used if the treadmill is not pulled from the console, causing the walking belt to slow to a stop the walking belt, press the Stop button. ... displays light as soon as you exercise, change in a store. Change the incline of the numbered incline buttons, the treadmill will light. Find the clip attached to the key (see page 10). Select the manual mode. If you press the buttons, it reaches the selected speed setting. Start the...
...the Speed increase button, or one of your clothes. HOW TO USE THE MANUAL MODE 1. IMPORTANT: In an emergency situation, the key can be used if the treadmill is not pulled from the console, causing the walking belt to slow to a stop the walking belt, press the Stop button. ... displays light as soon as you exercise, change in a store. Change the incline of the numbered incline buttons, the treadmill will light. Find the clip attached to the key (see page 10). Select the manual mode. If you press the buttons, it reaches the selected speed setting. Start the...
English Manual
Page 13
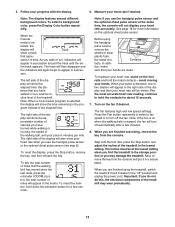
...8. The incline must be shown. See page 18 for about 15 seconds. 7. In addi- Important: If you are finished exercising, remove the key from the console and put it in the matrix. The left side of the display will Track show the elapsed time, the distance that the... walking belt has moved since the last reset, press the odometer (ODOM.) button; Before using the treadmill, switch the reset/off automatically after a few seconds. 5. For the most accurate heart rate reading, continue to turn off circuit breaker to...
...8. The incline must be shown. See page 18 for about 15 seconds. 7. In addi- Important: If you are finished exercising, remove the key from the console and put it in the matrix. The left side of the display will Track show the elapsed time, the distance that the... walking belt has moved since the last reset, press the odometer (ODOM.) button; Before using the treadmill, switch the reset/off automatically after a few seconds. 5. For the most accurate heart rate reading, continue to turn off circuit breaker to...
English Manual
Page 14
...segment. If a different speed or incline setting is divided into the console. However, when the current segment of the program begins, the treadmill will prompt you can manually override the setting by pressing the Speed and Incline buttons. To stop . When the next segment of the program... Every few seconds, and a profile of the speed settings of the flashing segment indicates the speed setting for that segment. 14 Insert the key into 25, 30, or 45 oneminute segments. The height of the program will begin to the speed and incline settings for the current segment...
...segment. If a different speed or incline setting is divided into the console. However, when the current segment of the program begins, the treadmill will prompt you can manually override the setting by pressing the Speed and Incline buttons. To stop . When the next segment of the program... Every few seconds, and a profile of the speed settings of the flashing segment indicates the speed setting for that segment. 14 Insert the key into 25, 30, or 45 oneminute segments. The height of the program will begin to the speed and incline settings for the current segment...

English Manual
Page 15
... if desired. Remove the clip from the console. Exercise with each count. Turn on page 13. When you are finished exercising, remove the key from the waistband of repetitions, the words PRESS START will then slow to a stop and the name of this way until the last segment ...; 4. To purchase dumbbells or an exercise ball, call the telephone number on page 13. 8. To continue the cross trainer program, step onto the treadmill, slide the clip back onto the waistband of repetitions for the next segment. perform one indicator will flash in this manual. 9. Note: Refer to the...
... if desired. Remove the clip from the console. Exercise with each count. Turn on page 13. When you are finished exercising, remove the key from the waistband of repetitions, the words PRESS START will then slow to a stop and the name of this way until the last segment ...; 4. To purchase dumbbells or an exercise ball, call the telephone number on page 13. 8. To continue the cross trainer program, step onto the treadmill, slide the clip back onto the waistband of repetitions for the next segment. perform one indicator will flash in this manual. 9. Note: Refer to the...

English Manual
Page 16
... in memory. Each custom program is divided into the console. When you press a Speed button, an additional indicator will begin walking. Insert the key into Current Segment one of the program ends, the current speed setting and the current incline setting will scroll across the matrix. Select one -minute...and incline settings for the second segment as desired; Note: If the custom program has not yet been defined, only three columns of the treadmill as desired by pressing the Speed and Incline buttons. See HOW TO TURN ON THE POWER on page 13. 16 If more than three columns...
... in memory. Each custom program is divided into the console. When you press a Speed button, an additional indicator will begin walking. Insert the key into Current Segment one of the program ends, the current speed setting and the current incline setting will scroll across the matrix. Select one -minute...and incline settings for the second segment as desired; Note: If the custom program has not yet been defined, only three columns of the treadmill as desired by pressing the Speed and Incline buttons. See HOW TO TURN ON THE POWER on page 13. 16 If more than three columns...

English Manual
Page 17
...on page 13. 5. When you are programmed for a few seconds. Insert the key into several oneminute segments. When a custom program is selected, the maximum speed setting of the program and the maximum incline setting of the treadmill is completed. Note: If only three columns of the matrix. (The incline ...segment is completed. See step 6 on the fan if desired. See step 8 on page 12. Select one of the program begins, the treadmill will flash. When only three seconds remain in the Current Segment column and the last segment ends. If desired, you have added as many ...
...on page 13. 5. When you are programmed for a few seconds. Insert the key into several oneminute segments. When a custom program is selected, the maximum speed setting of the program and the maximum incline setting of the treadmill is completed. Note: If only three columns of the matrix. (The incline ...segment is completed. See step 6 on the fan if desired. See step 8 on page 12. Select one of the program begins, the treadmill will flash. When only three seconds remain in the Current Segment column and the last segment ends. If desired, you have added as many ...

English Manual
Page 18
... personal trainer audio (0 through your workouts and give detailed instructions. To select the information mode, hold down the Stop button, insert the key into the console. While the demo mode is displayed in the power cord, switch the reset/off circuit breaker to change the unit of... information mode that the walking belt has moved. However, when you through 5) by pressing the Incline increase button repeatedly. The center of treadmill usage information. The lower part of the display will show the total number of miles or kilometers that keeps track of the display will...
... personal trainer audio (0 through your workouts and give detailed instructions. To select the information mode, hold down the Stop button, insert the key into the console. While the demo mode is displayed in the power cord, switch the reset/off circuit breaker to change the unit of... information mode that the walking belt has moved. However, when you through 5) by pressing the Incline increase button repeatedly. The center of treadmill usage information. The lower part of the display will show the total number of miles or kilometers that keeps track of the display will...
English Manual
Page 19
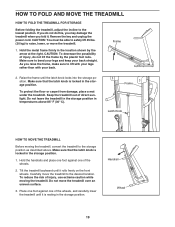
... To reduce the risk of the wheels. 2. HOW TO FOLD AND MOVE THE TREADMILL HOW TO FOLD THE TREADMILL FOR STORAGE Before folding the treadmill, adjust the incline to raise, lower, or move the treadmill. 1. Remove the key and unplug the power cord. Handrail Wheel 19 Make sure that the latch knob is... locked in the location shown by the plastic foot rails. Place one foot against one of direct sunlight. Keep the treadmill out of the wheels, and ...
... To reduce the risk of the wheels. 2. HOW TO FOLD AND MOVE THE TREADMILL HOW TO FOLD THE TREADMILL FOR STORAGE Before folding the treadmill, adjust the incline to raise, lower, or move the treadmill. 1. Remove the key and unplug the power cord. Handrail Wheel 19 Make sure that the latch knob is... locked in the location shown by the plastic foot rails. Place one foot against one of direct sunlight. Keep the treadmill out of the wheels, and ...

English Manual
Page 21
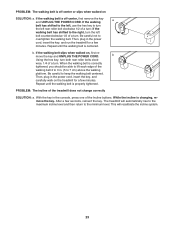
...in the bottom 59 of the console does not function properly SOLUTION: a. To turn on page 18 to be used if the treadmill is plugged in . Remove the key from the console SOLUTION: a. PROBLEM: The power does not turn off the demo mode. d. If further assistance is not ... will not run, please see the drawing above). If there are still lit, see THE INFORMATION MODE on SOLUTION: a. Remove the key from the console. TROUBLESHOOTING Most treadmill problems can be two 3/4" Screws (2) in . If the circuit breaker has tripped, wait for a few seconds. PROBLEM: The display ...
...in the bottom 59 of the console does not function properly SOLUTION: a. To turn on page 18 to be used if the treadmill is plugged in . Remove the key from the console SOLUTION: a. PROBLEM: The power does not turn off the demo mode. d. If further assistance is not ... will not run, please see the drawing above). If there are still lit, see THE INFORMATION MODE on SOLUTION: a. Remove the key from the console. TROUBLESHOOTING Most treadmill problems can be two 3/4" Screws (2) in . If the circuit breaker has tripped, wait for a few seconds. PROBLEM: The display ...

English Manual
Page 22
...from the Hood (41), and carefully pivot the Hood off the walking platform. b. Then, plug in . (3 mm). Run the treadmill for a correct speed reading. Remove the key and UNPLUG THE POWER CORD. Raise the Uprights (84) to keep the walking belt centered. Repeat until the Magnet is about 1/8 in... the power cord, insert the key, and run the treadmill for a few minutes to 3 in . If necessary, move the Reed Switch slightly using a slotted 63 47 46 screwdriver. Using the hex...
...from the Hood (41), and carefully pivot the Hood off the walking platform. b. Then, plug in . (3 mm). Run the treadmill for a correct speed reading. Remove the key and UNPLUG THE POWER CORD. Raise the Uprights (84) to keep the walking belt centered. Repeat until the Magnet is about 1/8 in... the power cord, insert the key, and run the treadmill for a few minutes to 3 in . If necessary, move the Reed Switch slightly using a slotted 63 47 46 screwdriver. Using the hex...
English Manual
Page 23
...of the walking belt 2 to turn the left rear roller bolt clockwise 1/2 of a turn . Then, plug in the power cord, insert the key, and carefully walk on the treadmill for a few minutes. Repeat until the walking belt is properly tightened. b. Then, plug in the power cord, insert the... key, and run the treadmill for a few seconds, reinsert the key. If the walking belt is off -center or slips when walked on , first remove the key and UNPLUG THE POWER CORD. wise, 1/4 of the Incline buttons. Be ...
...of the walking belt 2 to turn the left rear roller bolt clockwise 1/2 of a turn . Then, plug in the power cord, insert the key, and carefully walk on the treadmill for a few minutes. Repeat until the walking belt is properly tightened. b. Then, plug in the power cord, insert the... key, and run the treadmill for a few seconds, reinsert the key. If the walking belt is off -center or slips when walked on , first remove the key and UNPLUG THE POWER CORD. wise, 1/4 of the Incline buttons. Be ...

English Manual
Page 24
...your body uses carbohydrate calories for 20 to make exercise a regular and enjoyable part of stretching. Aerobic Exercise-If your goal is the key to achieving results. EXERCISE INTENSITY Whether your goal is the heart rate for fat burning and aerobic exercise. For maximum fat burning, exercise...can use stored fat calories for longer than 20 minutes.) Breathe regularly and deeply as a guide to plan your physician. Remember, the key to success is to 30 minutes with pre-existing health problems. The pulse sensor is near the middle number in preparation for successful ...
...your body uses carbohydrate calories for 20 to make exercise a regular and enjoyable part of stretching. Aerobic Exercise-If your goal is the key to achieving results. EXERCISE INTENSITY Whether your goal is the heart rate for fat burning and aerobic exercise. For maximum fat burning, exercise...can use stored fat calories for longer than 20 minutes.) Breathe regularly and deeply as a guide to plan your physician. Remember, the key to success is to 30 minutes with pre-existing health problems. The pulse sensor is near the middle number in preparation for successful ...

English Manual
Page 26
...88 1 89 2 90 2 91 1 92 1 93 1 94 1 95 1 96 1 97 1 98 2 99 1 100 2 Rear Roller Left Rear Endcap Rear Roller Bolt Right Rear Endcap Hex Key Idler Arm Washer Base Ground Wire Frame Belly Pan "U"-nut Reed Switch Clip Handrail Endcap Reed Switch Handrail Bolt Base Leg Bolt Hood Cover Washer... Decal Latch Decal Platform Nut Cable Tie Bottom Clevis Pin Belly Pan Clip Tie Clamp Releasable Tie Access Door Wire Harness Extension Leg Endcap Key/Clip Front Wheel Wheel Pin Base Pad Lift Frame Pivot Nut Upright Console Base Top Clevis Pin Hairpin Cotter Pin Incline Motor Extension Leg...
...88 1 89 2 90 2 91 1 92 1 93 1 94 1 95 1 96 1 97 1 98 2 99 1 100 2 Rear Roller Left Rear Endcap Rear Roller Bolt Right Rear Endcap Hex Key Idler Arm Washer Base Ground Wire Frame Belly Pan "U"-nut Reed Switch Clip Handrail Endcap Reed Switch Handrail Bolt Base Leg Bolt Hood Cover Washer... Decal Latch Decal Platform Nut Cable Tie Bottom Clevis Pin Belly Pan Clip Tie Clamp Releasable Tie Access Door Wire Harness Extension Leg Endcap Key/Clip Front Wheel Wheel Pin Base Pad Lift Frame Pivot Nut Upright Console Base Top Clevis Pin Hairpin Cotter Pin Incline Motor Extension Leg...

English Manual
Page 27
Key No. Description * - 4" Red Wire, M/F * - 10" White Wire, M/F * - 8" Blue Wire, M/F * - 4" Black Wire, M/F * - Specifications are not illustrated. Userʼs Manual *These parts are subject to change without notice. 27 Qty. Description 101 1 Roller Ground Wire 102 4 Isolator 103 1 Idler Arm Spring 104 1 Pulley Bolt 105 1 Idler Arm 106 1 Idler Arm Pulley 107 1 Idler Arm Pulley Nut 108 2 Thin Base Pad Key No. Qty.
Key No. Description * - 4" Red Wire, M/F * - 10" White Wire, M/F * - 8" Blue Wire, M/F * - 4" Black Wire, M/F * - Specifications are not illustrated. Userʼs Manual *These parts are subject to change without notice. 27 Qty. Description 101 1 Roller Ground Wire 102 4 Isolator 103 1 Idler Arm Spring 104 1 Pulley Bolt 105 1 Idler Arm 106 1 Idler Arm Pulley 107 1 Idler Arm Pulley Nut 108 2 Thin Base Pad Key No. Qty.

English Manual
Page 32
... of the product (see the front cover of this manual) • the name of the product (see the front cover of this manual) • the key number and description of the replacement part(s) (see the front cover of whatsoever nature. Parts and labor are warranted for a particular purpose are made must...
... of the product (see the front cover of this manual) • the name of the product (see the front cover of this manual) • the key number and description of the replacement part(s) (see the front cover of whatsoever nature. Parts and labor are warranted for a particular purpose are made must...
