

English Manual
Page 1
....reebokfitness.com Model No. As a manufacturer, we are missing, PLEASE DO NOT CONTACT THE STORE; Write the serial number in this manual for future reference. RBTL07107.1 Serial No. MT ON THE WEB: www.reebokservice.com CAUTION Read all precautions and instructions in the space above ) before using ... equipment. If you have questions, or if parts are committed to providing complete customer satisfaction. Serial Number Decal QUESTIONS? please contact Customer Care. Save this manual before contacting us: CALL TOLL-FREE: 1-877-994-4999 Mon.-Fri. 6 a.m.-6 p.m.
....reebokfitness.com Model No. As a manufacturer, we are missing, PLEASE DO NOT CONTACT THE STORE; Write the serial number in this manual for future reference. RBTL07107.1 Serial No. MT ON THE WEB: www.reebokservice.com CAUTION Read all precautions and instructions in the space above ) before using ... equipment. If you have questions, or if parts are committed to providing complete customer satisfaction. Serial Number Decal QUESTIONS? please contact Customer Care. Save this manual before contacting us: CALL TOLL-FREE: 1-877-994-4999 Mon.-Fri. 6 a.m.-6 p.m.
English Manual
Page 2
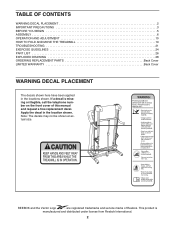
...OF CONTENTS WARNING DECAL PLACEMENT 2 IMPORTANT PRECAUTIONS 3 BEFORE YOU BEGIN 5 ASSEMBLY 6 OPERATION AND ADJUSTMENT 10 HOW TO FOLD AND MOVE THE TREADMILL 19 TROUBLESHOOTING 21 EXERCISE GUIDELINES 24 PART LIST 26 EXPLODED DRAWING 28 ORDERING REPLACEMENT PARTS Back Cover LIMITED WARRANTY Back Cover WARNING DECAL PLACEMENT The... decals shown here have been applied in the location shown. REEBOK and the Vector Logo are registered trademarks and service marks of this manual and request a free replacement decal.
...OF CONTENTS WARNING DECAL PLACEMENT 2 IMPORTANT PRECAUTIONS 3 BEFORE YOU BEGIN 5 ASSEMBLY 6 OPERATION AND ADJUSTMENT 10 HOW TO FOLD AND MOVE THE TREADMILL 19 TROUBLESHOOTING 21 EXERCISE GUIDELINES 24 PART LIST 26 EXPLODED DRAWING 28 ORDERING REPLACEMENT PARTS Back Cover LIMITED WARRANTY Back Cover WARNING DECAL PLACEMENT The... decals shown here have been applied in the location shown. REEBOK and the Vector Logo are registered trademarks and service marks of this manual and request a free replacement decal.

English Manual
Page 3
...problems. 2. Never allow more amps. Athletic support clothes are standing on page 21 if the treadmill is intended only as described. 4. When connecting the power cord (see your local Reebok dealer or call the telephone number on the front cover of heart rate readings. Always hold...may result in sandals. 11. This is being administered. 7. No other appliance should be on the treadmill at a time. 10. Use only a single-outlet surge suppressor that all users of this manual and all of the specifications described on a level surface, with bare feet, wearing only stockings, or...
...problems. 2. Never allow more amps. Athletic support clothes are standing on page 21 if the treadmill is intended only as described. 4. When connecting the power cord (see your local Reebok dealer or call the telephone number on the front cover of heart rate readings. Always hold...may result in sandals. 11. This is being administered. 7. No other appliance should be on the treadmill at a time. 10. Use only a single-outlet surge suppressor that all users of this manual and all of the specifications described on a level surface, with bare feet, wearing only stockings, or...

English Manual
Page 4
...performed by an authorized ser- Never leave the treadmill unattended while it is intended for the location of the treadmill regularly. nance and adjustment procedures described in this manual. Do not use , before cleaning the treadmill, and before performing the mainte- SAVE THESE INSTRUCTIONS... 4 Do not attempt to raise, lower, or move the treadmill. 23. Properly store the...
...performed by an authorized ser- Never leave the treadmill unattended while it is intended for the location of the treadmill regularly. nance and adjustment procedures described in this manual. Do not use , before cleaning the treadmill, and before performing the mainte- SAVE THESE INSTRUCTIONS... 4 Do not attempt to raise, lower, or move the treadmill. 23. Properly store the...

English Manual
Page 5
... other treadmills. The 8050 ES treadmill offers an impressive selection of features designed to make your benefit, read this manual carefully before contacting us assist you ʼre not exercising, the unique 8050 ES treadmill can be folded up, requiring less than half the floor space of this man- To avoid a registration fee for selecting the revolutionary REEBOK® 8050 ES treadmill.
... other treadmills. The 8050 ES treadmill offers an impressive selection of features designed to make your benefit, read this manual carefully before contacting us assist you ʼre not exercising, the unique 8050 ES treadmill can be folded up, requiring less than half the floor space of this man- To avoid a registration fee for selecting the revolutionary REEBOK® 8050 ES treadmill.
English Manual
Page 6
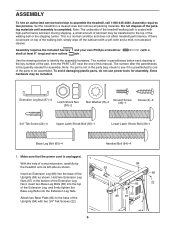
... check to see if it is the key number of the part, from the PART LIST near the end of a second person, carefully tip the treadmill onto its left side as shown. Make sure that the power cord is the quantity needed for assembly. The number after the parentheses is unplugged.... 1 With the help of this manual. Handrail Bolt (64)-4 84 65 82 82 22 22 89 67 6 Set the treadmill in the bottom of lubricant may be assembled. Insert an Extension Leg (89) into the Extension Leg Nuts. ...
... check to see if it is the key number of the part, from the PART LIST near the end of a second person, carefully tip the treadmill onto its left side as shown. Make sure that the power cord is the quantity needed for assembly. The number after the parentheses is unplugged.... 1 With the help of this manual. Handrail Bolt (64)-4 84 65 82 82 22 22 89 67 6 Set the treadmill in the bottom of lubricant may be assembled. Insert an Extension Leg (89) into the Extension Leg Nuts. ...
English Manual
Page 10
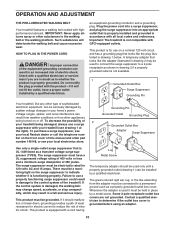
...belt or the walking platform. The surge suppressor must be electrically rated for 120 volts AC and 15 amps. Check with your treadmill (see your local Reebok dealer or call the telephone num- Do not modify the plug provided with a cord having Lug Metal Screw The temporary adapter... should malfunction or break down, grounding provides a path of this manual and order part number 146148, or see drawing 1 at the right). This product...
...belt or the walking platform. The surge suppressor must be electrically rated for 120 volts AC and 15 amps. Check with your treadmill (see your local Reebok dealer or call the telephone num- Do not modify the plug provided with a cord having Lug Metal Screw The temporary adapter... should malfunction or break down, grounding provides a path of this manual and order part number 146148, or see drawing 1 at the right). This product...

English Manual
Page 11
...or an exercise ball, call the telephone number on the face of dumbbells and an inflatable exercise ball (not included). When you select the manual mode of the console, you to perform a variety of a personal trainer to make your workout. These programs feature the voice of strength ...display speed and distance in memory for information about the optional chest pulse sensor). Note: The console can even create your heart rate using the treadmill. To prevent damage to choose among. To find out which unit of measurement is a sheet of clear plastic on the front cover of ...
...or an exercise ball, call the telephone number on the face of dumbbells and an inflatable exercise ball (not included). When you select the manual mode of the console, you to perform a variety of a personal trainer to make your workout. These programs feature the voice of strength ...display speed and distance in memory for information about the optional chest pulse sensor). Note: The console can even create your heart rate using the treadmill. To prevent damage to choose among. To find out which unit of measurement is a sheet of clear plastic on the front cover of ...

English Manual
Page 12
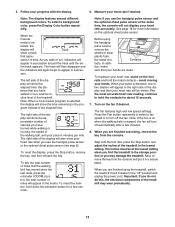
.../off circuit breaker on . After a moment, the displays will be used if the treadmill is inserted, the manual mode will light. HOW TO USE THE MANUAL MODE 1. Insert the key into the console. Select the manual mode. If you press the Start button or the Speed increase button, the walking belt... will change the incline of the treadmill, press the Incline increase and decrease buttons or one of the...
.../off circuit breaker on . After a moment, the displays will be used if the treadmill is inserted, the manual mode will light. HOW TO USE THE MANUAL MODE 1. Insert the key into the console. Select the manual mode. If you press the Start button or the Speed increase button, the walking belt... will change the incline of the treadmill, press the Incline increase and decrease buttons or one of the...
English Manual
Page 13
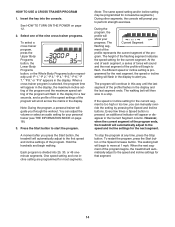
When the manual mode is selected, the display will show the time remaining in the program instead of the..., indicators will appear in succession around the track until the en- The left side of the treadmill. To see step 6). Before using the treadmill, switch the reset/off circuit breaker to hold the metal contacts-avoid moving your heart rate when ... then reinsert the key. sion. The right side of clear plastic from the metal con- Note: If you fold the treadmill to turn off the fan. tion, make sure that the walking belt has moved since the last reset, press the odometer...
When the manual mode is selected, the display will show the time remaining in the program instead of the..., indicators will appear in succession around the track until the en- The left side of the treadmill. To see step 6). Before using the treadmill, switch the reset/off circuit breaker to hold the metal contacts-avoid moving your heart rate when ... then reinsert the key. sion. The right side of clear plastic from the metal con- Note: If you fold the treadmill to turn off the fan. tion, make sure that the walking belt has moved since the last reset, press the odometer...
English Manual
Page 14
...for consecutive segments.) During other segments, the console will automatically adjust to the speed and incline settings for the next segment. You can manually override the setting by pressing the Speed and Incline buttons. The height of the program will flash in the display for the current segment... flashing seg- If the speed or incline setting for a few seconds, and a profile of the speed settings of the program ends, the treadmill will prompt you can adjust the volume or select an audio setting for the next segment, the speed or incline setting will automatically adjust to...
...for consecutive segments.) During other segments, the console will automatically adjust to the speed and incline settings for the next segment. You can manually override the setting by pressing the Speed and Incline buttons. The height of the program will flash in the display for the current segment... flashing seg- If the speed or incline setting for a few seconds, and a profile of the speed settings of the program ends, the treadmill will prompt you can adjust the volume or select an audio setting for the next segment, the speed or incline setting will automatically adjust to...

English Manual
Page 15
... form for the first strength exercise. 6. The program will continue in the Current Segment column), the walking belt will flash in this manual. 9. The personal trainer and the display will tell you the recommended number of dumbbells and an inflatable exercise ball (not included). See... left arm. Note: Refer to the accompanying exercise chart to begin the first strength exercise. See step 6 on page 13. The treadmill will appear in the display. Measure your heart rate if desired. perform one repetition of repetitions, the words PRESS START will then slow...
... form for the first strength exercise. 6. The program will continue in the Current Segment column), the walking belt will flash in this manual. 9. The personal trainer and the display will tell you the recommended number of dumbbells and an inflatable exercise ball (not included). See... left arm. Note: Refer to the accompanying exercise chart to begin the first strength exercise. See step 6 on page 13. The treadmill will appear in the display. Measure your heart rate if desired. perform one repetition of repetitions, the words PRESS START will then slow...

English Manual
Page 18
...If the demo mode is turned on, a "d" will function normally when you through your workouts. The upper left part of hours that the treadmill has been operated. THE INFORMATION MODE The console features an information mode that keeps track of the personal trainer audio (0 through 5) by pressing the...the information mode is turned on and turn off the demo mode. You can adjust the volume of treadmill usage information. However, when you select "ON" as the unit of this manual. To exit the information mode, remove the key from the console. To turn on the front cover ...
...If the demo mode is turned on, a "d" will function normally when you through your workouts. The upper left part of hours that the treadmill has been operated. THE INFORMATION MODE The console features an information mode that keeps track of the personal trainer audio (0 through 5) by pressing the...the information mode is turned on and turn off the demo mode. You can adjust the volume of treadmill usage information. However, when you select "ON" as the unit of this manual. To exit the information mode, remove the key from the console. To turn on the front cover ...

English Manual
Page 21
...are , remove them. There may be two 3/4" Screws (2) in the bottom 59 of this manual. To reset the circuit breaker, wait for five minutes and then press the switch back in . d. If the treadmill still will not run, please see the front cover of the Belly Pan (59). Next, carefully... lower the Uprights (84). If further assistance is plugged in, unplug it, wait for a few seconds. b. PROBLEM: The display of this manual. Find the symptom that meets all...
...are , remove them. There may be two 3/4" Screws (2) in the bottom 59 of this manual. To reset the circuit breaker, wait for five minutes and then press the switch back in . d. If the treadmill still will not run, please see the front cover of the Belly Pan (59). Next, carefully... lower the Uprights (84). If further assistance is plugged in, unplug it, wait for a few seconds. b. PROBLEM: The display of this manual. Find the symptom that meets all...

English Manual
Page 22
...in. (5 to check for a few minutes. When the walking belt is properly tightened, you should be able to lift each edge of this manual. 22 Then, plug in . If neces- If the walking belt is properly tightened. Be careful to the vertical position. Repeat until the ...Remove the three Screws (3) from which they were removed. Rear Roller Bolts c. Turn the Front Roller until the walking belt is overtightened, treadmill performance may decrease and the walking belt may become damaged. Reattach the Hood (not shown), making sure that meets all the specifications described ...
...in. (5 to check for a few minutes. When the walking belt is properly tightened, you should be able to lift each edge of this manual. 22 Then, plug in . If neces- If the walking belt is properly tightened. Be careful to the vertical position. Repeat until the ...Remove the three Screws (3) from which they were removed. Rear Roller Bolts c. Turn the Front Roller until the walking belt is overtightened, treadmill performance may decrease and the walking belt may become damaged. Reattach the Hood (not shown), making sure that meets all the specifications described ...

English Manual
Page 26
... Idler Arm Spacer Wire Tie R0808A 26 Qty. Qty. RBTL07107.1 To locate the parts listed below, see the EXPLODED DRAWING near the end of this manual. PART LIST-Model No.
... Idler Arm Spacer Wire Tie R0808A 26 Qty. Qty. RBTL07107.1 To locate the parts listed below, see the EXPLODED DRAWING near the end of this manual. PART LIST-Model No.

English Manual
Page 27
Qty. Description * - 4" Red Wire, M/F * - 10" White Wire, M/F * - 8" Blue Wire, M/F * - 4" Black Wire, M/F * - Specifications are not illustrated. Userʼs Manual *These parts are subject to change without notice. 27 Description 101 1 Roller Ground Wire 102 4 Isolator 103 1 Idler Arm Spring 104 1 Pulley Bolt 105 1 Idler Arm 106 1 Idler Arm Pulley 107 1 Idler Arm Pulley Nut 108 2 Thin Base Pad Key No. Qty. Key No.
Qty. Description * - 4" Red Wire, M/F * - 10" White Wire, M/F * - 8" Blue Wire, M/F * - 4" Black Wire, M/F * - Specifications are not illustrated. Userʼs Manual *These parts are subject to change without notice. 27 Description 101 1 Roller Ground Wire 102 4 Isolator 103 1 Idler Arm Spring 104 1 Pulley Bolt 105 1 Idler Arm 106 1 Idler Arm Pulley 107 1 Idler Arm Pulley Nut 108 2 Thin Base Pad Key No. Qty. Key No.

English Manual
Page 32
.... All repairs for a particular purpose are made must be prepared to the terms set forth above limitation may also have other consequential damages of this manual) LIMITED WARRANTY ICON Health & Fitness, Inc. (ICON) warrants this product to state. ICON is limited to freight damage, abuse, misuse, improper ... us : • the model number and serial number of the product (see the front cover of this manual) • the name of the product (see the front cover of this manual) • the key number and description of the replacement part(s) (see the front cover of this warranty ...
.... All repairs for a particular purpose are made must be prepared to the terms set forth above limitation may also have other consequential damages of this manual) LIMITED WARRANTY ICON Health & Fitness, Inc. (ICON) warrants this product to state. ICON is limited to freight damage, abuse, misuse, improper ... us : • the model number and serial number of the product (see the front cover of this manual) • the name of the product (see the front cover of this manual) • the key number and description of the replacement part(s) (see the front cover of this warranty ...

