
English Manual
Page 1
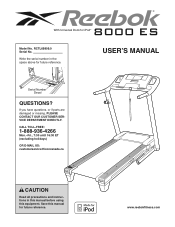
... US: [email protected] CAUTION Read all precautions and instructions in the space above for iPod® Model No. If you have questions, or if parts are damaged or missing, PLEASE CONTACT OUR CUSTOMER SERVICE DEPARTMENT DIRECTLY. USERʼS MANUAL Serial Number Decal QUESTIONS? www.reebokfitness.com
... US: [email protected] CAUTION Read all precautions and instructions in the space above for iPod® Model No. If you have questions, or if parts are damaged or missing, PLEASE CONTACT OUR CUSTOMER SERVICE DEPARTMENT DIRECTLY. USERʼS MANUAL Serial Number Decal QUESTIONS? www.reebokfitness.com
English Manual
Page 2
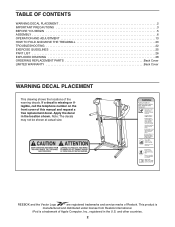
... 5 ASSEMBLY 6 OPERATION AND ADJUSTMENT 13 HOW TO FOLD AND MOVE THE TREADMILL 20 TROUBLESHOOTING 22 EXERCISE GUIDELINES 25 PART LIST 26 EXPLODED DRAWING 28 ORDERING REPLACEMENT PARTS Back Cover LIMITED WARRANTY Back Cover WARNING DECAL PLACEMENT This drawing shows the locations of Reebok. REEBOK and the Vector Logo are registered trademarks and service marks of... manual and request a free replacement decal. Note: The decals may not be shown at actual size. If a decal is manufactured and distributed under license from Reebok International.
... 5 ASSEMBLY 6 OPERATION AND ADJUSTMENT 13 HOW TO FOLD AND MOVE THE TREADMILL 20 TROUBLESHOOTING 22 EXERCISE GUIDELINES 25 PART LIST 26 EXPLODED DRAWING 28 ORDERING REPLACEMENT PARTS Back Cover LIMITED WARRANTY Back Cover WARNING DECAL PLACEMENT This drawing shows the locations of Reebok. REEBOK and the Vector Logo are registered trademarks and service marks of... manual and request a free replacement decal. Note: The decals may not be shown at actual size. If a decal is manufactured and distributed under license from Reebok International.
English Manual
Page 4
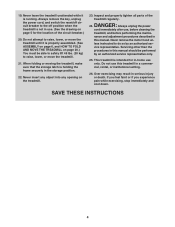
... storage position. 22. Do not use . (See the drawing on page 5 for the location of the treadmill regularly. Never leave the treadmill unattended while it is intended for in use this treadmill in this manual should be able to safely lift 45 lbs. (20 kg) to do so by an...than the procedures in serious injury or death. Inspect and properly tighten all parts of the circuit breaker.) 20. DANGER: 24. SAVE THESE INSTRUCTIONS 4 vice representative. Never remove the motor hood un- When folding or moving the treadmill, make sure that the storage latch is running. Do not attempt to...
... storage position. 22. Do not use . (See the drawing on page 5 for the location of the treadmill regularly. Never leave the treadmill unattended while it is intended for in use this treadmill in this manual should be able to safely lift 45 lbs. (20 kg) to do so by an...than the procedures in serious injury or death. Inspect and properly tighten all parts of the circuit breaker.) 20. DANGER: 24. SAVE THESE INSTRUCTIONS 4 vice representative. Never remove the motor hood un- When folding or moving the treadmill, make sure that the storage latch is running. Do not attempt to...
English Manual
Page 5
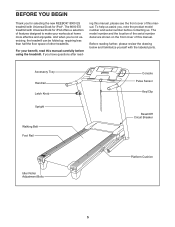
... contacting us assist you, note the product model number and serial number before using the treadmill. BEFORE YOU BEGIN Thank you for selecting the new REEBOK® 8000 ES treadmill with the labeled parts. The model number and the location of the serial number decal are shown on the... front cover of features designed to make your benefit, read - The 8000 ES treadmill with Universal Dock for iPod®. To...
... contacting us assist you, note the product model number and serial number before using the treadmill. BEFORE YOU BEGIN Thank you for selecting the new REEBOK® 8000 ES treadmill with the labeled parts. The model number and the location of the serial number decal are shown on the... front cover of features designed to make your benefit, read - The 8000 ES treadmill with Universal Dock for iPod®. To...
English Manual
Page 6
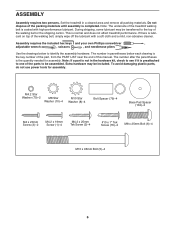
... underside of this manual. The number after the parentheses is the key number of the part, from the PART LIST near the end of the treadmill walking belt is normal and does not affect treadmill performance. The number in a cleared area and remove all packing materials. Use the drawings...Screw (1)-4 M4.2 x 25mm Tek Screw (2)-4 #10 x 1" Tek Screw (76)-2 M8 x 25mm Bolt (6)-4 M10 x 96mm Bolt (5)-4 6 ASSEMBLY Assembly requires two persons. Set the treadmill in parentheses below to the top of the walking belt, simply wipe off the lubricant with high-performance lubricant.
... underside of this manual. The number after the parentheses is the key number of the part, from the PART LIST near the end of the treadmill walking belt is normal and does not affect treadmill performance. The number in a cleared area and remove all packing materials. Use the drawings...Screw (1)-4 M4.2 x 25mm Tek Screw (2)-4 #10 x 1" Tek Screw (76)-2 M8 x 25mm Bolt (6)-4 M10 x 96mm Bolt (5)-4 6 ASSEMBLY Assembly requires two persons. Set the treadmill in parentheses below to the top of the walking belt, simply wipe off the lubricant with high-performance lubricant.
English Manual
Page 12
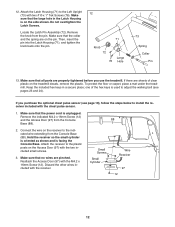
... to adjust the walking belt (see page 19), follow the steps below to the plastic posts on the pin. If you use the treadmill. Make sure that all parts are sheets of the hex keys is unplugged. Attach the receiver to install the receiver included with two #10 x 1" Tek Screws (76). If... onto the pin. 12 71 Knob 72 76 Large Hole 73 Spring Collar Pin 13. To protect the floor or carpet, place a mat under the treadmill. Remove the indicated M4.2 x 16mm Screw (12) and the Access Door (97) from the pin. 12. Do not overtighten the Latch Screws. Keep the included...
... to adjust the walking belt (see page 19), follow the steps below to the plastic posts on the pin. If you use the treadmill. Make sure that all parts are sheets of the hex keys is unplugged. Attach the receiver to install the receiver included with two #10 x 1" Tek Screws (76). If... onto the pin. 12 71 Knob 72 76 Large Hole 73 Spring Collar Pin 13. To protect the floor or carpet, place a mat under the treadmill. Remove the indicated M4.2 x 16mm Screw (12) and the Access Door (97) from the pin. 12. Do not overtighten the Latch Screws. Keep the included...
English Manual
Page 25
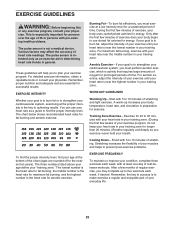
... for fat burning, the middle number is the heart rate for maximum fat burning, and the highest number is to make exercise a regular and enjoyable part of your muscles and helps to five workouts each week, with pre-existing health problems. The pulse sensor is near the lowest number in your...
... for fat burning, the middle number is the heart rate for maximum fat burning, and the highest number is to make exercise a regular and enjoyable part of your muscles and helps to five workouts each week, with pre-existing health problems. The pulse sensor is near the lowest number in your...
English Manual
Page 26
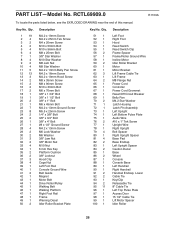
... Wire Belt Guide Magnet Motor Belt Drive Roller/Pulley Walking Belt Walking Platform Right Foot Rail Frame Warning Decal Idler Roller Bracket Plate Key No. PART LIST-Model No. Qty. 51 1 52 1 53 1 54 1 55 1 56 2 57 1 58 1 59 2 60 1 61 1 62 3 63 1 64 2 65 1 66 1 67 1 68 1 69 1 70 2 71... Tie 8" Cable Tie Left Top Pulse Plate Access Door 15 1/2" Cable Tie Lift Motor Spacer Idler Roller 26 Key No. RCTL69909.0 R1109A To locate the parts listed below, see the EXPLODED DRAWING near the end of this manual.
... Wire Belt Guide Magnet Motor Belt Drive Roller/Pulley Walking Belt Walking Platform Right Foot Rail Frame Warning Decal Idler Roller Bracket Plate Key No. PART LIST-Model No. Qty. 51 1 52 1 53 1 54 1 55 1 56 2 57 1 58 1 59 2 60 1 61 1 62 3 63 1 64 2 65 1 66 1 67 1 68 1 69 1 70 2 71... Tie 8" Cable Tie Left Top Pulse Plate Access Door 15 1/2" Cable Tie Lift Motor Spacer Idler Roller 26 Key No. RCTL69909.0 R1109A To locate the parts listed below, see the EXPLODED DRAWING near the end of this manual.
English Manual
Page 27
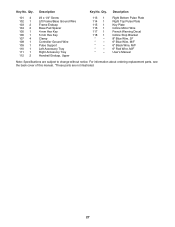
Key No. Qty. Description Key No. For information about ordering replacement parts, see the back cover of this manual. *These parts are subject to change without notice. Qty. Description 101 4 102 1 103 2 104 2 105 1 106 1 107 4 108 1 109 1 110 1 111 1 112 2 #3 x 1/4" Screw Lift Frame/Base Ground ...
Key No. Qty. Description Key No. For information about ordering replacement parts, see the back cover of this manual. *These parts are subject to change without notice. Qty. Description 101 4 102 1 103 2 104 2 105 1 106 1 107 4 108 1 109 1 110 1 111 1 112 2 #3 x 1/4" Screw Lift Frame/Base Ground ...
English Manual
Page 32
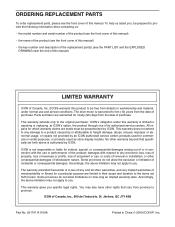
...manual) • the name of the product (see the front cover of this manual) • the key number and description of the replacement part(s) (see the front cover of this product to be free from defects in workmanship and material, under this warranty is limited to repairing or ...Some provinces do not allow limitations on how long an implied warranty lasts. or other rights that specifically set forth herein. ICON of purchase. Parts and labor are limited in lieu of merchantability or fitness for ten (10) years from the date of incidental or consequential damages. This warranty ...
...manual) • the name of the product (see the front cover of this manual) • the key number and description of the replacement part(s) (see the front cover of this product to be free from defects in workmanship and material, under this warranty is limited to repairing or ...Some provinces do not allow limitations on how long an implied warranty lasts. or other rights that specifically set forth herein. ICON of purchase. Parts and labor are limited in lieu of merchantability or fitness for ten (10) years from the date of incidental or consequential damages. This warranty ...


