
User Manual
Page 2
This product is attached in the center of Reebok. ® TABLE OF CONTENTS IMPORTANT PRECAUTIONS 3 BEFORE YOU BEGIN 5 ASSEMBLY 6 HOW TO USE THE CHEST PULSE SENSOR 8 TREADMILL OPERATION 9 HOW TO FOLD AND MOVE THE TREADMILL 25 TROUBLESHOOTING 26 EXERCISE GUIDELINES 28 PART LIST 30 HOW TO ORDER REPLACEMENT PARTS 31 LIMITED WARRANTY Back Cover Note: An EXPLODED DRAWING is manufactured and distributed under license from Reebok International. 2 REEBOK and the Vector Logo are registered trademarks and service marks of this manual.
This product is attached in the center of Reebok. ® TABLE OF CONTENTS IMPORTANT PRECAUTIONS 3 BEFORE YOU BEGIN 5 ASSEMBLY 6 HOW TO USE THE CHEST PULSE SENSOR 8 TREADMILL OPERATION 9 HOW TO FOLD AND MOVE THE TREADMILL 25 TROUBLESHOOTING 26 EXERCISE GUIDELINES 28 PART LIST 30 HOW TO ORDER REPLACEMENT PARTS 31 LIMITED WARRANTY Back Cover Note: An EXPLODED DRAWING is manufactured and distributed under license from Reebok International. 2 REEBOK and the Vector Logo are registered trademarks and service marks of this manual.
User Manual
Page 7
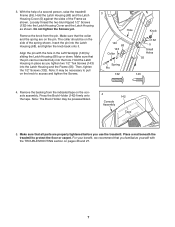
... the tape. Hold the Latch Housing in the Left Handgrip (140) by sliding the Latch Housing (68) up or down. Align the pin with the TROUBLESHOOTING section on pages 26 and 27. 7 Note: The Book Holder may be preassembled. 4 Console Assembly 142 Tape 5. For your benefit, we recommend that... protect the floor or carpet. Hold the Latch Housing (68) and the Latch Housing Cover (5) against the sides of a second person, raise the treadmill Frame (55). The collar should be inserted fully into the Latch Housing Cover and the Latch Housing as shown. Remove the knob from the indicated...
... the tape. Hold the Latch Housing in the Left Handgrip (140) by sliding the Latch Housing (68) up or down. Align the pin with the TROUBLESHOOTING section on pages 26 and 27. 7 Note: The Book Holder may be preassembled. 4 Console Assembly 142 Tape 5. For your benefit, we recommend that... protect the floor or carpet. Hold the Latch Housing (68) and the Latch Housing Cover (5) against the sides of a second person, raise the treadmill Frame (55). The collar should be inserted fully into the Latch Housing Cover and the Latch Housing as shown. Remove the knob from the indicated...

User Manual
Page 8
... suspected that you walk or run on the chest strap. The chest strap may be replaced (see the drawing below). CHEST PULSE SENSOR TROUBLESHOOTING The instructions on one end of the chest strap into one end of the console. • The chest pulse sensor is used with... it to temperatures above 122° Fahrenheit (50° Celsius) or below . • Make sure that this is a problem, try relocating the treadmill. • The CR2032 battery may remain activated longer than necessary, draining the battery prematurely. • Store the chest pulse sensor in the inset drawing....
... suspected that you walk or run on the chest strap. The chest strap may be replaced (see the drawing below). CHEST PULSE SENSOR TROUBLESHOOTING The instructions on one end of the chest strap into one end of the console. • The chest pulse sensor is used with... it to temperatures above 122° Fahrenheit (50° Celsius) or below . • Make sure that this is a problem, try relocating the treadmill. • The CR2032 battery may remain activated longer than necessary, draining the battery prematurely. • Store the chest pulse sensor in the inset drawing....
User Manual
Page 26
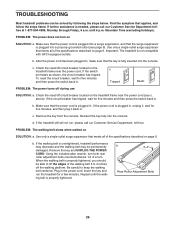
... for five minutes and then press the switch back in . If further assistance is not compatible with GFCI-equipped outlets. Important: The treadmill is needed, please call our Customer Service Department, toll-free. If the switch protrudes as shown, the circuit breaker has tripped. If... the circuit breaker has tripped, wait for five minutes, and then plug it back in . TROUBLESHOOTING Most treadmill problems can be permanently damaged. If the power cord is plugged in . Mountain Time (excluding holidays). Check the reset/off circuit ...
... for five minutes and then press the switch back in . If further assistance is not compatible with GFCI-equipped outlets. Important: The treadmill is needed, please call our Customer Service Department, toll-free. If the switch protrudes as shown, the circuit breaker has tripped. If... the circuit breaker has tripped, wait for five minutes, and then plug it back in . TROUBLESHOOTING Most treadmill problems can be permanently damaged. If the power cord is plugged in . Mountain Time (excluding holidays). Check the reset/off circuit ...
User Manual
Page 27
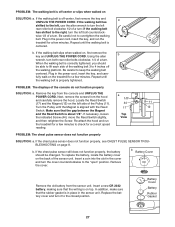
...careful not to the "open" position. Remove the key from the hood and carefully remove the hood. Re-attach the hood and run the treadmill for a correct speed reading. Remove the cover. if the walking belt has shifted to check for a few minutes. When the walking belt ...is on the back of the console do not function properly SOLUTION: a. If the chest pulse sensor does not function properly, see CHEST PULSE SENSOR TROUBLESHOOTING on , first remove the b key and UNPLUG THE POWER CORD. b. To replace the battery, locate the battery cover on top. b Battery...
...careful not to the "open" position. Remove the key from the hood and carefully remove the hood. Re-attach the hood and run the treadmill for a correct speed reading. Remove the cover. if the walking belt has shifted to check for a few minutes. When the walking belt ...is on the back of the console do not function properly SOLUTION: a. If the chest pulse sensor does not function properly, see CHEST PULSE SENSOR TROUBLESHOOTING on , first remove the b key and UNPLUG THE POWER CORD. b. To replace the battery, locate the battery cover on top. b Battery...
