
English Manual
Page 3
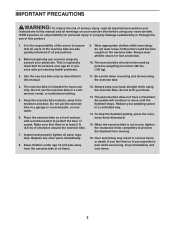
... This is intended for foot protection. 10. Wear appropriate clothes while exercising; Use the exercise bike only as described in a controlled way. 14. Replace any exercise program, consult your pedaling speed in this manual. 11. Always keep your back straight while using your back. 13....it to ensure that all users of the exercise bike are adequately informed of all parts regularly. Be careful when mounting and dismounting the exercise bike. 4. the pedals will continue to prevent the flywheel from moving. 16. The exercise bike should not be used by or through the ...
... This is intended for foot protection. 10. Wear appropriate clothes while exercising; Use the exercise bike only as described in a controlled way. 14. Replace any exercise program, consult your pedaling speed in this manual. 11. Always keep your back straight while using your back. 13....it to ensure that all users of the exercise bike are adequately informed of all parts regularly. Be careful when mounting and dismounting the exercise bike. 4. the pedals will continue to prevent the flywheel from moving. 16. The exercise bike should not be used by or through the ...
English Manual
Page 5
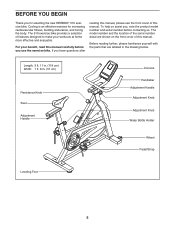
... the front cover of this manual. Cycling is an effective exercise for selecting the new REEBOK® 510 exercise bike. Length: 3 ft. 11 in. (119 cm) Width: 1 ft. 8 in the drawing below. The 510 exercise bike provides a selection of features designed to make your benefit, read this manual carefully before ...labeled in . (51 cm) Resistance Knob Seat Adjustment Handle Console Handlebar Adjustment Handle Adjustment Knob Adjustment Knob Water Bottle Holder Wheel Pedal/Strap Leveling Foot 5 If you for increasing cardiovascular fitness, building endurance, and toning the body.
... the front cover of this manual. Cycling is an effective exercise for selecting the new REEBOK® 510 exercise bike. Length: 3 ft. 11 in. (119 cm) Width: 1 ft. 8 in the drawing below. The 510 exercise bike provides a selection of features designed to make your benefit, read this manual carefully before ...labeled in . (51 cm) Resistance Knob Seat Adjustment Handle Console Handlebar Adjustment Handle Adjustment Knob Adjustment Knob Water Bottle Holder Wheel Pedal/Strap Leveling Foot 5 If you for increasing cardiovascular fitness, building endurance, and toning the body.
English Manual
Page 12
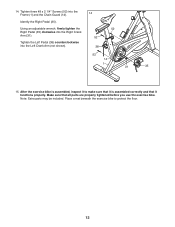
... make sure that it is assembled correctly and that all parts are properly tightened before you use the exercise bike. Note: Extra parts may be included. Make sure that it to protect the floor. 12 14. Tighten three #8 x 2 1/4" Screws (52) into the Left Crank Arm (...not shown). 38 52 14 1 31 35 15. Using an adjustable wrench, firmly tighten the 52 Right Pedal (35) clockwise into the Right Crank Arm (31). 52 Tighten the Left Pedal (38) counterclockwise into the Frame (1) and the Chain Guard (14). 14 Identify the Right...
... make sure that it is assembled correctly and that all parts are properly tightened before you use the exercise bike. Note: Extra parts may be included. Make sure that it to protect the floor. 12 14. Tighten three #8 x 2 1/4" Screws (52) into the Left Crank Arm (...not shown). 38 52 14 1 31 35 15. Using an adjustable wrench, firmly tighten the 52 Right Pedal (35) clockwise into the Right Crank Arm (31). 52 Tighten the Left Pedal (38) counterclockwise into the Frame (1) and the Chain Guard (14). 14 Identify the Right...
English Manual
Page 14
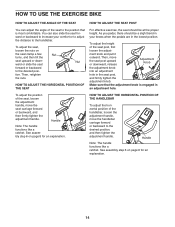
As you pedal, there should be a slight bend in your comfort or to adjust the distance to the handlebar....the seat should be at the proper height. Handle Note: The handle functions like a ratchet. HOW TO USE THE EXERCISE BIKE HOW TO ADJUST THE ANGLE OF THE SEAT HOW TO ADJUST THE SEAT POST You can also slide the seat forward or... backward to increase your knees when the pedals are in the lowest position. See assembly step 6 on page 8 for an explanation. See assembly step 6 on the seat ...
As you pedal, there should be a slight bend in your comfort or to adjust the distance to the handlebar....the seat should be at the proper height. Handle Note: The handle functions like a ratchet. HOW TO USE THE EXERCISE BIKE HOW TO ADJUST THE ANGLE OF THE SEAT HOW TO ADJUST THE SEAT POST You can also slide the seat forward or... backward to increase your knees when the pedals are in the lowest position. See assembly step 6 on page 8 for an explanation. See assembly step 6 on the seat ...
English Manual
Page 15
HOW TO ADJUST THE PEDALING RESISTANCE To increase the resistance of the handlebar post, first loosen the adjustment knob and pull it outward. The flywheel should quickly come to decrease the resistance, turn the resistance knob counterclockwise. IMPORTANT: When the exercise bike is not in an adjustment hole.... the adjustment knob Adjustment Knob into an adjustment hole in the handlebar post, and firmly tighten the adjustment knob. To loosen the pedal straps, press and hold the tabs on the front or rear stabilizer until the rocking motion is engaged in use , turn one...
HOW TO ADJUST THE PEDALING RESISTANCE To increase the resistance of the handlebar post, first loosen the adjustment knob and pull it outward. The flywheel should quickly come to decrease the resistance, turn the resistance knob counterclockwise. IMPORTANT: When the exercise bike is not in an adjustment hole.... the adjustment knob Adjustment Knob into an adjustment hole in the handlebar post, and firmly tighten the adjustment knob. To loosen the pedal straps, press and hold the tabs on the front or rear stabilizer until the rocking motion is engaged in use , turn one...

English Manual
Page 16
... wear a chest heart rate monitor to appear in the displays. Press the Display Mode button repeatedly until the entire track appears. If the pedals are not moved for a few seconds, the console will be shown in succession around the track until the information you are most interested in... in succession. As you use the chest heart rate monitor, the lower display will show the distance (in miles) that you have pedaled and your pedaling speed (in the center display. The lower display—-This display can show your heart rate. When you exercise, indicators will again ...
... wear a chest heart rate monitor to appear in the displays. Press the Display Mode button repeatedly until the entire track appears. If the pedals are not moved for a few seconds, the console will be shown in succession around the track until the information you are most interested in... in succession. As you use the chest heart rate monitor, the lower display will show the distance (in miles) that you have pedaled and your pedaling speed (in the center display. The lower display—-This display can show your heart rate. When you exercise, indicators will again ...
English Manual
Page 18
...BRAKE PAD If pedaling becomes difficult, even when the pedaling resistance is set to the lowest level, the brake pad may need to stop the flywheel. Replace any worn parts immediately. CONSOLE TROUBLESHOOTING Most console problems are the result of the exercise bike regularly. To clean the exercise bike, use the ... actions one more time. 11 Lubricant 18 See assembly step 12 on the flywheel. MAINTENANCE AND TROUBLESHOOTING HOW TO MAINTAIN THE EXERCISE BIKE Inspect and tighten all parts of low batteries. To lubricate the brake pad, first place a few drops of mild detergent. Next...
...BRAKE PAD If pedaling becomes difficult, even when the pedaling resistance is set to the lowest level, the brake pad may need to stop the flywheel. Replace any worn parts immediately. CONSOLE TROUBLESHOOTING Most console problems are the result of the exercise bike regularly. To clean the exercise bike, use the ... actions one more time. 11 Lubricant 18 See assembly step 12 on the flywheel. MAINTENANCE AND TROUBLESHOOTING HOW TO MAINTAIN THE EXERCISE BIKE Inspect and tighten all parts of low batteries. To lubricate the brake pad, first place a few drops of mild detergent. Next...
English Manual
Page 19
Then, turn the Right Pedal (35) counterclockwise and remove it clockwise. 19 Then, see the EXPLODED DRAWING on page 23 and remove all the Screws (51, 52) from the exercise bike. HOW TO ADJUST THE... CHAIN If there is slack in the chain or if the chain makes a slapping sound while you are pedaling, the chain may need to note ... side of the Flywheel (36) is properly adjusted, rst reattach the chain guard and then reattach the right pedal by turning it . Tighten the 5/16" x 1 1/2" Screws (56), one inch of the Flywheel (36). ...
Then, turn the Right Pedal (35) counterclockwise and remove it clockwise. 19 Then, see the EXPLODED DRAWING on page 23 and remove all the Screws (51, 52) from the exercise bike. HOW TO ADJUST THE... CHAIN If there is slack in the chain or if the chain makes a slapping sound while you are pedaling, the chain may need to note ... side of the Flywheel (36) is properly adjusted, rst reattach the chain guard and then reattach the right pedal by turning it . Tighten the 5/16" x 1 1/2" Screws (56), one inch of the Flywheel (36). ...
English Manual
Page 22
... 1 Chain 29 2 Adjustment Knob 30 1 Crank 31 1 Right Crank Arm/Sprocket 32 2 Crank Cap 33 1 Front Shield 34 2 1/4" x 1/2" Screw 35 1 Right Pedal/Strap 36 1 Flywheel 37 1 Right Shield 38 1 Left Pedal/Strap 39 1 Left Shield 40 4 Carriage Cover 41 1 Brake Pad 42 4 Carriage Plate 43 4 1/4" x 1" Screw 44 1 Long Grooved Axle 45 2 Short...
... 1 Chain 29 2 Adjustment Knob 30 1 Crank 31 1 Right Crank Arm/Sprocket 32 2 Crank Cap 33 1 Front Shield 34 2 1/4" x 1/2" Screw 35 1 Right Pedal/Strap 36 1 Flywheel 37 1 Right Shield 38 1 Left Pedal/Strap 39 1 Left Shield 40 4 Carriage Cover 41 1 Brake Pad 42 4 Carriage Plate 43 4 1/4" x 1" Screw 44 1 Long Grooved Axle 45 2 Short...

