

English Manual
Page 1
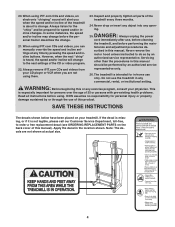
TO AVOID DELAYS, PLEASE CALL DIRECT TO OUR TOLLFREE CUSTOMER HOT LINE. The trained technicians on our customer hot line will guarantee complete satisfaction through direct assistance from our factory. Write the serial number in this manual before using this manual for future reference. CUSTOMER HOT LINE: 1-877-994-4999 Mon.-Fri., 6 a.m.- 6 p.m. RBTL091040 Serial No. MST ® USER'S MANUAL CAUTION Read all precautions and instructions in the space above for future reference. Model No. If you have questions, or if there are missing parts, we will provide immediate ...
TO AVOID DELAYS, PLEASE CALL DIRECT TO OUR TOLLFREE CUSTOMER HOT LINE. The trained technicians on our customer hot line will guarantee complete satisfaction through direct assistance from our factory. Write the serial number in this manual before using this manual for future reference. CUSTOMER HOT LINE: 1-877-994-4999 Mon.-Fri., 6 a.m.- 6 p.m. RBTL091040 Serial No. MST ® USER'S MANUAL CAUTION Read all precautions and instructions in the space above for future reference. Model No. If you have questions, or if there are missing parts, we will provide immediate ...

English Manual
Page 2
¨ TABLE OF CONTENTS IMPORTANT PRECAUTIONS 3 BEFORE YOU BEGIN 5 ASSEMBLY 6 TREADMILL OPERATION 8 HOW TO FOLD AND MOVE THE TREADMILL 24 TROUBLESHOOTING 26 EXERCISE GUIDELINES 28 PART LIST 30 HOW TO ORDER REPLACEMENT PARTS 31 LIMITED WARRANTY Back Cover Note: An EXPLODED DRAWING is manufactured and distributed under license from Reebok International. 2 This product is attached in the center of Reebok. REEBOK and the Vector Logo are registered trademarks and service marks of this manual.
¨ TABLE OF CONTENTS IMPORTANT PRECAUTIONS 3 BEFORE YOU BEGIN 5 ASSEMBLY 6 TREADMILL OPERATION 8 HOW TO FOLD AND MOVE THE TREADMILL 24 TROUBLESHOOTING 26 EXERCISE GUIDELINES 28 PART LIST 30 HOW TO ORDER REPLACEMENT PARTS 31 LIMITED WARRANTY Back Cover Note: An EXPLODED DRAWING is manufactured and distributed under license from Reebok International. 2 This product is attached in the center of Reebok. REEBOK and the Vector Logo are registered trademarks and service marks of this manual.

English Manual
Page 3
...sudden jumps in a garage or covered patio, or near water. 5. Always hold the handrails while using the treadmill. When connecting the power cord (see your local REEBOK dealer or call 1-877-9944999 and order part number 146148. 15. No other appliance should not be used ... 7. Various factors, including the user's movement, may result in damage to persons, read the following important precautions and information before operating the treadmill. 1. It is damaged, the walking belt may change speed or stop unexpectedly, which may affect the accuracy of burns, fire, electric shock...
...sudden jumps in a garage or covered patio, or near water. 5. Always hold the handrails while using the treadmill. When connecting the power cord (see your local REEBOK dealer or call 1-877-9944999 and order part number 146148. 15. No other appliance should not be used ... 7. Various factors, including the user's movement, may result in damage to persons, read the following important precautions and information before operating the treadmill. 1. It is damaged, the walking belt may change speed or stop unexpectedly, which may affect the accuracy of burns, fire, electric shock...
English Manual
Page 4
...iFIT.com CDs and videos, an electronic "chirping" sound will change . tenance and adjustment procedures de- Do not use , before cleaning the treadmill, and before using them. 23. Note: The decals are not using . Never drop or insert any object into any time by an ...authorized service representative. Always unplug the power cord immediately after use the treadmill in this or any commercial, rental, or institutional setting. Servicing other than the procedures in any exercise program, consult your physician. ...
...iFIT.com CDs and videos, an electronic "chirping" sound will change . tenance and adjustment procedures de- Do not use , before cleaning the treadmill, and before using them. 23. Note: The decals are not using . Never drop or insert any object into any time by an ...authorized service representative. Always unplug the power cord immediately after use the treadmill in this or any commercial, rental, or institutional setting. Servicing other than the procedures in any exercise program, consult your physician. ...
English Manual
Page 5
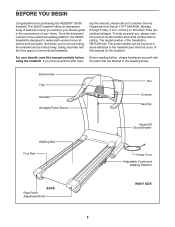
... Rear Roller Adjustment Bolts RIGHT SIDE 5 Mountain Time (excluding holidays). If you 're not exercising, the treadmill can be folded away, taking less than half the floor space of this manual for purchasing the REEBOK® 3500C treadmill. For your benefit, read - ing this manual carefully before calling. Before reading further, please familiarize yourself...
... Rear Roller Adjustment Bolts RIGHT SIDE 5 Mountain Time (excluding holidays). If you 're not exercising, the treadmill can be folded away, taking less than half the floor space of this manual for purchasing the REEBOK® 3500C treadmill. For your benefit, read - ing this manual carefully before calling. Before reading further, please familiarize yourself...
English Manual
Page 6
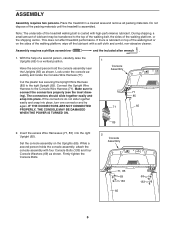
...(65) as shown. If the connectors do not slide together easily and snap into place. Note: The underside of the packing materials until the treadmill is coated with a soft cloth and a mild, non-abrasive cleaner. With the help of the walking platform, or the shipping carton. IF THE...71 85 65 85 2. The connectors should slide together easily and snap into place, turn one connector and try again. This does not affect treadmill performance. Look under the console assembly and locate the Console Wire Harness (71). During shipping, a small amount of lubricant may be transferred to...
...(65) as shown. If the connectors do not slide together easily and snap into place. Note: The underside of the packing materials until the treadmill is coated with a soft cloth and a mild, non-abrasive cleaner. With the help of the walking platform, or the shipping carton. IF THE...71 85 65 85 2. The connectors should slide together easily and snap into place, turn one connector and try again. This does not affect treadmill performance. Look under the console assembly and locate the Console Wire Harness (71). During shipping, a small amount of lubricant may be transferred to...
English Manual
Page 7
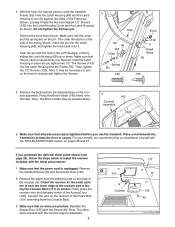
...on the receiver to install the receiver included with the chest pulse sensor. 1. Remove the backing from the Console Back. 3. Place a mat beneath the treadmill to access and tighten the Screws. 3 Hole Knob 140 68 143 Collar Spring Pin 132 132 5 Small Holes 55 143 4. If you tighten two 1/2"... the receiver onto the indicated corner of the Frame as shown. Make sure that all parts are on the side of a second person, raise the treadmill Frame (55). Then, tighten the 1/2" Screws (132). Press the Book Holder (142) firmly onto the tape. Note: The Book Holder may be preassembled. ...
...on the receiver to install the receiver included with the chest pulse sensor. 1. Remove the backing from the Console Back. 3. Place a mat beneath the treadmill to access and tighten the Screws. 3 Hole Knob 140 68 143 Collar Spring Pin 132 132 5 Small Holes 55 143 4. If you tighten two 1/2"... the receiver onto the indicated corner of the Frame as shown. Make sure that all parts are on the side of a second person, raise the treadmill Frame (55). Then, tighten the 1/2" Screws (132). Press the Book Holder (142) firmly onto the tape. Note: The Book Holder may be preassembled. ...
English Manual
Page 8
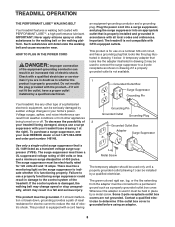
...high-performance lubricant. There must be grounded. The green-colored rigid ear, lug, or the like the plug illustrated in your treadmill (see your treadmill being turned on or off. Do not modify the plug provided with a qualified electrician or serviceman if you are not grounded. ... treadmill features a walking belt coated with all local codes and ordinances. IMPORTANT: Never apply silicone spray or other appliances being damaged, always use a surge suppressor with GFCI-equipped outlets. The surge suppressor must be held in an increased risk of 2 your local REEBOK dealer...
...high-performance lubricant. There must be grounded. The green-colored rigid ear, lug, or the like the plug illustrated in your treadmill (see your treadmill being turned on or off. Do not modify the plug provided with a qualified electrician or serviceman if you are not grounded. ... treadmill features a walking belt coated with all local codes and ordinances. IMPORTANT: Never apply silicone spray or other appliances being damaged, always use a surge suppressor with GFCI-equipped outlets. The surge suppressor must be held in an increased risk of 2 your local REEBOK dealer...
English Manual
Page 9
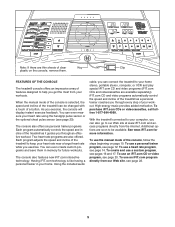
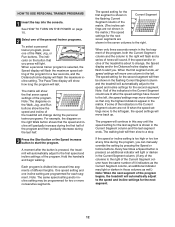
...videocassettes are available separately). The console also offers six personal trainer programs. Each program automatically controls the speed and incline of the treadmill as a personal trainer coaches you through an effective workout. You can even measure your heart rate using the handgrip pulse sensor or...to keep your heart rate near a target heart rate while you can be available. Each program adjusts the speed and incline of the treadmill to be changed with a touch of a button. Using the included audio cable, you exercise. Two heart rate programs are also offered....
...videocassettes are available separately). The console also offers six personal trainer programs. Each program automatically controls the speed and incline of the treadmill as a personal trainer coaches you through an effective workout. You can even measure your heart rate using the handgrip pulse sensor or...to keep your heart rate near a target heart rate while you can be available. Each program adjusts the speed and incline of the treadmill to be changed with a touch of a button. Using the included audio cable, you exercise. Two heart rate programs are also offered....
English Manual
Page 10
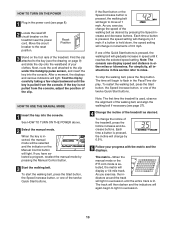
.... Each time a button is not pulled from the console. Find the clip attached to the key (see the drawing on the foot rails of the treadmill as desired by 0.1 mph; To restart the walking belt, press the Start button, the Speed increase button, or one of the twelve Quick Start buttons.... Next, route the cord attached to flash in succession. 10 if a button is pressed, the walking belt will be selected and the indicator on the treadmill near the power cord. Note: The console can display speed and distance in speed until it reaches the selected speed setting. If one of the...
.... Each time a button is not pulled from the console. Find the clip attached to the key (see the drawing on the foot rails of the treadmill as desired by 0.1 mph; To restart the walking belt, press the Start button, the Speed increase button, or one of the twelve Quick Start buttons.... Next, route the cord attached to flash in succession. 10 if a button is pressed, the walking belt will be selected and the indicator on the treadmill near the power cord. Note: The console can display speed and distance in speed until it reaches the selected speed setting. If one of the...
English Manual
Page 11
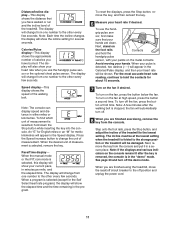
... shows the approximate number of calories you have walked or run and the incline level of measurement. The display will change the unit of the treadmill. Speed display-This display shows the speed of measurement is in the program. An "E" for English miles or an "M" for the Self Select..., the display will appear in minutes per mile, and the elapsed time. The display will automatically turn off. 8 When you are finished using the treadmill, move the reset/off the fan, press the button a third time. Pace/Time display- For the most accurate heart rate reading, continue to the...
... shows the approximate number of calories you have walked or run and the incline level of measurement. The display will change the unit of the treadmill. Speed display-This display shows the speed of measurement is in the program. An "E" for English miles or an "M" for the Self Select..., the display will appear in minutes per mile, and the elapsed time. The display will automatically turn off. 8 When you are finished using the treadmill, move the reset/off the fan, press the button a third time. Pace/Time display- For the most accurate heart rate reading, continue to the...
English Manual
Page 12
...The Pace/Time display will sound. Note: The diagrams on the Walk, Jog, and Run buttons show how the speed and incline of the treadmill will change , the Speed display and/or the Distance/Incline display will last. When only three seconds remain in the Current Segment column are ...move back up. One speed setting and one column to start the program. When the first segment ends, all of the program begins, the treadmill will automatically adjust to the left again, the speed settings will flash the maximum incline setting. Hold the handrails and begin walking. Each program ...
...The Pace/Time display will sound. Note: The diagrams on the Walk, Jog, and Run buttons show how the speed and incline of the treadmill will change , the Speed display and/or the Distance/Incline display will last. When only three seconds remain in the Current Segment column are ...move back up. One speed setting and one column to start the program. When the first segment ends, all of the program begins, the treadmill will automatically adjust to the left again, the speed settings will flash the maximum incline setting. Hold the handrails and begin walking. Each program ...

English Manual
Page 13
.... See step 7 on the console remain lit after the key is removed, the console is at the lowest setting. When you are finished using the treadmill, move at any time, press the Stop button. The time will begin to the speed and incline settings for the next segment. 4 Follow your heart... fan if desired. When the program has ended, make sure that the incline of the program begins, the treadmill will begin to the off the demo mode. When the next segment of the treadmill is in the Pace/Time display. To stop the program at 1 mph. See page 23 and turn off...
.... See step 7 on the console remain lit after the key is removed, the console is at the lowest setting. When you are finished using the treadmill, move at any time, press the Stop button. The time will begin to the speed and incline settings for the next segment. 4 Follow your heart... fan if desired. When the program has ended, make sure that the incline of the program begins, the treadmill will begin to the off the demo mode. When the next segment of the treadmill is in the Pace/Time display. To stop the program at 1 mph. See page 23 and turn off...
English Manual
Page 14
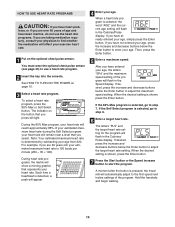
... the 85% Max program, your heart rate will light. Then, press the Enter button. 5 Enter a maximum speed. If the 85% Max program is pressed, the treadmill will affect your exercise heart rate. 1 Put on the optional chest pulse sensor. When the desired setting is detected, a peak will flash in the Calories...
... the 85% Max program, your heart rate will light. Then, press the Enter button. 5 Enter a maximum speed. If the 85% Max program is pressed, the treadmill will affect your exercise heart rate. 1 Put on the optional chest pulse sensor. When the desired setting is detected, a peak will flash in the Calories...

English Manual
Page 15
...rate is too far below the current target heart rate, the incline of the treadmill may automatically change to bring your heart rate is programmed for all segments. If...program, the letters "PLS" will flash in the Calories/Pulse display and the speed and incline of the treadmill will also increase to bring your heart rate to the target heart rate. However, each time the console... still too far below or above the target heart rate, a tone will sound and the speed of the treadmill will flash. To use a heart rate program again, reselect the program and start it at any time, ...
...rate is too far below the current target heart rate, the incline of the treadmill may automatically change to bring your heart rate is programmed for all segments. If...program, the letters "PLS" will flash in the Calories/Pulse display and the speed and incline of the treadmill will also increase to bring your heart rate to the target heart rate. However, each time the console... still too far below or above the target heart rate, a tone will sound and the speed of the treadmill will flash. To use a heart rate program again, reselect the program and start it at any time, ...

English Manual
Page 16
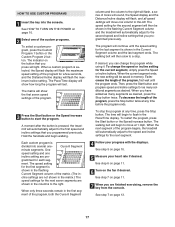
...- See step 7 on page 10. 2 Select one of the Speed buttons is finished, remove the key. When you have programmed and the number of the treadmill as desired; The speed and incline settings that you are not shown in the matrix.) To program a speed setting and an incline setting for the...
...- See step 7 on page 10. 2 Select one of the Speed buttons is finished, remove the key. When you have programmed and the number of the treadmill as desired; The speed and incline settings that you are not shown in the matrix.) To program a speed setting and an incline setting for the...
English Manual
Page 17
...the Start button and program speed and incline settings for the second segment will then be saved in the flashing Current Segment column and the treadmill will begin walking. The Pace/Time display will show the first seven speed settings of the program begins, the... treadmill will last. Each custom program is pressed, the treadmill will then slow to the second speed and incline settings that you programmed previously. One speed setting and one - If desired, you are ...
...the Start button and program speed and incline settings for the second segment will then be saved in the flashing Current Segment column and the treadmill will begin walking. The Pace/Time display will show the first seven speed settings of the program begins, the... treadmill will last. Each custom program is pressed, the treadmill will then slow to the second speed and incline settings that you programmed previously. One speed setting and one - If desired, you are ...
English Manual
Page 18
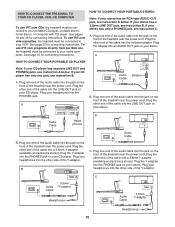
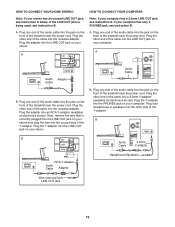
... an RCA-type AUDIO OUT jack, see instruction A below . Plug one jack, see instruction B. Plug the other end of the treadmill near the power cord. Plug the other end of the treadmill near the power cord. Plug one end of the audio cable into the jack on the front of the cable... CD player has separate LINE OUT and PHONES jacks, see instruction A below . Plug your VCR. HOW TO CONNECT THE TREADMILL TO YOUR CD PLAYER, VCR, OR COMPUTER To use iFIT.com CDs, the treadmill must be connected to your stereo has a 3.5mm LINE OUT jack, see instruction B. See pages 18 and 19...
... an RCA-type AUDIO OUT jack, see instruction A below . Plug one jack, see instruction B. Plug the other end of the treadmill near the power cord. Plug the other end of the treadmill near the power cord. Plug one end of the audio cable into the jack on the front of the cable... CD player has separate LINE OUT and PHONES jacks, see instruction A below . Plug your VCR. HOW TO CONNECT THE TREADMILL TO YOUR CD PLAYER, VCR, OR COMPUTER To use iFIT.com CDs, the treadmill must be connected to your stereo has a 3.5mm LINE OUT jack, see instruction B. See pages 18 and 19...
English Manual
Page 19
... jack, see instruction A. Plug one end of the audio cable into the jack on the front of the cable into the other end of the treadmill near the power cord. Plug the adapter into a 3.5mm Y-adapter (available at electronics stores). Plug one end of the cable into an RCA Y-adapter ...your computer. Plug the adapter into the jack on your computer. A LINE OUT Audio Cable Audio Adapter Cable B. Plug the other end of the treadmill near the power cord. Note: If your stereo. Plug the Y-adapter into the included adapter. Plug the other end of the cable into the LINE...
... jack, see instruction A. Plug one end of the audio cable into the jack on the front of the cable into the other end of the treadmill near the power cord. Plug the adapter into a 3.5mm Y-adapter (available at electronics stores). Plug one end of the cable into an RCA Y-adapter ...your computer. Plug the adapter into the jack on your computer. A LINE OUT Audio Cable Audio Adapter Cable B. Plug the other end of the treadmill near the power cord. Note: If your stereo. Plug the Y-adapter into the included adapter. Plug the other end of the cable into the LINE...
English Manual
Page 20
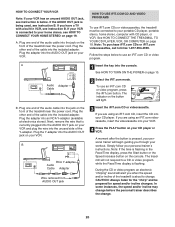
... adapter into the jack on the button will alert you are using an iFIT.com videocassette, insert the videocassette into the unused side of the treadmill is being used, see instruction A below to change . 20 HOW TO USE IFIT.COM CD AND VIDEO PROGRAMS To use iFIT.com CDs or videocassettes... front of the cable into the console. A moment after the button is pressed, your personal trainer will not respond to your personal trainer's instructions. The treadmill will begin guiding you are using an iFIT.com CD, insert the CD into the AUDIO OUT jack on page 19. During the CD or...
... adapter into the jack on the button will alert you are using an iFIT.com videocassette, insert the videocassette into the unused side of the treadmill is being used, see instruction A below to change . 20 HOW TO USE IFIT.COM CD AND VIDEO PROGRAMS To use iFIT.com CDs or videocassettes... front of the cable into the console. A moment after the button is pressed, your personal trainer will not respond to your personal trainer's instructions. The treadmill will begin guiding you are using an iFIT.com CD, insert the CD into the AUDIO OUT jack on page 19. During the CD or...