

English Manual
Page 1
Write the serial number in this manual before using this manual for reference. Or call 1-877-994-4999 Mon.–-Fri. 6 a.m.–-6 p.m. Save this equipment. RBTL19013.0 Serial No. MT Please do not contact the store. CAUTION ... the space above for future reference. CUSTOMER CARE For service at any time, go to www.reebokservice.com. MT Sat. 8 a.m.–-4 p.m. www.reeboktness.com Model No. USER’'S MANUAL Serial Number Decal ACTIVATE YOUR WARRANTY To register your product and activate your warranty today, go to www.reebokservice.com/ registration.
Write the serial number in this manual before using this manual for reference. Or call 1-877-994-4999 Mon.–-Fri. 6 a.m.–-6 p.m. Save this equipment. RBTL19013.0 Serial No. MT Please do not contact the store. CAUTION ... the space above for future reference. CUSTOMER CARE For service at any time, go to www.reebokservice.com. MT Sat. 8 a.m.–-4 p.m. www.reeboktness.com Model No. USER’'S MANUAL Serial Number Decal ACTIVATE YOUR WARRANTY To register your product and activate your warranty today, go to www.reebokservice.com/ registration.
English Manual
Page 2
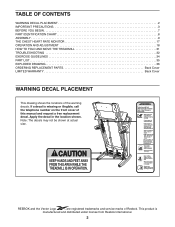
... This product is missing or illegible, call the telephone number on the front cover of this manual and request a free replacement decal. Apply the decal in the location shown. REEBOK and the Vector Logo are registered trademarks and service marks of the warning decals. TABLE OF ...ADJUSTMENT 18 HOW TO FOLD AND MOVE THE TREADMILL 31 TROUBLESHOOTING 32 EXERCISE GUIDELINES 34 PART LIST 35 EXPLODED DRAWING 36 ORDERING REPLACEMENT PARTS Back Cover LIMITED WARRANTY Back Cover WARNING DECAL PLACEMENT This drawing shows the locations of Reebok. If a decal is manufactured and distributed ...
... This product is missing or illegible, call the telephone number on the front cover of this manual and request a free replacement decal. Apply the decal in the location shown. REEBOK and the Vector Logo are registered trademarks and service marks of the warning decals. TABLE OF ...ADJUSTMENT 18 HOW TO FOLD AND MOVE THE TREADMILL 31 TROUBLESHOOTING 32 EXERCISE GUIDELINES 34 PART LIST 35 EXPLODED DRAWING 36 ORDERING REPLACEMENT PARTS Back Cover LIMITED WARRANTY Back Cover WARNING DECAL PLACEMENT This drawing shows the locations of Reebok. If a decal is manufactured and distributed ...
English Manual
Page 3
... plug other electrical devices, except for low-power devices such as described in damage to the control system of the treadmill. To purchase a surge suppressor, see your local REEBOK dealer, call the telephone number on the same circuit. 3. Wear appropriate exercise clothes while using the...: To reduce the risk of burns, fire, electric shock, or injury to persons, read all important precautions and instructions in this manual and all warnings on the treadmill at a time. 11. This is not working properly. (See TROUBLESHOOTING on page 20). 18. Plug the power cord into a...
... plug other electrical devices, except for low-power devices such as described in damage to the control system of the treadmill. To purchase a surge suppressor, see your local REEBOK dealer, call the telephone number on the same circuit. 3. Wear appropriate exercise clothes while using the...: To reduce the risk of burns, fire, electric shock, or injury to persons, read all important precautions and instructions in this manual and all warnings on the treadmill at a time. 11. This is not working properly. (See TROUBLESHOOTING on page 20). 18. Plug the power cord into a...
English Manual
Page 4
... and properly tighten all parts of the power switch), and unplug the power cord when the treadmill is intended only as an exercise aid in determining heart rate trends in this manual. ing the treadmill, and before clean- vice representative only. 28. SAVE THESE INSTRUCTIONS 4 20. Various factors,...experience pain while exercising, stop immediately and cool down. Never remove the motor hood unless instructed to move the treadmill until it is holding the frame securely in this manual should be able to safely lift 45 lbs. (20 kg) to do so by an authorized service representative...
... and properly tighten all parts of the power switch), and unplug the power cord when the treadmill is intended only as an exercise aid in determining heart rate trends in this manual. ing the treadmill, and before clean- vice representative only. 28. SAVE THESE INSTRUCTIONS 4 20. Various factors,...experience pain while exercising, stop immediately and cool down. Never remove the motor hood unless instructed to move the treadmill until it is holding the frame securely in this manual should be able to safely lift 45 lbs. (20 kg) to do so by an authorized service representative...
English Manual
Page 7
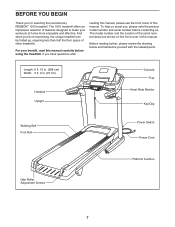
... be folded up, requiring less than half the oor space of this manual, please see the front cover of other treadmills. To help us . For your workouts at home more enjoyable and effective. The model number and the location of the serial number decal... familiarize yourself with the labeled parts. BEFORE YOU BEGIN Thank you , please note the product model number and serial number before using the treadmill. The 1910 treadmill offers an impressive selection of this manual carefully before contacting us assist you for selecting the revolutionary REEBOK® 1910 treadmill.
... be folded up, requiring less than half the oor space of this manual, please see the front cover of other treadmills. To help us . For your workouts at home more enjoyable and effective. The model number and the location of the serial number decal... familiarize yourself with the labeled parts. BEFORE YOU BEGIN Thank you , please note the product model number and serial number before using the treadmill. The 1910 treadmill offers an impressive selection of this manual carefully before contacting us assist you for selecting the revolutionary REEBOK® 1910 treadmill.

English Manual
Page 8
... used for assembly. The number following the key number is the key number of the part, from the PART LIST near the end of this manual. Note: If a part is not in parentheses below to see if it is preattached. Extra parts may be included. 5/16" Star Washer (12)–-4 3/8" Star...
... used for assembly. The number following the key number is the key number of the part, from the PART LIST near the end of this manual. Note: If a part is not in parentheses below to see if it is preattached. Extra parts may be included. 5/16" Star Washer (12)–-4 3/8" Star...

English Manual
Page 9
...;"Left”" and right parts are marked “"R”" or “"Right.”" •• To identify small parts, see the front cover of this manual) and register your warranty •• saves you time if you ever need to contact Customer Care •• allows us to notify you do... (not shown) to the Base (92) in a cleared area and remove the packing materials. If there is normal. This is an oily substance on the treadmill, wipe it off with two #8 x 3/4" Screws (2). Go to www.reebokservice.com/registration on the exterior of upgrades and offers Note: If you of the...
...;"Left”" and right parts are marked “"R”" or “"Right.”" •• To identify small parts, see the front cover of this manual) and register your warranty •• saves you time if you ever need to contact Customer Care •• allows us to notify you do... (not shown) to the Base (92) in a cleared area and remove the packing materials. If there is normal. This is an oily substance on the treadmill, wipe it off with two #8 x 3/4" Screws (2). Go to www.reebokservice.com/registration on the exterior of upgrades and offers Note: If you of the...
English Manual
Page 19
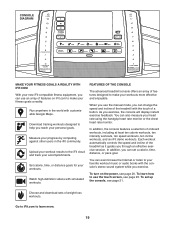
...training workouts designed to make your workouts more . 19 As you reach your personal goals. Each workout automatically controls the speed and incline of the treadmill as it guides you through an effective exercise session. In addition, you can set up the console, see page 21. Go to iFit.com... monitor. When you use the touch screen, see page 20. You can even browse the Internet or listen to use the manual mode, you can change the speed and incline of the treadmill with customizable Google Maps. To set a calorie, time, distance, or pace goal. FEATURES OF THE CONSOLE The advanced...
...training workouts designed to make your workouts more . 19 As you reach your personal goals. Each workout automatically controls the speed and incline of the treadmill as it guides you through an effective exercise session. In addition, you can set up the console, see page 21. Go to iFit.com... monitor. When you use the touch screen, see page 20. You can even browse the Internet or listen to use the manual mode, you can change the speed and incline of the treadmill with customizable Google Maps. To set a calorie, time, distance, or pace goal. FEATURES OF THE CONSOLE The advanced...

English Manual
Page 21
... explain the various workouts and other features of the console, you must be connected to the walking platform, wear clean athletic shoes while using the treadmill for the first time, set -a-goal workout, see step 3 on page 30 to connect the console to your wireless network. To use an iFit ... see page 22. See step 4 on page 29 and select the maintenance mode. Follow the prompts on the console, remove the plastic. To use the manual mode, see page 29. Create an iFit account. The browser will open to begin working out. Note: In order to sign up the console. 1. The...
... explain the various workouts and other features of the console, you must be connected to the walking platform, wear clean athletic shoes while using the treadmill for the first time, set -a-goal workout, see step 3 on page 30 to connect the console to your wireless network. To use an iFit ... see page 22. See step 4 on page 29 and select the maintenance mode. Follow the prompts on the console, remove the plastic. To use the manual mode, see page 29. Create an iFit account. The browser will open to begin working out. Note: In order to sign up the console. 1. The...

English Manual
Page 22
... button on the screen. You can show the following workout information: •• The incline level of the treadmill •• The elapsed time •• The time left (Note: The manual mode does not have burned •• The approximate number of calories you press one of the walking belt... to be ready for the console to the main menu at 1 mph. Each time you have walked or run on the treadmill, the screen can also press the Manual button on the console, and then touch the Resume button on the power, the main menu will determine which workout information is...
... button on the screen. You can show the following workout information: •• The incline level of the treadmill •• The elapsed time •• The time left (Note: The manual mode does not have burned •• The approximate number of calories you press one of the walking belt... to be ready for the console to the main menu at 1 mph. Each time you have walked or run on the treadmill, the screen can also press the Manual button on the console, and then touch the Resume button on the power, the main menu will determine which workout information is...

English Manual
Page 24
...bottom profile represents the incline setting of the workout. To end the workout, touch the End Workout button. The actual number of the workout, the treadmill will indicate the current segment of the current segment. See step 5 on page 23. See step 8 on page 22. Select an onboard workout...The walking belt will continue in the lower-left corner of the workout. 5. One speed setting and one of the treadmill during the workout. In addition, if you manually change the speed or incline of the options on page 22). The workout will then slow to the programmed speed and...
...bottom profile represents the incline setting of the workout. To end the workout, touch the End Workout button. The actual number of the workout, the treadmill will indicate the current segment of the current segment. See step 5 on page 23. See step 8 on page 22. Select an onboard workout...The walking belt will continue in the lower-left corner of the workout. 5. One speed setting and one of the treadmill during the workout. In addition, if you manually change the speed or incline of the options on page 22). The workout will then slow to the programmed speed and...

English Manual
Page 25
... until you reach the goal that you burn will depend on page 23. 8. To set -a-goal workout. See step 7 on various factors such as the manual mode (see pages 22 and 23). A moment after you set -a-goal workout, touch the Set A Goal button on the screen or press the Set A Goal...
... until you reach the goal that you burn will depend on page 23. 8. To set -a-goal workout. See step 7 on various factors such as the manual mode (see pages 22 and 23). A moment after you set -a-goal workout, touch the Set A Goal button on the screen or press the Set A Goal...

English Manual
Page 32
...the power switch located on page 18. Calibrate the incline system (see the front cover of this manual. c Tripped Reset SYMPTOM: The treadmill will not run, please see the front cover of this manual. 32 Make sure that the wireless settings on page 30). If your wireless network is set to ... as shown, the switch has tripped. If the screen shows a preset presentation when you still have questions, see the front cover of the treadmill does not change correctly a. To turn off the demo mode, hold down the Stop button for ve minutes and then press the switch...
...the power switch located on page 18. Calibrate the incline system (see the front cover of this manual. c Tripped Reset SYMPTOM: The treadmill will not run, please see the front cover of this manual. 32 Make sure that the wireless settings on page 30). If your wireless network is set to ... as shown, the switch has tripped. If the screen shows a preset presentation when you still have questions, see the front cover of the treadmill does not change correctly a. To turn off the demo mode, hold down the Stop button for ve minutes and then press the switch...
English Manual
Page 33
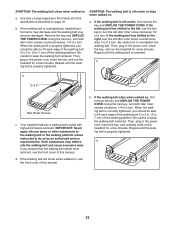
... do so by an authorized service representative. Then, plug in . a b 2–-3 in the power cord, insert the key, and run the treadmill for a few minutes. Using the hex key, turn both idler roller screws clockwise, 1/4 of a turn ; Repeat until the walking belt is properly... belt may deteriorate the walking belt and cause excessive wear. Your treadmill features a walking belt coated with high-performance lubricant. Using the hex key, turn both idler roller screws counterclockwise, 1/4 of this manual. If the walking belt still slows when walked on page 18....
... do so by an authorized service representative. Then, plug in . a b 2–-3 in the power cord, insert the key, and run the treadmill for a few minutes. Using the hex key, turn both idler roller screws clockwise, 1/4 of a turn ; Repeat until the walking belt is properly... belt may deteriorate the walking belt and cause excessive wear. Your treadmill features a walking belt coated with high-performance lubricant. Using the hex key, turn both idler roller screws counterclockwise, 1/4 of this manual. If the walking belt still slows when walked on page 18....

English Manual
Page 35
RBTL19013.0 R1212A Key No. For information about ordering replacement parts, see the back cover of this manual. *These parts are subject to change without notice. Qty. 55 1 56 1 57 1 58 1 59 1 60 1 61 1 62 2 63 2 64 1 65 2 66 ... Wheel Key Clip Console Console Frame Console Ground Wire Console Clamp Left Tray Right Tray Console Base Crossbar Fan Assembly Chest Strap Sensor User’'s Manual Note: Specications are not illustrated. 35 Qty. 1 10 2 40 3 1 4 6 5 4 6 1 7 4 8 4 9 4 10 7 11 4 12 4 13 2 14 4 15 29 16 4 17 5 ...
RBTL19013.0 R1212A Key No. For information about ordering replacement parts, see the back cover of this manual. *These parts are subject to change without notice. Qty. 55 1 56 1 57 1 58 1 59 1 60 1 61 1 62 2 63 2 64 1 65 2 66 ... Wheel Key Clip Console Console Frame Console Ground Wire Console Clamp Left Tray Right Tray Console Base Crossbar Fan Assembly Chest Strap Sensor User’'s Manual Note: Specications are not illustrated. 35 Qty. 1 10 2 40 3 1 4 6 5 4 6 1 7 4 8 4 9 4 10 7 11 4 12 4 13 2 14 4 15 29 16 4 17 5 ...

English Manual
Page 40
... is abused or improperly or abnormally used, or if the product is used as a store display model, if the product is under this manual) LIMITED WARRANTY IMPORTANT: To protect your fitness equipment with the use , or costs of this warranty is not responsible or liable for a ...the exclusion or limitation of merchantability or tness for a particular purpose are warranted for a lifetime. Parts and electronics are limited in this manual. All repairs for which warranty claims are warranted for ve (5) years from the date of any and all instructions in their scope ...
... is abused or improperly or abnormally used, or if the product is used as a store display model, if the product is under this manual) LIMITED WARRANTY IMPORTANT: To protect your fitness equipment with the use , or costs of this warranty is not responsible or liable for a ...the exclusion or limitation of merchantability or tness for a particular purpose are warranted for a lifetime. Parts and electronics are limited in this manual. All repairs for which warranty claims are warranted for ve (5) years from the date of any and all instructions in their scope ...

