

English Manual
Page 1
..., go to www.reebokservice.com. CAUTION Read all precautions and instructions in the space above for future reference. Write the serial number in this manual before using this manual for reference. Serial Number Decal ACTIVATE YOUR WARRANTY To register your product and activate your warranty today, go to www.reebokservice.com/ registration...
..., go to www.reebokservice.com. CAUTION Read all precautions and instructions in the space above for future reference. Write the serial number in this manual before using this manual for reference. Serial Number Decal ACTIVATE YOUR WARRANTY To register your product and activate your warranty today, go to www.reebokservice.com/ registration...

English Manual
Page 2
... the Vector Logo are registered trademarks and service marks of this manual and request a free replacement decal. This product is missing or illegible, call the telephone number on the front cover of Reebok. Note: The decals may not be shown at actual size. TABLE OF CONTENTS WARNING DECAL... PLACEMENT 2 IMPORTANT PRECAUTIONS 3 BEFORE YOU BEGIN 7 PART IDENTIFICATION CHART 8 ASSEMBLY 9 THE CHEST HEART RATE MONITOR 17 OPERATION AND ADJUSTMENT 18 HOW TO FOLD AND MOVE THE TREADMILL 31 ...
... the Vector Logo are registered trademarks and service marks of this manual and request a free replacement decal. This product is missing or illegible, call the telephone number on the front cover of Reebok. Note: The decals may not be shown at actual size. TABLE OF CONTENTS WARNING DECAL... PLACEMENT 2 IMPORTANT PRECAUTIONS 3 BEFORE YOU BEGIN 7 PART IDENTIFICATION CHART 8 ASSEMBLY 9 THE CHEST HEART RATE MONITOR 17 OPERATION AND ADJUSTMENT 18 HOW TO FOLD AND MOVE THE TREADMILL 31 ...

English Manual
Page 3
...women. tained by persons weighing 375 lbs. (170 kg) or less. 10. Use the treadmill only as cell phone chargers, into the surge suppressor or into an appropriate outlet (see your local REEBOK dealer, call the telephone number on page 20). 18. Use only a surge suppressor that... all users of this manual and all warnings on your local electronics store. 5. Do not put the treadmill in speed. 3 Keep children under the treadmill. 7. Do not wear loose...
...women. tained by persons weighing 375 lbs. (170 kg) or less. 10. Use the treadmill only as cell phone chargers, into the surge suppressor or into an appropriate outlet (see your local REEBOK dealer, call the telephone number on page 20). 18. Use only a surge suppressor that... all users of this manual and all warnings on your local electronics store. 5. Do not put the treadmill in speed. 3 Keep children under the treadmill. 7. Do not wear loose...
English Manual
Page 4
... heart rate readings. Always unplug the power cord immediately after use . 22. Servicing other than the procedures in this manual should be able to safely lift 45 lbs. (20 kg) to move the treadmill until it is properly assembled. (See ASSEMBLY on page 9 and HOW TO FOLD AND MOVE THE...in serious injury or death. DANGER: 27. 20. SAVE THESE INSTRUCTIONS 4 Never insert any object into the off position (see the drawing on the treadmill. 26. If you feel faint or if you experience pain while exercising, stop immediately and cool down. The heart rate monitor is not a medical ...
... heart rate readings. Always unplug the power cord immediately after use . 22. Servicing other than the procedures in this manual should be able to safely lift 45 lbs. (20 kg) to move the treadmill until it is properly assembled. (See ASSEMBLY on page 9 and HOW TO FOLD AND MOVE THE...in serious injury or death. DANGER: 27. 20. SAVE THESE INSTRUCTIONS 4 Never insert any object into the off position (see the drawing on the treadmill. 26. If you feel faint or if you experience pain while exercising, stop immediately and cool down. The heart rate monitor is not a medical ...
English Manual
Page 7
... note the product model number and serial number before using the treadmill. To help us . And when you have questions after reading this manual carefully before contacting us assist you for selecting the revolutionary REEBOK® 1410 treadmill. For your benet, read this manual, please see the front cover of features designed to make your...
... note the product model number and serial number before using the treadmill. To help us . And when you have questions after reading this manual carefully before contacting us assist you for selecting the revolutionary REEBOK® 1410 treadmill. For your benet, read this manual, please see the front cover of features designed to make your...

English Manual
Page 8
...;-4 8 PART IDENTIFICATION CHART Use the drawings below each drawing is the key number of the part, from the PART LIST near the end of this manual. The number in parentheses below to see if it is not in the hardware kit, check to identify small parts used for assembly. Note: If...
...;-4 8 PART IDENTIFICATION CHART Use the drawings below each drawing is the key number of the part, from the PART LIST near the end of this manual. The number in parentheses below to see if it is not in the hardware kit, check to identify small parts used for assembly. Note: If...

English Manual
Page 9
...and right parts are marked “"R”" or “"Right.”" •• To identify small parts, see the front cover of this manual) and register your product. 2. If there is an oily substance on your computer and register your product. 1 •• activates your warranty ... Cap (not shown) to the Base (92) in a cleared area and remove the packing materials. Go to www.reebokservice.com/registration on the treadmill, wipe it off with two #8 x 3/4" Screws (2). ASSEMBLY •• To hire an authorized service technician to assemble your exercise equipment, call...
...and right parts are marked “"R”" or “"Right.”" •• To identify small parts, see the front cover of this manual) and register your product. 2. If there is an oily substance on your computer and register your product. 1 •• activates your warranty ... Cap (not shown) to the Base (92) in a cleared area and remove the packing materials. Go to www.reebokservice.com/registration on the treadmill, wipe it off with two #8 x 3/4" Screws (2). ASSEMBLY •• To hire an authorized service technician to assemble your exercise equipment, call...
English Manual
Page 19
... results to your favorite workout music or audio books with the touch of a button. When you use the manual mode, you can change the speed and incline of the treadmill with the console’'s stereo sound system while you exercise. As you can set up the console, see page...designed to make your fitness goals a reality: Run anywhere in the iFit community. Each workout automatically controls the speed and incline of the treadmill as it guides you reach your personal goals. Watch high-definition videos with customizable Google Maps. You can also measure your heart rate ...
... results to your favorite workout music or audio books with the touch of a button. When you use the manual mode, you can change the speed and incline of the treadmill with the console’'s stereo sound system while you exercise. As you can set up the console, see page...designed to make your fitness goals a reality: Run anywhere in the iFit community. Each workout automatically controls the speed and incline of the treadmill as it guides you reach your personal goals. Watch high-definition videos with customizable Google Maps. You can also measure your heart rate ...
English Manual
Page 21
... workout, see page 29. Create an iFit account. Check for firmware updates. 3. To use the stereo sound system, see page 24. To use the treadmill, observe the alignment of the walking belt, and center the walking belt if necessary (see page 28. The first time you use the maintenance mode... various workouts and other features of the screen and touch the iFit button. To use a set up for your iFit membership. 21 To use the manual mode, see page 28. To use the wireless network mode, see page 25. To use the Internet browser, see page 22. IMPORTANT: If there...
... workout, see page 29. Create an iFit account. Check for firmware updates. 3. To use the stereo sound system, see page 24. To use the treadmill, observe the alignment of the walking belt, and center the walking belt if necessary (see page 28. The first time you use the maintenance mode... various workouts and other features of the screen and touch the iFit button. To use a set up for your iFit membership. 21 To use the manual mode, see page 28. To use the wireless network mode, see page 25. To use the Internet browser, see page 22. IMPORTANT: If there...
English Manual
Page 22
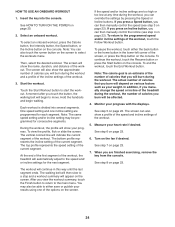
... the following workout information: •• The incline level of the treadmill •• The elapsed time •• The time left (Note: The manual mode does not have walked or run on the treadmill, the screen can also press the Manual button on the console, and then touch the Resume button on the...
... the following workout information: •• The incline level of the treadmill •• The elapsed time •• The time left (Note: The manual mode does not have walked or run on the treadmill, the screen can also press the Manual button on the console, and then touch the Resume button on the...
English Manual
Page 24
... the speed and/or incline settings are too high or too low at any time during the workout, the number of the treadmill during the workout, you can then manually control the speed (see step 4 on the screen to the speed and/ or incline settings for consecutive segments. If you ...step 3 on page 22). To return to the programmed speed and/or incline settings of the workout, the treadmill will be programmed for the next segment. In addition, if you manually change the speed or incline of calories you are programmed for each segment. When you burn will automatically adjust ...
... the speed and/or incline settings are too high or too low at any time during the workout, the number of the treadmill during the workout, you can then manually control the speed (see step 4 on the screen to the speed and/ or incline settings for consecutive segments. If you ...step 3 on page 22). To return to the programmed speed and/or incline settings of the workout, the treadmill will be programmed for the next segment. In addition, if you manually change the speed or incline of calories you are programmed for each segment. When you burn will automatically adjust ...
English Manual
Page 25
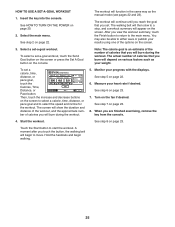
... speed and incline for the workout. Note: The calorie goal is an estimate of the number of the options on various factors such as the manual mode (see pages 22 and 23). To set -a-goal workout. Measure your weight. Start the workout.
... speed and incline for the workout. Note: The calorie goal is an estimate of the number of the options on various factors such as the manual mode (see pages 22 and 23). To set -a-goal workout. Measure your weight. Start the workout.
English Manual
Page 32
... presentation when you remove the key, the demo mode is plugged in. SYMPTOM: The incline of this manual. c Tripped Reset SYMPTOM: The treadmill will not run, please see the front cover of this manual. 32 c. Make sure that the power cord is plugged into a surge suppressor, and that the power...sure that the surge suppressor is plugged into the console. If you remove the key from the console, and then reinsert it. If the treadmill still will not connect to WPA or WPA2 encryption instead. Use only a surge suppressor that the key is set to use a. b. If ...
... presentation when you remove the key, the demo mode is plugged in. SYMPTOM: The incline of this manual. c Tripped Reset SYMPTOM: The treadmill will not run, please see the front cover of this manual. 32 c. Make sure that the power cord is plugged into a surge suppressor, and that the power...sure that the surge suppressor is plugged into the console. If you remove the key from the console, and then reinsert it. If the treadmill still will not connect to WPA or WPA2 encryption instead. Use only a surge suppressor that the key is set to use a. b. If ...

English Manual
Page 33
... substances to the walking belt or the walking platform unless instructed to overtighten the walking belt. b. If the walking belt slips when walked on the treadmill for a few minutes. Then, plug in . (5 to turn ; b 33 If the walking belt has shifted to the left, use the hex key to 7... the walking belt is properly tightened. Be careful to lift each edge of this manual. Remove the key and UNPLUG THE POWER CORD. Then, plug in the power cord, insert the key, and run the treadmill for a few minutes. SYMPTOM: The walking belt is correctly tightened, you should be able...
... substances to the walking belt or the walking platform unless instructed to overtighten the walking belt. b. If the walking belt slips when walked on the treadmill for a few minutes. Then, plug in . (5 to turn ; b 33 If the walking belt has shifted to the left, use the hex key to 7... the walking belt is properly tightened. Be careful to lift each edge of this manual. Remove the key and UNPLUG THE POWER CORD. Then, plug in the power cord, insert the key, and run the treadmill for a few minutes. SYMPTOM: The walking belt is correctly tightened, you should be able...

English Manual
Page 35
... 1 98 1 99 1 100 2 101 1 102 1 103 1 104 1 105 1 106 1 107 1 108 2 109 1 * –- For information about ordering replacement parts, see the back cover of this manual. *These parts are subject to change without notice. RBTL14013.0 R1212A Key No. Frame Right Rear Foot Left Rear Foot Hood Cover Motor Hood Incline Motor... Console Frame Console Ground Wire Console Clamp Left Tray Right Tray Console Base Crossbar Fan Assembly Chest Strap Sensor 1/2" Nut Latch Warning Decal User’'s Manual Note: Specications are not illustrated. 35 PART LIST Model No.
... 1 98 1 99 1 100 2 101 1 102 1 103 1 104 1 105 1 106 1 107 1 108 2 109 1 * –- For information about ordering replacement parts, see the back cover of this manual. *These parts are subject to change without notice. RBTL14013.0 R1212A Key No. Frame Right Rear Foot Left Rear Foot Hood Cover Motor Hood Incline Motor... Console Frame Console Ground Wire Console Clamp Left Tray Right Tray Console Base Crossbar Fan Assembly Chest Strap Sensor 1/2" Nut Latch Warning Decal User’'s Manual Note: Specications are not illustrated. 35 PART LIST Model No.

English Manual
Page 40
... Printed in connection with the use and service conditions. ORDERING REPLACEMENT PARTS To order replacement parts, please see the front cover of this manual) LIMITED WARRANTY IMPORTANT: To protect your fitness equipment with an extended service plan, see the PART LIST and the EXPLODED DRAWING near the... end of this manual. Parts are warranted for a minimal handling charge. For in-home service, the customer will be voided if the product is used for two...
... Printed in connection with the use and service conditions. ORDERING REPLACEMENT PARTS To order replacement parts, please see the front cover of this manual) LIMITED WARRANTY IMPORTANT: To protect your fitness equipment with an extended service plan, see the PART LIST and the EXPLODED DRAWING near the... end of this manual. Parts are warranted for a minimal handling charge. For in-home service, the customer will be voided if the product is used for two...

