
English Manual
Page 2
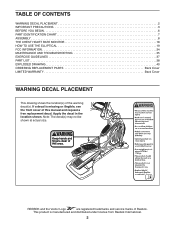
...trademarks and service marks of this manual and request a free replacement decal. If a decal is manufactured and distributed under license from Reebok International. 2 TABLE OF CONTENTS WARNING DECAL PLACEMENT 2 IMPORTANT PRECAUTIONS 3 BEFORE YOU BEGIN 6 PART IDENTIFICATION CHART 7 ASSEMBLY 8 ...THE CHEST HEART RATE MONITOR 18 HOW TO USE THE ELLIPTICAL 19 FCC INFORMATION 34 MAINTENANCE AND TROUBLESHOOTING 35 EXERCISE GUIDELINES 37 PART LIST 38 EXPLODED DRAWING 40 ORDERING REPLACEMENT PARTS Back Cover ...
...trademarks and service marks of this manual and request a free replacement decal. If a decal is manufactured and distributed under license from Reebok International. 2 TABLE OF CONTENTS WARNING DECAL PLACEMENT 2 IMPORTANT PRECAUTIONS 3 BEFORE YOU BEGIN 6 PART IDENTIFICATION CHART 7 ASSEMBLY 8 ...THE CHEST HEART RATE MONITOR 18 HOW TO USE THE ELLIPTICAL 19 FCC INFORMATION 34 MAINTENANCE AND TROUBLESHOOTING 35 EXERCISE GUIDELINES 37 PART LIST 38 EXPLODED DRAWING 40 ORDERING REPLACEMENT PARTS Back Cover ...

English Manual
Page 3
... 1. sentative only. 4. To protect the floor or carpet from heated surfaces. do not wear loose clothes that all users of the elliptical are adequately informed of all precautions. 2. SAVE THESE INSTRUCTIONS 3 DANGER: 12. do not arch your pedaling speed in a commercial, ...water. 13. This is intended for personal injury or property damage sustained by or through the use and before using the elliptical. The elliptical is especially important for foot protection while exercising. 6. Inspect and properly tighten all times. 9. Reduce your back. 19. ...
... 1. sentative only. 4. To protect the floor or carpet from heated surfaces. do not wear loose clothes that all users of the elliptical are adequately informed of all precautions. 2. SAVE THESE INSTRUCTIONS 3 DANGER: 12. do not arch your pedaling speed in a commercial, ...water. 13. This is intended for personal injury or property damage sustained by or through the use and before using the elliptical. The elliptical is especially important for foot protection while exercising. 6. Inspect and properly tighten all times. 9. Reduce your back. 19. ...
English Manual
Page 6
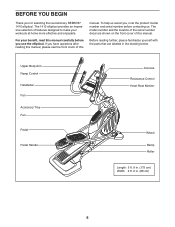
.... (175 cm) Width: 2 ft. 2 in the drawing below. If you , note the product model number and serial number before you for selecting the revolutionary REEBOK® 1410 elliptical. For your workouts at home more effective and enjoyable. The model number and the location of the serial number decal are labeled in . (66 cm... us assist you have questions after reading this manual, please see the front cover of features designed to make your benefit, read this manual. The 1410 elliptical provides an impressive selection of this manual. BEFORE YOU BEGIN Thank you use the...
.... (175 cm) Width: 2 ft. 2 in the drawing below. If you , note the product model number and serial number before you for selecting the revolutionary REEBOK® 1410 elliptical. For your workouts at home more effective and enjoyable. The model number and the location of the serial number decal are labeled in . (66 cm... us assist you have questions after reading this manual, please see the front cover of features designed to make your benefit, read this manual. The 1410 elliptical provides an impressive selection of this manual. BEFORE YOU BEGIN Thank you use the...
English Manual
Page 8
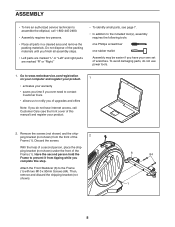
... person hold the Frame to prevent it from the front of the 2 Frame (1). ASSEMBLY •• To hire an authorized service technician to assemble the elliptical, call Customer Care (see page 7. •• In addition to the included tool(s), assembly requires the following tools: one Phillips screwdriver one rubber mallet Assembly...
... person hold the Frame to prevent it from the front of the 2 Frame (1). ASSEMBLY •• To hire an authorized service technician to assemble the elliptical, call Customer Care (see page 7. •• In addition to the included tool(s), assembly requires the following tools: one Phillips screwdriver one rubber mallet Assembly...

English Manual
Page 14
Attach the Left Pedal Arm (44) to the axle on the other side of the elliptical. 14 61 36 Grease 136 98 53 58 120 14 Slide the Pedal Arm Flex Bracket (136) on the Right Upper Body Leg. Tip: Do ...
Attach the Left Pedal Arm (44) to the axle on the other side of the elliptical. 14 61 36 Grease 136 98 53 58 120 14 Slide the Pedal Arm Flex Bracket (136) on the Right Upper Body Leg. Tip: Do ...

English Manual
Page 15
... Upper Body Arm (61) with a #8 x 3/4" 16 Screw (123). Repeat this step on the other side of the elliptical. 123 61 68 36 67 123 15 Repeat this step on the other side of the elliptical. See step 14. Tighten the M8 x 16mm Screws (120). 15 61 96 Hexagonal Holes 36 102 16...
... Upper Body Arm (61) with a #8 x 3/4" 16 Screw (123). Repeat this step on the other side of the elliptical. 123 61 68 36 67 123 15 Repeat this step on the other side of the elliptical. See step 14. Tighten the M8 x 16mm Screws (120). 15 61 96 Hexagonal Holes 36 102 16...

English Manual
Page 17
Make sure that all parts are properly tightened before you use the elliptical. Note: Extra parts may be included. Press the Front Upright Cover (91) onto the Rear Upright Cover (80). 20 Attach the Front Upright Cover (91) to protect the floor. 17 Place a mat beneath the elliptical to the Upright (4) with a #8 x 3/4" Screw (123). 123 91 4 80 21. 20.
Make sure that all parts are properly tightened before you use the elliptical. Note: Extra parts may be included. Press the Front Upright Cover (91) onto the Rear Upright Cover (80). 20 Attach the Front Upright Cover (91) to protect the floor. 17 Place a mat beneath the elliptical to the Upright (4) with a #8 x 3/4" Screw (123). 123 91 4 80 21. 20.

English Manual
Page 19
... available. 2-pole Receptacle Adapter Lug Metal Screw The lug or wire extending from the adapter must be adjusted to several positions. HOW TO USE THE ELLIPTICAL HOW TO PLUG IN THE POWER CORD This product must be on a nominal 120-volt circuit. Do not modify the plug; To adjust each pedal...
... available. 2-pole Receptacle Adapter Lug Metal Screw The lug or wire extending from the adapter must be adjusted to several positions. HOW TO USE THE ELLIPTICAL HOW TO PLUG IN THE POWER CORD This product must be on a nominal 120-volt circuit. Do not modify the plug; To adjust each pedal...

English Manual
Page 20
... the upright, and place one foot against one of the wheels. It is in the opposite direction. Stand in front of the elliptical, hold the upper body arms or the handlebars and step onto the pedal that is recommended that you can turn the crank arms in the... lower position. however, for variety, you turn the crank arms in either direction. Pull on the wheels. Carefully move until the elliptical will continue to move the elliptical to the desired location, and then lower it requires two persons. When the pedals are stationary, step off the lower pedal. 20 Pull...
... the upright, and place one foot against one of the wheels. It is in the opposite direction. Stand in front of the elliptical, hold the upper body arms or the handlebars and step onto the pedal that is recommended that you can turn the crank arms in the... lower position. however, for variety, you turn the crank arms in either direction. Pull on the wheels. Carefully move until the elliptical will continue to move the elliptical to the desired location, and then lower it requires two persons. When the pedals are stationary, step off the lower pedal. 20 Pull...
English Manual
Page 22
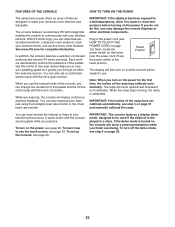
... The display will then turn off the demo mode, see HOW TO PLUG IN THE POWER CORD on , the console will be used if the elliptical is calibrated. In addition, the console features a selection of onboard workouts and several iFit demo workouts. When you use the manual mode of the console... will move upward and downward as it to warm to room temperature before turning on page 31 and manually calibrate the ramp. IMPORTANT: If the elliptical has been exposed to cold temperatures, allow it guides you can change the resistance of the pedals and the incline of the ramp with your...
... The display will then turn off the demo mode, see HOW TO PLUG IN THE POWER CORD on , the console will be used if the elliptical is calibrated. In addition, the console features a selection of onboard workouts and several iFit demo workouts. When you use the manual mode of the console... will move upward and downward as it to warm to room temperature before turning on page 31 and manually calibrate the ramp. IMPORTANT: If the elliptical has been exposed to cold temperatures, allow it guides you can change the resistance of the pedals and the incline of the ramp with your...
English Manual
Page 23
... workouts, and use the Internet browser, see page 33. To use a set up for firmware updates. 3. HOW TO SET UP THE CONSOLE Before using the elliptical for you become familiar with a backward-facing arrow and an X. •• Use these buttons on page 31 and calibrate the incline of the console...
... workouts, and use the Internet browser, see page 33. To use a set up for firmware updates. 3. HOW TO SET UP THE CONSOLE Before using the elliptical for you become familiar with a backward-facing arrow and an X. •• Use these buttons on page 31 and calibrate the incline of the console...

English Manual
Page 25
... resting against the contacts. tic. To measure your heart rate, hold the contacts for a while when the main menu is selected, the speed of the elliptical may wear prematurely. 25 Turn on the handgrip heart rate monitor, remove the plas- The fan has several speed settings, including an auto mode. While...
... resting against the contacts. tic. To measure your heart rate, hold the contacts for a while when the main menu is selected, the speed of the elliptical may wear prematurely. 25 Turn on the handgrip heart rate monitor, remove the plas- The fan has several speed settings, including an auto mode. While...

English Manual
Page 29
... IMPORTANT: To access the settings main menu when the gears button is hidden, draw a square clockwise on , the screen will show a preset presentation when the elliptical is turned on the screen. 8. To enable or disable the Internet browser, first touch the Browser button. Note: Some of the... your iFit account when you turn on the screen. Then, touch the gears button at the bottom of your console to be used if the elliptical is recommended for automatic console updates, see steps 1 and 2 on the screen. 4. Note: This feature is displayed in to use a passcode. To hide or ...
... IMPORTANT: To access the settings main menu when the gears button is hidden, draw a square clockwise on , the screen will show a preset presentation when the elliptical is turned on the screen. 8. To enable or disable the Internet browser, first touch the Browser button. Note: Some of the... your iFit account when you turn on the screen. Then, touch the gears button at the bottom of your console to be used if the elliptical is recommended for automatic console updates, see steps 1 and 2 on the screen. 4. Note: This feature is displayed in to use a passcode. To hide or ...

English Manual
Page 30
... Then, touch the back button on the screen. 11. When you select an update time, you normally use the elliptical and will be available to unplug the power cord after using the elliptical. Select the unit of the maps, first touch the Street View button. Next, touch the checkbox for automatic console...
... Then, touch the back button on the screen. 11. When you select an update time, you normally use the elliptical and will be available to unplug the power cord after using the elliptical. Select the unit of the maps, first touch the Street View button. Next, touch the checkbox for automatic console...
English Manual
Page 31
...differently. 1. In the settings main menu, touch the Maintenance button to 6. Using a pencil eraser or other objects away from the elliptical while the incline is not properly calibrated, it does not, press the power switch into the reset position. Note: Occasionally, a ...firmware update may cause your console to function slightly differently. Touch the Calibrate Incline button. The ramp will show information about the elliptical. Press the Cancel button to enter the maintenance mode. IMPORTANT: If you reset the console, you view the information, touch the...
...differently. 1. In the settings main menu, touch the Maintenance button to 6. Using a pencil eraser or other objects away from the elliptical while the incline is not properly calibrated, it does not, press the power switch into the reset position. Note: Occasionally, a ...firmware update may cause your console to function slightly differently. Touch the Calibrate Incline button. The ramp will show information about the elliptical. Press the Cancel button to enter the maintenance mode. IMPORTANT: If you reset the console, you view the information, touch the...

English Manual
Page 35
... heart rate monitor, see Then, use a damp cloth and a small the Lower Upright amount of the ramp may need to remove 56 To clean the elliptical, use a flat TROUBLESHOOTING on the Tracks (11), apply a small amount of this manual. Then, wipe off any worn parts immediately. MAINTENANCE AND TROUBLESHOOTING Inspect and... TO GREASE THE ROLLERS See the EXPLODED DRAWING near the end of the included PTFE grease to the console, keep the console out of the elliptical regularly. to a paper towel.
... heart rate monitor, see Then, use a damp cloth and a small the Lower Upright amount of the ramp may need to remove 56 To clean the elliptical, use a flat TROUBLESHOOTING on the Tracks (11), apply a small amount of this manual. Then, wipe off any worn parts immediately. MAINTENANCE AND TROUBLESHOOTING Inspect and... TO GREASE THE ROLLERS See the EXPLODED DRAWING near the end of the included PTFE grease to the console, keep the console out of the elliptical regularly. to a paper towel.


