RTD315 Product Manual
Page 6
...) Connecting AUDIO from external sources such a TV (Aux-in TUNER mode 8 Using the remote to USB device Start Ripping CD File Names of Controls 7 Front panel controls Remote control Remote control functions in ) Connecting the speakers 4 Positioning speakers 5 Front speaker placement Better surround ...24 Compatible Formats 25 Sound Enhancement Systems 26 Technical Specifications 27 Limited Warranty 28 Basic Functions 9 Compatible discs/formats Regional coding Operating the DVD receiver Basic Playback Operations 10 Types of Menus The Info Menu 11 Using the Info menu Title/...
...) Connecting AUDIO from external sources such a TV (Aux-in TUNER mode 8 Using the remote to USB device Start Ripping CD File Names of Controls 7 Front panel controls Remote control Remote control functions in ) Connecting the speakers 4 Positioning speakers 5 Front speaker placement Better surround ...24 Compatible Formats 25 Sound Enhancement Systems 26 Technical Specifications 27 Limited Warranty 28 Basic Functions 9 Compatible discs/formats Regional coding Operating the DVD receiver Basic Playback Operations 10 Types of Menus The Info Menu 11 Using the Info menu Title/...
RTD315 Product Manual
Page 9
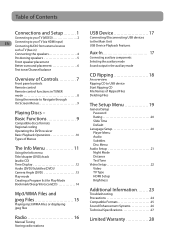
... well. • When using HDMI cable, do not connect to select the AUX mode. Using AUX IN 2 jacks Connect the AUX IN 2 jacks on the remote control to change output signals as TV (Aux-In) Using AUDIO IN (AUX 1) jacks Connect the AUDIO IN (AUX 1) jacks from the unit to page... supplied) TV VC R OR Set To p B ox OR AUDIO OU T Notes: • Audio cables (color-coded in red and white) (not included) are required. • Press either SOURCE on the main unit or AUX1/ 2 on the remote control to select AUX1 IN or AUX2 IN mode. • To listen to the audio...
... well. • When using HDMI cable, do not connect to select the AUX mode. Using AUX IN 2 jacks Connect the AUX IN 2 jacks on the remote control to change output signals as TV (Aux-In) Using AUDIO IN (AUX 1) jacks Connect the AUDIO IN (AUX 1) jacks from the unit to page... supplied) TV VC R OR Set To p B ox OR AUDIO OU T Notes: • Audio cables (color-coded in red and white) (not included) are required. • Press either SOURCE on the main unit or AUX1/ 2 on the remote control to select AUX1 IN or AUX2 IN mode. • To listen to the audio...
RTD315 Product Manual
Page 15
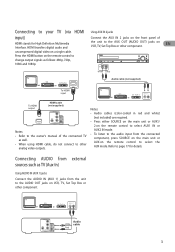
...formats. Press ON•OFF on the remote or ON/ STANDBY located on the remote control. Loading disc 1. Insert a compatible disc into the disc slot. 3. Once highlighted, press OK to select the option that have a different regional code will not play. Regional coding Your unit has been designed to highlight... or press and hold STOP on -screen displays (the DVD player's menu, batteries to the remote control prior to open the disc tray. 2. Use on the remote to move through the on the remote control to use. Press again to move right, press >). Playing Discs - EN the Info...
...formats. Press ON•OFF on the remote or ON/ STANDBY located on the remote control. Loading disc 1. Insert a compatible disc into the disc slot. 3. Once highlighted, press OK to select the option that have a different regional code will not play. Regional coding Your unit has been designed to highlight... or press and hold STOP on -screen displays (the DVD player's menu, batteries to the remote control prior to open the disc tray. 2. Use on the remote to move through the on the remote control to use. Press again to move right, press >). Playing Discs - EN the Info...

RTD315 Product Manual
Page 26
... using the up /down arrow buttons and press OK. • Rating limits take affect only when the unit is safe even for coding With this language is available on the remote control to the rating limits. Use the up / down arrow buttons to the original settings, except the password. recommended as acceptable...
... using the up /down arrow buttons and press OK. • Rating limits take affect only when the unit is safe even for coding With this language is available on the remote control to the rating limits. Use the up / down arrow buttons to the original settings, except the password. recommended as acceptable...
RTD315 Product Manual
Page 29
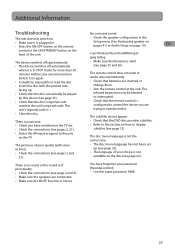
...configuration in . • Press the ON•OFF button on the remote Setup menu (See Positioning speaker on pages 4-5 or Audio Setup on . The remote control does not work or works only intermittently. • Check that the remote control is no picture. • Check you are trying to control ...The device switches off spontaneously. • The device switches off automatically • Make sure the filename is not on page 19). This unit's regional code is not the correct one. The infrared beam must not be played by this device (see page 2 and 4). • Make sure the speakers ...
...configuration in . • Press the ON•OFF button on the remote Setup menu (See Positioning speaker on pages 4-5 or Audio Setup on . The remote control does not work or works only intermittently. • Check that the remote control is no picture. • Check you are trying to control ...The device switches off spontaneously. • The device switches off automatically • Make sure the filename is not on page 19). This unit's regional code is not the correct one. The infrared beam must not be played by this device (see page 2 and 4). • Make sure the speakers ...
RTD315 Quick Installation Guide
Page 1
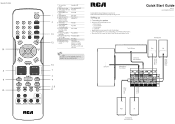
...during playback 11. Change the subtle Press SUBTITLE 13 language 12.Access the Disc menu Press DISC MENU for more details on remote control functions. 14 7 4 9 2, 5 11 RCA Congraluicrtions on purchasing your selection. Note: See page 12 - 13 of a Press PLAY DISC 5. Open the disc fray ... with the unit: • 2 front speakers • 1 center speaker • 2 rear speakers • 1 subwoofer • Speaker wires are color-coded to match the terminals. • Connect the speaker wire to the corresponding color terminal as shown below • Press down the tab to the next...
...during playback 11. Change the subtle Press SUBTITLE 13 language 12.Access the Disc menu Press DISC MENU for more details on remote control functions. 14 7 4 9 2, 5 11 RCA Congraluicrtions on purchasing your selection. Note: See page 12 - 13 of a Press PLAY DISC 5. Open the disc fray ... with the unit: • 2 front speakers • 1 center speaker • 2 rear speakers • 1 subwoofer • Speaker wires are color-coded to match the terminals. • Connect the speaker wire to the corresponding color terminal as shown below • Press down the tab to the next...

