User Manual - RTD215
Page 2
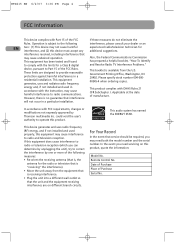
... been tested and found to provide reasonable protection against harmful interference in a residential installation. In accordance with the instruction, may not cause harmful interference, and (2) this product, quote the information: Model No. This device generates and uses radio frequency (RF) energy, and if not installed and used in a particular installation. Remote Control No. Operation is subject to the following measures: • Re-orient the receiving antenna...
... been tested and found to provide reasonable protection against harmful interference in a residential installation. In accordance with the instruction, may not cause harmful interference, and (2) this product, quote the information: Model No. This device generates and uses radio frequency (RF) energy, and if not installed and used in a particular installation. Remote Control No. Operation is subject to the following measures: • Re-orient the receiving antenna...
User Manual - RTD215
Page 3
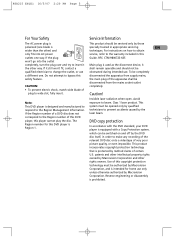
... this player cannot play the disc. This system must be disconnected from supply mains, safety feature. patents and other ) and specially trained in appropriate servicing EN techniques. Do not attempt to wide slot, fully insert. Caution! The Region number for home use . This product incorporates copyright protection technology that is protected by method claims of this outlets one . the main plug of...
... this player cannot play the disc. This system must be disconnected from supply mains, safety feature. patents and other ) and specially trained in appropriate servicing EN techniques. Do not attempt to wide slot, fully insert. Caution! The Region number for home use . This product incorporates copyright protection technology that is protected by method claims of this outlets one . the main plug of...
User Manual - RTD215
Page 6
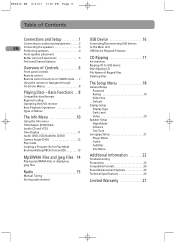
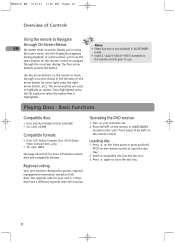
... Display Setup Display Type Dark Level Video 20 Speaker Setup Night Mode Distance Test Tone Lanugage Setup 21 Player Menu Audio Subtitles Disc Menu Additional Information 22 Troubleshooting Precautions 23 Compatible Formats 24 Sound Enhancement Systems 25 Technical Specifications 26 Limited Warranty 27 Basic Functions . . .8 Compatible discs/formats Regional coding Operating the DVD receiver Basic Playback Operations 9 Types of Controls 6 Front panel controls Remote control Remote control functions in TUNER mode . . .7 Using the remote to Navigate through On Screen Menus 8 Playing...
... Display Setup Display Type Dark Level Video 20 Speaker Setup Night Mode Distance Test Tone Lanugage Setup 21 Player Menu Audio Subtitles Disc Menu Additional Information 22 Troubleshooting Precautions 23 Compatible Formats 24 Sound Enhancement Systems 25 Technical Specifications 26 Limited Warranty 27 Basic Functions . . .8 Compatible discs/formats Regional coding Operating the DVD receiver Basic Playback Operations 9 Types of Controls 6 Front panel controls Remote control Remote control functions in TUNER mode . . .7 Using the remote to Navigate through On Screen Menus 8 Playing...

User Manual - RTD215
Page 7
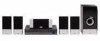
... Remote control and 2 AAA batteries Left and right front speakers Center speaker Subwoofer Left and right Surround Speakers One external AM loop antenna Composite Video Cable One Pig-Tail antenna wire Things to a warm one can cause condensation on the back of your unit. • Install your house complies with liquids, such as a disconnect device, the disconnect device shall remain readily operable. • Other important use...
... Remote control and 2 AAA batteries Left and right front speakers Center speaker Subwoofer Left and right Surround Speakers One external AM loop antenna Composite Video Cable One Pig-Tail antenna wire Things to a warm one can cause condensation on the back of your unit. • Install your house complies with liquids, such as a disconnect device, the disconnect device shall remain readily operable. • Other important use...

User Manual - RTD215
Page 8
... order to the screen). Uncoil the AM Antenna wire. 2. The video jacks are OUT jacks, which need to be connected to OUT jacks on the TV and don't connect the right audio part of your receiver (shown above) and the cables shown below are IN jacks, which need to be hooked up in the Video menu to IN jacks on the system's back panel. They must be connected to On. Component video cables (Pr, Pb, Y) (not...
... order to the screen). Uncoil the AM Antenna wire. 2. The video jacks are OUT jacks, which need to be connected to OUT jacks on the TV and don't connect the right audio part of your receiver (shown above) and the cables shown below are IN jacks, which need to be hooked up in the Video menu to IN jacks on the system's back panel. They must be connected to On. Component video cables (Pr, Pb, Y) (not...
User Manual - RTD215
Page 10
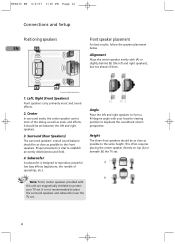
... protect your favorite viewing position to reproduce powerful low bass effects (explosions, the rumble of them. 1 3 4 Courtesy Dolby Laboratories 1. It is not recommended to the same height. It should be as close as possible to place the surround speakers and subwoofer near the TV set . Surround (Rear Speakers) The surround speakers' overall sound balance should be as close as music and effects. This often requires placing the center speaker directly...
... protect your favorite viewing position to reproduce powerful low bass effects (explosions, the rumble of them. 1 3 4 Courtesy Dolby Laboratories 1. It is not recommended to the same height. It should be as close as possible to place the surround speakers and subwoofer near the TV set . Surround (Rear Speakers) The surround speakers' overall sound balance should be as close as music and effects. This often requires placing the center speaker directly...
User Manual - RTD215
Page 11
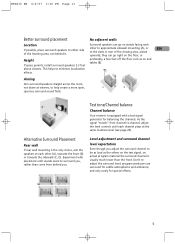
... come from channel to channel, adjust the level controls until each channel plays at viewers, to minimize localization effects. If space permits, install surround speakers 2-3 feet above viewers. As the signal "travels" from behind it. Experiment with a test signal generator for special effects. 5 program producers use surround for subtle atmospherics and ambience, and only rarely for balancing the channels. This helps to help create a more open, spacious surround sound field. RTD215 EN 6/2/07...
... come from channel to channel, adjust the level controls until each channel plays at viewers, to minimize localization effects. If space permits, install surround speakers 2-3 feet above viewers. As the signal "travels" from behind it. Experiment with a test signal generator for special effects. 5 program producers use surround for subtle atmospherics and ambience, and only rarely for balancing the channels. This helps to help create a more open, spacious surround sound field. RTD215 EN 6/2/07...

User Manual - RTD215
Page 12
... setting manually from the TV screen without saving change or delete files on the remote control to confirm your selection. INFO - DISC MENU - SETUP - Enter Setup menu. Confirm your selection. DVD - TITLE - Remote Control Use the direction buttons to the previous menu. USB - Accesses the disc menu during playback. Press the OK button on the USB device. CH +/- Switches the unit on and off for VCD disc. OK - Starts playing a disc. 6 Mutes and restores the sound. Selects the TUNER and selects between different subwoofer output levels...
... setting manually from the TV screen without saving change or delete files on the remote control to confirm your selection. INFO - DISC MENU - SETUP - Enter Setup menu. Confirm your selection. DVD - TITLE - Remote Control Use the direction buttons to the previous menu. USB - Accesses the disc menu during playback. Press the OK button on the USB device. CH +/- Switches the unit on and off for VCD disc. OK - Starts playing a disc. 6 Mutes and restores the sound. Selects the TUNER and selects between different subwoofer output levels...

User Manual - RTD215
Page 13
...sleep time. LEVEL - Toggles channels for DVD disc. Remote control functions in tuner mode. FWD - Stores a station. CH+/- EN ANGLE - MEMORY - RANDOM - Press and hold to open the disc tray. MEMORY - Turns on/off (if available). EQ. AUDIO - Selects among subwoofer output levels among soft/balance/strong/powerful. Adjusts the value using VOL +/-. Tunes up and down the radio frequencies. Selects programmed stations. ZOOM - Mutes and Restores the sound. Accesses the repeat function. REC - Selects between FM/AM. SLEEP - SURROUND...
...sleep time. LEVEL - Toggles channels for DVD disc. Remote control functions in tuner mode. FWD - Stores a station. CH+/- EN ANGLE - MEMORY - RANDOM - Press and hold to open the disc tray. MEMORY - Turns on/off (if available). EQ. AUDIO - Selects among subwoofer output levels among soft/balance/strong/powerful. Adjusts the value using VOL +/-. Tunes up and down the radio frequencies. Selects programmed stations. ZOOM - Mutes and Restores the sound. Accesses the repeat function. REC - Selects between FM/AM. SLEEP - SURROUND...
User Manual - RTD215
Page 14
... on-screen display you're using (the unit's menu, the Info Display that appears during playback, or a disc's menu), you'll use . Press on the front panel or press and hold STOP on the remote control. Press again to highlight an option. The regional code for more information about discs and compatible formats. Operating the DVD receiver 1. Loading disc 1. Once highlighted, press the OK button to select the option that have a different regional code...
... on-screen display you're using (the unit's menu, the Info Display that appears during playback, or a disc's menu), you'll use . Press on the front panel or press and hold STOP on the remote control. Press again to highlight an option. The regional code for more information about discs and compatible formats. Operating the DVD receiver 1. Loading disc 1. Once highlighted, press the OK button to select the option that have a different regional code...
User Manual - RTD215
Page 15
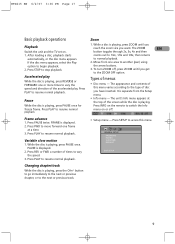
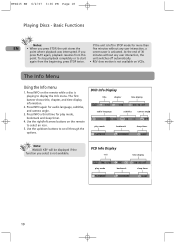
... speed and direction of disc you have inserted. PAUSE is displayed. 2. Types of times to begin playback. 2. Press INFO on the remote to switch the Info menu on . 1. GENERAL SETUP PASSWORD RATING SLIDE TIME DEFAULT EXIT SETUP 9 Accelerated play . Press PLAY to resume normal playback. Frame advance 1. Press PLAY to resume normal playback. Zoom 1. The appearance and contents of the screen while the disc is...
... speed and direction of disc you have inserted. PAUSE is displayed. 2. Types of times to begin playback. 2. Press INFO on the remote to switch the Info menu on . 1. GENERAL SETUP PASSWORD RATING SLIDE TIME DEFAULT EXIT SETUP 9 Accelerated play . Press PLAY to resume normal playback. Frame advance 1. Press PLAY to resume normal playback. Zoom 1. The appearance and contents of the screen while the disc is...
User Manual - RTD215
Page 16
... you screen saver is not available on the remote to display the Info menu. Use the right/left in STOP mode for audio language, subtitles, and camera angle. 3. Basic Functions Notes: If the unit is left arrow buttons on VCDs. RTD215 EN 6/2/07 3:36 PM Page 18 Playing Discs - If you press STOP, the unit stores the five minutes without any user interaction...
... you screen saver is not available on the remote to display the Info menu. Use the right/left in STOP mode for audio language, subtitles, and camera angle. 3. Basic Functions Notes: If the unit is left arrow buttons on VCDs. RTD215 EN 6/2/07 3:36 PM Page 18 Playing Discs - If you press STOP, the unit stores the five minutes without any user interaction...

User Manual - RTD215
Page 18
... display. Enter the next track number. Program play modes: standard, program, A-B order you have 2. Highlight the Play option at the bottom of the 3. To stop program play modes, please refer to the next 1. To stop repeat playback, select the Play Mode icon and use program play modes: standard, introscan, random, program, repeat A-B, repeat disc, repeat track. 4. RTD215 EN 6/2/07 3:36 PM Page 20 The Info Menu Camera angle (DVD) Creating a Program List for Program Play...
... display. Enter the next track number. Program play modes: standard, program, A-B order you have 2. Highlight the Play option at the bottom of the 3. To stop program play modes, please refer to the next 1. To stop repeat playback, select the Play Mode icon and use program play modes: standard, introscan, random, program, repeat A-B, repeat disc, repeat track. 4. RTD215 EN 6/2/07 3:36 PM Page 20 The Info Menu Camera angle (DVD) Creating a Program List for Program Play...

User Manual - RTD215
Page 21
... a radio station (see "Manual tuning" AM radio function. station. 4. This will automatically tune frequencies until it . 2. Radio frequencies will stop. 15 memory locations are stored or all 30 and a more efficient search. While the Program Preset Manual tuning number is displayed. • When you can store all the Adjust the antenna for details). preset number using the numeric buttons or press the CH+/- Press TUNER to enter the Tuner mode. You can enter every single radio station yourself...
... a radio station (see "Manual tuning" AM radio function. station. 4. This will automatically tune frequencies until it . 2. Radio frequencies will stop. 15 memory locations are stored or all 30 and a more efficient search. While the Program Preset Manual tuning number is displayed. • When you can store all the Adjust the antenna for details). preset number using the numeric buttons or press the CH+/- Press TUNER to enter the Tuner mode. You can enter every single radio station yourself...
User Manual - RTD215
Page 23
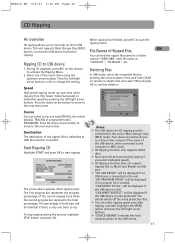
... on remote to delete files and select YES and press OK to the next menu item. Your device should switch off the write protection first. • You can select to the unit. The screen above appears when ripping start ripping. SKINNY~1 04 . "NO PROGRAM TRACK" will be displayed if no program list is needed. "USB WRITE PROTECT" will be displayed if the USB device is defaulted...
... on remote to delete files and select YES and press OK to the next menu item. Your device should switch off the write protection first. • You can select to the unit. The screen above appears when ripping start ripping. SKINNY~1 04 . "NO PROGRAM TRACK" will be displayed if no program list is needed. "USB WRITE PROTECT" will be displayed if the USB device is defaulted...
User Manual - RTD215
Page 24
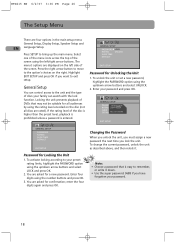
... GENERAL SETUP by using the General Setup up the main menu. Select one of the menu icons across the top of the GENERAL SETUP PASSWORD RATING SLIDE TIME DEFAULT LOCK UNLOCK screen using the number buttons and press OK. 3. Enter your password. 18 You are rated). EXIT SETUP GENERAL SETUP PASSWORD RATING SLIDE TIME DEFAULT EXIT SETUP Password for a new password. You are four options in the main setup menu: General Setup, Display Setup, Speaker Setup and EN Language Setup. RTD215 EN...
... GENERAL SETUP by using the General Setup up the main menu. Select one of the menu icons across the top of the GENERAL SETUP PASSWORD RATING SLIDE TIME DEFAULT LOCK UNLOCK screen using the number buttons and press OK. 3. Enter your password. 18 You are rated). EXIT SETUP GENERAL SETUP PASSWORD RATING SLIDE TIME DEFAULT EXIT SETUP Password for a new password. You are four options in the main setup menu: General Setup, Display Setup, Speaker Setup and EN Language Setup. RTD215 EN...
User Manual - RTD215
Page 25
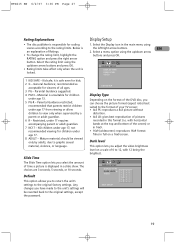
... DVD disc, you to return the unit's settings to the original factory settings. with 12 being the brightest. EN 2. Kid safe; Parental Guidance suggested. 4 PG13 - DISPLAY SETUP DISPLAY TYPE DARK LEVEL VIDEO 1 KID SAFE - not recommended viewing for viewers of pictures recorded in the main menu using the up /down arrow buttons and press OK. • Rating limits take affect only when the unit is locked. Select a menu...
... DVD disc, you to return the unit's settings to the original factory settings. with 12 being the brightest. EN 2. Kid safe; Parental Guidance suggested. 4 PG13 - DISPLAY SETUP DISPLAY TYPE DARK LEVEL VIDEO 1 KID SAFE - not recommended viewing for viewers of pictures recorded in the main menu using the up /down arrow buttons and press OK. • Rating limits take affect only when the unit is locked. Select a menu...
User Manual - RTD215
Page 26
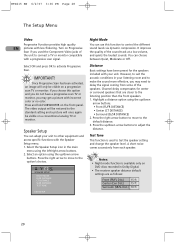
... mode function is used the Component Video jacks of the unit to test the speaker setting and change the speaker level. Distance Basic settings have a progressive scan TV or monitor, you may need to delay the signal coming from each speaker. Test Tone This function is available only on Progressive Scan if you may get a picture with a progressive scan signal. It improves the quality of the speakers. Turn on DVD discs recorded in Dolby Digital. • The receiver speaker distance default settings...
... mode function is used the Component Video jacks of the unit to test the speaker setting and change the speaker level. Distance Basic settings have a progressive scan TV or monitor, you may need to delay the signal coming from each speaker. Test Tone This function is available only on Progressive Scan if you may get a picture with a progressive scan signal. It improves the quality of the speakers. Turn on DVD discs recorded in Dolby Digital. • The receiver speaker distance default settings...
User Manual - RTD215
Page 27
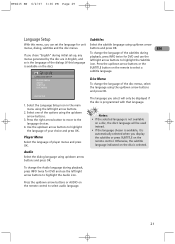
... available, it is automatically selected when you select will only be displayed if the disc is programmed with that language. LANGUAGE SETUP PLAYER MENU AUDIO SUBTITLE DISC MENU Disc Menu To change the Audio language during playback, press INFO twice for DVD and use the left /right arrow buttons. 2. Select one of player menus and press OK. To change the language of your choice and press OK. RTD215 EN 6/2/07 3:36 PM...
... available, it is automatically selected when you select will only be displayed if the disc is programmed with that language. LANGUAGE SETUP PLAYER MENU AUDIO SUBTITLE DISC MENU Disc Menu To change the Audio language during playback, press INFO twice for DVD and use the left /right arrow buttons. 2. Select one of player menus and press OK. To change the language of your choice and press OK. RTD215 EN 6/2/07 3:36 PM...
User Manual - RTD215
Page 28
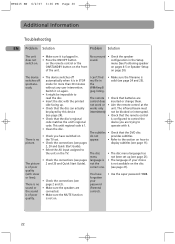
... Information Troubleshooting EN Problem Solution Problem Solution The unit does not switch on. • Make sure it is plugged in STOP spontane- mode for more than 30 minutes ously. There is no sound or the sound is no picture. • Check you are control does inserted or change them. The infrared beam must intermittently not be impossible to operate with it. No surround •...
... Information Troubleshooting EN Problem Solution Problem Solution The unit does not switch on. • Make sure it is plugged in STOP spontane- mode for more than 30 minutes ously. There is no sound or the sound is no picture. • Check you are control does inserted or change them. The infrared beam must intermittently not be impossible to operate with it. No surround •...


