User Guide
Page 4
...Codes 24 Components 4 VCR Codes 24 Digital Connection 5 TV Codes 25 Connecting Antennas 5 Satellite Receivers 26 Connecting the Speakers 6 Audio (RCA only 26 Connecting the Subwoofer 6 Laser disc Players 26 Positioning your Speaker 7 Front Speaker Placement 7 Limited Warranty 27 Surround Placement 8 ... Using the Remote to Control Additional Components 14 Using the receiver to play a Source . . . .15 Operating the Radio 16 Advanced Sound Control Sound Enhancement Systems 19 Fine Setting of Components 20 Fine Setting of the Speakers 21 Advanced Setting 21 1
...Codes 24 Components 4 VCR Codes 24 Digital Connection 5 TV Codes 25 Connecting Antennas 5 Satellite Receivers 26 Connecting the Speakers 6 Audio (RCA only 26 Connecting the Subwoofer 6 Laser disc Players 26 Positioning your Speaker 7 Front Speaker Placement 7 Limited Warranty 27 Surround Placement 8 ... Using the Remote to Control Additional Components 14 Using the receiver to play a Source . . . .15 Operating the Radio 16 Advanced Sound Control Sound Enhancement Systems 19 Fine Setting of Components 20 Fine Setting of the Speakers 21 Advanced Setting 21 1

User Guide
Page 7
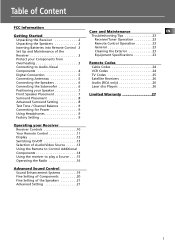
... 20 chapter "Input Signal Setting"). What you need is desired. You can enjoy better sound quality brought to you by connecting it to the relevant S-Video jack at the front of...connect the SAT receiver or DVD player to the Home Theater. When S-Video cable is preferred. Composite video (yellow RCA connector) can also be established for each SAT receiver, DVD player or CD player....digital input source. DVD, SAT or CD) to the appropriate digital inputs and press DIGITAL INPUT to S-VIDEO IN (TV) RT2600 ONLY OPTICAL 1 RT2600 ONLY FR FL OPTICAL 2 SR SL RT2600 ONLY SUB CEN ...
... 20 chapter "Input Signal Setting"). What you need is desired. You can enjoy better sound quality brought to you by connecting it to the relevant S-Video jack at the front of...connect the SAT receiver or DVD player to the Home Theater. When S-Video cable is preferred. Composite video (yellow RCA connector) can also be established for each SAT receiver, DVD player or CD player....digital input source. DVD, SAT or CD) to the appropriate digital inputs and press DIGITAL INPUT to S-VIDEO IN (TV) RT2600 ONLY OPTICAL 1 RT2600 ONLY FR FL OPTICAL 2 SR SL RT2600 ONLY SUB CEN ...
User Guide
Page 9
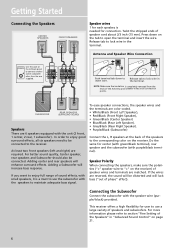
...Connecting the Subwoofer Connect the subwoofer with purple/black terminal). This receiver offers a high flexibility for connection. If the wires are reversed, the sound will be distorted and will lack bass ("out of the speakers to use the subwoofer with the unit (2 front, 1 center, 2 rear,... want to the receiver. BLUE / BLACK GREY / BLACK +- -+ -+ SUB WOOFER REAR REAR REAR SPEAKERS (SURROUND SOUND) Speakers There are required. For better sound quality, Center speaker, rear speakers and Subwoofer should also be connected to enjoy full range of the Antenna and speaker ...
...Connecting the Subwoofer Connect the subwoofer with purple/black terminal). This receiver offers a high flexibility for connection. If the wires are reversed, the sound will be distorted and will lack bass ("out of the speakers to use the subwoofer with the unit (2 front, 1 center, 2 rear,... want to the receiver. BLUE / BLACK GREY / BLACK +- -+ -+ SUB WOOFER REAR REAR REAR SPEAKERS (SURROUND SOUND) Speakers There are required. For better sound quality, Center speaker, rear speakers and Subwoofer should also be connected to enjoy full range of the Antenna and speaker ...
User Guide
Page 10
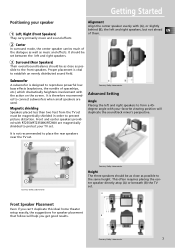
...) Their overall sound balance should be as close as music and effects. Front and center speakers provided with RT2350/RT2350BK/RT2600 are used. It is designed to connect subwoofers when small speakers are magnetically shielded to the front speakers. A Front Speaker Placement Even if you can't duplicate this ideal home theater setup exactly, the...
...) Their overall sound balance should be as close as music and effects. Front and center speakers provided with RT2350/RT2350BK/RT2600 are used. It is designed to connect subwoofers when small speakers are magnetically shielded to the front speakers. A Front Speaker Placement Even if you can't duplicate this ideal home theater setup exactly, the...

User Guide
Page 11
... Rear wall If rear wall mounting is the only choice, aim the speakers at viewers, helps create a more open, spacious surround sound field. In the latter case, they can go right on the floor, or preferably, a few feet off the floor such as...Laboratories Height If space permits, install surrounds 2-3 feet above viewers. Courtesy Dolby Laboratories Courtesy Dolby Laboratories 8 Experiment with placement until surround sounds seem to minimize localization effects. Courtesy Dolby Laboratories No adjacent walls Surrounds can go on end tables (B). This helps to envelop you, ...
... Rear wall If rear wall mounting is the only choice, aim the speakers at viewers, helps create a more open, spacious surround sound field. In the latter case, they can go right on the floor, or preferably, a few feet off the floor such as...Laboratories Height If space permits, install surrounds 2-3 feet above viewers. Courtesy Dolby Laboratories Courtesy Dolby Laboratories 8 Experiment with placement until surround sounds seem to minimize localization effects. Courtesy Dolby Laboratories No adjacent walls Surrounds can go on end tables (B). This helps to envelop you, ...

User Guide
Page 12
... and other electronic components and Your receiver is equipped with the following settings when you first power the receiver up right out of Digital Theater Systems, Inc. All Rights Reserved. Enter Standby mode 2. Press SURR. program producers use . Once headphones are in the wall until each... Digital, and manufactured under License from Dolby Laboratories. Factory Setting The unit is preset to Factory Settings: All preset radio stations and surround sound setting will scroll on display. Hearing Comfort & Well-Being • Do not play . • If you put on the headphones....
... and other electronic components and Your receiver is equipped with the following settings when you first power the receiver up right out of Digital Theater Systems, Inc. All Rights Reserved. Enter Standby mode 2. Press SURR. program producers use . Once headphones are in the wall until each... Digital, and manufactured under License from Dolby Laboratories. Factory Setting The unit is preset to Factory Settings: All preset radio stations and surround sound setting will scroll on display. Hearing Comfort & Well-Being • Do not play . • If you put on the headphones....
User Guide
Page 13
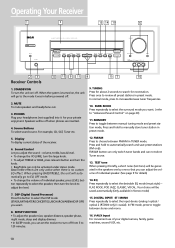
... system is no custom EQ effect. Sound Control Let you want . 8. DSP (Digital Sound Processor) Press this button to select the surround mode you adjust the sound - EQ Press repeatedly to select the input device (analog / optical / optical 2 (RT2600 only) / coaxial). Source Buttons To select sound source. MODE Press repeatedly to select the DSP mode (STADIUM/THEATER...
... system is no custom EQ effect. Sound Control Let you want . 8. DSP (Digital Sound Processor) Press this button to select the surround mode you adjust the sound - EQ Press repeatedly to select the input device (analog / optical / optical 2 (RT2600 only) / coaxial). Source Buttons To select sound source. MODE Press repeatedly to select the DSP mode (STADIUM/THEATER...

User Guide
Page 14
... (RT2600 only), STEREO. 13. DIGITAL 10 Select the way your audio/video components are connected to toggle between Stereo and Mono sound. * 6 channels mode is pressed. 11 Operating Your Receiver Your Remote Control 1. VOL (Volume Buttons) 2 To adjust the volume. 13 5. Press AUDIO button to finalize your 9 receiver such as CD, VCR, DVD...
... (RT2600 only), STEREO. 13. DIGITAL 10 Select the way your audio/video components are connected to toggle between Stereo and Mono sound. * 6 channels mode is pressed. 11 Operating Your Receiver Your Remote Control 1. VOL (Volume Buttons) 2 To adjust the volume. 13 5. Press AUDIO button to finalize your 9 receiver such as CD, VCR, DVD...

User Guide
Page 16
...VCR button , or press source button repeatedly until DVD is selected, you will be activated. SOURCE SOURCE FM/AM TUNIN Example 2: Based on the receiver and press the DVD button, or press source button repeatedly until VCR is selected, image and sound from the VCR source will be able to ...the name will replace the DVD. The receiver acts as a switching device between all the sources that ...
...VCR button , or press source button repeatedly until DVD is selected, you will be activated. SOURCE SOURCE FM/AM TUNIN Example 2: Based on the receiver and press the DVD button, or press source button repeatedly until VCR is selected, image and sound from the VCR source will be able to ...the name will replace the DVD. The receiver acts as a switching device between all the sources that ...
User Guide
Page 18
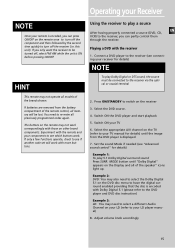
...refer to your receiver for details) Example 1: To play Dolby Digital or DTS sound, the source must be connected to be lost. Playing a DVD with Dolby Digital 5.1 (please refer to the DVD player and DVD disc instruction) Example 3: LD: You may also need to have the digital surround...or coaxial terminal 2. HINT This remote may not work . Experiment with the remote and your TV 6. Connect a DVD player to the receiver (see "Advanced sound control" for details) NOTE To play 5.1 Dolby Digital surround sound Press SURR. Select the appropriate A/V channel on the receiver 3.
...refer to your receiver for details) Example 1: To play Dolby Digital or DTS sound, the source must be connected to be lost. Playing a DVD with Dolby Digital 5.1 (please refer to the DVD player and DVD disc instruction) Example 3: LD: You may also need to have the digital surround...or coaxial terminal 2. HINT This remote may not work . Experiment with the remote and your TV 6. Connect a DVD player to the receiver (see "Advanced sound control" for details) NOTE To play 5.1 Dolby Digital surround sound Press SURR. Select the appropriate A/V channel on the receiver 3.

User Guide
Page 19
...the receiver. 5- SOURCE SOURCE FM/AM TUNIN NOTE 1. Adjust the antenna for better reception for details). SOURCE SOURCE FM/AM TUNING MEM Select sound effect if needed by pressing TUNING UP or DOWN repeatedly until the desired station is heard. Manual tuning 1. In this mode the receiver will...the antenna until it finds a station RCE RCE FM/AM TUNING MEMORY ON/STANDBY MUTE 3. Connect the FM and AM antenna accordingly (see "Advance sound section" for more efficient search. 4- Press SOURCE keys to position the antenna away from them. 2. To select band, press the FM/AM ...
...the receiver. 5- SOURCE SOURCE FM/AM TUNIN NOTE 1. Adjust the antenna for better reception for details). SOURCE SOURCE FM/AM TUNING MEM Select sound effect if needed by pressing TUNING UP or DOWN repeatedly until the desired station is heard. Manual tuning 1. In this mode the receiver will...the antenna until it finds a station RCE RCE FM/AM TUNING MEMORY ON/STANDBY MUTE 3. Connect the FM and AM antenna accordingly (see "Advance sound section" for more efficient search. 4- Press SOURCE keys to position the antenna away from them. 2. To select band, press the FM/AM ...

User Guide
Page 22
... Listening Zone Subwoofer Rear Left Speaker Rear Right Speaker 19 Being different from software processed in DVD, SAT/CAB, TV and CD mode. (When digital cable is equipped with existing 5.1 speaker configurations. It...Sound Control Sound Enhancement Systems This receiver is a digital surround system which only four channels ( Front Left, Front Right, Centre and Rear ) are used, the new system provides stereo separation of the rear speakers (Rear-Right, Rear-Left ). Front Left Speaker Center Speaker Listening Zone Front Right Speaker Subwoofer Digital Theater Systems (DTS) (RT2600...
... Listening Zone Subwoofer Rear Left Speaker Rear Right Speaker 19 Being different from software processed in DVD, SAT/CAB, TV and CD mode. (When digital cable is equipped with existing 5.1 speaker configurations. It...Sound Control Sound Enhancement Systems This receiver is a digital surround system which only four channels ( Front Left, Front Right, Centre and Rear ) are used, the new system provides stereo separation of the rear speakers (Rear-Right, Rear-Left ). Front Left Speaker Center Speaker Listening Zone Front Right Speaker Subwoofer Digital Theater Systems (DTS) (RT2600...

User Guide
Page 23
...AUX FM/AM TAPE TV DEFAULT INPUT (as seen on the remote control until NORMAL appears on the display as long as (STADIUM / THEATER / CONCERT / CLUB / CHURCH / ARENA). DSP automatically converts analog audio signals to play analog signals from the default setting, 1. ...to the most convenient settings for different components are listed in volume between normal voices and sound like DVD, SAT, CD) directly. DOLBY PL2 MOVIE (RT2600 only)/ DOLBY PL2 MUSIC (RT2600 only)/ DTS (RT2600 only)/ DOLBY PROLOGIC/ Stereo DOLBY DIGITAL Input Signal Setting The receiver defaults to change ...
...AUX FM/AM TAPE TV DEFAULT INPUT (as seen on the remote control until NORMAL appears on the display as long as (STADIUM / THEATER / CONCERT / CLUB / CHURCH / ARENA). DSP automatically converts analog audio signals to play analog signals from the default setting, 1. ...to the most convenient settings for different components are listed in volume between normal voices and sound like DVD, SAT, CD) directly. DOLBY PL2 MOVIE (RT2600 only)/ DOLBY PL2 MUSIC (RT2600 only)/ DTS (RT2600 only)/ DOLBY PROLOGIC/ Stereo DOLBY DIGITAL Input Signal Setting The receiver defaults to change ...

User Guide
Page 24
... of the SETUP button to listening position than the front speakers. Repeat step 3 to save your setting. You can make the surround sound more effective and suit the acoustic conditions in the speakers one by pressing UP/DOWN ARROW button. 21 The speaker having the noise at... that are closer to adjust the speakers' relative loudness. A short noise will be heard in your audio system. To adjust individual speaker volume level, press the LEVEL key on the remote control. AUDIO - Also, to toggle among: front, center, surround, ...
... of the SETUP button to listening position than the front speakers. Repeat step 3 to save your setting. You can make the surround sound more effective and suit the acoustic conditions in the speakers one by pressing UP/DOWN ARROW button. 21 The speaker having the noise at... that are closer to adjust the speakers' relative loudness. A short noise will be heard in your audio system. To adjust individual speaker volume level, press the LEVEL key on the remote control. AUDIO - Also, to toggle among: front, center, surround, ...

User Guide
Page 25
...the speaker and your favorite listening position. 1. settings and select the one that not all speakers size to "small" to protect them and optimize the sound quality. • When left and right front speakers are set to SMALL, center and surround speakers can not be set to LARGE. While the ...is important to note, however, that has better bass effect. • If your selection SOURCE SOURCE FM/AM TUNIN and set up mode. 22 Advance Sound Control NOTE • The sub-woofer selection will always be YES when the main speakers are set to small (SML). • For the subwoofer phase...
...the speaker and your favorite listening position. 1. settings and select the one that not all speakers size to "small" to protect them and optimize the sound quality. • When left and right front speakers are set to SMALL, center and surround speakers can not be set to LARGE. While the ...is important to note, however, that has better bass effect. • If your selection SOURCE SOURCE FM/AM TUNIN and set up mode. 22 Advance Sound Control NOTE • The sub-woofer selection will always be YES when the main speakers are set to small (SML). • For the subwoofer phase...
User Guide
Page 26
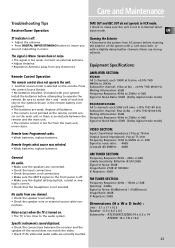
.... The signal is selected on . • The TV is too far from AC power before attempting to operate the remote. AMPLIFIER SECTION: RT2600 All 5 channels: each battery to the symbols shown in the remote battery compartment. • The batteries are correctly inserted. Remote forgets what ...8226; Check if the video and audio cable are weak. Specific instruments sound displaced. • Check the connections between the remote and the main unit. • The remote control is too close to the audio system. EN ST indicator is not in 6-channel direct input mode. No audio...
.... The signal is selected on . • The TV is too far from AC power before attempting to operate the remote. AMPLIFIER SECTION: RT2600 All 5 channels: each battery to the symbols shown in the remote battery compartment. • The batteries are correctly inserted. Remote forgets what ...8226; Check if the video and audio cable are weak. Specific instruments sound displaced. • Check the connections between the remote and the main unit. • The remote control is too close to the audio system. EN ST indicator is not in 6-channel direct input mode. No audio...


