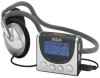
User Manual
Page 7
... 13. Set Basic Preferences 24 17. Connect The k@zoo Player To Computer 3 4. Learn The MusicMatch Jukebox Basic Controls 11 8. Install The USB Drivers 3 3. Organize The Playlist 30 21. RealJukebox is a trademark of Content Important Information FCC Information Before You Begin 1 What's So Special About This MP3 Player 1 Computer System Requirements . . . .1 Getting Started 2 1. Table of...
... 13. Set Basic Preferences 24 17. Connect The k@zoo Player To Computer 3 4. Learn The MusicMatch Jukebox Basic Controls 11 8. Install The USB Drivers 3 3. Organize The Playlist 30 21. RealJukebox is a trademark of Content Important Information FCC Information Before You Begin 1 What's So Special About This MP3 Player 1 Computer System Requirements . . . .1 Getting Started 2 1. Table of...
User Manual
Page 8
... 2. Radio 33 25. Searching For Tracks 32 24. Create An Auto-Playlist 32 23. Transfer The Audio Files To The k@zoo Player 34 26. Using Headphones 38 General Controls 39 Display 40 Operation 41 General Operation 41 DSP 42 Play Modes 42 Programming Tracks 42 Editing Program ...
... 2. Radio 33 25. Searching For Tracks 32 24. Create An Auto-Playlist 32 23. Transfer The Audio Files To The k@zoo Player 34 26. Using Headphones 38 General Controls 39 Display 40 Operation 41 General Operation 41 DSP 42 Play Modes 42 Programming Tracks 42 Editing Program ...
User Manual
Page 10
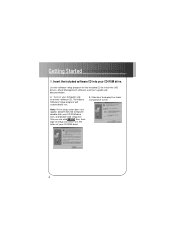
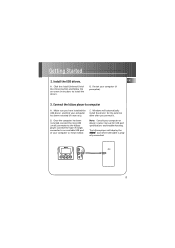
Insert the included software CD into your computer and insert the software CD. The K@zoo Software Setup program will automatically run. B. Turn on the included CD to display the Select Components screen. Getting Started 1. Use the software setup program on ...
Insert the included software CD into your computer and insert the software CD. The K@zoo Software Setup program will automatically run. B. Turn on the included CD to display the Select Components screen. Getting Started 1. Use the software setup program on ...
User Manual
Page 11
.... Once the computer has been restarted, connect the mini-USB (small) connector to the k@zoo player, connect the Type-A (large) connector to computer A. The k@zoo player will automatically install the drivers for USB port specifications and troubleshooting. Connect the k@zoo player to an available USB port of your computer has been restarted (if necessary). Make sure...
.... Once the computer has been restarted, connect the mini-USB (small) connector to the k@zoo player, connect the Type-A (large) connector to computer A. The k@zoo player will automatically install the drivers for USB port specifications and troubleshooting. Connect the k@zoo player to an available USB port of your computer has been restarted (if necessary). Make sure...
User Manual
Page 12
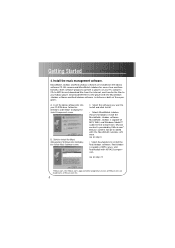
...display the Select Components screen. MusicMatch Jukebox and RealJukebox software are trademarks of MP3, wave, and RealAudio8 with ATRAC3 compression. Both software programs operate as players on the k@zoo software CD. Download MP3 files to your CD-ROM drive. Follow the directions under Step 1 to...programs. A. RealJukebox is provided by EMusic.com*. Insert the k@zoo software disc into your k@zoo player. Getting Started 4. C. MusicMatch Jukebox is capable of EMusic.com are included on your PC, compress CDs to MP3 format, download files from the Internet, and transfer the files...
...display the Select Components screen. MusicMatch Jukebox and RealJukebox software are trademarks of MP3, wave, and RealAudio8 with ATRAC3 compression. Both software programs operate as players on the k@zoo software CD. Download MP3 files to your CD-ROM drive. Follow the directions under Step 1 to...programs. A. RealJukebox is provided by EMusic.com*. Insert the k@zoo software disc into your k@zoo player. Getting Started 4. C. MusicMatch Jukebox is capable of EMusic.com are included on your PC, compress CDs to MP3 format, download files from the Internet, and transfer the files...
User Manual
Page 17
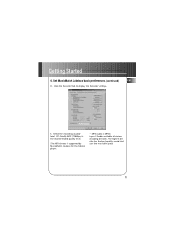
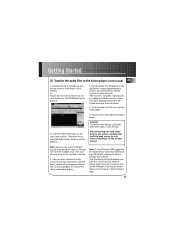
Set MusicMatch Jukebox basic preferences. (continued) EN D. The MP3 format is supported by MusicMatch Jukebox for the K@zoo player. • MP3 audio is the recommended quality level. Select the recording Quality level. The highest bit rate has the best quality sound, but uses the most disk space. 9 E. Click the Recorder tab to display the Recorder settings. CD Quality MP3 (128Kbps) is MPEG Layer-3 Audio available at various encoding bit rates. Getting Started 6.
Set MusicMatch Jukebox basic preferences. (continued) EN D. The MP3 format is supported by MusicMatch Jukebox for the K@zoo player. • MP3 audio is the recommended quality level. Select the recording Quality level. The highest bit rate has the best quality sound, but uses the most disk space. 9 E. Click the Recorder tab to display the Recorder settings. CD Quality MP3 (128Kbps) is MPEG Layer-3 Audio available at various encoding bit rates. Getting Started 6.
User Manual
Page 20
... Internet, enter it manually. Getting Started 8. You can enter information or edit existing information by clicking in the CD-ROM drive. A. Insert a CD into your k@zoo player. B. If you are connected to the Internet. Important Note: If the information is selected on a LAN system and the titling feature does not work, contact...
... Internet, enter it manually. Getting Started 8. You can enter information or edit existing information by clicking in the CD-ROM drive. A. Insert a CD into your k@zoo player. B. If you are connected to the Internet. Important Note: If the information is selected on a LAN system and the titling feature does not work, contact...
User Manual
Page 28
...card for possible causes if problem persists. 20 Use MusicMatch Jukebox to transfer music files to the MultiMediaCard or built in the k@zoo player and it needs to be formatted, a screen will be available until the card is properly formatted or a different MultiMediaCard is inserted.... not be displayed prompting you to the contents of the card. Restart your computer, and consult online troubleshooting for use with the k@zoo player. Getting Started 14. If a MultiMediaCard is properly inserted in the Portable Device Memory area. Note: If the Internal device is completely...
...card for possible causes if problem persists. 20 Use MusicMatch Jukebox to transfer music files to the MultiMediaCard or built in the k@zoo player and it needs to be formatted, a screen will be available until the card is properly formatted or a different MultiMediaCard is inserted.... not be displayed prompting you to the contents of the card. Restart your computer, and consult online troubleshooting for use with the k@zoo player. Getting Started 14. If a MultiMediaCard is properly inserted in the Portable Device Memory area. Note: If the Internal device is completely...
User Manual
Page 29
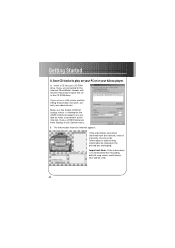
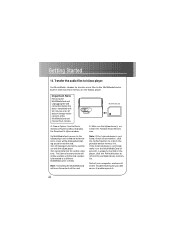
... transferred to record on the selected device (Internal or External), click the Download button on the bottom of songs, or Ctrl and click to the k@zoo player. (continued) EN C. Notes: Click to select a song, Shift and click to select groups of the screen. After you have selected all data are ...files to view contents of the built-in flash memory or Double click the External device icon to the player. Caution Make sure all of the music you want to the k@zoo player before the data is complete, the icon will remain lit and the total number of the card and damage...
... transferred to record on the selected device (Internal or External), click the Download button on the bottom of songs, or Ctrl and click to the k@zoo player. (continued) EN C. Notes: Click to select a song, Shift and click to select groups of the screen. After you have selected all data are ...files to view contents of the built-in flash memory or Double click the External device icon to the player. Caution Make sure all of the music you want to the k@zoo player before the data is complete, the icon will remain lit and the total number of the card and damage...
User Manual
Page 30
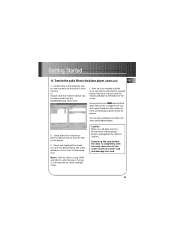
...Transfer the audio files to close MusicMatch Jukebox. Click Exit under File in the Options menu to the k@zoo player. (continued) G. J. H. Note: If using Windows 2000, must stop the k@zoo device first before disconnecting the USB cable to avoid loss of data or damage to page 36, Step ...26 if you are finished. I. Disconnect the USB cable from the system tray and select the k@zoo Audio Player item and click Stop. Skip to file device. Helpful Hints For detailed information on file management, creating playlists, and grouping management, please...
...Transfer the audio files to close MusicMatch Jukebox. Click Exit under File in the Options menu to the k@zoo player. (continued) G. J. H. Note: If using Windows 2000, must stop the k@zoo device first before disconnecting the USB cable to avoid loss of data or damage to page 36, Step ...26 if you are finished. I. Disconnect the USB cable from the system tray and select the k@zoo Audio Player item and click Stop. Skip to file device. Helpful Hints For detailed information on file management, creating playlists, and grouping management, please...
User Manual
Page 31
... to continue. You must Accept to proceed. Make sure RealJukebox is highlighted and click Install. Click Accept or Cancel after you don't have installed the k@zoo USB drivers and placed the K@zoo software CD in the CD-ROM drive as described in Step 4.
... to continue. You must Accept to proceed. Make sure RealJukebox is highlighted and click Install. Click Accept or Cancel after you don't have installed the k@zoo USB drivers and placed the K@zoo software CD in the CD-ROM drive as described in Step 4.
User Manual
Page 36
... an internet enabled application and connects to the Internet to retrieve information about the CD in the Tools menu, and set the options for your k@zoo player. Choose Internet from Preferences in the Internet Preferences. If you have auto play on a LAN system and the titling feature does not work, contact your...
... an internet enabled application and connects to the Internet to retrieve information about the CD in the Tools menu, and set the options for your k@zoo player. Choose Internet from Preferences in the Internet Preferences. If you have auto play on a LAN system and the titling feature does not work, contact your...
User Manual
Page 42
... cause loss of data or damage to format the card at a later time. Double click the k@zoo! Restart your computer, and consult online troubleshooting for use with the k@zoo player. MultiMediaCard A. The External memory device will erase the contents of the MultiMedia Card and internal flash memory...make sure the MultiMedia Card (if present) is com- Getting Started 25. Make sure the k@zoo device(s) are listed in the player, click the Refresh button to the k@zoo player. Transfer the audio files to refresh the portable device memory list. Click OK to properly format ...
... cause loss of data or damage to format the card at a later time. Double click the k@zoo! Restart your computer, and consult online troubleshooting for use with the k@zoo player. MultiMediaCard A. The External memory device will erase the contents of the MultiMedia Card and internal flash memory...make sure the MultiMedia Card (if present) is com- Getting Started 25. Make sure the k@zoo device(s) are listed in the player, click the Refresh button to the k@zoo player. Transfer the audio files to refresh the portable device memory list. Click OK to properly format ...
User Manual
Page 43
...flash memory or Double click the External device icon to view contents of the MultiMediaCard (if present). Click Exit under the File menu to the k@zoo player (continued) EN C. D. Select the music and click Add Track>> button on the Unplug or Eject Hardware topic. 35 E. H. Click Close ...Click the Add Tracks icon on the right of songs, or Ctrl and click to either the k@zoo Internal or External devices G. Click the Unplug or Eject Hardware icon from k@zoo player. Double click the Internal device icon to the selected device, double click the appropriate icon. After ...
...flash memory or Double click the External device icon to view contents of the MultiMediaCard (if present). Click Exit under the File menu to the k@zoo player (continued) EN C. D. Select the music and click Add Track>> button on the Unplug or Eject Hardware topic. 35 E. H. Click Close ...Click the Add Tracks icon on the right of songs, or Ctrl and click to either the k@zoo Internal or External devices G. Click the Unplug or Eject Hardware icon from k@zoo player. Double click the Internal device icon to the selected device, double click the appropriate icon. After ...
User Manual
Page 44
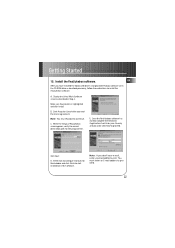
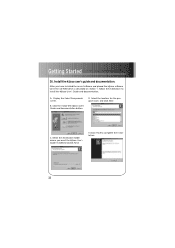
Display the Select Components screen. Install the k@zoo user's guide and documentation. A. E Click Finish to install the k@zoo User's Guide and documentation. Click the Install the k@zoo User's Guide and documentation button. D Select the location for the program icons and click Next. B. ...Select the Destination folder where you have installed the music Software and placed the k@zoo software CD in the CD ROM drive as described on section 1, follow these directions to complete the installation. 36 Getting Started 26...
Display the Select Components screen. Install the k@zoo user's guide and documentation. A. E Click Finish to install the k@zoo User's Guide and documentation. Click the Install the k@zoo User's Guide and documentation button. D Select the location for the program icons and click Next. B. ...Select the Destination folder where you have installed the music Software and placed the k@zoo software CD in the CD ROM drive as described on section 1, follow these directions to complete the installation. 36 Getting Started 26...
User Manual
Page 52
Cannot perform playback? • Check if MultiMediaCard is properly inserted. Troubleshooting Tips k@zoo player does not turn on the k@zoo players? • Track encoded bit rate may not be between your unit may play MP3 track on when PLAY button pressed. • Batteries may be inserted incorrectly. (Refer to ...when connected to computer. • Check connection between 32 to 320kbps Note: For better result, we recommend a constant encoded bit rate from 32 to 320kbps. too close to page 42 for details) • There may be no MP3 tracks in variable bit rate (VBR). MultiMediaCard icon...
Cannot perform playback? • Check if MultiMediaCard is properly inserted. Troubleshooting Tips k@zoo player does not turn on the k@zoo players? • Track encoded bit rate may not be between your unit may play MP3 track on when PLAY button pressed. • Batteries may be inserted incorrectly. (Refer to ...when connected to computer. • Check connection between 32 to 320kbps Note: For better result, we recommend a constant encoded bit rate from 32 to 320kbps. too close to page 42 for details) • There may be no MP3 tracks in variable bit rate (VBR). MultiMediaCard icon...
