
Warranty Card
Page 2
... and a description of sale. The exchange unit is under warranty for the remainder of damage or loss en route to Audiovox. • Pay any removable batteries, even if batteries were included with the product.
... and a description of sale. The exchange unit is under warranty for the remainder of damage or loss en route to Audiovox. • Pay any removable batteries, even if batteries were included with the product.

Owner/User Manual
Page 3
... that came with tape or other insulators. • Do not use the unit immediately after transportation from the automobile when you discard the battery, cover the terminal with your product from a cold place to a warm place; Caution: Danger of an automobile where temperatures may exceed 50&#... personnel. 2 To minimize the risk of your automobile, and do not exceed 50°C (122°F). The RBRC seal on the rechargeable battery used in this product in direct sunlight. condensation problems may cause damage or malfunction. • Do not expose to rain or moisture. •...
... that came with tape or other insulators. • Do not use the unit immediately after transportation from the automobile when you discard the battery, cover the terminal with your product from a cold place to a warm place; Caution: Danger of an automobile where temperatures may exceed 50&#... personnel. 2 To minimize the risk of your automobile, and do not exceed 50°C (122°F). The RBRC seal on the rechargeable battery used in this product in direct sunlight. condensation problems may cause damage or malfunction. • Do not expose to rain or moisture. •...
Owner/User Manual
Page 5
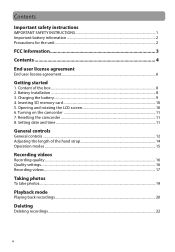
... ...11 8. Setting date and time ...11 General controls General controls ...12 Adjusting the length of the box...8 2. Battery Installation ...8 3. Content of the hand strap 14 Operation modes ...15 Recording videos Recording quality...16 Quality settings...16 Recording...22 4 Opening and rotating the LCD screen 10 6. Turning on the camcorder ...11 7. Charging the battery...9 4. Contents Important safety instructions IMPORTANT SAFETY INSTRUCTIONS 1 Important battery information ...2 Precautions for the unit ...2 FCC Information 3 Contents 4 End user license agreement End user...
... ...11 8. Setting date and time ...11 General controls General controls ...12 Adjusting the length of the box...8 2. Battery Installation ...8 3. Content of the hand strap 14 Operation modes ...15 Recording videos Recording quality...16 Quality settings...16 Recording...22 4 Opening and rotating the LCD screen 10 6. Turning on the camcorder ...11 7. Charging the battery...9 4. Contents Important safety instructions IMPORTANT SAFETY INSTRUCTIONS 1 Important battery information ...2 Precautions for the unit ...2 FCC Information 3 Contents 4 End user license agreement End user...
Owner/User Manual
Page 9
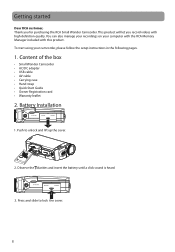
... Wonder Camcorder. Push to lock the cover. 8 To start using your computer with the RCA Memory Manager included with high definition quality. You can also manage your recordings on your camcorder, please follow the setup instructions in the following.... 1. Press and slide to unlock and lift up the cover. 2 2. Observe the polarities and insert the battery until a click sound is heard. 3 3. Getting started Dear RCA customer, Thank you record videos with this product. Battery Installation 1 1. Content of the box • Small Wonder Camcorder • AC/DC adapter • USB ...
... Wonder Camcorder. Push to lock the cover. 8 To start using your computer with the RCA Memory Manager included with high definition quality. You can also manage your recordings on your camcorder, please follow the setup instructions in the following.... 1. Press and slide to unlock and lift up the cover. 2 2. Observe the polarities and insert the battery until a click sound is heard. 3 3. Getting started Dear RCA customer, Thank you record videos with this product. Battery Installation 1 1. Content of the box • Small Wonder Camcorder • AC/DC adapter • USB ...
Owner/User Manual
Page 10
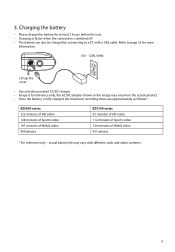
... may vary from the actual product. • Once the battery is switched off. • The battery can also be charged by connecting to page 25 for more information. 100 - 120V, 60Hz Lift up the cover • Use only the provided AC/... series 92 minutes of HD video 112 minutes of Sports video 134 minutes of WebQ video 931 photos * For reference only - Charging the battery • Please charge the battery for reference only, the AC/DC adapter shown in the image may vary with a USB cable. Refer to a PC with different cards and...
... may vary from the actual product. • Once the battery is switched off. • The battery can also be charged by connecting to page 25 for more information. 100 - 120V, 60Hz Lift up the cover • Use only the provided AC/... series 92 minutes of HD video 112 minutes of Sports video 134 minutes of WebQ video 931 photos * For reference only - Charging the battery • Please charge the battery for reference only, the AC/DC adapter shown in the image may vary with a USB cable. Refer to a PC with different cards and...

Owner/User Manual
Page 12
... hold • "Ready" shows on . Resetting the camcorder • If the player stops operating properly, you can reset it by removing and re-installing the battery. 8. Refer to set the date and time before using the camcorder. Turning on the camcorder • Open the LCD screen and press the power switch...
... hold • "Ready" shows on . Resetting the camcorder • If the player stops operating properly, you can reset it by removing and re-installing the battery. 8. Refer to set the date and time before using the camcorder. Turning on the camcorder • Open the LCD screen and press the power switch...

Owner/User Manual
Page 13
zoom during record and preview Audio speaker Lens Recording indicator Microphone Video light Lift up the cover Lift up the cover AV output (Lift up the cover to access the connector) HDMI video output (Lift up the cover to access the connector) SD card slot (Lift up the cover to show the card slot) Battery compartment (Lift up the cover to show the battery compartment) Camcorder strap hole 12 General controls General controls Take photo Zoom lever -
zoom during record and preview Audio speaker Lens Recording indicator Microphone Video light Lift up the cover Lift up the cover AV output (Lift up the cover to access the connector) HDMI video output (Lift up the cover to access the connector) SD card slot (Lift up the cover to show the card slot) Battery compartment (Lift up the cover to show the battery compartment) Camcorder strap hole 12 General controls General controls Take photo Zoom lever -
Owner/User Manual
Page 28
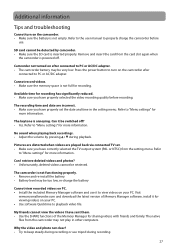
... may be very low. Camcorder not turned on after connected to PC or AC/DC adapter. • The camcorder battery may not play in the setting menu. The recording time and date are played back via connected TV set the date and time in other ... keytone is not empty. Can I have correctly selected the TV output system (PAL or NTSC) from the camcorder may be too low, re-charge the battery Cannot view recorded videos on PC. • Install the included Memory Manager software and use it to view videos on the camcorder after connected to...
... may be very low. Camcorder not turned on after connected to PC or AC/DC adapter. • The camcorder battery may not play in the setting menu. The recording time and date are played back via connected TV set the date and time in other ... keytone is not empty. Can I have correctly selected the TV output system (PAL or NTSC) from the camcorder may be too low, re-charge the battery Cannot view recorded videos on PC. • Install the included Memory Manager software and use it to view videos on the camcorder after connected to...
Owner/User Manual
Page 30
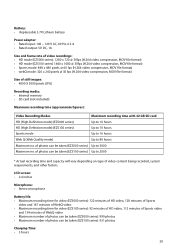
of photos can be taken (EZ5100 series) Up to 80 hours Maximum no . Battery: • Replaceable 3.7V Lithium battery Power adapter: • Rated input: 100 - 120 V AC, 60 Hz, 0.3 A • Rated output: 5V DC, 1A Size and frame rate of video recordings: •...capacity will vary depending on type of video content being recorded, system requirements, and other factors. LCD screen: • 2.4 inches Microphone: • Stereo microphone Battery life: • Maximum recording time for video (EZ5000 series): 122 minutes of HD video, 128 minutes of Sports video and 147 minutes of WebQ video...
of photos can be taken (EZ5100 series) Up to 80 hours Maximum no . Battery: • Replaceable 3.7V Lithium battery Power adapter: • Rated input: 100 - 120 V AC, 60 Hz, 0.3 A • Rated output: 5V DC, 1A Size and frame rate of video recordings: •...capacity will vary depending on type of video content being recorded, system requirements, and other factors. LCD screen: • 2.4 inches Microphone: • Stereo microphone Battery life: • Maximum recording time for video (EZ5000 series): 122 minutes of HD video, 128 minutes of Sports video and 147 minutes of WebQ video...

Owner/User Manual
Page 32
... : Audiovox Electronics Corp. The exchange unit is under warranty for loss or damage. What we will be shipped to Audiovox. • Pay any removable batteries, even if batteries were included with the original purchase. Attn: Service Department. 150 Marcus Blvd. Audiovox accepts no liability in case of the original product's warranty period...
... : Audiovox Electronics Corp. The exchange unit is under warranty for loss or damage. What we will be shipped to Audiovox. • Pay any removable batteries, even if batteries were included with the original purchase. Attn: Service Department. 150 Marcus Blvd. Audiovox accepts no liability in case of the original product's warranty period...

Quick Start Guide
Page 1
...Pause recording 3 Zoom in Preview mode after switched on purchasing your camcorder Please charge the battery for recording. It is recommended to lock the cover. 3. Charging your new RCA High Definition Small Wonder Camcorder. zoom during playback 3 Cue to previous recording 5 4 Cue... to next recording 5 Enter Preview mode from playback mode; Switch on using the product. Installing battery Camcorder strap hole 1 2 1. Make...
...Pause recording 3 Zoom in Preview mode after switched on purchasing your camcorder Please charge the battery for recording. It is recommended to lock the cover. 3. Charging your new RCA High Definition Small Wonder Camcorder. zoom during playback 3 Cue to previous recording 5 4 Cue... to next recording 5 Enter Preview mode from playback mode; Switch on using the product. Installing battery Camcorder strap hole 1 2 1. Make...

