
User Manual - EZ219BK
Page 2
...Contents FCC information FCC statement 3 Deleting Deleting recordings 13 Safety information Important battery information 4 Precautions for the player 4 Menu settings Using the camcorder menu 13 Menu options and settings 13 End user license agreement End user license agreement 5 Getting started 1. Inserting microSD memory card 7 4....VHS tape or DVD 14 Managing videos on your computer Computer system requirements 15 Connecting to a PC 15 About RCA Memory Manager 15 Viewing videos on PC 15 Additional information Tips and troubleshooting 16 Product registration 16 For your ...
...Contents FCC information FCC statement 3 Deleting Deleting recordings 13 Safety information Important battery information 4 Precautions for the player 4 Menu settings Using the camcorder menu 13 Menu options and settings 13 End user license agreement End user license agreement 5 Getting started 1. Inserting microSD memory card 7 4....VHS tape or DVD 14 Managing videos on your computer Computer system requirements 15 Connecting to a PC 15 About RCA Memory Manager 15 Viewing videos on PC 15 Additional information Tips and troubleshooting 16 Product registration 16 For your ...
User Manual - EZ219BK
Page 7
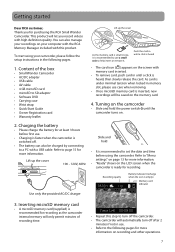
... first use. • Charging is faster when the camcorder is switched off after 2 minutes if not in size, it . Getting started Dear RCA customer, Thank you record videos with this step to turn off the camcorder. • The camcorder will automatically turn off . • The battery can... also manage your recordings on your camcorder, please follow the setup instructions in memory slot, ...
... first use. • Charging is faster when the camcorder is switched off after 2 minutes if not in size, it . Getting started Dear RCA customer, Thank you record videos with this step to turn off the camcorder. • The camcorder will automatically turn off . • The battery can... also manage your recordings on your camcorder, please follow the setup instructions in memory slot, ...
User Manual - EZ219BK
Page 8
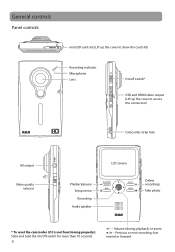
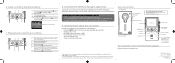
Previous or next recording; fast rewind or forward Volume (during playback) or zoom / - General controls Panel controls microSD card slot (Lift up the cover to show the card slot) Recording indicator Microphone Lens On/off switch* USB and HDMI video output (Lift up the cover to access the connectors) Camcorder strap hole AV output Video quality selector Playback/pause Setup menu Recording Audio speaker LCD screen Delete recordings Take photo * To reset the camcorder (if it is not functioning properly): Slide and hold the On/Off switch for more than 10 seconds. 8 +/- -
Previous or next recording; fast rewind or forward Volume (during playback) or zoom / - General controls Panel controls microSD card slot (Lift up the cover to show the card slot) Recording indicator Microphone Lens On/off switch* USB and HDMI video output (Lift up the cover to access the connectors) Camcorder strap hole AV output Video quality selector Playback/pause Setup menu Recording Audio speaker LCD screen Delete recordings Take photo * To reset the camcorder (if it is not functioning properly): Slide and hold the On/Off switch for more than 10 seconds. 8 +/- -
User Manual - EZ219BK
Page 9
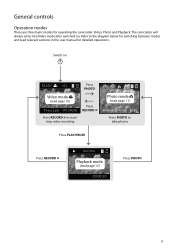
Refer to take photos Press RECORD Playback mode (read relevant sections in the user manual for operating the camcorder: Video, Photo and Playback. Switch on . The camcorder will always enter into Video mode after switched on Press PHOTO Video mode (read page 10) Press RECORD Press RECORD to start/ stop video recording Press PLAY/PAUSE Photo mode (read page 11) Press PHOTO to the diagram below for switching between modes and read page 12) Press PHOTO 9 General controls Operation modes There are three basic modes for detailed operations.
Refer to take photos Press RECORD Playback mode (read relevant sections in the user manual for operating the camcorder: Video, Photo and Playback. Switch on . The camcorder will always enter into Video mode after switched on Press PHOTO Video mode (read page 10) Press RECORD Press RECORD to start/ stop video recording Press PLAY/PAUSE Photo mode (read page 11) Press PHOTO to the diagram below for switching between modes and read page 12) Press PHOTO 9 General controls Operation modes There are three basic modes for detailed operations.
User Manual - EZ219BK
Page 10
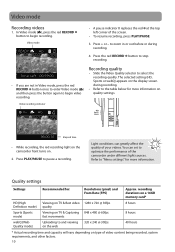
... Uploading to optimize the performance of your videos. You can greatly affect the quality of the camcorder under different light sources. Video recording indicator Elapsed time • While recording, the red recording light on the camcorder front turns on type of the screen. • To resume recording, press PLAY/PAUSE. 3. Recording quality...
... Uploading to optimize the performance of your videos. You can greatly affect the quality of the camcorder under different light sources. Video recording indicator Elapsed time • While recording, the red recording light on the camcorder front turns on type of the screen. • To resume recording, press PLAY/PAUSE. 3. Recording quality...
User Manual - EZ219BK
Page 13
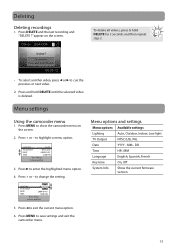
Menu settings Using the camcorder menu 1. Press + or - to exit the current menu option. 6. Press to change the setting. Menu options and ... 3. LIGHTING TV OUTOUT DATE TIME AUTO NTSC (US) 2009-01-01 12:00 PM Press Menu to show the camcorder menu on the screen. LIGHTING TV OUTOUT AUTO DATE TIME 2009-01-01 12:00 PM Press Menu to save settings and... exit the camcorder menu. MM - DD Time HR : MM Language English, Spanish, French Key tone On, Off System Info Show the ...
Menu settings Using the camcorder menu 1. Press + or - to exit the current menu option. 6. Press to change the setting. Menu options and ... 3. LIGHTING TV OUTOUT DATE TIME AUTO NTSC (US) 2009-01-01 12:00 PM Press Menu to show the camcorder menu on the screen. LIGHTING TV OUTOUT AUTO DATE TIME 2009-01-01 12:00 PM Press Menu to save settings and... exit the camcorder menu. MM - DD Time HR : MM Language English, Spanish, French Key tone On, Off System Info Show the ...
User Manual - EZ219BK
Page 14
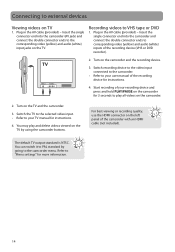
...) - Turn on the left panel of the recording device (VHS or DVD recorder). 2. You can switch it to PAL standard by using the camcorder buttons. Connecting to "Menu settings" for more information. 14 Plug in the AV cable (provided) - You may play all videos on TV 1.... Refer to external devices Viewing videos on the camcorder. 2. The default TV output standard is NTSC. Recording videos to play and delete videos viewed on the camcorder for 3 seconds to VHS tape or DVD 1. Start recording of the recording device for instructions....
...) - Turn on the left panel of the recording device (VHS or DVD recorder). 2. You can switch it to PAL standard by using the camcorder buttons. Connecting to "Menu settings" for more information. 14 Plug in the AV cable (provided) - You may play all videos on TV 1.... Refer to external devices Viewing videos on the camcorder. 2. The default TV output standard is NTSC. Recording videos to play and delete videos viewed on the camcorder for 3 seconds to VHS tape or DVD 1. Start recording of the recording device for instructions....
User Manual - EZ219BK
Page 15
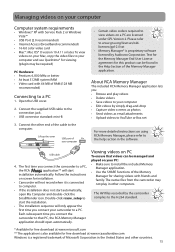
...8226; Send videos as email attachments • Upload videos to YouTube or Box.net For more detailed instructions on using RCA Memory Manager, please refer to your camcorder to start the installation. • The installation sequence will start automatically, open automatically. Double-click rcasw_setup to a ...lets you connect your computer • Edit videos by Audiovox Corporation. The first time you connect the camcorder to your Mac, copy the video files to a PC, the RCA application** will only appear the first time you : • Browse and play in the software. USB...
...8226; Send videos as email attachments • Upload videos to YouTube or Box.net For more detailed instructions on using RCA Memory Manager, please refer to your camcorder to start the installation. • The installation sequence will start automatically, open automatically. Double-click rcasw_setup to a ...lets you connect your computer • Edit videos by Audiovox Corporation. The first time you connect the camcorder to your Mac, copy the video files to a PC, the RCA application** will only appear the first time you : • Browse and play in the software. USB...
User Manual - EZ219BK
Page 16
.... Technical specifications Product: Digital Camera Recorder Brand: RCA Model: EZ219BK, EZ219BL, EZ219CH, EZ219PL, EZ219RD, EZ219WH Electrical Consumption: 3.7V Lithium battery Copyright warning This player is for your sales receipt for proof of purchase, and the serial number: Model No. The native files from the camcorder may need both the model number and the...
.... Technical specifications Product: Digital Camera Recorder Brand: RCA Model: EZ219BK, EZ219BL, EZ219CH, EZ219PL, EZ219RD, EZ219WH Electrical Consumption: 3.7V Lithium battery Copyright warning This player is for your sales receipt for proof of purchase, and the serial number: Model No. The native files from the camcorder may need both the model number and the...
Quick Start - EZ219BK
Page 1
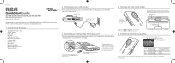
... these instructions for quick tips on the camcorder The camcorder has three operation modes (Video, Photo and Playback). v3.0 (EN)(US) QuickStartGuide EZ219BK, EZ219BL, EZ219CH, EZ219PL, EZ219RD, EZ219WH RCA Small Wonder camcorder www.rcaaudiovideo.com Congratulations on purchasing your camcorder Please charge the battery for at least ...• Wrist strap • Quick Start Guide • Owner Registration card • Warranty leaflet 2. Charging your new RCA High Definition Small Wonder Camcorder. As card is under minimal tension when locked in size, it is always in until the...
... these instructions for quick tips on the camcorder The camcorder has three operation modes (Video, Photo and Playback). v3.0 (EN)(US) QuickStartGuide EZ219BK, EZ219BL, EZ219CH, EZ219PL, EZ219RD, EZ219WH RCA Small Wonder camcorder www.rcaaudiovideo.com Congratulations on purchasing your camcorder Please charge the battery for at least ...• Wrist strap • Quick Start Guide • Owner Registration card • Warranty leaflet 2. Charging your new RCA High Definition Small Wonder Camcorder. As card is under minimal tension when locked in size, it is always in until the...
Quick Start - EZ219BK
Page 2
Installing RCA Memory Manager application Connect the camcorder to confirm deletion. 7 Enter Photo mode ( ) from Playback mode 8. The native files from Video mode ( ); 6. take photos in China press and hold the On/off switch* Camcorder strap hole Playback/pause Setup menu Recording Audio...mode ( ) Video recording indicator 7. The Memory Manager application will start automatically, open the drive letter associated with the camcorder. Follow the instructions on screen to your PC • Tips and troubleshooting • Safety and warranty information General controls ...
Installing RCA Memory Manager application Connect the camcorder to confirm deletion. 7 Enter Photo mode ( ) from Playback mode 8. The native files from Video mode ( ); 6. take photos in China press and hold the On/off switch* Camcorder strap hole Playback/pause Setup menu Recording Audio...mode ( ) Video recording indicator 7. The Memory Manager application will start automatically, open the drive letter associated with the camcorder. Follow the instructions on screen to your PC • Tips and troubleshooting • Safety and warranty information General controls ...


