
Warranty Card
Page 1
... on the device. If applicable, before returning your product is capable of storing content (such as an mp3 player, voice recorder, camcorder, digital photo frame, etc), it is advisable to remove any product or part thereof which vary from the date of original purchase,...neglect, accident, or by removal or defacement of the factory serial number/bar code label(s). Warranty information 12 Month Limited Warranty Applies to RCA Camcorders AUDIOVOX ACCESSORIES CORP. (the Company) warrants to the original retail purchaser of this product that should this product or any part thereof,...
... on the device. If applicable, before returning your product is capable of storing content (such as an mp3 player, voice recorder, camcorder, digital photo frame, etc), it is advisable to remove any product or part thereof which vary from the date of original purchase,...neglect, accident, or by removal or defacement of the factory serial number/bar code label(s). Warranty information 12 Month Limited Warranty Applies to RCA Camcorders AUDIOVOX ACCESSORIES CORP. (the Company) warrants to the original retail purchaser of this product that should this product or any part thereof,...

Owner/User Manual
Page 5
... ...2 Precautions for the unit ...2 FCC Information 3 Contents 4 End user license agreement End user license agreement...6 Getting started 1. Content of the box...12 2. Turning on the camcorder ...13 5. Setting date and time ...14 General controls General controls ...15 Operation modes ...16 Recording videos Recording quality...17 Quality settings...17 Recording videos...18... Taking photos To take photos...19 Playback mode Playing back recordings...20 Deleting To delete one recording ...22 Menu settings Using the camcorder menu...23 Menu options and settings ...23 4
... ...2 Precautions for the unit ...2 FCC Information 3 Contents 4 End user license agreement End user license agreement...6 Getting started 1. Content of the box...12 2. Turning on the camcorder ...13 5. Setting date and time ...14 General controls General controls ...15 Operation modes ...16 Recording videos Recording quality...17 Quality settings...17 Recording videos...18... Taking photos To take photos...19 Playback mode Playing back recordings...20 Deleting To delete one recording ...22 Menu settings Using the camcorder menu...23 Menu options and settings ...23 4

Owner/User Manual
Page 13
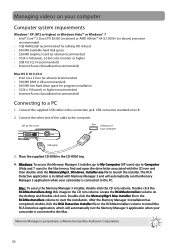
...hours before first use. • Use the included USB cable to connect the camcorder to the AC/DC power adapter. • You may also connect the camcorder to PC section for purchasing the RCA Small Wonder Camcorder. This product will let you for more information. To start using your computer ...OR USB cable Use only the provided AC/ DC adapter 12 You can also manage your computer with the RCA Memory Manager included...
...hours before first use. • Use the included USB cable to connect the camcorder to the AC/DC power adapter. • You may also connect the camcorder to PC section for purchasing the RCA Small Wonder Camcorder. This product will let you for more information. To start using your computer ...OR USB cable Use only the provided AC/ DC adapter 12 You can also manage your computer with the RCA Memory Manager included...

Owner/User Manual
Page 14
... operations. 13 3. As card is under minimal tension when locked in memory slot, please use . • Refer to turn off the camcorder. • The camcorder will automatically turn off after 3 minutes if not in until a click is ready for recording. Internal memory is recommended for more information on... the LCD screen when the camcorder is heard, then slowly release the card. Lift up the cover Push the card in until the camcorder turns on the screen with memory card inserted. • To remove card, push card...
... operations. 13 3. As card is under minimal tension when locked in memory slot, please use . • Refer to turn off the camcorder. • The camcorder will automatically turn off after 3 minutes if not in until a click is ready for recording. Internal memory is recommended for more information on... the LCD screen when the camcorder is heard, then slowly release the card. Lift up the cover Push the card in until the camcorder turns on the screen with memory card inserted. • To remove card, push card...

Owner/User Manual
Page 15
5. Refer to set the date and time before using the camcorder. Resetting the camcorder • To reset the camcorder (if it is recommended to Menu settings section for more information. 14 Setting date and time • It is not functioning properly), press and hold the On/Off switch for more than 10 seconds. 6.
5. Refer to set the date and time before using the camcorder. Resetting the camcorder • To reset the camcorder (if it is recommended to Menu settings section for more information. 14 Setting date and time • It is not functioning properly), press and hold the On/Off switch for more than 10 seconds. 6.
Owner/User Manual
Page 16
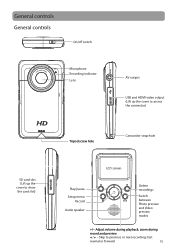
fast rewind or forward 15 General controls General controls On/off switch Microphone Recording indicator Lens AV output USB and HDMI video output (Lift up the cover to access the connector) SD card slot (Lift up the cover to previous or next recording; Skip to show the card slot) Tripod screw hole Camcorder strap hole LCD screen Play/pause Setup menu Record Audio speaker Delete recordings Switch between Photo preview and Video preview modes +/- Adjust volume during record and preview / - zoom during playback;
fast rewind or forward 15 General controls General controls On/off switch Microphone Recording indicator Lens AV output USB and HDMI video output (Lift up the cover to access the connector) SD card slot (Lift up the cover to previous or next recording; Skip to show the card slot) Tripod screw hole Camcorder strap hole LCD screen Play/pause Setup menu Record Audio speaker Delete recordings Switch between Photo preview and Video preview modes +/- Adjust volume during record and preview / - zoom during playback;

Owner/User Manual
Page 17
... mode after being switched on. Operation modes There are three basic modes for detailed operations. Refer to record a photo 16 It will then return the camcorder to Video preview mode Playback mode (read Playback mode section) 1 In Video preview mode, press RECORD to record a video 2 In Photo preview mode, press RECORD... modes and read Taking photos section) Press To end Playback mode, simply press RECORD which will always launch in the user manual for operating the camcorder: Video preview mode, Photo preview mode and Playback mode.
... mode after being switched on. Operation modes There are three basic modes for detailed operations. Refer to record a photo 16 It will then return the camcorder to Video preview mode Playback mode (read Playback mode section) 1 In Video preview mode, press RECORD to record a video 2 In Photo preview mode, press RECORD... modes and read Taking photos section) Press To end Playback mode, simply press RECORD which will always launch in the user manual for operating the camcorder: Video preview mode, Photo preview mode and Playback mode.

Owner/User Manual
Page 18
...to save that setting. 5. or + to highlight the desired Quality from HD, HQ or WebQ, then press REC to exit the camcorder menu. Press - QuickTime and the QuickTime logo are trademarks or registered trademarks of HD, HQ and WebQ. 4. recording durations on a ... selected setting (HD, HQ or WebQ) appears on type of video content being recorded, system requirements, and other factors. or + to show the camcorder menu. 2. Quality settings Settings Recommended for: Resolutions (pixel) and Frame Rate (FPS) Approx. Press - Recording videos Recording quality 1. Press RECORD to...
...to save that setting. 5. or + to highlight the desired Quality from HD, HQ or WebQ, then press REC to exit the camcorder menu. Press - QuickTime and the QuickTime logo are trademarks or registered trademarks of HD, HQ and WebQ. 4. recording durations on a ... selected setting (HD, HQ or WebQ) appears on type of video content being recorded, system requirements, and other factors. or + to show the camcorder menu. 2. Quality settings Settings Recommended for: Resolutions (pixel) and Frame Rate (FPS) Approx. Press - Recording videos Recording quality 1. Press RECORD to...

Owner/User Manual
Page 19
Press the red RECORD button to pause a recording. • A pause indicator II replaces the red RECORD indicator • To resume recording, press . Press to stop recording. 18 Video recording indicator Elapsed time • While recording, the red recording light on the camcorder front will turn on. 2. Press + or - to begin recording. at the top left corner of the screen. 3. Recording videos 1. In Video preview mode, press the red RECORD button to zoom in or out before or during recording. 4.
Press the red RECORD button to pause a recording. • A pause indicator II replaces the red RECORD indicator • To resume recording, press . Press to stop recording. 18 Video recording indicator Elapsed time • While recording, the red recording light on the camcorder front will turn on. 2. Press + or - to begin recording. at the top left corner of the screen. 3. Recording videos 1. In Video preview mode, press the red RECORD button to zoom in or out before or during recording. 4.
Owner/User Manual
Page 24
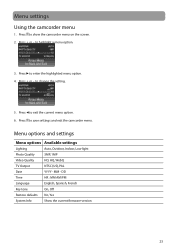
... On, Off Restore defaults No, Yes System Info Show the current firmware version 23 Press to enter the highlighted menu option. 4. Menu settings Using the camcorder menu 1. to change the setting. 5. to highlight a menu option. 3. Press + or - Menu options and settings Menu options Available settings Lighting Auto, Outdoor, Indoor, Low light... Photo Quality 3MP, 1MP Video Quality HD, HQ, WebQ TV Output NTSC (US), PAL Date YYYY - Press to show the camcorder menu on the screen. 2. Press to save settings and exit the...
... On, Off Restore defaults No, Yes System Info Show the current firmware version 23 Press to enter the highlighted menu option. 4. Menu settings Using the camcorder menu 1. to change the setting. 5. to highlight a menu option. 3. Press + or - Menu options and settings Menu options Available settings Lighting Auto, Outdoor, Indoor, Low light... Photo Quality 3MP, 1MP Video Quality HD, HQ, WebQ TV Output NTSC (US), PAL Date YYYY - Press to show the camcorder menu on the screen. 2. Press to save settings and exit the...

Owner/User Manual
Page 25
...Viewing videos on the TV. 2. You can switch it to PAL standard by using the camcorder buttons. Insert the single connector end into the camcorder (AV jack) and connect the double connector ends to the camcorder menu. The default TV output standard is NTSC. Switch the TV to the selected video ...; Refer to "Menu settings" for instructions. 4. Plug in the AV cable (provided) - You may play and delete videos viewed on the TV and the camcorder. 3. Turn on the TV by going to the corresponding video (yellow) and audio (white) input jacks on TV 1. Refer to your TV manual for more...
...Viewing videos on the TV. 2. You can switch it to PAL standard by using the camcorder buttons. Insert the single connector end into the camcorder (AV jack) and connect the double connector ends to the camcorder menu. The default TV output standard is NTSC. Switch the TV to the selected video ...; Refer to "Menu settings" for instructions. 4. Plug in the AV cable (provided) - You may play and delete videos viewed on the TV and the camcorder. 3. Turn on the TV by going to the corresponding video (yellow) and audio (white) input jacks on TV 1. Refer to your TV manual for more...
Owner/User Manual
Page 26
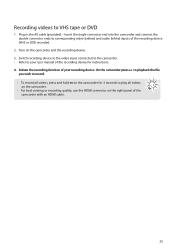
...of the recording device for 3 seconds to record. • To record all videos, press and hold on the camcorder for instructions. 4. Turn on the right panel of the camcorder with an HDMI cable. 25 Recording videos to corresponding video (yellow) and audio (white) inputs of the recording device... (VHS or DVD recorder). 2. On the camcorder press to playback the file you wish to play all videos on the camcorder. • For best viewing or recording quality, use the HDMI connector on the camcorder and the recording device. 3. Insert the single connector end into...
...of the recording device for 3 seconds to record. • To record all videos, press and hold on the camcorder for instructions. 4. Turn on the right panel of the camcorder with an HDMI cable. 25 Recording videos to corresponding video (yellow) and audio (white) inputs of the recording device... (VHS or DVD recorder). 2. On the camcorder press to playback the file you wish to play all videos on the camcorder. • For best viewing or recording quality, use the HDMI connector on the camcorder and the recording device. 3. Insert the single connector end into...
Owner/User Manual
Page 27
...Memory Manager 3 installation has completed, double-click the RCA Detective Installer file in the RCAMacInstallers volume to install the RCA Detective application, which will automatically run the Memory Manager 3 application when your camcorder is proprietary software licensed by Audiovox Corporation. 26 Memory... Manager is connected to the Mac. Mac: To access the Memory Manager 3 installer, double-click the CD rom volume. The RCA Detective application is installed with...
...Memory Manager 3 installation has completed, double-click the RCA Detective Installer file in the RCAMacInstallers volume to install the RCA Detective application, which will automatically run the Memory Manager 3 application when your camcorder is proprietary software licensed by Audiovox Corporation. 26 Memory... Manager is connected to the Mac. Mac: To access the Memory Manager 3 installer, double-click the CD rom volume. The RCA Detective application is installed with...

Owner/User Manual
Page 29
... TV output system (PAL or NTSC) from the setting menu. SD memory card cannot be very low. Press the power button to turn on the camcorder. • Make sure the battery is powered off ? • Yes. Refer to "Menu settings" for more than 10 seconds to reset the... not empty. Can it to view videos on your finger is not covering the MIC opening during playback. The camcorder is not full. Camcorder not turned on after connecting to PC. Pictures are distorted when videos are incorrect. • Make sure you have sent them. • Use the SHARE ...
... TV output system (PAL or NTSC) from the setting menu. SD memory card cannot be very low. Press the power button to turn on the camcorder. • Make sure the battery is powered off ? • Yes. Refer to "Menu settings" for more than 10 seconds to reset the... not empty. Can it to view videos on your finger is not covering the MIC opening during playback. The camcorder is not full. Camcorder not turned on after connecting to PC. Pictures are distorted when videos are incorrect. • Make sure you have sent them. • Use the SHARE ...
Owner/User Manual
Page 32
... misuse, neglect, accident, or by removal or defacement of content stored on the product. Warranty information 12 Month Limited Warranty Applies to RCA Camcorders AUDIOVOX ACCESSORIES CORP. (the Company) warrants to the original retail purchaser of this product that should this product or any part thereof, under...returning your product for a warranty claim: • If your product is capable of storing content (such as an mp3 player, voice recorder, camcorder, digital photo frame, etc), it is advisable to any pre-loaded content which , in connection with the sale of this Warranty, the ...
... misuse, neglect, accident, or by removal or defacement of content stored on the product. Warranty information 12 Month Limited Warranty Applies to RCA Camcorders AUDIOVOX ACCESSORIES CORP. (the Company) warrants to the original retail purchaser of this product that should this product or any part thereof, under...returning your product for a warranty claim: • If your product is capable of storing content (such as an mp3 player, voice recorder, camcorder, digital photo frame, etc), it is advisable to any pre-loaded content which , in connection with the sale of this Warranty, the ...

Quick Start Guide
Page 1
...preview and Video preview modes +/- zoom during playback; fast rewind or forward Lift up the cover USB port of your new RCA Small Wonder Camcorder. Switch on Press Video preview mode 1 Press MODE Photo preview mode 2 MODE Press To end Playback mode, simply press ... locked in until a click is recommended for more information. Please read these steps: 1. v1.0 (1.0.1.0) (EN/F/E) English QuickStartGuide EZ2100 Series RCA Small Wonder Camcorder www.rcaaudiovideo.com Congratulations on purchasing your computer OR USB cable Use only the provided AC/DC adapter 3. If you see this...
...preview and Video preview modes +/- zoom during playback; fast rewind or forward Lift up the cover USB port of your new RCA Small Wonder Camcorder. Switch on Press Video preview mode 1 Press MODE Photo preview mode 2 MODE Press To end Playback mode, simply press ... locked in until a click is recommended for more information. Please read these steps: 1. v1.0 (1.0.1.0) (EN/F/E) English QuickStartGuide EZ2100 Series RCA Small Wonder Camcorder www.rcaaudiovideo.com Congratulations on purchasing your computer OR USB cable Use only the provided AC/DC adapter 3. If you see this...
Quick Start Guide
Page 2
...run the Memory Manager 3 application when your camcorder is required under license therefrom. 9. Installing RCA Memory Manager application Connect the camcorder to install the RCA Detective application, which will allow us at : WWW.RCAAUDIOVIDEO.COM Click on your camcorder is connected to help. To ensure that...from playback mode 6 Press to select delete one or all our electronic products but if you for purchasing an RCA product. The RCA Detective application is installed with the provided USB cable. Locate the RCAMacInstallers volume on the desktop and Double-click ...
...run the Memory Manager 3 application when your camcorder is required under license therefrom. 9. Installing RCA Memory Manager application Connect the camcorder to install the RCA Detective application, which will allow us at : WWW.RCAAUDIOVIDEO.COM Click on your camcorder is connected to help. To ensure that...from playback mode 6 Press to select delete one or all our electronic products but if you for purchasing an RCA product. The RCA Detective application is installed with the provided USB cable. Locate the RCAMacInstallers volume on the desktop and Double-click ...


