Owner/User Manual: ANT751
Page 1
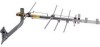
... SAFETY INFORMATION sheet included in the package: • Antenna • Mounting pipe and foot • Hardware bag U-Bolt Mast Clamp Insert (2) Black Plastic Plugs Matching Transformer (4) 7/16" Washers (2) 10/32" Hex nuts (5) 1/4" Hex Nuts (2) 5/8" Bolts 2 1/2" Screw Step 2: Unfold the antenna's elements Starting from package. Rear Make sure the following parts are flat and parallel to each other when you've finished. ANT751 Outdoor Antenna User's Guide BEFORE...
... SAFETY INFORMATION sheet included in the package: • Antenna • Mounting pipe and foot • Hardware bag U-Bolt Mast Clamp Insert (2) Black Plastic Plugs Matching Transformer (4) 7/16" Washers (2) 10/32" Hex nuts (5) 1/4" Hex Nuts (2) 5/8" Bolts 2 1/2" Screw Step 2: Unfold the antenna's elements Starting from package. Rear Make sure the following parts are flat and parallel to each other when you've finished. ANT751 Outdoor Antenna User's Guide BEFORE...
Owner/User Manual: ANT751
Page 2
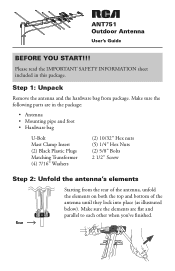
...Use them to attach the transformer to the coaxial downlead (not included). Step 3: Unfold the tetrapole Tetrapole Make sure the tetrapole locks into the mast clamp on the insert should be facing the same direction. Note: VHF elements have been removed from this illustration to the left). Step 4: Attach the mast clamp insert U-bolt Mast clamp Mast.... Step 5: Install the transformer and coaxial downlead Attach the transformer to the bottom of the U-bolt. Put the U-bolt into the mast clamp insert with the teeth of the mast clamp insert facing the closed end of the antenna at...
...Use them to attach the transformer to the coaxial downlead (not included). Step 3: Unfold the tetrapole Tetrapole Make sure the tetrapole locks into the mast clamp on the insert should be facing the same direction. Note: VHF elements have been removed from this illustration to the left). Step 4: Attach the mast clamp insert U-bolt Mast clamp Mast.... Step 5: Install the transformer and coaxial downlead Attach the transformer to the bottom of the U-bolt. Put the U-bolt into the mast clamp insert with the teeth of the mast clamp insert facing the closed end of the antenna at...
Owner/User Manual: ANT751
Page 3
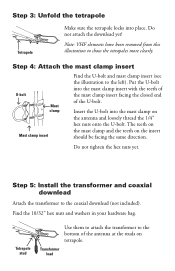
Step 6: Insert end caps Insert the plastic end caps in place. Insert this end into the antenna booms to secure them into the middle of the foot. Find the square holes on the 5/8" bolts to hold the pipe and foot together. Don't tighten the nut completely yet. Install the nuts on the outside... ends of the booms as illustrated here. Make sure to place the leads of the matching transformer between the two washers on the sides for screws. Step 7: Attach the mounting pipe to the foot 2 1/2" screw Hex... side of the foot as shown here. Use a rubber mallet to secure the leads.
Step 6: Insert end caps Insert the plastic end caps in place. Insert this end into the antenna booms to secure them into the middle of the foot. Find the square holes on the 5/8" bolts to hold the pipe and foot together. Don't tighten the nut completely yet. Install the nuts on the outside... ends of the booms as illustrated here. Make sure to place the leads of the matching transformer between the two washers on the sides for screws. Step 7: Attach the mounting pipe to the foot 2 1/2" screw Hex... side of the foot as shown here. Use a rubber mallet to secure the leads.
Owner/User Manual: ANT751
Page 4
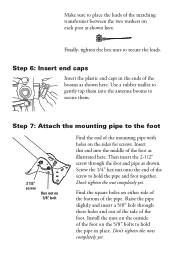
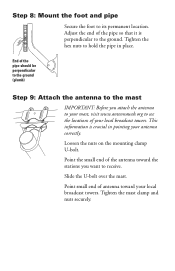
... over the mast. Tighten the hex nuts to receive. Loosen the nuts on the mounting clamp U-bolt. Tighten the mast clamp and nuts securely. Point the small end of the antenna toward your antenna correctly. Step 8: Mount the foot and pipe Secure the foot to see the locations of your local broadcast towers. This information is perpendicular to the ground. End of...
... over the mast. Tighten the hex nuts to receive. Loosen the nuts on the mounting clamp U-bolt. Tighten the mast clamp and nuts securely. Point the small end of the antenna toward your antenna correctly. Step 8: Mount the foot and pipe Secure the foot to see the locations of your local broadcast towers. This information is perpendicular to the ground. End of...

Owner/User Manual: ANT751
Page 5
...herein in connection with any accessories included in the original packaging is to be repaired or replaced (at...specific legal rights and you . No person or representative is not transferable and does not cover product purchased, serviced or used outside...part thereof, under normal use and conditions, be proven defective in material or workmanship within 12 months from state/province to costs incurred for parts and repair labor. 12 Month Limited Warranty Audiovox Electronics Corporation (the "Company") warrants to the Company at the Company's option) without charge for installation...
...herein in connection with any accessories included in the original packaging is to be repaired or replaced (at...specific legal rights and you . No person or representative is not transferable and does not cover product purchased, serviced or used outside...part thereof, under normal use and conditions, be proven defective in material or workmanship within 12 months from state/province to costs incurred for parts and repair labor. 12 Month Limited Warranty Audiovox Electronics Corporation (the "Company") warrants to the Company at the Company's option) without charge for installation...


