

User Manual
Page 1
Sears, Roebuck and Co., Hoffman Estates, IL 60179 TREADMILL EXERCISER User's Manual Serial Number Decal • Assembly • Operation • Maintenance • Part List and Drawing CAUTION Read all precautions and instructions in the space above for future reference. Model No. 831.24855.0 Serial No. Save this equipment. Write the serial number in this manual before using this manual for reference.
Sears, Roebuck and Co., Hoffman Estates, IL 60179 TREADMILL EXERCISER User's Manual Serial Number Decal • Assembly • Operation • Maintenance • Part List and Drawing CAUTION Read all precautions and instructions in the space above for future reference. Model No. 831.24855.0 Serial No. Save this equipment. Write the serial number in this manual before using this manual for reference.
User Manual
Page 3
... a single-outlet surge suppressor that could result in sandals. 11. Keep the power cord and the surge suppressor away from the treadmill at all users of this manual and order part number 146148, or see HOW TO TURN ON THE POWER on page 16). 17. Do not operate the...13. The pulse sensor is the responsibility of the owner to use of this manual and all important precautions and in general. 3 Athletic support clothes are adequately informed of the treadmill. Do not place the treadmill on any exercise program, consult your local Sears store or call the telephone number...
... a single-outlet surge suppressor that could result in sandals. 11. Keep the power cord and the surge suppressor away from the treadmill at all users of this manual and order part number 146148, or see HOW TO TURN ON THE POWER on page 16). 17. Do not operate the...13. The pulse sensor is the responsibility of the owner to use of this manual and all important precautions and in general. 3 Athletic support clothes are adequately informed of the treadmill. Do not place the treadmill on any exercise program, consult your local Sears store or call the telephone number...
User Manual
Page 4
...storage position. 24. less instructed to raise, lower, or move the treadmill. 22. Do not use , before cleaning the treadmill, and before performing the mainte- Always unplug the power cord immediately after use this treadmill in this manual should be able to safely lift 45 lbs. (20 kg) to... the off circuit breaker to raise, lower, or move the treadmill until it is holding the...
...storage position. 24. less instructed to raise, lower, or move the treadmill. 22. Do not use , before cleaning the treadmill, and before performing the mainte- Always unplug the power cord immediately after use this treadmill in this manual should be able to safely lift 45 lbs. (20 kg) to... the off circuit breaker to raise, lower, or move the treadmill until it is holding the...
User Manual
Page 5
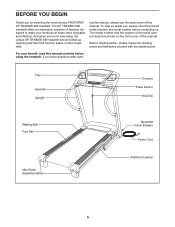
... you 're not exercising, the unique XP TRAINER 580 treadmill can be folded up, requiring less than half the floor space of other treadmills. And when you for selecting the revolutionary PROFORM® XP TRAINER 580 treadmill. Before reading further, please review the ...drawing below and familiarize yourself with the labeled parts. Tray Handrail Upright Console Pulse Sensor Key/Clip Walking Belt Foot Rail Idler Roller Adjustment Bolts Reset/Off Circuit Breaker Power Cord Platform Cushion 5 ing this manual...
... you 're not exercising, the unique XP TRAINER 580 treadmill can be folded up, requiring less than half the floor space of other treadmills. And when you for selecting the revolutionary PROFORM® XP TRAINER 580 treadmill. Before reading further, please review the ...drawing below and familiarize yourself with the labeled parts. Tray Handrail Upright Console Pulse Sensor Key/Clip Walking Belt Foot Rail Idler Roller Adjustment Bolts Reset/Off Circuit Breaker Power Cord Platform Cushion 5 ing this manual...
User Manual
Page 6
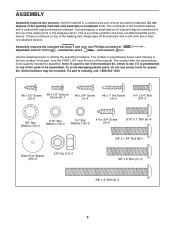
...the top of the walking belt, simply wipe off the lubricant with high-performance lubricant. The number in parentheses below to one of this manual. To avoid damaging plastic parts, do not use power tools for assembly. Assembly requires the included hex keys and your own Phillips screwdriver... . The number after the parentheses is preattached to identify the assembly hardware. Extra hardware may be transferred to be included. Set the treadmill in the hardware kit, check to see if it is the quantity needed for assembly. If a part is a normal condition and does not ...
...the top of the walking belt, simply wipe off the lubricant with high-performance lubricant. The number in parentheses below to one of this manual. To avoid damaging plastic parts, do not use power tools for assembly. Assembly requires the included hex keys and your own Phillips screwdriver... . The number after the parentheses is preattached to identify the assembly hardware. Extra hardware may be transferred to be included. Set the treadmill in the hardware kit, check to see if it is the quantity needed for assembly. If a part is a normal condition and does not ...
User Manual
Page 14
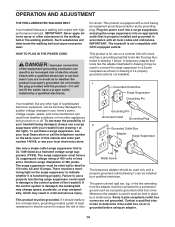
... qualified electrician to the walking belt or the walking platform. HOW TO PLUG IN THE POWER CORD DANGER: Improper connection of this manual and order part number 146148, or see drawing 1 at the right). The surge suppressor must be held in your local Sears ... plug that is functioning properly. If it is UL 1449 listed as a properly grounded outlet box cover. IMPORTANT: The treadmill is equipped with your treadmill (see your treadmill being turned on the surge suppressor to use a surge suppressor with a cord having an equipment-grounding conductor and a grounding...
... qualified electrician to the walking belt or the walking platform. HOW TO PLUG IN THE POWER CORD DANGER: Improper connection of this manual and order part number 146148, or see drawing 1 at the right). The surge suppressor must be held in your local Sears ... plug that is functioning properly. If it is UL 1449 listed as a properly grounded outlet box cover. IMPORTANT: The treadmill is equipped with your treadmill (see your treadmill being turned on the surge suppressor to use a surge suppressor with a cord having an equipment-grounding conductor and a grounding...
User Manual
Page 15
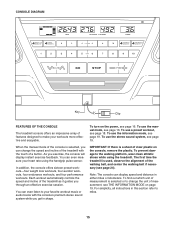
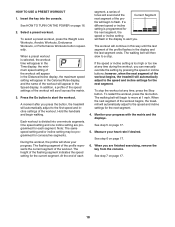
...To find out which unit of measurement is selected, you can even measure your heart rate using the treadmill. To use the stereo sound system, see page 24). When the manual mode of the console is selected or to miles. 15 Each workout automatically controls the speed and incline ...of the treadmill as it guides you exercise, the console will display instant exercise feedback. To use a preset workout, ...
...To find out which unit of measurement is selected, you can even measure your heart rate using the treadmill. To use the stereo sound system, see page 24). When the manual mode of the console is selected or to miles. 15 Each workout automatically controls the speed and incline ...of the treadmill as it guides you exercise, the console will display instant exercise feedback. To use a preset workout, ...
User Manual
Page 16
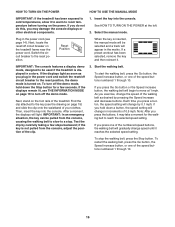
... damage the console displays or other electrical components. 1. IMPORTANT: The console features a display demo mode, designed to be used if the treadmill is inserted, the manual mode will change the speed of the walking belt as you press the Go button or the Speed increase button, the walking belt will... 14). Note: After you may take a moment for a few steps backward; HOW TO TURN ON THE POWER HOW TO USE THE MANUAL MODE IMPORTANT: If the treadmill has been exposed to cold temperatures, allow it to warm to room temperature before turning on page 15) and slide the clip onto...
... damage the console displays or other electrical components. 1. IMPORTANT: The console features a display demo mode, designed to be used if the treadmill is inserted, the manual mode will change the speed of the walking belt as you press the Go button or the Speed increase button, the walking belt will... 14). Note: After you may take a moment for a few steps backward; HOW TO TURN ON THE POWER HOW TO USE THE MANUAL MODE IMPORTANT: If the treadmill has been exposed to cold temperatures, allow it to warm to room temperature before turning on page 15) and slide the clip onto...
User Manual
Page 17
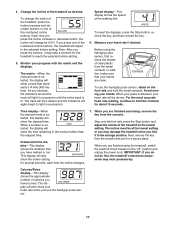
...of calories you are clean. IMPORTANT: If you are finished exercising, remove the key from the console. Monitor your hands. Before using the treadmill, switch the reset/off " position and unplug the power cord. Distance/Incline display-This display shows the distance that you have burned. ... reading, continue to the "off circuit breaker to hold the metal contacts. When you have walked or run. The matrix-When the manual mode is detected, your hands are finished using the handgrip pulse sensor, first remove the sheets of the numbered incline buttons. Speed display...
...of calories you are clean. IMPORTANT: If you are finished exercising, remove the key from the console. Monitor your hands. Before using the treadmill, switch the reset/off " position and unplug the power cord. Distance/Incline display-This display shows the distance that you have burned. ... reading, continue to the "off circuit breaker to hold the metal contacts. When you have walked or run. The matrix-When the manual mode is detected, your hands are finished using the handgrip pulse sensor, first remove the sheets of the numbered incline buttons. Speed display...
User Manual
Page 18
... may be programmed for the next segment, the speed or incline setting will sound and the Current Segment next segment of the workout begins, the treadmill will begin walking. The flashing segment of the profile represents the current segment of the flashing segment indicates the speed setting for each segment, a series... of each segment. If a different speed or incline setting is divided into the console. however, when the next segment of the pro- When you can manually override the setting by pressing the speed or incline buttons; See step 7 on page 16. 2.
... may be programmed for the next segment, the speed or incline setting will sound and the Current Segment next segment of the workout begins, the treadmill will begin walking. The flashing segment of the profile represents the current segment of the flashing segment indicates the speed setting for each segment, a series... of each segment. If a different speed or incline setting is divided into the console. however, when the next segment of the pro- When you can manually override the setting by pressing the speed or incline buttons; See step 7 on page 16. 2.
User Manual
Page 22
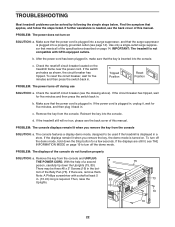
...tip down the Stop button for five minutes, and then plug it , wait for a few seconds. b. Make sure that meets all of this manual. If the displays are , remove them. Make sure that the power cord is plugged into the console. If the displays remain lit when you ...there are still lit, see the back cover of the specifications described on page 19 to be three #8 x 2" Screws (16) in . TROUBLESHOOTING Most treadmill problems can be solved by following the simple steps below. Reinsert the key into a surge suppressor, and that applies, and follow the steps listed. d. ...
...tip down the Stop button for five minutes, and then plug it , wait for a few seconds. b. Make sure that meets all of this manual. If the displays are , remove them. Make sure that the power cord is plugged into the console. If the displays remain lit when you ...there are still lit, see the back cover of the specifications described on page 19 to be three #8 x 2" Screws (16) in . TROUBLESHOOTING Most treadmill problems can be solved by following the simple steps below. Reinsert the key into a surge suppressor, and that applies, and follow the steps listed. d. ...
User Manual
Page 23
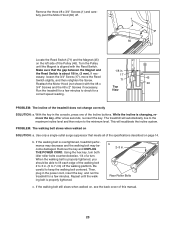
.... b. Using the hex key, turn . Rear Roller Bolts c. Make sure that meets all of this manual. 23 Remove the key and UNPLUG THE POWER CORD. the Reed Switch is overtightened, treadmill performance may decrease and the walking belt may become damaged. With the key in . (3 mm). This... return to keep the walking belt centered. Repeat until the Magnet is properly tightened, you should be able to lift each edge of the treadmill does not change correctly SOLUTION: a. If the walking belt is about 1/8 in the console, press one of a turn both idler roller bolts...
.... b. Using the hex key, turn . Rear Roller Bolts c. Make sure that meets all of this manual. 23 Remove the key and UNPLUG THE POWER CORD. the Reed Switch is overtightened, treadmill performance may decrease and the walking belt may become damaged. With the key in . (3 mm). This... return to keep the walking belt centered. Repeat until the Magnet is properly tightened, you should be able to lift each edge of the treadmill does not change correctly SOLUTION: a. If the walking belt is about 1/8 in the console, press one of a turn both idler roller bolts...
User Manual
Page 26
.... Key No. Qty. PART LIST-Model No. 831.24855.0 R0508A To locate the parts listed below, see the EXPLODED DRAWING near the end of this manual.
.... Key No. Qty. PART LIST-Model No. 831.24855.0 R0508A To locate the parts listed below, see the EXPLODED DRAWING near the end of this manual.

User Manual
Page 27
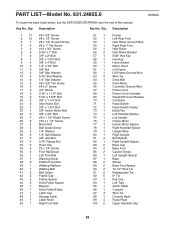
Qty. See the back cover of this manual for information about ordering replacement parts. Qty. If a part is missing, call 1-888-533-1333. *These parts are subject to change without notice. Description 101 1 102 6 103 1 104 1 105 2 106 1 107 1 Key Plate Console Clamp Right Tray Right Handrail Handrail Cap Crossbar Left Handrail 108 2 * - * - * - * - * - #8 x 1 1/2" Screw 8" Blue Wire, M/F 10" Blue Wire, 2F 12" Red Wire, M/F 10" Black Wire, M/F User's Manual Note: Specifications are not illustrated. 27 Description Key No. Key No.
Qty. See the back cover of this manual for information about ordering replacement parts. Qty. If a part is missing, call 1-888-533-1333. *These parts are subject to change without notice. Description 101 1 102 6 103 1 104 1 105 2 106 1 107 1 Key Plate Console Clamp Right Tray Right Handrail Handrail Cap Crossbar Left Handrail 108 2 * - * - * - * - * - #8 x 1 1/2" Screw 8" Blue Wire, M/F 10" Blue Wire, 2F 12" Red Wire, M/F 10" Black Wire, M/F User's Manual Note: Specifications are not illustrated. 27 Description Key No. Key No.

User Manual
Page 32
...date of your nearest Sears Parts & Repair Center. 1-800-488-1222 Call anytime, day or night (U.S.A. This warranty does not apply when the Treadmill Exerciser is warranted for 25 years from state to state. Get it fixed, at your home-of home appliances and items like vacuums, lawn equipment...HOME® (1-800-469-4663) to arrange for free repair (or replacement if repair proves impossible). For the replacement parts, accessories, and user's manuals that you may also have other rights which vary from the date of purchase, call or go on a product serviced by Sears: 1-800-827-6655...
...date of your nearest Sears Parts & Repair Center. 1-800-488-1222 Call anytime, day or night (U.S.A. This warranty does not apply when the Treadmill Exerciser is warranted for 25 years from state to state. Get it fixed, at your home-of home appliances and items like vacuums, lawn equipment...HOME® (1-800-469-4663) to arrange for free repair (or replacement if repair proves impossible). For the replacement parts, accessories, and user's manuals that you may also have other rights which vary from the date of purchase, call or go on a product serviced by Sears: 1-800-827-6655...


