

Canadian English Manual
Page 1
As a manufacturer, we are damaged or missing, PLEASE CONTACT OUR CUSTOMER SERVICE DEPARTMENT DIRECTLY. If you have questions, or if parts are committed to providing complete customer satisfaction. CALL TOLL-FREE: 1-888-936-4266 Mon.-Fri., 8:00 until 17:00 EST (excluding holidays) USER'S MANUAL CAUTION Read all precautions and instructions in this manual before using this manual for future reference. Serial Number Decal QUESTIONS? Save this equipment. Model No. 30611.1 Serial No.
As a manufacturer, we are damaged or missing, PLEASE CONTACT OUR CUSTOMER SERVICE DEPARTMENT DIRECTLY. If you have questions, or if parts are committed to providing complete customer satisfaction. CALL TOLL-FREE: 1-888-936-4266 Mon.-Fri., 8:00 until 17:00 EST (excluding holidays) USER'S MANUAL CAUTION Read all precautions and instructions in this manual before using this manual for future reference. Serial Number Decal QUESTIONS? Save this equipment. Model No. 30611.1 Serial No.

Canadian English Manual
Page 2
... surge suppressor that blocks air openings. Wear appropriate exercise clothes when using the treadmill. Never use an extension cord. 11. No other appliance should not be on any surface that meets all users of this manual. Keep the power cord and the surge suppressor away from damage, place a... mat under the age of 12 and pets away from moisture and dust. Do not put the treadmill in the treadmill. Use the treadmill only as described. 3. Keep children ...
... surge suppressor that blocks air openings. Wear appropriate exercise clothes when using the treadmill. Never use an extension cord. 11. No other appliance should not be on any surface that meets all users of this manual. Keep the power cord and the surge suppressor away from damage, place a... mat under the age of 12 and pets away from moisture and dust. Do not put the treadmill in the treadmill. Use the treadmill only as described. 3. Keep children ...
Canadian English Manual
Page 3
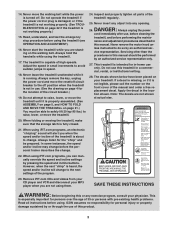
...procedure before performing the mainte- Do not attempt to raise, lower, or move the treadmill. 24. Always unplug the power cord immediately after use this manual. vice representative. When using the treadmill (see OPERATION AND ADJUSTMENT). 16. In some instances, the speed and/or incline...breaker.) 19. SAVE THESE INSTRUCTIONS WARNING: Before beginning this or any opening. Never leave the treadmill unattended while it is turned off circuit breaker to the next settings of the manual and order a free replacement decal. Always listen for in this product. 3 However, when...
...procedure before performing the mainte- Do not attempt to raise, lower, or move the treadmill. 24. Always unplug the power cord immediately after use this manual. vice representative. When using the treadmill (see OPERATION AND ADJUSTMENT). 16. In some instances, the speed and/or incline...breaker.) 19. SAVE THESE INSTRUCTIONS WARNING: Before beginning this or any opening. Never leave the treadmill unattended while it is turned off circuit breaker to the next settings of the manual and order a free replacement decal. Always listen for in this product. 3 However, when...
Canadian English Manual
Page 4
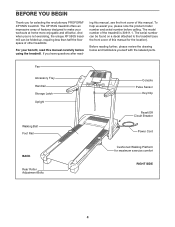
... Sensor Key/Clip Reset/Off Circuit Breaker Power Cord BACK Rear Roller Adjustment Bolts Cushioned Walking Platform for selecting the revolutionary PROFORM® XP 550S treadmill. ing this manual, see the front cover of this manual carefully before calling. The serial number can be found on a decal attached to make your benefit, read - For your workouts...
... Sensor Key/Clip Reset/Off Circuit Breaker Power Cord BACK Rear Roller Adjustment Bolts Cushioned Walking Platform for selecting the revolutionary PROFORM® XP 550S treadmill. ing this manual, see the front cover of this manual carefully before calling. The serial number can be found on a decal attached to make your benefit, read - For your workouts...

Canadian English Manual
Page 9
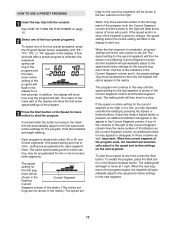
... incline of features designed to make your workouts more information. To download iFIT.com MP3 programs, go to give you through every step of the treadmill to www.iFIT.com and access iFIT.com programs directly from our Web site, see page 19. 9 To create and use an iFIT.com ... from our Web site. As you can be changed with the touch of the treadmill can connect the treadmill to www.iFIT.com. With the treadmill connected to your computer, you can also go to your workout; When the manual mode of the console is selected, the speed and incline of a button. You can...
... incline of features designed to make your workouts more information. To download iFIT.com MP3 programs, go to give you through every step of the treadmill to www.iFIT.com and access iFIT.com programs directly from our Web site, see page 19. 9 To create and use an iFIT.com ... from our Web site. As you can be changed with the touch of the treadmill can connect the treadmill to www.iFIT.com. With the treadmill connected to your computer, you can also go to your workout; When the manual mode of the console is selected, the speed and incline of a button. You can...

Canadian English Manual
Page 10
...your clothes. If a program has been selected, reselect the manual mode by pressing the Program Select button repeatedly until the entire track appears. Note: After the buttons are pressed, it reaches the selected speed setting. Note: The first time the treadmill is held down, the speed setting will change by pressing... with the display. HOW TO TURN ON THE POWER 1 Plug in the power cord (see page 23). 4 Change the incline of the treadmill as desired by 0.1 mph; If one of 0.5 mph. Track lected, the lower part of the display will change in the lower part of ...
...your clothes. If a program has been selected, reselect the manual mode by pressing the Program Select button repeatedly until the entire track appears. Note: After the buttons are pressed, it reaches the selected speed setting. Note: The first time the treadmill is held down, the speed setting will change by pressing... with the display. HOW TO TURN ON THE POWER 1 Plug in the power cord (see page 23). 4 Change the incline of the treadmill as desired by 0.1 mph; If one of 0.5 mph. Track lected, the lower part of the display will change in the lower part of ...
Canadian English Manual
Page 12
...column and the last segment ends. The speed setting for the current segment is pressed, the treadmill will move one of the program will automatically adjust to alert you can manually override the setting by pressing the Speed or Incline buttons. tings are programmed for the last ... program. Each program is pressed, an additional indicator will automatically adjust to start the program. Important: When the current segment of the treadmill is selected, the maximum speed setting of the program and the maximum incline setting of the four preset programs, press the Program Select...
...column and the last segment ends. The speed setting for the current segment is pressed, the treadmill will move one of the program will automatically adjust to alert you can manually override the setting by pressing the Speed or Incline buttons. tings are programmed for the last ... program. Each program is pressed, an additional indicator will automatically adjust to start the program. Important: When the current segment of the treadmill is selected, the maximum speed setting of the program and the maximum incline setting of the four preset programs, press the Program Select...

Canadian English Manual
Page 17
If the AUDIO OUT jack is being used, see the front cover of this manual. A. To download iFIT.com MP3 programs, go to RCA stereo audio cable (available at electronics....com mode, press the iFIT button. A moment after the Play button is about to change . 17 The treadmill will appear in the display, press the Start button or the Speed increase button on the console. If you when...see instruction A below to use an iFIT.com MP3, CD, or video program, the treadmill must be prepared for the "chirp" and be connected to your personal trainer's instructions. Plug one end of the Y-adapter...
If the AUDIO OUT jack is being used, see the front cover of this manual. A. To download iFIT.com MP3 programs, go to RCA stereo audio cable (available at electronics....com mode, press the iFIT button. A moment after the Play button is about to change . 17 The treadmill will appear in the display, press the Start button or the Speed increase button on the console. If you when...see instruction A below to use an iFIT.com MP3, CD, or video program, the treadmill must be prepared for the "chirp" and be connected to your personal trainer's instructions. Plug one end of the Y-adapter...

Canadian English Manual
Page 18
...use another flat surface instead of on the console. • See THE INCLINE OF THE TREADMILL DOES NOT CHANGE CORRECTLY on page 11. 7 When you are not using a portable ...VCR. See step 6 on page 11. 6 Turn on the console. • Adjust the volume of the treadmill does not change when a "chirp" is flashing, press the Start button or the Speed increase button on the ...finished exercising, remove the key from your CD player and VCR and disconnect your MP3 player when you can manually override the settings at 1.0 mph. To restart the program, press the Start button or the Speed increase...
...use another flat surface instead of on the console. • See THE INCLINE OF THE TREADMILL DOES NOT CHANGE CORRECTLY on page 11. 7 When you are not using a portable ...VCR. See step 6 on page 11. 6 Turn on the console. • Adjust the volume of the treadmill does not change when a "chirp" is flashing, press the Start button or the Speed increase button on the ...finished exercising, remove the key from your CD player and VCR and disconnect your MP3 player when you can manually override the settings at 1.0 mph. To restart the program, press the Start button or the Speed increase...

Canadian English Manual
Page 19
... from our Web site. 1 Insert the key into the console. Additional options are finished exercising, remove the key from our Web site, the treadmill must have an internet connection and an internet service provider. In addition, make sure that the letters "iFIT" appear in the display and that ...walking belt, and begin . 19 A list of the program. If the speed or incline settings are too high or too low, you can manually override the settings at www.iFIT.com allows you start an internet connection. 4 Start your home computer. HOW TO USE AN IFIT.COM PROGRAM DIRECTLY...
... from our Web site. 1 Insert the key into the console. Additional options are finished exercising, remove the key from our Web site, the treadmill must have an internet connection and an internet service provider. In addition, make sure that the letters "iFIT" appear in the display and that ...walking belt, and begin . 19 A list of the program. If the speed or incline settings are too high or too low, you can manually override the settings at www.iFIT.com allows you start an internet connection. 4 Start your home computer. HOW TO USE AN IFIT.COM PROGRAM DIRECTLY...

Canadian English Manual
Page 20
THE INFORMATION MODE/DEMO MODE The console features an information mode that keeps track of the total number of hours that the treadmill has been operated and the total number of this manual. When the console is dis- 20 To purchase the optional chest pulse sensor, see the front cover of miles that..., the key can be shown in the display: The left side of the display will show the total number of miles (or kilometers) that the treadmill has been used. To select the information mode, hold down the Stop button while inserting the key into the console. If a "d" appears when the ...
THE INFORMATION MODE/DEMO MODE The console features an information mode that keeps track of the total number of hours that the treadmill has been operated and the total number of this manual. When the console is dis- 20 To purchase the optional chest pulse sensor, see the front cover of miles that..., the key can be shown in the display: The left side of the display will show the total number of miles (or kilometers) that the treadmill has been used. To select the information mode, hold down the Stop button while inserting the key into the console. If a "d" appears when the ...

Canadian English Manual
Page 22
... buttons. Remove the key from the console and UNPLUG THE a POWER CORD. The treadmill will recalibrate the incline system. Reinsert the key fully into a properly grounded outlet (see page 8). With the help of this manual. Find the symptom that the power cord is required. 95 95 22 If further ...assistance is plugged in, unplug it, wait for five minutes, and then plug it back in . b. c. d. If the treadmill still will not run, see the drawing above)....
... buttons. Remove the key from the console and UNPLUG THE a POWER CORD. The treadmill will recalibrate the incline system. Reinsert the key fully into a properly grounded outlet (see page 8). With the help of this manual. Find the symptom that the power cord is required. 95 95 22 If further ...assistance is plugged in, unplug it, wait for five minutes, and then plug it back in . b. c. d. If the treadmill still will not run, see the drawing above)....

Canadian English Manual
Page 23
... able to lift each side of a turn . With the help of this manual. Top View PROBLEM: The walking belt slows when walked on , first re- When the walking belt is overtightened, treadmill performance may decrease and the walking belt may become damaged. Be careful to ...as shown. b Using the allen wrench, turn both rear roller adjustment bolts counterclockwise, 1/4 of the Pulley (18). Reattach the Hood, and run the treadmill for a few minutes. b 5-7 cm Rear Roller Adjustment Bolts c. b. Turn the Pulley until the walking belt is about 3 mm (1/8 in the ...
... able to lift each side of a turn . With the help of this manual. Top View PROBLEM: The walking belt slows when walked on , first re- When the walking belt is overtightened, treadmill performance may decrease and the walking belt may become damaged. Be careful to ...as shown. b Using the allen wrench, turn both rear roller adjustment bolts counterclockwise, 1/4 of the Pulley (18). Reattach the Hood, and run the treadmill for a few minutes. b 5-7 cm Rear Roller Adjustment Bolts c. b. Turn the Pulley until the walking belt is about 3 mm (1/8 in the ...

Canadian English Manual
Page 26
Key No. PART LIST-Model No. 30611.1 R0807A To locate the parts listed below, see the EXPLODED DRAWING attached in the center of this manual. Qty. Description Key No. Description 1 1 Left Foot Rail 2 8 Foot Rail Screw 3 1 Console 4 2 Isolator Decal 5 1 Catch 6 4 Front Isolator 7 2 Center Isolator 8 4 Console Mounting Screw 9 2 Isolator Bracket Cover ...
Key No. PART LIST-Model No. 30611.1 R0807A To locate the parts listed below, see the EXPLODED DRAWING attached in the center of this manual. Qty. Description Key No. Description 1 1 Left Foot Rail 2 8 Foot Rail Screw 3 1 Console 4 2 Isolator Decal 5 1 Catch 6 4 Front Isolator 7 2 Center Isolator 8 4 Console Mounting Screw 9 2 Isolator Bracket Cover ...

Canadian English Manual
Page 27
Qty. Description # 1 12" Blue Wire, M/F # 1 14" Blue Wire, F/F # 1 6" Blue Wire, F/F # 1 20" Black Wire, M/F # 1 22" Red Wire, M/F # 1 User's Manual #These parts are not illustrated 27 Qty. Description 101 1 Console Base 102 1 Optic Disk 103 13 Ground Screw/Choke Screw 104 1 Key Clip 105 2 Handrail Extension 106 1 Console Fan 107 2 Base Pad Spacer 108 2 Rear Roller Bracket 109 1 Roller Ground Wire Key No. Key No.
Qty. Description # 1 12" Blue Wire, M/F # 1 14" Blue Wire, F/F # 1 6" Blue Wire, F/F # 1 20" Black Wire, M/F # 1 22" Red Wire, M/F # 1 User's Manual #These parts are not illustrated 27 Qty. Description 101 1 Console Base 102 1 Optic Disk 103 13 Ground Screw/Choke Screw 104 1 Key Clip 105 2 Handrail Extension 106 1 Console Fan 107 2 Base Pad Spacer 108 2 Rear Roller Bracket 109 1 Roller Ground Wire Key No. Key No.

Canadian English Manual
Page 28
... legal rights. ORDERING REPLACEMENT PARTS To order replacement parts, please see the EXPLODED DRAWING and PART LIST attached in the center of this manual) LIMITED WARRANTY ICON of Canada, Inc. (ICON) warrants this product to be preauthorized by the retailer of your equipment. When ordering ...information: • the MODEL NUMBER OF THE PRODUCT (30611.1) • the NAME OF THE PRODUCT (PROFORM XP 550S treadmill) • the SERIAL NUMBER OF THE PRODUCT (see the front cover of this manual) • the KEY NUMBER AND DESCRIPTION OF THE PART(S) (see the front cover of this warranty ...
... legal rights. ORDERING REPLACEMENT PARTS To order replacement parts, please see the EXPLODED DRAWING and PART LIST attached in the center of this manual) LIMITED WARRANTY ICON of Canada, Inc. (ICON) warrants this product to be preauthorized by the retailer of your equipment. When ordering ...information: • the MODEL NUMBER OF THE PRODUCT (30611.1) • the NAME OF THE PRODUCT (PROFORM XP 550S treadmill) • the SERIAL NUMBER OF THE PRODUCT (see the front cover of this manual) • the KEY NUMBER AND DESCRIPTION OF THE PART(S) (see the front cover of this warranty ...

Canadian English Manual
Page 29
To identify the parts shown on this EXPLODED DRAWING, see the PART LIST on pages 26 and 27 of the User's Manual. 4 2 2 1 2 95 6 42 7 14 9 95 15 5 6 12 15 69 13 2 68 16 44 108 39 62 45 35 67 2 16 44 63 66 52 65 64 ...
To identify the parts shown on this EXPLODED DRAWING, see the PART LIST on pages 26 and 27 of the User's Manual. 4 2 2 1 2 95 6 42 7 14 9 95 15 5 6 12 15 69 13 2 68 16 44 108 39 62 45 35 67 2 16 44 63 66 52 65 64 ...


