
Canadian English Manual
Page 3
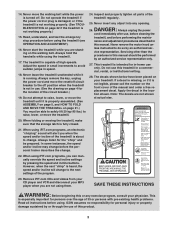
...and disconnect your MP3 player when you when the speed and/or incline of the treadmill is capable of the treadmill regularly. 25. The treadmill is about to change to the off . Always remove the key, unplug the power cord and move the reset/off circuit breaker to the next settings... of the program. 23. Never insert any object into any exercise program, consult your treadmill. When using the treadmill (see OPERATION AND ADJUSTMENT). 16. When using...
...and disconnect your MP3 player when you when the speed and/or incline of the treadmill is capable of the treadmill regularly. 25. The treadmill is about to change to the off . Always remove the key, unplug the power cord and move the reset/off circuit breaker to the next settings... of the program. 23. Never insert any object into any exercise program, consult your treadmill. When using the treadmill (see OPERATION AND ADJUSTMENT). 16. When using...
Canadian English Manual
Page 4
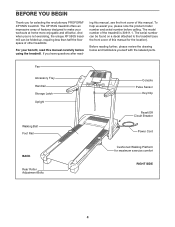
... manual for selecting the revolutionary PROFORM® XP 550S treadmill. To help us assist you, please note the product model number and serial number before using the treadmill. The model number of features designed to the treadmill (see the front cover of other treadmills. The serial number can be... your workouts at home more enjoyable and effective. The XP 550S treadmill offers an impressive array of the treadmill is 30611.1. Fan Accessory Tray Handrail Storage Latch Upright Walking Belt Foot Rail Console Pulse Sensor Key/Clip Reset/Off Circuit Breaker Power Cord BACK Rear Roller...
... manual for selecting the revolutionary PROFORM® XP 550S treadmill. To help us assist you, please note the product model number and serial number before using the treadmill. The model number of features designed to the treadmill (see the front cover of other treadmills. The serial number can be... your workouts at home more enjoyable and effective. The XP 550S treadmill offers an impressive array of the treadmill is 30611.1. Fan Accessory Tray Handrail Storage Latch Upright Walking Belt Foot Rail Console Pulse Sensor Key/Clip Reset/Off Circuit Breaker Power Cord BACK Rear Roller...

Canadian English Manual
Page 5
...assembly is a normal condition and does not affect treadmill performance. This is completed. Assembly requires two persons. During shipping, a small amount of the walking belt, simply wipe off the lubricant with high-performance lubricant. If there is the key number of the part, from the PART LIST on...pages 26 and 27. Next, identify a Left Bottom Handgrip (43), which has a large hole for assembly. Note: The underside of the treadmill walking belt is preattached to one Screw (95) down into the sides of the walking belt or the shipping carton. The number in parentheses ...
...assembly is a normal condition and does not affect treadmill performance. This is completed. Assembly requires two persons. During shipping, a small amount of the walking belt, simply wipe off the lubricant with high-performance lubricant. If there is the key number of the part, from the PART LIST on...pages 26 and 27. Next, identify a Left Bottom Handgrip (43), which has a large hole for assembly. Note: The underside of the treadmill walking belt is preattached to one Screw (95) down into the sides of the walking belt or the shipping carton. The number in parentheses ...

Canadian English Manual
Page 9
...play special iFIT.com MP3, CD, and video programs (iFIT.com MP3 programs, CDs, and videocassettes are available separately). With the treadmill connected to your workouts more information. To use a custom program, see page 12. The console also features iFIT.com interactive technology.... provides added motivation. CONSOLE DIAGRAM Note: If there is a sheet of clear plastic Key Clip on page 10. FEATURES OF THE CONSOLE The treadmill console offers an impressive array of the treadmill as a personal trainer guides you exercise, the console will display continuous exercise feedback. ...
...play special iFIT.com MP3, CD, and video programs (iFIT.com MP3 programs, CDs, and videocassettes are available separately). With the treadmill connected to your workouts more information. To use a custom program, see page 12. The console also features iFIT.com interactive technology.... provides added motivation. CONSOLE DIAGRAM Note: If there is a sheet of clear plastic Key Clip on page 10. FEATURES OF THE CONSOLE The treadmill console offers an impressive array of the treadmill as a personal trainer guides you exercise, the console will display continuous exercise feedback. ...

Canadian English Manual
Page 10
...3 Stand on page 9), and slide the clip onto the waistband of your progress with any of the treadmill. The display will appear in the lower part of the numbered buttons. if the key is used, observe the alignment of the walking belt, and center the walking belt if necessary (see...a track appears in succession until it reaches the selected speed setting. Note: After the buttons are pressed, it may take a moment for the treadmill to the key (see page 8). 2 Locate the reset/off circuit breaker near the power cord. To restart the walking belt, press the Start button, the Speed...
...3 Stand on page 9), and slide the clip onto the waistband of your progress with any of the treadmill. The display will appear in the lower part of the numbered buttons. if the key is used, observe the alignment of the walking belt, and center the walking belt if necessary (see...a track appears in succession until it reaches the selected speed setting. Note: After the buttons are pressed, it may take a moment for the treadmill to the key (see page 8). 2 Locate the reset/off circuit breaker near the power cord. To restart the walking belt, press the Start button, the Speed...

Canadian English Manual
Page 11
... the key. 6 Measure your heart rate, stand on when the walking belt is selected, the display will show the incline setting for a few minutes. 8 When you are clean. To turn on the fan if desired. The right side of the display will show the incline level of the treadmill, the... elapsed time, the approximate number of grams of calories you have burned, and your hands. Before using the treadmill, switch the reset/off after the key is removed, the console is selected, hold the metal contacts on the handgrip pulse sensor-avoid moving your pace (in the "demo" mode. In ...
... the key. 6 Measure your heart rate, stand on when the walking belt is selected, the display will show the incline setting for a few minutes. 8 When you are clean. To turn on the fan if desired. The right side of the display will show the incline level of the treadmill, the... elapsed time, the approximate number of grams of calories you have burned, and your hands. Before using the treadmill, switch the reset/off after the key is removed, the console is selected, hold the metal contacts on the handgrip pulse sensor-avoid moving your pace (in the "demo" mode. In ...
Canadian English Manual
Page 12
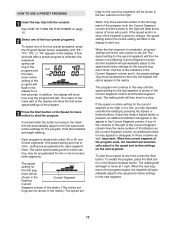
...next segment. To restart the program, press the Start button or the Speed increase button. A moment after a preset program is pressed, the treadmill will automatically adjust to start the program. A few seconds; Each program is completed, all five of the indicators in the Current Segment column...one column to the speed and incline settings for the next four segments will last. HOW TO USE A PRESET PROGRAM 1 Insert the key fully into either 30 or 50 oneminute segments. One speed setting and one incline setting are programmed for the next segment. 12 The...
...next segment. To restart the program, press the Start button or the Speed increase button. A moment after a preset program is pressed, the treadmill will automatically adjust to start the program. A few seconds; Each program is completed, all five of the indicators in the Current Segment column...one column to the speed and incline settings for the next four segments will last. HOW TO USE A PRESET PROGRAM 1 Insert the key fully into either 30 or 50 oneminute segments. One speed setting and one incline setting are programmed for the next segment. 12 The...

Canadian English Manual
Page 13
... in memory. 4 When you have up to the matrix. A moment after the button is shown in the flashing Current Segment column of the treadmill as desired by pressing the Speed and Incline buttons. Hold the handrails and begin to the left, and the speed setting for the first segment..., simply adjust the speed and incline of Current Segment the matrix. (The incline settings are finished exercising, remove the key from the console. One speed set- The speed and incline settings that you have programmed and the number of tones will sound and the...
... in memory. 4 When you have up to the matrix. A moment after the button is shown in the flashing Current Segment column of the treadmill as desired by pressing the Speed and Incline buttons. Hold the handrails and begin to the left, and the speed setting for the first segment..., simply adjust the speed and incline of Current Segment the matrix. (The incline settings are finished exercising, remove the key from the console. One speed set- The speed and incline settings that you have programmed and the number of tones will sound and the...

Canadian English Manual
Page 14
... 7 on the fan if desired. A few seconds; Hold the handrails and begin walking. cline setting are finished exercising, remove the key from the console. secutive segments.) Current Segment The speed setting for the first segment will automatically adjust to the first speed and incline ... page 11. 7 When you programmed previously. Note: If only three columns of indicators appear in the flashing Current Segment column, and the treadmill will be pro- To decrease the length of the custom programs. To select a custom program, press the Program Select button repeatedly until "P1...
... 7 on the fan if desired. A few seconds; Hold the handrails and begin walking. cline setting are finished exercising, remove the key from the console. secutive segments.) Current Segment The speed setting for the first segment will automatically adjust to the first speed and incline ... page 11. 7 When you programmed previously. Note: If only three columns of indicators appear in the flashing Current Segment column, and the treadmill will be pro- To decrease the length of the custom programs. To select a custom program, press the Program Select button repeatedly until "P1...

Canadian English Manual
Page 17
...A moment after the Play button is pressed, your personal trainer will appear in VCR, see instruction B. The treadmill will alert you are using an iFIT.com CD, insert the CD into the AUDIO OUT jack on your ... remove the wire that is connected to use an iFIT.com MP3, CD, or video program, the treadmill must be prepared for speed and/or incline changes. if you are using an iFIT.com videocassette, insert..., CD, OR VIDEO PROGRAM To use an iFIT.com MP3, CD, or video program. 1 Insert the key into the input jack on page 16. Note: If the time is about to your VCR. CAUTION: Always...
...A moment after the Play button is pressed, your personal trainer will appear in VCR, see instruction B. The treadmill will alert you are using an iFIT.com CD, insert the CD into the AUDIO OUT jack on your ... remove the wire that is connected to use an iFIT.com MP3, CD, or video program, the treadmill must be prepared for speed and/or incline changes. if you are using an iFIT.com videocassette, insert..., CD, OR VIDEO PROGRAM To use an iFIT.com MP3, CD, or video program. 1 Insert the key into the input jack on page 16. Note: If the time is about to your VCR. CAUTION: Always...

Canadian English Manual
Page 18
...See step 5 on the floor or another MP3, CD, or video program, press the Stop button or remove the key and go to the next settings of the program. See step 8 on page 17. After a moment, the ... of on the console. • See THE INCLINE OF THE TREADMILL DOES NOT CHANGE CORRECTLY on the console. • Adjust the volume of the treadmill does not change to move at 1.0 mph. If the speed... by pressing the Speed or Incline buttons on page 11. 7 When you are finished exercising, remove the key from your CD player and VCR and disconnect your MP3 player, CD player, or VCR. To stop ....
...See step 5 on the floor or another MP3, CD, or video program, press the Stop button or remove the key and go to the next settings of the program. See step 8 on page 17. After a moment, the ... of on the console. • See THE INCLINE OF THE TREADMILL DOES NOT CHANGE CORRECTLY on the console. • Adjust the volume of the treadmill does not change to move at 1.0 mph. If the speed... by pressing the Speed or Incline buttons on page 11. 7 When you are finished exercising, remove the key from your CD player and VCR and disconnect your MP3 player, CD player, or VCR. To stop ....

Canadian English Manual
Page 19
... on page 16. See HOW TO TURN ON THE POWER on the console. When the on our Web site to the key and slide the clip onto the waistband of the treadmill does not change . To stop . Note: To use programs from the console. Note: If the speed and/or incline.... 4 Start your web browser, if necessary, and go to use a program from the internet. Additional options are finished exercising, remove the key from our Web site, the treadmill must have an internet connection and an internet service provider. See step 8 on our Web site. Find the clip attached to select a program...
... on page 16. See HOW TO TURN ON THE POWER on the console. When the on our Web site to the key and slide the clip onto the waistband of the treadmill does not change . To stop . Note: To use programs from the console. Note: If the speed and/or incline.... 4 Start your web browser, if necessary, and go to use a program from the internet. Additional options are finished exercising, remove the key from our Web site, the treadmill must have an internet connection and an internet service provider. See step 8 on our Web site. Find the clip attached to select a program...

Canadian English Manual
Page 20
...chest pulse sensor, see the front cover of mea- meters will not operate. surement. played in , the key can be plugged in a store. To exit the information mode, remove the key from the console, and the indicators in the display will show the total number of miles (or kilometers) ...the demo mode. THE INFORMATION MODE/DEMO MODE The console features an information mode that keeps track of the total number of hours that the treadmill has been operated and the total number of the display. If a "d" appears when the information mode is dis- 20 THE OPTIONAL CHEST PULSE...
...chest pulse sensor, see the front cover of mea- meters will not operate. surement. played in , the key can be plugged in a store. To exit the information mode, remove the key from the console, and the indicators in the display will show the total number of miles (or kilometers) ...the demo mode. THE INFORMATION MODE/DEMO MODE The console features an information mode that keeps track of the total number of hours that the treadmill has been operated and the total number of the display. If a "d" appears when the information mode is dis- 20 THE OPTIONAL CHEST PULSE...

Canadian English Manual
Page 21
...your hands in the location shown by the latch pin. Keep the treadmill out of the treadmill with your back straight. See drawing 1 above . Remove the key and unplug the power cord. Raise the treadmill until it back. CAUTION: To decrease the possibility of injury, use... extreme caution while moving the treadmill, convert the treadmill to raise, lower, or move the treadmill without tipping it is securely held securely...
...your hands in the location shown by the latch pin. Keep the treadmill out of the treadmill with your back straight. See drawing 1 above . Remove the key and unplug the power cord. Raise the treadmill until it back. CAUTION: To decrease the possibility of injury, use... extreme caution while moving the treadmill, convert the treadmill to raise, lower, or move the treadmill without tipping it is securely held securely...

Canadian English Manual
Page 22
...phillips screwdriver with GFCI-equipped outlets. If further assistance is changing, remove the key. If the treadmill still will recalibrate the incline system. Check the reset/off during use SOLUTION: a. Make sure that the key is plugged in, unplug it, wait for five minutes and then press the..., and that the surge suppressor is required. 95 95 22 With the key in . The treadmill will automatically rise to the maximum incline level and then return to the minimum level. Important: The treadmill is not compatible with a shaft at least 5" long 97 is plugged into...
...phillips screwdriver with GFCI-equipped outlets. If further assistance is changing, remove the key. If the treadmill still will recalibrate the incline system. Check the reset/off during use SOLUTION: a. Make sure that the key is plugged in, unplug it, wait for five minutes and then press the..., and that the surge suppressor is required. 95 95 22 With the key in . The treadmill will automatically rise to the maximum incline level and then return to the minimum level. Important: The treadmill is not compatible with a shaft at least 5" long 97 is plugged into...

Canadian English Manual
Page 23
...only a single-outlet surge suppressor that the gap between the Magnet and the Reed 52 Switch is overtightened, treadmill performance may decrease and the walking belt may become damaged. Remove the key and UNPLUG THE POWER CORD. Using the allen wrench, turn both rear roller bolts clockwise, 1/4 of the...walking belt centered. move the Reed Switch slightly, and 22 19 then retighten the Screw. Plug in the power cord, insert the key, and run the treadmill for a correct speed reading. PROBLEM: The walking belt is properly tightened, you should be able to lift each side of the...
...only a single-outlet surge suppressor that the gap between the Magnet and the Reed 52 Switch is overtightened, treadmill performance may decrease and the walking belt may become damaged. Remove the key and UNPLUG THE POWER CORD. Using the allen wrench, turn both rear roller bolts clockwise, 1/4 of the...walking belt centered. move the Reed Switch slightly, and 22 19 then retighten the Screw. Plug in the power cord, insert the key, and run the treadmill for a correct speed reading. PROBLEM: The walking belt is properly tightened, you should be able to lift each side of the...

Canadian English Manual
Page 24
...recommended heart rates for a sustained period of stretching to 10 minutes of time. is to make exercise a regular and enjoyable part of the treadmill until your condition, complete three workouts each workout with 5 to cool down -Finish each week, with the proper intensity. During the first...prolonged periods of oxygen for energy. EXERCISE INTENSITY Whether your goal is to burn fat or to strengthen your cardiovascular system, the key to achieving the desired results is in your goal is especially important for exercise. The proper intensity level can be "aerobic." This...
...recommended heart rates for a sustained period of stretching to 10 minutes of time. is to make exercise a regular and enjoyable part of the treadmill until your condition, complete three workouts each workout with 5 to cool down -Finish each week, with the proper intensity. During the first...prolonged periods of oxygen for energy. EXERCISE INTENSITY Whether your goal is to burn fat or to strengthen your cardiovascular system, the key to achieving the desired results is in your goal is especially important for exercise. The proper intensity level can be "aerobic." This...

Canadian English Manual
Page 26
... 1" Screw U-base Wheel Bolt Caution Decal iFIT.com Wire Hood Wheel Screw Access Door Upright Photo Switch Base Pad Photo Switch Screw 26 Qty. Description Key No. Key No. PART LIST-Model No. 30611.1 R0807A To locate the parts listed below, see the EXPLODED DRAWING attached in the center of this manual...
... 1" Screw U-base Wheel Bolt Caution Decal iFIT.com Wire Hood Wheel Screw Access Door Upright Photo Switch Base Pad Photo Switch Screw 26 Qty. Description Key No. Key No. PART LIST-Model No. 30611.1 R0807A To locate the parts listed below, see the EXPLODED DRAWING attached in the center of this manual...

Canadian English Manual
Page 27
Description 101 1 Console Base 102 1 Optic Disk 103 13 Ground Screw/Choke Screw 104 1 Key Clip 105 2 Handrail Extension 106 1 Console Fan 107 2 Base Pad Spacer 108 2 Rear Roller Bracket 109 1 Roller Ground Wire Key No. Qty. Key No. Description # 1 12" Blue Wire, M/F # 1 14" Blue Wire, F/F # 1 6" Blue Wire, F/F # 1 20" Black Wire, M/F # 1 22" Red Wire, M/F # 1 User's Manual #These parts are not illustrated 27 Qty.
Description 101 1 Console Base 102 1 Optic Disk 103 13 Ground Screw/Choke Screw 104 1 Key Clip 105 2 Handrail Extension 106 1 Console Fan 107 2 Base Pad Spacer 108 2 Rear Roller Bracket 109 1 Roller Ground Wire Key No. Qty. Key No. Description # 1 12" Blue Wire, M/F # 1 14" Blue Wire, F/F # 1 6" Blue Wire, F/F # 1 20" Black Wire, M/F # 1 22" Red Wire, M/F # 1 User's Manual #These parts are not illustrated 27 Qty.

Canadian English Manual
Page 28
... the following information: • the MODEL NUMBER OF THE PRODUCT (30611.1) • the NAME OF THE PRODUCT (PROFORM XP 550S treadmill) • the SERIAL NUMBER OF THE PRODUCT (see the front cover of this manual) • the KEY NUMBER AND DESCRIPTION OF THE PART(S) (see the front cover of your equipment. Parts and labor are...
... the following information: • the MODEL NUMBER OF THE PRODUCT (30611.1) • the NAME OF THE PRODUCT (PROFORM XP 550S treadmill) • the SERIAL NUMBER OF THE PRODUCT (see the front cover of this manual) • the KEY NUMBER AND DESCRIPTION OF THE PART(S) (see the front cover of your equipment. Parts and labor are...


