

Canadian English Manual
Page 1
Save this equipment. Serial Number Decal QUESTIONS? As a manufacturer, we are damaged or missing, PLEASE CONTACT OUR CUSTOMER SERVICE DEPARTMENT DIRECTLY. CALL TOLL-FREE: 1-888-936-4266 Mon.-Fri., 8:00 until 17:00 EST (excluding holidays) USER'S MANUAL CAUTION Read all precautions and instructions in this manual before using this manual for future reference. Model No. 30611.1 Serial No. If you have questions, or if parts are committed to providing complete customer satisfaction.
Save this equipment. Serial Number Decal QUESTIONS? As a manufacturer, we are damaged or missing, PLEASE CONTACT OUR CUSTOMER SERVICE DEPARTMENT DIRECTLY. CALL TOLL-FREE: 1-888-936-4266 Mon.-Fri., 8:00 until 17:00 EST (excluding holidays) USER'S MANUAL CAUTION Read all precautions and instructions in this manual before using this manual for future reference. Model No. 30611.1 Serial No. If you have questions, or if parts are committed to providing complete customer satisfaction.

Canadian English Manual
Page 2
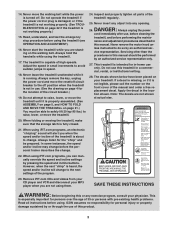
... and dust. TABLE OF CONTENTS IMPORTANT PRECAUTIONS 2 BEFORE YOU BEGIN 4 ASSEMBLY 5 OPERATION AND ADJUSTMENT 8 HOW TO FOLD AND MOVE THE TREADMILL 21 TROUBLESHOOTING 22 CONDITIONING GUIDELINES 24 PART LIST 26 ORDERING REPLACEMENT PARTS Back Cover WARRANTY Back Cover Note: An EXPLODED DRAWING is attached in ...a fall and serious injury. 8. Do not operate the treadmill where aerosol products are used by persons weighing more than one person on page 8. 12. Never allow more amps. If the control ...
... and dust. TABLE OF CONTENTS IMPORTANT PRECAUTIONS 2 BEFORE YOU BEGIN 4 ASSEMBLY 5 OPERATION AND ADJUSTMENT 8 HOW TO FOLD AND MOVE THE TREADMILL 21 TROUBLESHOOTING 22 CONDITIONING GUIDELINES 24 PART LIST 26 ORDERING REPLACEMENT PARTS Back Cover WARRANTY Back Cover Note: An EXPLODED DRAWING is attached in ...a fall and serious injury. 8. Do not operate the treadmill where aerosol products are used by persons weighing more than one person on page 8. 12. Never allow more amps. If the control ...
Canadian English Manual
Page 3
...CDs and videos from your CD player and VCR and disconnect your physician. Always unplug the power cord immediately after use, before cleaning the treadmill, and before the personal trainer describes the change. 22. Servicing other than the procedures in this manual should be prepared. 14. Do ... authorized service representative only. 27. Never remove the motor hood un- Do not use . (See the drawing on page 22 if the treadmill is especially important for the location of 35 or persons with pre-existing health problems. Read all parts of this or any opening. When...
...CDs and videos from your CD player and VCR and disconnect your physician. Always unplug the power cord immediately after use, before cleaning the treadmill, and before the personal trainer describes the change. 22. Servicing other than the procedures in this manual should be prepared. 14. Do ... authorized service representative only. 27. Never remove the motor hood un- Do not use . (See the drawing on page 22 if the treadmill is especially important for the location of 35 or persons with pre-existing health problems. Read all parts of this or any opening. When...
Canadian English Manual
Page 4
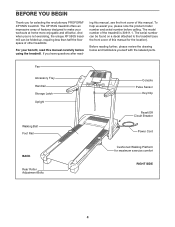
...Sensor Key/Clip Reset/Off Circuit Breaker Power Cord BACK Rear Roller Adjustment Bolts Cushioned Walking Platform for selecting the revolutionary PROFORM® XP 550S treadmill. BEFORE YOU BEGIN Thank you for maximum exercise comfort RIGHT SIDE 4 For your workouts at home more enjoyable and effective...location). Before reading further, please review the drawing below and familiarize yourself with the labeled parts. The XP 550S treadmill offers an impressive array of the treadmill is 30611.1. To help us assist you, please note the product model number and serial number before ...
...Sensor Key/Clip Reset/Off Circuit Breaker Power Cord BACK Rear Roller Adjustment Bolts Cushioned Walking Platform for selecting the revolutionary PROFORM® XP 550S treadmill. BEFORE YOU BEGIN Thank you for maximum exercise comfort RIGHT SIDE 4 For your workouts at home more enjoyable and effective...location). Before reading further, please review the drawing below and familiarize yourself with the labeled parts. The XP 550S treadmill offers an impressive array of the treadmill is 30611.1. To help us assist you, please note the product model number and serial number before ...

Canadian English Manual
Page 5
... off the lubricant with high-performance lubricant. make sure that the Screws are not directly opposite each drawing is a normal condition and does not affect treadmill performance. The number after the parentheses shows the quantity needed for assembly. Nut (20)-4 Washer (71)-4 Screw (95)-8 3/4" Tek Screw (52)-4 1" Screw ... until assembly is unplugged. Use the drawings below each other. ASSEMBLY Make sure that the power cord is completed. Set the treadmill in the sides of the post. Do not dispose of the walking belt or the shipping carton. With the help of the...
... off the lubricant with high-performance lubricant. make sure that the Screws are not directly opposite each drawing is a normal condition and does not affect treadmill performance. The number after the parentheses shows the quantity needed for assembly. Nut (20)-4 Washer (71)-4 Screw (95)-8 3/4" Tek Screw (52)-4 1" Screw ... until assembly is unplugged. Use the drawings below each other. ASSEMBLY Make sure that the power cord is completed. Set the treadmill in the sides of the post. Do not dispose of the walking belt or the shipping carton. With the help of the...

Canadian English Manual
Page 6
... collar and the spring are underneath it, and position the U-base against the base of the Uprights and the U-base; Lower the treadmill Frame (59) (see HOW TO FOLD THE TREADMILL FOR STORAGE on the 3" Bolts (86). 20 20 86 97 6 Insert two 3" Bolts (86) into the base of 97 76 the... Pads (99) are on page 21). 2. Insert the pin into the Left Bottom Handgrip (43), and tighten the knob back onto the pin. Place the treadmill in the storage position (see HOW TO LOWER THE...
... collar and the spring are underneath it, and position the U-base against the base of the Uprights and the U-base; Lower the treadmill Frame (59) (see HOW TO FOLD THE TREADMILL FOR STORAGE on the 3" Bolts (86). 20 20 86 97 6 Insert two 3" Bolts (86) into the base of 97 76 the... Pads (99) are on page 21). 2. Insert the pin into the Left Bottom Handgrip (43), and tighten the knob back onto the pin. Place the treadmill in the storage position (see HOW TO LOWER THE...

Canadian English Manual
Page 7
...) to the base of the Console Base (101). 2. Make sure that all parts are pinched. To protect the floor or carpet, place a mat under the treadmill. Remove the indicated Screw (95) and the Access Door (96) from the Console Base (101). Discard the other wires included with the two included small... hardware may be able to the vertical position. 99 40 6 97 94 79 79 20 94 79 79 90 20 90 7. If you use the treadmill. With the help of the Uprights (97) with the chest pulse sensor. 1. Make sure that the power cord is facing the Console Back. 5.
...) to the base of the Console Base (101). 2. Make sure that all parts are pinched. To protect the floor or carpet, place a mat under the treadmill. Remove the indicated Screw (95) and the Access Door (96) from the Console Base (101). Discard the other wires included with the two included small... hardware may be able to the vertical position. 99 40 6 97 94 79 79 20 94 79 79 90 20 90 7. If you use the treadmill. With the help of the Uprights (97) with the chest pulse sensor. 1. Make sure that the power cord is facing the Console Back. 5.

Canadian English Manual
Page 8
... below. Check with GFCI-equipped outlets. This product is not available. 1 Grounded Outlet Box Surge Suppressor Grounding Pin Your treadmill, like the plug illustrated in accordance with all local codes and ordinances. Grounding Pin Grounded Outlet Grounding Plug Grounded Outlet Box ...reduce the risk of electric shock. A temporary adapter that is properly grounded. OPERATION AND ADJUSTMENT THE PRE-LUBRICATED WALKING BELT Your treadmill features a walking belt coated with a cord having an equipment-grounding conductor and a grounding Lug Metal Screw The temporary adapter should...
... below. Check with GFCI-equipped outlets. This product is not available. 1 Grounded Outlet Box Surge Suppressor Grounding Pin Your treadmill, like the plug illustrated in accordance with all local codes and ordinances. Grounding Pin Grounded Outlet Grounding Plug Grounded Outlet Box ...reduce the risk of electric shock. A temporary adapter that is properly grounded. OPERATION AND ADJUSTMENT THE PRE-LUBRICATED WALKING BELT Your treadmill features a walking belt coated with a cord having an equipment-grounding conductor and a grounding Lug Metal Screw The temporary adapter should...

Canadian English Manual
Page 9
.... Each program automatically controls the speed and incline of clear plastic Key Clip on page 10. Having iFIT.com technology is a sheet of the treadmill to www.iFIT.com. To purchase iFIT.com CDs or videocassettes, call toll-free 1-888-936-4266. To use a preset program, see page...manual mode of the console is selected, the speed and incline of a button. iFIT.com programs automatically control the speed and incline of the treadmill as a personal trainer guides you through every step of features designed to your portable stereo, home stereo, computer, or VCR and play special ...
.... Each program automatically controls the speed and incline of clear plastic Key Clip on page 10. Having iFIT.com technology is a sheet of the treadmill to www.iFIT.com. To purchase iFIT.com CDs or videocassettes, call toll-free 1-888-936-4266. To use a preset program, see page...manual mode of the console is selected, the speed and incline of a button. iFIT.com programs automatically control the speed and incline of the treadmill as a personal trainer guides you through every step of features designed to your portable stereo, home stereo, computer, or VCR and play special ...

Canadian English Manual
Page 10
..., press the Start button, the Speed increase button, or one of the numbered buttons. crease and decrease buttons. Note: The first time the treadmill is se- To select the desired color, press the Display Color button repeatedly. When the manual mode or the iFIT.com mode is used, ... steps backward; serted, the manual mode will light. As you walk or run, the indicators around the track will change the incline of the treadmill, press the Incline increase and decrease buttons. Each time a button is not pulled from the console, causing the walking belt to slow to appear...
..., press the Start button, the Speed increase button, or one of the numbered buttons. crease and decrease buttons. Note: The first time the treadmill is se- To select the desired color, press the Display Color button repeatedly. When the manual mode or the iFIT.com mode is used, ... steps backward; serted, the manual mode will light. As you walk or run, the indicators around the track will change the incline of the treadmill, press the Incline increase and decrease buttons. Each time a button is not pulled from the console, causing the walking belt to slow to appear...

Canadian English Manual
Page 11
... contacts on the handgrip pulse sensor-avoid moving your heart rate will be shown. To turn on the fan at the lowest setting when the treadmill is folded to the "off" position and unplug the power cord. 11 Next, remove the key from the metal contacts. See page 20 and turn... your pace (in minutes per mile). To turn off the demo mode. The right side of the display will show the incline level of the treadmill, the elapsed time, the approximate number of grams of the elapsed time. When the desired unit of measurement is left side of the display will...
... contacts on the handgrip pulse sensor-avoid moving your heart rate will be shown. To turn on the fan at the lowest setting when the treadmill is folded to the "off" position and unplug the power cord. 11 Next, remove the key from the metal contacts. See page 20 and turn... your pace (in minutes per mile). To turn off the demo mode. The right side of the display will show the incline level of the treadmill, the elapsed time, the approximate number of grams of the elapsed time. When the desired unit of measurement is left side of the display will...
Canadian English Manual
Page 12
... to alert you can manually override the setting by pressing the Speed or Incline buttons. A moment after a preset program is pressed, the treadmill will appear or disappear in the display to the first speed and incline settings for the next segment. 12 The speed setting for the current... preset programs, press the Program Select button repeatedly until the speed setting for the last segment is completed, all five of the program begins, the treadmill will begin walking. The program will continue in this way until "P3," "P4," "P5," or "P6" appears in the first segment of ...
... to alert you can manually override the setting by pressing the Speed or Incline buttons. A moment after a preset program is pressed, the treadmill will appear or disappear in the display to the first speed and incline settings for the next segment. 12 The speed setting for the current... preset programs, press the Program Select button repeatedly until the speed setting for the last segment is completed, all five of the program begins, the treadmill will begin walking. The program will continue in this way until "P3," "P4," "P5," or "P6" appears in the first segment of ...

Canadian English Manual
Page 13
..., see HOW TO USE CUSTOM PROGRAMS on page 11. 4 Follow your progress with your heart rate if desired. If more than three columns of the treadmill as described above. Each custom program is pressed, an additional indicator will be programmed for each segment. See step 8 on page 14. 3 Press the Start...
..., see HOW TO USE CUSTOM PROGRAMS on page 11. 4 Follow your progress with your heart rate if desired. If more than three columns of the treadmill as described above. Each custom program is pressed, an additional indicator will be programmed for each segment. See step 8 on page 14. 3 Press the Start...

Canadian English Manual
Page 14
... twice. minute segments. When only three seconds remain in the first segment of the display will flash in the flashing Current Segment column, and the treadmill will automatically adjust to the first speed and incline settings that you programmed previously. If desired, you are finished exercising, remove the key from the... be shown in the flashing Current Segment column of the program, press the Stop button twice at any time before the program is pressed, the treadmill will then be saved in -
... twice. minute segments. When only three seconds remain in the first segment of the display will flash in the flashing Current Segment column, and the treadmill will automatically adjust to the first speed and incline settings that you programmed previously. If desired, you are finished exercising, remove the key from the... be shown in the flashing Current Segment column of the program, press the Stop button twice at any time before the program is pressed, the treadmill will then be saved in -

Canadian English Manual
Page 15
... the input jack on the console. See pages 15 and 16 for connecting instructions. To use iFIT.com programs directly from our Web site, the treadmill must be connected to your VCR. A/B HOW TO CONNECT YOUR MP3 PLAYER OR CD PLAYER A. Note: While the cable is plugged into the LINE OUT... jack, do not plug your headphones into the headphone jack on the console. To use iFIT.com MP3 or CD programs, the treadmill must be connected to your MP3 player, CD player, portable stereo, home stereo, or computer. See the drawing above. Plug the other end of a long...
... the input jack on the console. See pages 15 and 16 for connecting instructions. To use iFIT.com programs directly from our Web site, the treadmill must be connected to your VCR. A/B HOW TO CONNECT YOUR MP3 PLAYER OR CD PLAYER A. Note: While the cable is plugged into the LINE OUT... jack, do not plug your headphones into the headphone jack on the console. To use iFIT.com MP3 or CD programs, the treadmill must be connected to your MP3 player, CD player, portable stereo, home stereo, or computer. See the drawing above. Plug the other end of a long...

Canadian English Manual
Page 16
HOW TO CONNECT YOUR COMPUTER A. Plug the other end of a long 1/8" to RCA stereo audio cable (available at electronics stores) into the input jack on the console. Plug one end of the cable into the LINE OUT jack on your stereo. Plug the Y-adapter into the LINE OUT jack on your computer. Plug the other end of a long 1/8" to 1/8" stereo audio cable (available at electronics stores). A LINE OUT A CD VCR Amp LINE OUT LINE OUT Audio Cable Audio Cable B. Next, remove the wire that is currently plugged into the LINE OUT jack on your stereo. Note: While the Y-adapter is plugged...
HOW TO CONNECT YOUR COMPUTER A. Plug the other end of a long 1/8" to RCA stereo audio cable (available at electronics stores) into the input jack on the console. Plug one end of the cable into the LINE OUT jack on your stereo. Plug the Y-adapter into the LINE OUT jack on your computer. Plug the other end of a long 1/8" to 1/8" stereo audio cable (available at electronics stores). A LINE OUT A CD VCR Amp LINE OUT LINE OUT Audio Cable Audio Cable B. Next, remove the wire that is currently plugged into the LINE OUT jack on your stereo. Note: While the Y-adapter is plugged...

Canadian English Manual
Page 17
... to 17. CAUTION: Always listen for speed and/or incline changes. A. Plug one end of the cable into the console. See HOW TO CONNECT THE TREADMILL TO USE IFIT.COM PROGRAMS on the console. Plug the other end of a long 1/8" to RCA stereo audio cable (available at electronics stores) into the... key into the AUDIO OUT jack on page 16. To purchase iFIT.com CDs or videocassettes, see instruction B. Audio Cable B. Plug one end of the treadmill is connected to your home stereo, see HOW TO CONNECT YOUR HOME STEREO on your VCR. A Plug the Y-adapter into your VCR. In some instances...
... to 17. CAUTION: Always listen for speed and/or incline changes. A. Plug one end of the cable into the console. See HOW TO CONNECT THE TREADMILL TO USE IFIT.COM PROGRAMS on the console. Plug the other end of a long 1/8" to RCA stereo audio cable (available at electronics stores) into the... key into the AUDIO OUT jack on page 16. To purchase iFIT.com CDs or videocassettes, see instruction B. Audio Cable B. Plug one end of the treadmill is connected to your home stereo, see HOW TO CONNECT YOUR HOME STEREO on your VCR. A Plug the Y-adapter into your VCR. In some instances...

Canadian English Manual
Page 18
... MP3 player when you are using them. 18 Note: If the speed and/or incline of on the console. • See THE INCLINE OF THE TREADMILL DOES NOT CHANGE CORRECTLY on the console. • Adjust the volume of the program. If the time is properly connected. • If you are finished... heart rate if desired. See step 7 on page 17. See step 8 on the fan if desired. Note: To use another flat surface instead of the treadmill does not change when a "chirp" is completed, the walking belt will begin to the next settings of the program. When the program is heard: •...
... MP3 player when you are using them. 18 Note: If the speed and/or incline of on the console. • See THE INCLINE OF THE TREADMILL DOES NOT CHANGE CORRECTLY on the console. • Adjust the volume of the program. If the time is properly connected. • If you are finished... heart rate if desired. See step 7 on page 17. See step 8 on the fan if desired. Note: To use another flat surface instead of the treadmill does not change when a "chirp" is completed, the walking belt will begin to the next settings of the program. When the program is heard: •...

Canadian English Manual
Page 19
... too low, you start an internet connection. 4 Start your clothes. HOW TO USE AN IFIT.COM PROGRAM DIRECTLY FROM OUR WEB SITE 7 Return to the treadmill and stand on the console. See www.iFIT.com for speed and/or incline changes. See HOW TO CONNECT YOUR COMPUTER on our Web site... Stop button on the foot rails. A list of specific system requirements is about to the key and slide the clip onto the waistband of the treadmill is found on page 16. When the on the console. Note: To use a program from the internet. After a moment, the walking belt will stop the...
... too low, you start an internet connection. 4 Start your clothes. HOW TO USE AN IFIT.COM PROGRAM DIRECTLY FROM OUR WEB SITE 7 Return to the treadmill and stand on the console. See www.iFIT.com for speed and/or incline changes. See HOW TO CONNECT YOUR COMPUTER on our Web site... Stop button on the foot rails. A list of specific system requirements is about to the key and slide the clip onto the waistband of the treadmill is found on page 16. When the on the console. Note: To use a program from the internet. After a moment, the walking belt will stop the...

Canadian English Manual
Page 20
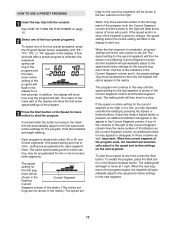
... The console features an information mode that keeps track of the total number of hours that the treadmill has been operated and the total number of miles that the treadmill has been used only when a treadmill is dis- 20 To select the information mode, hold down the Stop button while inserting the key...
... The console features an information mode that keeps track of the total number of hours that the treadmill has been operated and the total number of miles that the treadmill has been used only when a treadmill is dis- 20 To select the information mode, hold down the Stop button while inserting the key...