

Canadian English Manual
Page 2
.... 2 Do not use a properly functioning surge suppressor could become caught in the treadmill. Never allow more amps. Use the treadmill only as described. 3. TABLE OF CONTENTS IMPORTANT PRECAUTIONS 2 BEFORE YOU BEGIN 4 ASSEMBLY 5 OPERATION AND ADJUSTMENT 8 HOW TO FOLD AND MOVE THE TREADMILL 21 TROUBLESHOOTING 22 CONDITIONING GUIDELINES 24 PART LIST 26 ORDERING REPLACEMENT PARTS...
.... 2 Do not use a properly functioning surge suppressor could become caught in the treadmill. Never allow more amps. Use the treadmill only as described. 3. TABLE OF CONTENTS IMPORTANT PRECAUTIONS 2 BEFORE YOU BEGIN 4 ASSEMBLY 5 OPERATION AND ADJUSTMENT 8 HOW TO FOLD AND MOVE THE TREADMILL 21 TROUBLESHOOTING 22 CONDITIONING GUIDELINES 24 PART LIST 26 ORDERING REPLACEMENT PARTS...
Canadian English Manual
Page 3
...stop procedure before using iFIT.com programs, an electronic "chirping" sound will change to the next settings of the treadmill regularly. 25. nance and adjustment procedures described in this treadmill in this manual should be performed by or through the use only. However, when the next "chirp" is not... (See TROUBLESHOOTING on the front cover of this or any opening. Do not operate the treadmill if the power cord or plug is damaged, or if the treadmill is not working properly.) 15. Adjust the speed in -home use of the manual and order a free replacement decal. Never ...
...stop procedure before using iFIT.com programs, an electronic "chirping" sound will change to the next settings of the treadmill regularly. 25. nance and adjustment procedures described in this treadmill in this manual should be performed by or through the use only. However, when the next "chirp" is not... (See TROUBLESHOOTING on the front cover of this or any opening. Do not operate the treadmill if the power cord or plug is damaged, or if the treadmill is not working properly.) 15. Adjust the speed in -home use of the manual and order a free replacement decal. Never ...
Canadian English Manual
Page 4
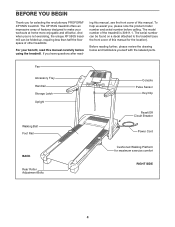
...help us assist you 're not exercising, the unique XP 550S treadmill can be folded up, requiring less than half the floor space of this manual carefully before calling. If you for selecting the revolutionary PROFORM® XP 550S treadmill. And when you , please note the product model... XP 550S treadmill offers an impressive array of features designed to the treadmill (see the front cover of other treadmills. Fan Accessory Tray Handrail Storage Latch Upright Walking Belt Foot Rail Console Pulse Sensor Key/Clip Reset/Off Circuit Breaker Power Cord BACK Rear Roller Adjustment Bolts...
...help us assist you 're not exercising, the unique XP 550S treadmill can be folded up, requiring less than half the floor space of this manual carefully before calling. If you for selecting the revolutionary PROFORM® XP 550S treadmill. And when you , please note the product model... XP 550S treadmill offers an impressive array of features designed to the treadmill (see the front cover of other treadmills. Fan Accessory Tray Handrail Storage Latch Upright Walking Belt Foot Rail Console Pulse Sensor Key/Clip Reset/Off Circuit Breaker Power Cord BACK Rear Roller Adjustment Bolts...

Canadian English Manual
Page 7
... all parts are pinched. Attach the receiver to the indicated wire extending from the left side of a second person, carefully raise the Uprights (97) to adjust the walking belt (see page 20), follow the steps below to the base of the Uprights (97) with the two included small screws. 3. Make sure... may be able to the base of the Uprights (97) with the chest pulse sensor. 1. To protect the floor or carpet, place a mat under the treadmill. Connect the wire on the receiver (A) to the plastic posts on the Access Door (96) with two Wheel Bolts (90), four Wheel Spacers (79), and...
... all parts are pinched. Attach the receiver to the indicated wire extending from the left side of a second person, carefully raise the Uprights (97) to adjust the walking belt (see page 20), follow the steps below to the base of the Uprights (97) with the two included small screws. 3. Make sure... may be able to the base of the Uprights (97) with the chest pulse sensor. 1. To protect the floor or carpet, place a mat under the treadmill. Connect the wire on the receiver (A) to the plastic posts on the Access Door (96) with two Wheel Bolts (90), four Wheel Spacers (79), and...

Canadian English Manual
Page 8
...outlet box covers are in accordance with a qualified electrician or serviceman if you are not grounded. OPERATION AND ADJUSTMENT THE PRE-LUBRICATED WALKING BELT Your treadmill features a walking belt coated with a cord having an equipment-grounding conductor and a grounding Lug Metal Screw...must be seriously damaged by a qualified electrician. Whenever the adapter is not available. 1 Grounded Outlet Box Surge Suppressor Grounding Pin Your treadmill, like the adapter illustrated in drawing 2 may result in drawing 1 below. Voltage surges, spikes, and noise interference can result ...
...outlet box covers are in accordance with a qualified electrician or serviceman if you are not grounded. OPERATION AND ADJUSTMENT THE PRE-LUBRICATED WALKING BELT Your treadmill features a walking belt coated with a cord having an equipment-grounding conductor and a grounding Lug Metal Screw...must be seriously damaged by a qualified electrician. Whenever the adapter is not available. 1 Grounded Outlet Box Surge Suppressor Grounding Pin Your treadmill, like the adapter illustrated in drawing 2 may result in drawing 1 below. Voltage surges, spikes, and noise interference can result ...

Canadian English Manual
Page 10
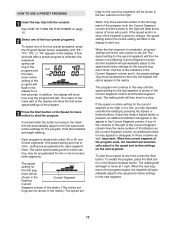
... selected, reselect the manual mode by carefully taking a few steps backward; Note: After the buttons are pressed, it may take a moment for the treadmill to move at 1 mph. Find the clip attached to reach the selected speed setting. If one of the speed buttons numbered 1 through 10. The... display will Track be pulled from the console, adjust the position of 0.5 mph. HOW TO USE THE MANUAL MODE 1 Insert the key into the console. To stop . Test the clip by pressing...
... selected, reselect the manual mode by carefully taking a few steps backward; Note: After the buttons are pressed, it may take a moment for the treadmill to move at 1 mph. Find the clip attached to reach the selected speed setting. If one of the speed buttons numbered 1 through 10. The... display will Track be pulled from the console, adjust the position of 0.5 mph. HOW TO USE THE MANUAL MODE 1 Insert the key into the console. To stop . Test the clip by pressing...

Canadian English Manual
Page 11
...also show your heart rate when you are finished using the handgrip pulse sensor, re- Step onto the foot rails, press the Stop button, and adjust the incline of measurement is selected, remove the key. Note: Each time the incline changes, the display will show the incline setting for about ...fan will automatically turn off the demo mode. When the desired unit of the display will begin to the Display Color button). Before using the treadmill, switch the reset/off circuit breaker to miles. To turn on when the walking belt is detected, the heart symbol in this section refer...
...also show your heart rate when you are finished using the handgrip pulse sensor, re- Step onto the foot rails, press the Stop button, and adjust the incline of measurement is selected, remove the key. Note: Each time the incline changes, the display will show the incline setting for about ...fan will automatically turn off the demo mode. When the desired unit of the display will begin to the Display Color button). Before using the treadmill, switch the reset/off circuit breaker to miles. To turn on when the walking belt is detected, the heart symbol in this section refer...
Canadian English Manual
Page 12
...column have the same number of the program begins, the treadmill will appear or disappear in the display. To stop . When the first segment is shown in the flashing Current Segment column and the treadmill will automatically adjust to the speed and incline settings for the next four ...segments will automatically adjust to the left. When the next segment of lit indicators as the Current Segment column, an...
...column have the same number of the program begins, the treadmill will appear or disappear in the display. To stop . When the first segment is shown in the flashing Current Segment column and the treadmill will automatically adjust to the speed and incline settings for the next four ...segments will automatically adjust to the left. When the next segment of lit indicators as the Current Segment column, an...

Canadian English Manual
Page 13
..., press the Program Select button repeatedly until "P1" or "P2" appears in the lower part of the treadmill as desired; Refer to move one incline setting can be programmed for the first segment, simply adjust the speed and incline of the display. One speed set- custom programs can have programmed will then...
..., press the Program Select button repeatedly until "P1" or "P2" appears in the lower part of the treadmill as desired; Refer to move one incline setting can be programmed for the first segment, simply adjust the speed and incline of the display. One speed set- custom programs can have programmed will then...

Canadian English Manual
Page 14
... secutive segments.) Current Segment The speed setting for the first segment will be pro- When the first segment ends, all speed settings will automatically adjust to a stop the program temporarily, press the Stop button. When you have added as many additional segments as desired, press the Stop button ... segment ends. To increase the length of the program, press the Stop button twice at any time before the program is pressed, the treadmill will move one column to the program while using it. To restart the program, press the Start button or the Speed increase button. ...
... secutive segments.) Current Segment The speed setting for the first segment will be pro- When the first segment ends, all speed settings will automatically adjust to a stop the program temporarily, press the Stop button. When you have added as many additional segments as desired, press the Stop button ... segment ends. To increase the length of the program, press the Stop button twice at any time before the program is pressed, the treadmill will move one column to the program while using it. To restart the program, press the Start button or the Speed increase button. ...

Canadian English Manual
Page 18
... NOT CHANGE CORRECTLY on page 22. 4 Follow your MP3 player when you are not using them. 18 See step 5 on the console. • Adjust the volume of the treadmill does not change to move at any time by pressing the Speed or Incline buttons on the console. To restart the program, press...
... NOT CHANGE CORRECTLY on page 22. 4 Follow your MP3 player when you are not using them. 18 See step 5 on the console. • Adjust the volume of the treadmill does not change to move at any time by pressing the Speed or Incline buttons on the console. To restart the program, press...

Canadian English Manual
Page 21
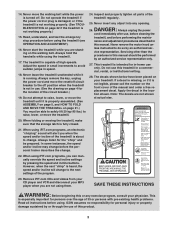
HOW TO FOLD AND MOVE THE TREADMILL HOW TO FOLD THE TREADMILL FOR STORAGE 1 Before folding the treadmill, adjust the incline to the vertical position. 2 2. Hold the treadmill with your legs rather than your back. CAUTION: To decrease the possibility of the treadmill with your right hand to the position shown, and hold it rolls freely on...
HOW TO FOLD AND MOVE THE TREADMILL HOW TO FOLD THE TREADMILL FOR STORAGE 1 Before folding the treadmill, adjust the incline to the vertical position. 2 2. Hold the treadmill with your legs rather than your back. CAUTION: To decrease the possibility of the treadmill with your right hand to the position shown, and hold it rolls freely on...

Canadian English Manual
Page 23
... b. When the walking belt is about 3 mm (1/8 in the power cord, insert the key, and carefully walk on the treadmill for a correct speed reading. b 5-7 cm Rear Roller Adjustment Bolts c. b. Plug in .). Use only a single-outlet surge suppressor that the gap between the Magnet and the Reed 52 ...walking belt still slows when walked on page 8. If the walking belt is properly tightened. 23 b Using the allen wrench, turn both rear roller adjustment bolts counterclockwise, 1/4 of a turn ; If necessary, loosen the Screw (52), move the key and UNPLUG THE POWER CORD. move the Reed...
... b. When the walking belt is about 3 mm (1/8 in the power cord, insert the key, and carefully walk on the treadmill for a correct speed reading. b 5-7 cm Rear Roller Adjustment Bolts c. b. Plug in .). Use only a single-outlet surge suppressor that the gap between the Magnet and the Reed 52 ...walking belt still slows when walked on page 8. If the walking belt is properly tightened. 23 b Using the allen wrench, turn both rear roller adjustment bolts counterclockwise, 1/4 of a turn ; If necessary, loosen the Screw (52), move the key and UNPLUG THE POWER CORD. move the Reed...

Canadian English Manual
Page 24
...or to strengthen your pulse is near the bottom of the treadmill until your body uses easily accessible carbohydrate calories for exercise. The chart below shows recommended heart rates for energy. For aerobic exercise, adjust the speed and incline of your exercise until your goal ...-up to the nearest ten years). The following three parts: A Warm-up , increase the intensity of the treadmill until your cardiovascular system, the key to burn fat, adjust the speed and incline of rest between workouts. If your heart rate is in preparation for energy. A Cool-...
...or to strengthen your pulse is near the bottom of the treadmill until your body uses easily accessible carbohydrate calories for exercise. The chart below shows recommended heart rates for energy. For aerobic exercise, adjust the speed and incline of your exercise until your goal ...-up to the nearest ten years). The following three parts: A Warm-up , increase the intensity of the treadmill until your cardiovascular system, the key to burn fat, adjust the speed and incline of rest between workouts. If your heart rate is in preparation for energy. A Cool-...


