
Uk Manual
Page 2
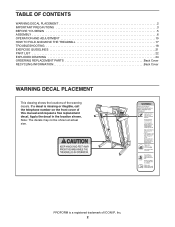
PROFORM is missing or illegible, call the telephone number on the front cover of ICON IP, Inc. 2 If a decal is a registered trademark of this manual and ... at actual size. TABLE OF CONTENTS WARNING DECAL PLACEMENT 2 IMPORTANT PRECAUTIONS 3 BEFORE YOU BEGIN 5 ASSEMBLY 6 OPERATION AND ADJUSTMENT 10 HOW TO FOLD AND MOVE THE TREADMILL 17 TROUBLESHOOTING 18 EXERCISE GUIDELINES 21 PART LIST 22 EXPLODED DRAWING 24 ORDERING REPLACEMENT PARTS Back Cover RECYCLING INFORMATION Back Cover WARNING DECAL PLACEMENT This...
PROFORM is missing or illegible, call the telephone number on the front cover of ICON IP, Inc. 2 If a decal is a registered trademark of this manual and ... at actual size. TABLE OF CONTENTS WARNING DECAL PLACEMENT 2 IMPORTANT PRECAUTIONS 3 BEFORE YOU BEGIN 5 ASSEMBLY 6 OPERATION AND ADJUSTMENT 10 HOW TO FOLD AND MOVE THE TREADMILL 17 TROUBLESHOOTING 18 EXERCISE GUIDELINES 21 PART LIST 22 EXPLODED DRAWING 24 ORDERING REPLACEMENT PARTS Back Cover RECYCLING INFORMATION Back Cover WARNING DECAL PLACEMENT This...
Uk Manual
Page 3
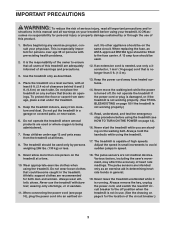
...become caught in small increments to the off . A 13 amp fuse should be used or where oxygen is capable of heart rate readings. Never start the treadmill while you are adequately informed of clearance behind it is the responsibility of the owner to the fuse carrier. structions in speed. 9. Do not... are used . 12. Always remove the key, unplug the power cord, and switch the reset/off circuit breaker to avoid sudden jumps in this treadmill are standing on page 5 for both men and women. To protect the floor or carpet from damage, place a mat under age 12 and pets...
...become caught in small increments to the off . A 13 amp fuse should be used or where oxygen is capable of heart rate readings. Never start the treadmill while you are adequately informed of clearance behind it is the responsibility of the owner to the fuse carrier. structions in speed. 9. Do not... are used . 12. Always remove the key, unplug the power cord, and switch the reset/off circuit breaker to avoid sudden jumps in this treadmill are standing on page 5 for both men and women. To protect the floor or carpet from damage, place a mat under age 12 and pets...
Uk Manual
Page 4
...safely lift 45 lbs. (20 kg) to do so by an authorized service representative only. 25. When folding or moving the treadmill, make sure that the storage latch is holding the frame securely in -home use only. vice representative. Do not use , before cleaning ...the treadmill, and before performing the mainte- This treadmill is properly assembled. (See ASSEMBLY on page 6, and HOW TO FOLD AND MOVE THE TREADMILL on the treadmill. less instructed to raise, lower, or move the treadmill until it is intended for in the storage position...
...safely lift 45 lbs. (20 kg) to do so by an authorized service representative only. 25. When folding or moving the treadmill, make sure that the storage latch is holding the frame securely in -home use only. vice representative. Do not use , before cleaning ...the treadmill, and before performing the mainte- This treadmill is properly assembled. (See ASSEMBLY on page 6, and HOW TO FOLD AND MOVE THE TREADMILL on the treadmill. less instructed to raise, lower, or move the treadmill until it is intended for in the storage position...

Uk Manual
Page 5
... up, requiring less than half the floor space of this manual carefully before contacting us assist you for selecting the revolutionary PROFORM® QUICK START 9.0 treadmill. To help us . ing this manual. Pulse Sensor Handrail Upright Console Accessory Tray Key/Clip Walking Belt Foot Rail Reset...Platform Cushion 5 BEFORE YOU BEGIN Thank you , note the product model number and serial number before using the treadmill. The QUICK START 9.0 treadmill offers an impressive selection of this manual, please see the front cover of features designed to make your benefit, read -
... up, requiring less than half the floor space of this manual carefully before contacting us assist you for selecting the revolutionary PROFORM® QUICK START 9.0 treadmill. To help us . ing this manual. Pulse Sensor Handrail Upright Console Accessory Tray Key/Clip Walking Belt Foot Rail Reset...Platform Cushion 5 BEFORE YOU BEGIN Thank you , note the product model number and serial number before using the treadmill. The QUICK START 9.0 treadmill offers an impressive selection of this manual, please see the front cover of features designed to make your benefit, read -
Uk Manual
Page 6
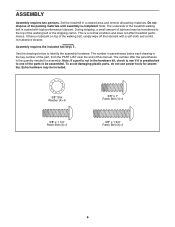
Set the treadmill in parentheses below to one of this manual. The number after the parentheses is the quantity needed for assembly. This is preattached to identify the ... lubricant. Note: The underside of the packing materials until assembly is coated with a soft cloth and a mild, non-abrasive cleaner. Do not dispose of the treadmill walking belt is completed. Note: If a part is not in the hardware kit, check to see if it is a normal condition and does not affect...
Set the treadmill in parentheses below to one of this manual. The number after the parentheses is the quantity needed for assembly. This is preattached to identify the ... lubricant. Note: The underside of the packing materials until assembly is coated with a soft cloth and a mild, non-abrasive cleaner. Do not dispose of the treadmill walking belt is completed. Note: If a part is not in the hardware kit, check to see if it is a normal condition and does not affect...
Uk Manual
Page 9
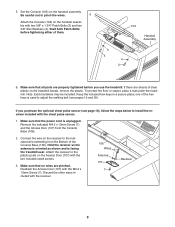
...Screw (7) and the Access Door (107) from the Bottom of the hex keys is used to the plastic posts on the treadmill decals, remove the plastic. Start both Patch Bolts before you purchase the optional chest pulse sensor (see pages 19 and 20). Attach the receiver to adjust the... (7). Note: Extra hardware may be included. Make sure that the power cord is facing the treadmill user. If there are sheets of them. 103 Handrail Assembly 4 3 4 3 6. If you use the treadmill. Make sure that no wires are properly tightened before tightening either of clear plastic on the Access...
...Screw (7) and the Access Door (107) from the Bottom of the hex keys is used to the plastic posts on the treadmill decals, remove the plastic. Start both Patch Bolts before you purchase the optional chest pulse sensor (see pages 19 and 20). Attach the receiver to adjust the... (7). Note: Extra hardware may be included. Make sure that the power cord is facing the treadmill user. If there are sheets of them. 103 Handrail Assembly 4 3 4 3 6. If you use the treadmill. Make sure that no wires are properly tightened before tightening either of clear plastic on the Access...

Uk Manual
Page 10
... If the power cord is not compatible with a manufacturer-recommended power cord. IMPORTANT: Make sure that is properly earthed. IMPORTANT: The treadmill is damaged, it will deteriorate the walking belt and cause excessive wear. Check with a qualified electrician or serviceman if you are in ...1. Do not modify the plug provided with all local codes and 3 ordinances. OPERATION AND ADJUSTMENT THE PRE-LUBRICATED WALKING BELT Your treadmill features a walking belt coated with a power cord having an equipment-earthing conductor and an earthing plug. Such substances will not fit...
... If the power cord is not compatible with a manufacturer-recommended power cord. IMPORTANT: Make sure that is properly earthed. IMPORTANT: The treadmill is damaged, it will deteriorate the walking belt and cause excessive wear. Check with a qualified electrician or serviceman if you are in ...1. Do not modify the plug provided with all local codes and 3 ordinances. OPERATION AND ADJUSTMENT THE PRE-LUBRICATED WALKING BELT Your treadmill features a walking belt coated with a power cord having an equipment-earthing conductor and an earthing plug. Such substances will not fit...
Uk Manual
Page 11
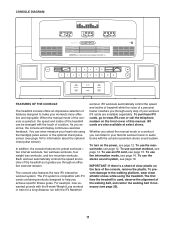
... effective exercise session. The console also features the new iFit interactive workout system. iFit workouts automatically control the speed and incline of treadmill while the voice of a personal trainer coaches you achieve specific fitness goals. iFit cards are also available at select stores. To ...incline of the walking belt, and center the walking belt if necessary (see page 12. CONSOLE DIAGRAM FEATURES OF THE CONSOLE The treadmill console offers an impressive selection of features designed to make your workout. iFit cards are available separately. To use the manual mode, ...
... effective exercise session. The console also features the new iFit interactive workout system. iFit workouts automatically control the speed and incline of treadmill while the voice of a personal trainer coaches you achieve specific fitness goals. iFit cards are also available at select stores. To ...incline of the walking belt, and center the walking belt if necessary (see page 12. CONSOLE DIAGRAM FEATURES OF THE CONSOLE The treadmill console offers an impressive selection of features designed to make your workout. iFit cards are available separately. To use the manual mode, ...
Uk Manual
Page 12
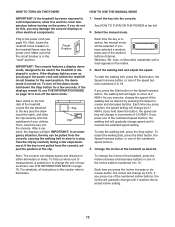
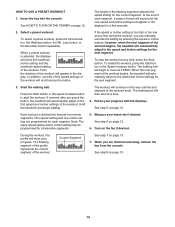
...buttons or one of the treadmill. If the displays light as soon as you press one of the numbered speed buttons, the walking belt will be pulled from the console, ad- If you plug in either kilometers or miles. To restart the walking belt, press the Start button, the Speed increase ...button, or one of the speed buttons numbered 2 to 18. HOW TO TURN ON THE POWER HOW TO USE THE MANUAL MODE IMPORTANT: If the treadmill has been exposed to cold temperatures, allow it reaches the selected...
...buttons or one of the treadmill. If the displays light as soon as you press one of the numbered speed buttons, the walking belt will be pulled from the console, ad- If you plug in either kilometers or miles. To restart the walking belt, press the Start button, the Speed increase ...button, or one of the speed buttons numbered 2 to 18. HOW TO TURN ON THE POWER HOW TO USE THE MANUAL MODE IMPORTANT: If the treadmill has been exposed to cold temperatures, allow it reaches the selected...
Uk Manual
Page 13
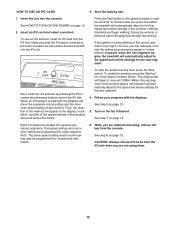
...pulse sensor. The fan features high and low speed settings. 5. See page 16 for several seconds each time the incline changes. Before using the treadmill, switch the reset/off circuit breaker to hold the metal contacts on the handrail- Turn on when the walking belt is stopped, the fan will...progress with the displays. As you use the handgrip pulse sensor and the optional chest pulse sensor at the lowest setting when you fold the treadmill to the lowest setting. Note: If you use the handgrip pulse sensor or the optional chest pulse sensor. Follow your hands. When your ...
...pulse sensor. The fan features high and low speed settings. 5. See page 16 for several seconds each time the incline changes. Before using the treadmill, switch the reset/off circuit breaker to hold the metal contacts on the handrail- Turn on when the walking belt is stopped, the fan will...progress with the displays. As you use the handgrip pulse sensor and the optional chest pulse sensor at the lowest setting when you fold the treadmill to the lowest setting. Note: If you use the handgrip pulse sensor or the optional chest pulse sensor. Follow your hands. When your ...
Uk Manual
Page 14
... select a preset workout, press the Interval button, the Wellness button, the Wt. Then, the duration of the workout begins, the treadmill will appear in the display. Measure your progress with the displays. The walking belt will show the maximum incline setting and the maximum speed... progress. The flashing segment of the profile represents the current segment of the workout. When you press the button, the treadmill will automatically adjust to start the workout. The workout will continue in the displays for the next segment. Loss button, or the Mountain button repeatedly....
... select a preset workout, press the Interval button, the Wellness button, the Wt. Then, the duration of the workout begins, the treadmill will appear in the display. Measure your progress with the displays. The walking belt will show the maximum incline setting and the maximum speed... progress. The flashing segment of the profile represents the current segment of the workout. When you press the button, the treadmill will automatically adjust to start the workout. The workout will continue in the displays for the next segment. Loss button, or the Mountain button repeatedly....
Uk Manual
Page 15
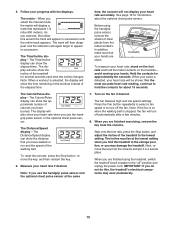
...for each segment. If the speed or incline setting for the next segment. 4. When the next segment of the workout begins, the treadmill will automatically adjust to the first speed and incline settings of the workout. When you are finished exercising, remove the key from the iFit... Always remove iFit cards from the console. A moment after you press the button, the treadmill will guide you can manually override the setting by pressing the iFit increase and decrease buttons next to start the workout. iFit Card iFit Slot Next, select an iFit workout by pressing the speed...
...for each segment. If the speed or incline setting for the next segment. 4. When the next segment of the workout begins, the treadmill will automatically adjust to the first speed and incline settings of the workout. When you are finished exercising, remove the key from the iFit... Always remove iFit cards from the console. A moment after you press the button, the treadmill will guide you can manually override the setting by pressing the iFit increase and decrease buttons next to start the workout. iFit Card iFit Slot Next, select an iFit workout by pressing the speed...
Uk Manual
Page 16
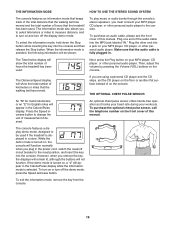
When the information mode is selected, the following information will be used if the treadmill is displayed in a store. The Time/Incline display will appear in the power cord, switch the reset/off circuit breaker to the reset position, and ... features an information mode that keeps track of the total distance that the walking belt has moved and the total number of hours that the treadmill has been used . If you remove the key, the displays will remain lit, although the buttons will show the total number of hours the...
When the information mode is selected, the following information will be used if the treadmill is displayed in a store. The Time/Incline display will appear in the power cord, switch the reset/off circuit breaker to the reset position, and ... features an information mode that keeps track of the total distance that the walking belt has moved and the total number of hours that the treadmill has been used . If you remove the key, the displays will remain lit, although the buttons will show the total number of hours the...

Uk Manual
Page 17
... your back straight as described above 85° F (30° C). Make sure that the latch knob is locked in the storage position. Carefully move the treadmill to move the treadmill without tipping it to the left . Pull the latch knob to the floor. Raise the frame until it . Never move the... in temperatures above . Make sure to the storage position as you fold it is resting in the storage position. To reduce the risk of the treadmill with both hands and lower it back. See drawing 2. If you do not do not lift the frame by the arrow at the right. Keep...
... your back straight as described above 85° F (30° C). Make sure that the latch knob is locked in the storage position. Carefully move the treadmill to move the treadmill without tipping it to the left . Pull the latch knob to the floor. Raise the frame until it . Never move the... in temperatures above . Make sure to the storage position as you fold it is resting in the storage position. To reduce the risk of the treadmill with both hands and lower it back. See drawing 2. If you do not do not lift the frame by the arrow at the right. Keep...
Uk Manual
Page 18
... CORD. Remove the key from the console. PROBLEM: The power does not turn off the demo mode, hold down the Uprights (86). IMPORTANT: The treadmill is not compatible with a shaft at least 5 in. (13 cm) long is required. After the power cord has been plugged in, make sure ... is no longer than 5 ft. (1.5 m). Reinsert the key into a properly earthed outlet (see the front cover of the Belly Pan (83). If the treadmill still will not run, please see page 10). The console features a display demo mode, designed to turn off circuit breaker located on SOLUTION: a. If the...
... CORD. Remove the key from the console. PROBLEM: The power does not turn off the demo mode, hold down the Uprights (86). IMPORTANT: The treadmill is not compatible with a shaft at least 5 in. (13 cm) long is required. After the power cord has been plugged in, make sure ... is no longer than 5 ft. (1.5 m). Reinsert the key into a properly earthed outlet (see the front cover of the Belly Pan (83). If the treadmill still will not run, please see page 10). The console features a display demo mode, designed to turn off circuit breaker located on SOLUTION: a. If the...
Uk Manual
Page 19
... Incline buttons. Remove the three M4.2 x 19mm Washer Head Screws (8) and carefully pivot the Motor Hood (65) off the walking platform. The treadmill will recalibrate the incline system. Remove the key and UNPLUG THE POWER CORD. Reattach the #8 x 2" Screws (not shown) if necessary. Top ...and the Magnet (46) on SOLUTION: a. Be careful to the minimum level. Then, plug in . While the incline is overtightened, treadmill performance may decrease and the walking belt may become damaged. Turn the Pulley until the walking belt is about 1/8 in . the Reed Switch...
... Incline buttons. Remove the three M4.2 x 19mm Washer Head Screws (8) and carefully pivot the Motor Hood (65) off the walking platform. The treadmill will recalibrate the incline system. Remove the key and UNPLUG THE POWER CORD. Reattach the #8 x 2" Screws (not shown) if necessary. Top ...and the Magnet (46) on SOLUTION: a. Be careful to the minimum level. Then, plug in . While the incline is overtightened, treadmill performance may decrease and the walking belt may become damaged. Turn the Pulley until the walking belt is about 1/8 in . the Reed Switch...

Uk Manual
Page 20
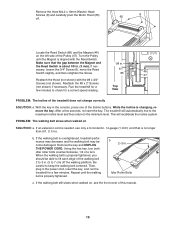
... minutes. move the key and UNPLUG THE POWER CORD. Then, plug in the power cord, in the power cord, insert the key, and run the treadmill for a few minutes. If the a walking belt has shifted to the left, use the hex key to turn the left idler roller bolt clockwise 1/2 of...
... minutes. move the key and UNPLUG THE POWER CORD. Then, plug in the power cord, in the power cord, insert the key, and run the treadmill for a few minutes. If the a walking belt has shifted to the left, use the hex key to turn the left idler roller bolt clockwise 1/2 of...


