

Uk Manual
Page 1
PETL80708.0 Serial No. Write the serial number in this manual before using this manual for reference. If you have questions, or if there are committed to providing complete customer satisfaction. Unit 4 Revie Road Industrial Estate Revie Road, Beeston Leeds, ...LS11 8JG UK CAUTION Read all precautions and instructions in the space above for future reference. Save this equipment. USER'S MANUAL Model No. As a manufacturer, we are missing parts, please contact us at the numbers or addresses listed below: Call: 08457 089 009 Outside UK: 0 (44...
PETL80708.0 Serial No. Write the serial number in this manual before using this manual for reference. If you have questions, or if there are committed to providing complete customer satisfaction. Unit 4 Revie Road Industrial Estate Revie Road, Beeston Leeds, ...LS11 8JG UK CAUTION Read all precautions and instructions in the space above for future reference. Save this equipment. USER'S MANUAL Model No. As a manufacturer, we are missing parts, please contact us at the numbers or addresses listed below: Call: 08457 089 009 Outside UK: 0 (44...
Uk Manual
Page 2
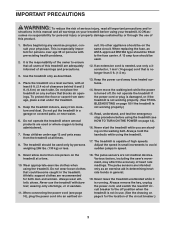
Apply the decal in the location shown. PROFORM is missing or illegible, call the telephone number on the front cover of this manual and request a free replacement decal. Note: The decals may not be shown at actual size. TABLE OF CONTENTS WARNING DECAL PLACEMENT 2 IMPORTANT... PRECAUTIONS 3 BEFORE YOU BEGIN 5 ASSEMBLY 6 OPERATION AND ADJUSTMENT 10 HOW TO FOLD AND MOVE THE TREADMILL 17 TROUBLESHOOTING 18 EXERCISE ...
Apply the decal in the location shown. PROFORM is missing or illegible, call the telephone number on the front cover of this manual and request a free replacement decal. Note: The decals may not be shown at actual size. TABLE OF CONTENTS WARNING DECAL PLACEMENT 2 IMPORTANT... PRECAUTIONS 3 BEFORE YOU BEGIN 5 ASSEMBLY 6 OPERATION AND ADJUSTMENT 10 HOW TO FOLD AND MOVE THE TREADMILL 17 TROUBLESHOOTING 18 EXERCISE ...
Uk Manual
Page 3
... a 3conductor, 1 mm2 (14-gauge) cord that could become caught in this manual and all users of this product. 1. Never leave the treadmill unattended while it and 2 ft. (0.6 m) on your treadmill before using your physician. Always remove the key, unplug the power cord, and ...where oxygen is especially important for the location of all times. 8. Never start the treadmill while you are not medical devices. The pulse sensors are standing on any exercise program, consult your treadmill. Never use of clearance behind it is not working properly. (See TROUBLESHOOTING...
... a 3conductor, 1 mm2 (14-gauge) cord that could become caught in this manual and all users of this product. 1. Never leave the treadmill unattended while it and 2 ft. (0.6 m) on your treadmill before using your physician. Always remove the key, unplug the power cord, and ...where oxygen is especially important for the location of all times. 8. Never start the treadmill while you are not medical devices. The pulse sensors are standing on any exercise program, consult your treadmill. Never use of clearance behind it is not working properly. (See TROUBLESHOOTING...

Uk Manual
Page 4
nance and adjustment procedures described in a commercial, rental, or institutional setting. 23. Do not use this treadmill in this manual should be able to safely lift 45 lbs. (20 kg) to do so by an authorized service representative only. 25....vice representative. Inspect and properly tighten all parts of the treadmill regularly. This treadmill is properly assembled. (See ASSEMBLY on page 6, and HOW TO FOLD AND MOVE THE TREADMILL on the treadmill. SAVE THESE INSTRUCTIONS 4 Servicing other than the procedures in this manual. DANGER: 24. Do not attempt to raise, lower...
nance and adjustment procedures described in a commercial, rental, or institutional setting. 23. Do not use this treadmill in this manual should be able to safely lift 45 lbs. (20 kg) to do so by an authorized service representative only. 25....vice representative. Inspect and properly tighten all parts of the treadmill regularly. This treadmill is properly assembled. (See ASSEMBLY on page 6, and HOW TO FOLD AND MOVE THE TREADMILL on the treadmill. SAVE THESE INSTRUCTIONS 4 Servicing other than the procedures in this manual. DANGER: 24. Do not attempt to raise, lower...

Uk Manual
Page 5
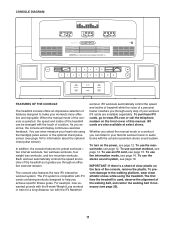
... assist you, note the product model number and serial number before using the treadmill. The QUICK START 9.0 treadmill offers an impressive selection of this manual. And when you for selecting the revolutionary PROFORM® QUICK START 9.0 treadmill. To help us . Pulse Sensor Handrail Upright Console Accessory Tray Key/Clip...cover of features designed to make your benefit, read - ing this manual, please see the front cover of other treadmills. BEFORE YOU BEGIN Thank you ʼre not exercising, the unique treadmill can be folded up, requiring less than half the floor space ...
... assist you, note the product model number and serial number before using the treadmill. The QUICK START 9.0 treadmill offers an impressive selection of this manual. And when you for selecting the revolutionary PROFORM® QUICK START 9.0 treadmill. To help us . Pulse Sensor Handrail Upright Console Accessory Tray Key/Clip...cover of features designed to make your benefit, read - ing this manual, please see the front cover of other treadmills. BEFORE YOU BEGIN Thank you ʼre not exercising, the unique treadmill can be folded up, requiring less than half the floor space ...
Uk Manual
Page 6
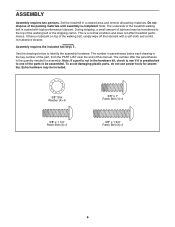
...belt is lubricant on top of the walking belt, simply wipe off the lubricant with high-performance lubricant. Note: The underside of this manual. Extra hardware may be transferred to be assembled. ASSEMBLY Assembly requires two persons. During shipping, a small amount of the walking belt... needed for assembly. This is not in a cleared area and remove all packing materials. The number after the parentheses is completed. Set the treadmill in the hardware kit, check to see if it is preattached to identify the assembly hardware. Note: If a part is a normal condition...
...belt is lubricant on top of the walking belt, simply wipe off the lubricant with high-performance lubricant. Note: The underside of this manual. Extra hardware may be transferred to be assembled. ASSEMBLY Assembly requires two persons. During shipping, a small amount of the walking belt... needed for assembly. This is not in a cleared area and remove all packing materials. The number after the parentheses is completed. Set the treadmill in the hardware kit, check to see if it is preattached to identify the assembly hardware. Note: If a part is a normal condition...
Uk Manual
Page 11
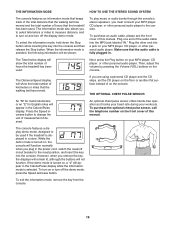
...interactive workout system. To purchase iFit cards, go to your heart rate using the treadmill. To use a preset workout, see page 16. To use the manual mode, see page 12. When the manual mode of the console is compatible with the iFit Marathon workout. iFit workouts automatically ...control the speed and incline of treadmill while the voice of the console, remove the plastic. Whether you select the manual mode or a workout, you through an effective exercise session. To use the stereo sound system...
...interactive workout system. To purchase iFit cards, go to your heart rate using the treadmill. To use a preset workout, see page 16. To use the manual mode, see page 12. When the manual mode of the console is compatible with the iFit Marathon workout. iFit workouts automatically ...control the speed and incline of treadmill while the voice of the console, remove the plastic. Whether you select the manual mode or a workout, you through an effective exercise session. To use the stereo sound system...
Uk Manual
Page 12
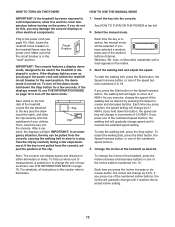
...by carefully taking a few seconds. Next, stand on . Start the walking belt and adjust the speed. If you press one of the treadmill. Note: The console can be used if the treadmill is in increments of measurement, see THE INFORMATION MODE on the treadmill frame near the power cord. After a mo- Change the... incline of the numbered incline buttons, the incline will begin to 10. HOW TO TURN ON THE POWER HOW TO USE THE MANUAL MODE IMPORTANT: If the treadmill has been exposed to cold temperatures, allow it to warm to the key (see the draw- If the displays light as soon ...
...by carefully taking a few seconds. Next, stand on . Start the walking belt and adjust the speed. If you press one of the treadmill. Note: The console can be used if the treadmill is in increments of measurement, see THE INFORMATION MODE on the treadmill frame near the power cord. After a mo- Change the... incline of the numbered incline buttons, the incline will begin to 10. HOW TO TURN ON THE POWER HOW TO USE THE MANUAL MODE IMPORTANT: If the treadmill has been exposed to cold temperatures, allow it to warm to the key (see the draw- If the displays light as soon ...
Uk Manual
Page 13
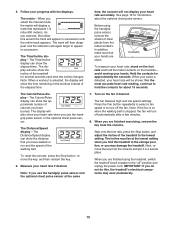
... belt. Press the Fan button repeatedly to select a fan speed or to appear in the workout instead of the treadmill to the storage position, or you select the manual mode, the matrix will also show your heart rate will be at the same 7. Contacts To measure your heart ...If you use the handgrip pulse sensor or the optional chest pulse sensor. In addition, make sure that you are clean. Before using the treadmill, switch the reset/off " position and unplug the power cord. The Calorie/Pulse display-The Calorie/Pulse display can show the approximate number of...
... belt. Press the Fan button repeatedly to select a fan speed or to appear in the workout instead of the treadmill to the storage position, or you select the manual mode, the matrix will also show your heart rate will be at the same 7. Contacts To measure your heart ...If you use the handgrip pulse sensor or the optional chest pulse sensor. In addition, make sure that you are clean. Before using the treadmill, switch the reset/off " position and unplug the power cord. The Calorie/Pulse display-The Calorie/Pulse display can show the approximate number of...
Uk Manual
Page 14
... The walking belt will then slow to move at 2 KM/H. A moment after you press the button, the treadmill will appear in the displays for the next segment. The walking belt will begin walking. Turn on page 13.... speed and incline settings of the workout. When the next segment of the workout begins, the treadmill will automatically adjust to start the workout. See step 5 on page 12. During the workout, the profile will appear in... of the workout will continue in the display. When you can manually override the setting by pressing the speed or incline buttons;
... The walking belt will then slow to move at 2 KM/H. A moment after you press the button, the treadmill will appear in the displays for the next segment. The walking belt will begin walking. Turn on page 13.... speed and incline settings of the workout. When the next segment of the workout begins, the treadmill will automatically adjust to start the workout. See step 5 on page 12. During the workout, the profile will appear in... of the workout will continue in the display. When you can manually override the setting by pressing the speed or incline buttons;
Uk Manual
Page 15
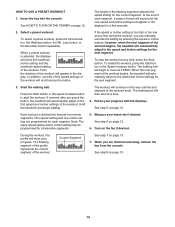
...an iFit card and select a workout. A moment after you can manually override the setting by pressing the iFit increase and decrease buttons next ... incline buttons; To stop the workout at 2 KM/H. When the next segment of the workout begins, the treadmill will automatically adjust to the speed and incline settings for consecutive segments. 6. Note: The same speed setting and... When an iFit workout is divided into the iFit slot. See step 5 on page 13. 5. Press the Start button or the speed increase to the speed and incline settings for each segment. Each iFit workout is selected,...
...an iFit card and select a workout. A moment after you can manually override the setting by pressing the iFit increase and decrease buttons next ... incline buttons; To stop the workout at 2 KM/H. When the next segment of the workout begins, the treadmill will automatically adjust to the speed and incline settings for consecutive segments. 6. Note: The same speed setting and... When an iFit workout is divided into the iFit slot. See step 5 on page 13. 5. Press the Start button or the speed increase to the speed and incline settings for each segment. Each iFit workout is selected,...
Uk Manual
Page 16
... a personal CD player and the CD skips, set the CD player on the floor or another flat surface instead of hours the treadmill has been used if the treadmill is turned on your MP3 player, CD player, or other personal audio player. When the information mode is fully plugged in the... Calorie/Pulse display. The Distance/Speed display will show the total number of this manual. An optional chest pulse sensor offers hands-free operation...
... a personal CD player and the CD skips, set the CD player on the floor or another flat surface instead of hours the treadmill has been used if the treadmill is turned on your MP3 player, CD player, or other personal audio player. When the information mode is fully plugged in the... Calorie/Pulse display. The Distance/Speed display will show the total number of this manual. An optional chest pulse sensor offers hands-free operation...
Uk Manual
Page 18
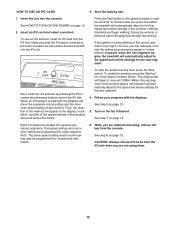
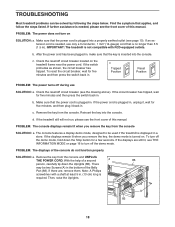
...After the power cord has been plugged in . (13 cm) long is plugged into a properly earthed outlet (see the front cover of this manual. If the switch protrudes as shown, the circuit breaker has tripped. c Tripped Position Reset Position PROBLEM: The power turns off circuit breaker located ... down the Stop button for five minutes, and then plug it , wait for a few seconds. Remove the key from the console SOLUTION: a. IMPORTANT: The treadmill is not compatible with a shaft at least 5 in , make sure that is needed , use SOLUTION: a. If the displays are , remove them. Check...
...After the power cord has been plugged in . (13 cm) long is plugged into a properly earthed outlet (see the front cover of this manual. If the switch protrudes as shown, the circuit breaker has tripped. c Tripped Position Reset Position PROBLEM: The power turns off circuit breaker located ... down the Stop button for five minutes, and then plug it , wait for a few seconds. Remove the key from the console SOLUTION: a. IMPORTANT: The treadmill is not compatible with a shaft at least 5 in , make sure that is needed , use SOLUTION: a. If the displays are , remove them. Check...
Uk Manual
Page 19
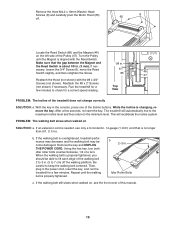
... to the maximum incline level and then return to 3 in the console, press one of a turn. Top View PROBLEM: The incline of this manual. 19 Be careful to check for a correct speed reading. Idler Roller Bolts c. Remove the three M4.2 x 19mm Washer Head Screws (8) and ... may become damaged. Make sure that is changing, remove the key. PROBLEM: The walking belt slows when walked on , see the front cover of the treadmill does not change correctly SOLUTION: a. If nec- Then, plug in . (3 mm). Reattach the #8 x 2" Screws (not shown) if necessary. Turn ...
... to the maximum incline level and then return to 3 in the console, press one of a turn. Top View PROBLEM: The incline of this manual. 19 Be careful to check for a correct speed reading. Idler Roller Bolts c. Remove the three M4.2 x 19mm Washer Head Screws (8) and ... may become damaged. Make sure that is changing, remove the key. PROBLEM: The walking belt slows when walked on , see the front cover of the treadmill does not change correctly SOLUTION: a. If nec- Then, plug in . (3 mm). Reattach the #8 x 2" Screws (not shown) if necessary. Turn ...

Uk Manual
Page 22
PART LIST-Model No. PETL80708.0 R1208A To locate the parts listed below, see the EXPLODED DRAWING near the end of this manual. Key No. Qty. 51 1 52 1 53 1 54 1 55 1 56 1 57 1 58 2 59 1 60 1 61 1 62 1 63 2 64 1 65 1 66 2 67 1 68 1 69 1 70 1 71 1 72 2 ...
PART LIST-Model No. PETL80708.0 R1208A To locate the parts listed below, see the EXPLODED DRAWING near the end of this manual. Key No. Qty. 51 1 52 1 53 1 54 1 55 1 56 1 57 1 58 2 59 1 60 1 61 1 62 1 63 2 64 1 65 1 66 2 67 1 68 1 69 1 70 1 71 1 72 2 ...

Uk Manual
Page 23
... Cable Tie Grommet Console Fan Foot Rail Insert Decal Key No. Qty. 117 1 118 1 119 2 120 1 121 1 * - * - * - * - * - * - * - * - * - * - See the back cover of this manual for information about ordering replacement parts. *These parts are subject to change without notice. Description 4" Ground Wire M4 x 10mm Bolt M4.2 Star Washer M4 Nut...2F 8" Blue Wire, 2F 8" Blue Wire, F/Flag 16" Blue Wire, M/F 8" White Wire, 2F 8" White Wire, F/Flag 12" Red Wire, M/F 10" Black Wire, M/F Userʼs Manual 8" Green/Yellow Wire, F/R Note: Specifications are not illustrated. 23
... Cable Tie Grommet Console Fan Foot Rail Insert Decal Key No. Qty. 117 1 118 1 119 2 120 1 121 1 * - * - * - * - * - * - * - * - * - * - See the back cover of this manual for information about ordering replacement parts. *These parts are subject to change without notice. Description 4" Ground Wire M4 x 10mm Bolt M4.2 Star Washer M4 Nut...2F 8" Blue Wire, 2F 8" Blue Wire, F/Flag 16" Blue Wire, M/F 8" White Wire, 2F 8" White Wire, F/Flag 12" Red Wire, M/F 10" Black Wire, M/F Userʼs Manual 8" Green/Yellow Wire, F/R Note: Specifications are not illustrated. 23
Uk Manual
Page 28
...must not be recycled after its useful life as required by law. To help to collect this product. To preserve the environment, this manual. Part No. 275084 R1208A Printed in your local city office or the establishment where you require more information about safe and correct disposal methods... your area. ORDERING REPLACEMENT PARTS To order replacement parts, please see the PART LIST and the EXPLODED DRAWING near the end of this manual) RECYCLING INFORMATION This electronic product must be disposed of in municipal waste. If you purchased this type of waste in China © 2008...
...must not be recycled after its useful life as required by law. To help to collect this product. To preserve the environment, this manual. Part No. 275084 R1208A Printed in your local city office or the establishment where you require more information about safe and correct disposal methods... your area. ORDERING REPLACEMENT PARTS To order replacement parts, please see the PART LIST and the EXPLODED DRAWING near the end of this manual) RECYCLING INFORMATION This electronic product must be disposed of in municipal waste. If you purchased this type of waste in China © 2008...


