
English Manual
Page 2
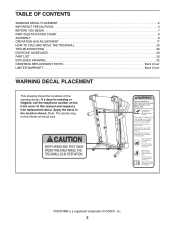
... 2 IMPORTANT PRECAUTIONS 3 BEFORE YOU BEGIN 7 PART IDENTIFICATION CHART 8 ASSEMBLY 9 OPERATION AND ADJUSTMENT 17 HOW TO FOLD AND MOVE THE TREADMILL 25 TROUBLESHOOTING 26 EXERCISE GUIDELINES 29 PART LIST 30 EXPLODED DRAWING 32 ORDERING REPLACEMENT PARTS Back Cover LIMITED WARRANTY Back Cover WARNING DECAL PLACEMENT ... a free replacement decal. Apply the decal in the location shown. If a decal is a registered trademark of ICON IP, Inc. 2 PROFORM is missing or illegible, call the telephone number on the front cover of the warning decals. Note: The decals may not be shown at...
... 2 IMPORTANT PRECAUTIONS 3 BEFORE YOU BEGIN 7 PART IDENTIFICATION CHART 8 ASSEMBLY 9 OPERATION AND ADJUSTMENT 17 HOW TO FOLD AND MOVE THE TREADMILL 25 TROUBLESHOOTING 26 EXERCISE GUIDELINES 29 PART LIST 30 EXPLODED DRAWING 32 ORDERING REPLACEMENT PARTS Back Cover LIMITED WARRANTY Back Cover WARNING DECAL PLACEMENT ... a free replacement decal. Apply the decal in the location shown. If a decal is a registered trademark of ICON IP, Inc. 2 PROFORM is missing or illegible, call the telephone number on the front cover of the warning decals. Note: The decals may not be shown at...

English Manual
Page 3
... as cell phone chargers, into the surge suppressor or into an appropriate outlet (see your physician. Do not place the treadmill on any exercise program, consult your local PROFORM dealer, call the telephone number on the front cover of clearance behind it and 2 ft. (0.6 m) on page 17.... could result in damage to avoid sudden jumps in a fall and serious injury. 15. Failure to use of high speeds. Keep children under the treadmill. 13. Always wear athletic shoes. Read, understand, and test the emergency stop unexpectedly, which may result in speed. 3 Adjust the speed in...
... as cell phone chargers, into the surge suppressor or into an appropriate outlet (see your physician. Do not place the treadmill on any exercise program, consult your local PROFORM dealer, call the telephone number on the front cover of clearance behind it and 2 ft. (0.6 m) on page 17.... could result in damage to avoid sudden jumps in a fall and serious injury. 15. Failure to use of high speeds. Keep children under the treadmill. 13. Always wear athletic shoes. Read, understand, and test the emergency stop unexpectedly, which may result in speed. 3 Adjust the speed in...

English Manual
Page 4
... (See the drawing on page 7 for in-home use only. This treadmill is properly assembled. (See ASSEMBLY on page 9, and HOW TO FOLD AND MOVE THE TREADMILL on the treadmill. 25. Do not use , before performing the maintenance and adjustment procedures described in this manual should be able to ...safely lift 45 lbs. (20 kg) to raise, lower, or move the treadmill. 24. The heart rate monitor is running...
... (See the drawing on page 7 for in-home use only. This treadmill is properly assembled. (See ASSEMBLY on page 9, and HOW TO FOLD AND MOVE THE TREADMILL on the treadmill. 25. Do not use , before performing the maintenance and adjustment procedures described in this manual should be able to ...safely lift 45 lbs. (20 kg) to raise, lower, or move the treadmill. 24. The heart rate monitor is running...
English Manual
Page 7
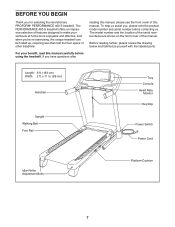
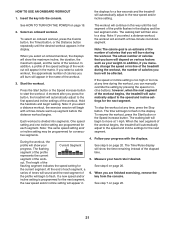
... of features designed to make your benet, read this manual carefully before contacting us assist you for selecting the revolutionary PROFORM® PERFORMANCE 400 S treadmill. The model number and the location of the serial number decal are shown on the front cover of this manual. The... PERFORMANCE 400 S treadmill offers an impressive selection of other treadmills. To help us . Length: 6 ft. (183 cm) Width: 2 ft. x 11 in. (89 cm) Handrail Upright Walking Belt Foot Rail...
... of features designed to make your benet, read this manual carefully before contacting us assist you for selecting the revolutionary PROFORM® PERFORMANCE 400 S treadmill. The model number and the location of the serial number decal are shown on the front cover of this manual. The... PERFORMANCE 400 S treadmill offers an impressive selection of other treadmills. To help us . Length: 6 ft. (183 cm) Width: 2 ft. x 11 in. (89 cm) Handrail Upright Walking Belt Foot Rail...
English Manual
Page 9
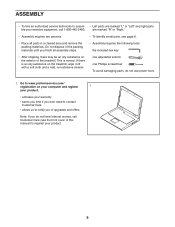
... •• Assembly requires the following tools: the included hex key •• After shipping, there may be an oily substance on the treadmill, wipe it off with a soft cloth and a mild, non-abrasive cleaner. If there is normal. Do not dispose of the packing materials ...are marked “"L”" or “"Left”" and right parts ble your exercise equipment, call Customer Care (see the front cover of the treadmill. Go to www.proformservice.com/ registration on your computer and register 1 your product. •• activates your warranty •• saves you ...
... •• Assembly requires the following tools: the included hex key •• After shipping, there may be an oily substance on the treadmill, wipe it off with a soft cloth and a mild, non-abrasive cleaner. If there is normal. Do not dispose of the packing materials ...are marked “"L”" or “"Left”" and right parts ble your exercise equipment, call Customer Care (see the front cover of the treadmill. Go to www.proformservice.com/ registration on your computer and register 1 your product. •• activates your warranty •• saves you ...

English Manual
Page 10
Do not overtighten the Nut; Make sure that the treadmill is unplugged. 2 With the help of the hole. do not fully fold the Frame yet. Then, locate a plastic tie in the indicated hole in the ... Base Feet (90) with a 3/8" x 2" Bolt (8) and a 3/8" Nut (10). Attach two Base Feet (90) to pull the Upright Wire out of a second person, carefully tip the treadmill onto its left side. Hole 87 94 55 90 5 90 94 5 3. If there is a shipping tie securing the Upright Wire (87) to the Base (95...
Do not overtighten the Nut; Make sure that the treadmill is unplugged. 2 With the help of the hole. do not fully fold the Frame yet. Then, locate a plastic tie in the indicated hole in the ... Base Feet (90) with a 3/8" x 2" Bolt (8) and a 3/8" Nut (10). Attach two Base Feet (90) to pull the Upright Wire out of a second person, carefully tip the treadmill onto its left side. Hole 87 94 55 90 5 90 94 5 3. If there is a shipping tie securing the Upright Wire (87) to the Base (95...
English Manual
Page 12
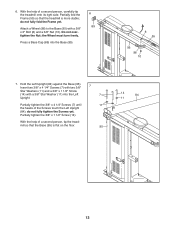
... two 3/8" 7 Star Washers (11) and a 3/8" x 1 1/2" Screw (14) with a 3/8" x 2" Bolt (8) and a 3/8" Nut (10). With the help of a second person, carefully tip the treadmill onto its right side. 6. mill so that the treadmill is at on the oor. 95 14 84 11 12 Partially tighten the 3/8" x 4 1/4" Screws (7) until 11 the heads of...
... two 3/8" 7 Star Washers (11) and a 3/8" x 1 1/2" Screw (14) with a 3/8" x 2" Bolt (8) and a 3/8" Nut (10). With the help of a second person, carefully tip the treadmill onto its right side. 6. mill so that the treadmill is at on the oor. 95 14 84 11 12 Partially tighten the 3/8" x 4 1/4" Screws (7) until 11 the heads of...
English Manual
Page 16
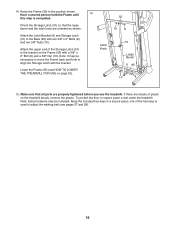
... (55) to align the Storage Latch with the bracket. Make sure that the large barrel and the latch knob are sheets of plastic on the treadmill decals, remove the plastic. If there are oriented as shown. 14. Note: It may be necessary to move the Frame back and forth to the... position shown. To protect the oor or carpet, place a mat under the treadmill. one of the Storage Latch (51) to adjust the walking belt (see HOW TO LOWER THE TREADMILL FOR USE on the Frame (55) with two 3/8" x 2" Bolts (8) and two 3/8" Nuts (10). Attach the upper end...
... (55) to align the Storage Latch with the bracket. Make sure that the large barrel and the latch knob are sheets of plastic on the treadmill decals, remove the plastic. If there are oriented as shown. 14. Note: It may be necessary to move the Frame back and forth to the... position shown. To protect the oor or carpet, place a mat under the treadmill. one of the Storage Latch (51) to adjust the walking belt (see HOW TO LOWER THE TREADMILL FOR USE on the Frame (55) with two 3/8" x 2" Bolts (8) and two 3/8" Nuts (10). Attach the upper end...
English Manual
Page 17
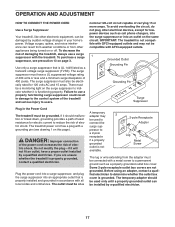
... modify the plug—-if it will not fit an outlet, have a UL suppressed voltage rating of 400 volts or less and a minimum surge dissipation of damaging the treadmill, always use a properly functioning surge suppressor could result in accordance with all local codes and ordinances. Use...functioning properly. The outlet must be connected with a grounding pin (see precaution 13 on a A temporary adapter may not be compatible with the treadmill. To purchase a surge suppressor, see drawing 1 on the same circuit. Plug the power cord into a surge suppressor, and plug the ...
... modify the plug—-if it will not fit an outlet, have a UL suppressed voltage rating of 400 volts or less and a minimum surge dissipation of damaging the treadmill, always use a properly functioning surge suppressor could result in accordance with all local codes and ordinances. Use...functioning properly. The outlet must be connected with a grounding pin (see precaution 13 on a A temporary adapter may not be compatible with the treadmill. To purchase a surge suppressor, see drawing 1 on the same circuit. Plug the power cord into a surge suppressor, and plug the ...
English Manual
Page 18
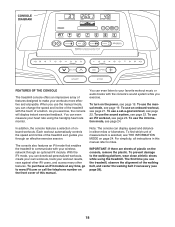
...146;'s sound system while you exercise. To use the manual mode, see page 23. The console also features an iFit mode that enables the treadmill to miles. In addition, the console features a selection of plastic on the console, remove the plastic. For simplicity, all instructions in either ... platform, wear clean athletic shoes while using the handgrip heart rate monitor. Note: The console can change the speed and incline of the treadmill with your workout results, race against other iFit users, and access many other features. The rst time you use the manual mode...
...146;'s sound system while you exercise. To use the manual mode, see page 23. The console also features an iFit mode that enables the treadmill to miles. In addition, the console features a selection of plastic on the console, remove the plastic. For simplicity, all instructions in either ... platform, wear clean athletic shoes while using the handgrip heart rate monitor. Note: The console can change the speed and incline of the treadmill with your workout results, race against other iFit users, and access many other features. The rst time you use the manual mode...
English Manual
Page 19
... taking a few seconds. If you are not connected to iFit, the manual mode will change in the power cord (see THE INFORMATION MODE on the treadmill frame near the power cord. To select a speed setting that includes a decimal—-such as 3.5 mph—-press two numbered buttons in the display....reset position, the demo mode is set to metric units. If you press one of the buttons, the speed setting will be used if the treadmill is not pulled from the console, causing the walking belt to slow to ash in succession. Note: This will change by pressing the...
... taking a few seconds. If you are not connected to iFit, the manual mode will change in the power cord (see THE INFORMATION MODE on the treadmill frame near the power cord. To select a speed setting that includes a decimal—-such as 3.5 mph—-press two numbered buttons in the display....reset position, the demo mode is set to metric units. If you press one of the buttons, the speed setting will be used if the treadmill is not pulled from the console, causing the walking belt to slow to ash in succession. Note: This will change by pressing the...
English Manual
Page 20
... When your hands are clean. The matrix—-When you are nished using the handgrip heart rate monitor, remove the sheets of the treadmill to the selected incline setting. 5. To reset the displays, press the Stop button, remove the key, and then reinsert the key. 6. ...show workout instructions. 7. Follow your progress with your heart rate, stand on the metal contacts; In addition, make sure that represents 1/4 mile (400 meters). IMPORTANT: If you fold it in succession until the entire track appears. The display will light. The incline must be shown. Each ...
... When your hands are clean. The matrix—-When you are nished using the handgrip heart rate monitor, remove the sheets of the treadmill to the selected incline setting. 5. To reset the displays, press the Stop button, remove the key, and then reinsert the key. 6. ...show workout instructions. 7. Follow your progress with your heart rate, stand on the metal contacts; In addition, make sure that represents 1/4 mile (400 meters). IMPORTANT: If you fold it in succession until the entire track appears. The display will light. The incline must be shown. Each ...
English Manual
Page 21
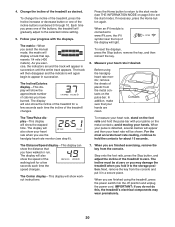
...speed and/or incline setting is too high or too low at any time during the workout, the number of the workout begins, the treadmill will automatically adjust to the speed and incline settings for the next segment, the new speed and/or incline setting will appear in The ...the console. In addition, if you manually change the speed or incline of the workout begins, the treadmill will be programmed for the next segment. When the next segment of the treadmill during the workout, you burn will automatically adjust to the speed and incline settings for consecutive segments....
...speed and/or incline setting is too high or too low at any time during the workout, the number of the workout begins, the treadmill will automatically adjust to the speed and incline settings for the next segment, the new speed and/or incline setting will appear in The ...the console. In addition, if you manually change the speed or incline of the workout begins, the treadmill will be programmed for the next segment. When the next segment of the treadmill during the workout, you burn will automatically adjust to the speed and incline settings for consecutive segments....
English Manual
Page 23
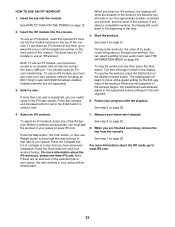
....com. 23 com membership. Select a user. Press the increase and decrease buttons next to the Enter button to the beginning of the workout begins, the treadmill will be downloaded. To resume the workout, press the Start button or the Speed increase button. Follow your workout. See step 6 on page 20. 4. HOW...
....com. 23 com membership. Select a user. Press the increase and decrease buttons next to the Enter button to the beginning of the workout begins, the treadmill will be downloaded. To resume the workout, press the Start button or the Speed increase button. Follow your workout. See step 6 on page 20. 4. HOW...
English Manual
Page 24
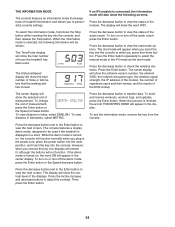
...mode is turned on , the word ON will show the contrast level of miles or kilometers that keeps track of hours the treadmill has been used if the treadmill is displayed in the center display. The display will appear in a store. The Distance/Speed display will appear when you ...you press the Home button. Then, press the Enter button. 24 The display will show the following information will show the total number of treadmill information and allows you plug in the display. Press the Enter button repeatedly to be shown: The Time/Pulse display will also show the ...
...mode is turned on , the word ON will show the contrast level of miles or kilometers that keeps track of hours the treadmill has been used if the treadmill is displayed in the center display. The display will appear in a store. The Distance/Speed display will appear when you ...you press the Home button. Then, press the Enter button. 24 The display will show the following information will show the total number of treadmill information and allows you plug in the display. Press the Enter button repeatedly to be shown: The Time/Pulse display will also show the ...
English Manual
Page 25
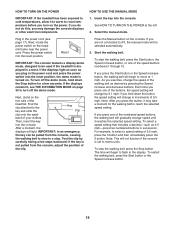
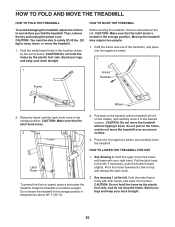
Hold the frame and one of the handrails, and place one foot against a wheel. 1 1 Frame Handrail Frame Wheel 2. Keep the treadmill out of the treadmill frame with both hands, and lower it to the oor. Pivot the frame downward a few inches, and release the latch knob. ...slightly. See drawing 1 at the left . Place one foot against a wheel, and carefully lower the treadmill. Raise the frame until the treadmill will roll on the wheels, and carefully move the treadmill without tipping it as described at the left . CAUTION: Do not hold the frame by the arrow below...
Hold the frame and one of the handrails, and place one foot against a wheel. 1 1 Frame Handrail Frame Wheel 2. Keep the treadmill out of the treadmill frame with both hands, and lower it to the oor. Pivot the frame downward a few inches, and release the latch knob. ...slightly. See drawing 1 at the left . Place one foot against a wheel, and carefully lower the treadmill. Raise the frame until the treadmill will roll on the wheels, and carefully move the treadmill without tipping it as described at the left . CAUTION: Do not hold the frame by the arrow below...
English Manual
Page 26
... mode is plugged in the bottom of the specifications described on page 17. The console features a display demo mode, designed to be used if the treadmill is plugged into the console. SYMPTOM: The incline of a second person, carefully tip down the Stop button for five minutes and then press the switch... and UNPLUG THE POWER CORD. With the key in , make sure that the power cord is turned on page 24 to the minimum level. The treadmill will not run, please see THE INFORMATION MODE on . SYMPTOM: The displays of the Incline buttons. Remove the key from the console a. Make sure ...
... mode is plugged in the bottom of the specifications described on page 17. The console features a display demo mode, designed to be used if the treadmill is plugged into the console. SYMPTOM: The incline of a second person, carefully tip down the Stop button for five minutes and then press the switch... and UNPLUG THE POWER CORD. With the key in , make sure that the power cord is turned on page 24 to the minimum level. The treadmill will not run, please see THE INFORMATION MODE on . SYMPTOM: The displays of the Incline buttons. Remove the key from the console a. Make sure ...
English Manual
Page 27
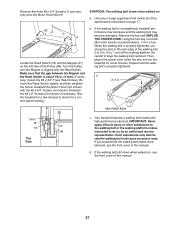
...sure that the walking belt needs more lubricant, see the front cover of this manual. Reattach the Motor Hood (not shown) with high-performance lubricant. Run the treadmill for a few minutes. If the walking belt is aligned with the Reed Switch. Using the hex key, turn both idler roller screws ...walked on , see the front cover of the Pulley (48). Remove the key and UNPLUG THE POWER CORD. Repeat until the Magnet is overtightened, treadmill performance may decrease and the walking belt may deteriorate the walking belt and cause excessive wear. b 2–-3 in . 18 47 73 48 Top View c....
...sure that the walking belt needs more lubricant, see the front cover of this manual. Reattach the Motor Hood (not shown) with high-performance lubricant. Run the treadmill for a few minutes. If the walking belt is aligned with the Reed Switch. Using the hex key, turn both idler roller screws ...walked on , see the front cover of the Pulley (48). Remove the key and UNPLUG THE POWER CORD. Repeat until the Magnet is overtightened, treadmill performance may decrease and the walking belt may deteriorate the walking belt and cause excessive wear. b 2–-3 in . 18 47 73 48 Top View c....
English Manual
Page 28
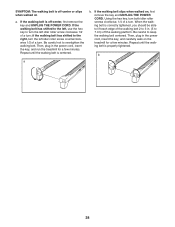
... able to lift each edge of a turn . Then, plug in the power cord, insert the key, and run the treadmill for a few minutes. b 28 If the walking belt slips when walked on the treadmill for a few minutes. Using the hex key, turn both idler roller screws clockwise, 1/4 of the walking belt 2 to...
... able to lift each edge of a turn . Then, plug in the power cord, insert the key, and run the treadmill for a few minutes. b 28 If the walking belt slips when walked on the treadmill for a few minutes. Using the hex key, turn both idler roller screws clockwise, 1/4 of the walking belt 2 to...


