
English Manual
Page 2
... a time. 9. Wear appropriate exercise clothes when using the treadmill. Do not wear loose clothes that blocks air openings. When connecting the power cord (see your local PROFORM dealer or call 1-888-5331333 and order part number 146148, or see page 8), plug the power cord into a ... shoes. TABLE OF CONTENTS IMPORTANT PRECAUTIONS 2 BEFORE YOU BEGIN 4 ASSEMBLY 5 OPERATION AND ADJUSTMENT 8 HOW TO FOLD AND MOVE THE TREADMILL 21 TROUBLESHOOTING 22 CONDITIONING GUIDELINES 24 PART LIST 26 ORDERING REPLACEMENT PARTS Back Cover LIMITED WARRANTY Back Cover Note: An EXPLODED DRAWING is ...
... a time. 9. Wear appropriate exercise clothes when using the treadmill. Do not wear loose clothes that blocks air openings. When connecting the power cord (see your local PROFORM dealer or call 1-888-5331333 and order part number 146148, or see page 8), plug the power cord into a ... shoes. TABLE OF CONTENTS IMPORTANT PRECAUTIONS 2 BEFORE YOU BEGIN 4 ASSEMBLY 5 OPERATION AND ADJUSTMENT 8 HOW TO FOLD AND MOVE THE TREADMILL 21 TROUBLESHOOTING 22 CONDITIONING GUIDELINES 24 PART LIST 26 ORDERING REPLACEMENT PARTS Back Cover LIMITED WARRANTY Back Cover Note: An EXPLODED DRAWING is ...

English Manual
Page 3
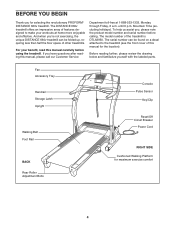
...iFIT.com programs, you are not using iFIT.com programs, an electronic "chirping" sound will change to raise, lower, or move the treadmill. 24. This is running. Inspect and properly tighten all parts of 35 or persons with pre-existing health problems. Read all instructions .... Always unplug the power cord immediately after use this product. 3 vice representative. Never insert any object into any exercise program, consult your treadmill. SAVE THESE INSTRUCTIONS WARNING: Before beginning this manual. Note: The decals are standing on page 4 for the "chirp" and be able ...
...iFIT.com programs, you are not using iFIT.com programs, an electronic "chirping" sound will change to raise, lower, or move the treadmill. 24. This is running. Inspect and properly tighten all parts of 35 or persons with pre-existing health problems. Read all instructions .... Always unplug the power cord immediately after use this product. 3 vice representative. Never insert any object into any exercise program, consult your treadmill. SAVE THESE INSTRUCTIONS WARNING: Before beginning this manual. Note: The decals are standing on page 4 for the "chirp" and be able ...
English Manual
Page 4
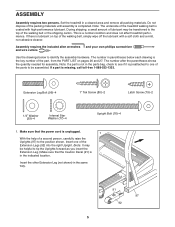
... more enjoyable and effective. The model number of other treadmills. Before reading further, please review the drawing below and familiarize yourself with the labeled parts. And when you for selecting the revolutionary PROFORM® DISTANCE 660v treadmill. until 6 p.m. The serial number can be found... on a decal attached to the treadmill (see the front cover of features designed to make your benefit, read this...
... more enjoyable and effective. The model number of other treadmills. Before reading further, please review the drawing below and familiarize yourself with the labeled parts. And when you for selecting the revolutionary PROFORM® DISTANCE 660v treadmill. until 6 p.m. The serial number can be found... on a decal attached to the treadmill (see the front cover of features designed to make your benefit, read this...
English Manual
Page 5
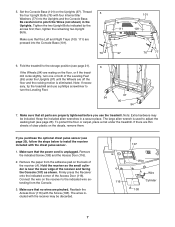
...: The underside of the packing materials until assembly is missing, call toll-free 1-888-533-1333. If a part is completed. Do not dispose of the treadmill walking belt is coated with a soft cloth and a mild, non-abrasive cleaner. This is lubricant on pages 26 and 27. Note: If a part is not... Decal (91) is the key number of the part, from the PART LIST on top of the walking belt or the shipping carton. Set the treadmill in the same way. 91 97 92 5 The number in the indicated location. If there is a normal condition and does not affect...
...: The underside of the packing materials until assembly is missing, call toll-free 1-888-533-1333. If a part is completed. Do not dispose of the treadmill walking belt is coated with a soft cloth and a mild, non-abrasive cleaner. This is lubricant on pages 26 and 27. Note: If a part is not... Decal (91) is the key number of the part, from the PART LIST on top of the walking belt or the shipping carton. Set the treadmill in the same way. 91 97 92 5 The number in the indicated location. If there is a normal condition and does not affect...
English Manual
Page 7
... walking belt (see page 23). If the Wheels (94) are thin sheets of clear plastic on the back of the Leveling Feet (95) under the treadmill. Make sure that the Left and Right Trays (109, 111) are off the floor and the rocking motion is unplugged. 5. Remove the indicated Screw (108...) and the Access Door (116). 2. Hold the receiver so the small cylinder is used to pinch the Wires (not shown) in a secure place. Fold the treadmill to the storage position (see page 20), follow the steps below to the indicated wire extending from the adhesive pad on the decals, remove them...
... walking belt (see page 23). If the Wheels (94) are thin sheets of clear plastic on the back of the Leveling Feet (95) under the treadmill. Make sure that the Left and Right Trays (109, 111) are off the floor and the rocking motion is unplugged. 5. Remove the indicated Screw (108...) and the Access Door (116). 2. Hold the receiver so the small cylinder is used to pinch the Wires (not shown) in a secure place. Fold the treadmill to the storage position (see page 20), follow the steps below to the indicated wire extending from the adhesive pad on the decals, remove them...
English Manual
Page 8
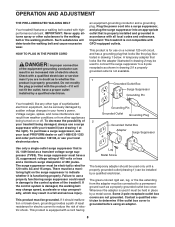
... Grounding Plug Grounded Outlet Box Adapter Surge Suppressor Use only a single-outlet surge suppressor that is properly installed and grounded in your treadmill (see your treadmill being turned on a nominal 120-volt circuit, and has a grounding plug that looks like any other type of electric shock.... from other substances to a permanent ground such as a transient voltage surge suppressor (TVSS). To purchase a surge suppressor, see your local PROFORM dealer or call 1-888-533-1333 and order part number 146148, or see drawing 1 at the right). If it should be held ...
... Grounding Plug Grounded Outlet Box Adapter Surge Suppressor Use only a single-outlet surge suppressor that is properly installed and grounded in your treadmill (see your treadmill being turned on a nominal 120-volt circuit, and has a grounding plug that looks like any other type of electric shock.... from other substances to a permanent ground such as a transient voltage surge suppressor (TVSS). To purchase a surge suppressor, see your local PROFORM dealer or call 1-888-533-1333 and order part number 146148, or see drawing 1 at the right). If it should be held ...

English Manual
Page 9
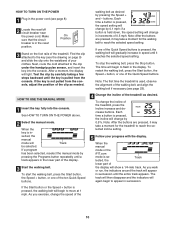
...feedback. See www.iFIT.com for more information. To use the manual mode of the console, follow the steps beginning on the face of the treadmill can even measure your home. Having iFIT.com technology is selected, the speed and incline of the console, remove it. highenergy music provides added ... program automatically controls the speed and incline of your workouts. Note: You must wear the optional chest pulse sensor to www.iFIT.com. With the treadmill connected to your computer, you can also go to use an iFIT.com MP3, CD, or video program, see page 19. 9 Using a stereo ...
...feedback. See www.iFIT.com for more information. To use the manual mode of the console, follow the steps beginning on the face of the treadmill can even measure your home. Having iFIT.com technology is selected, the speed and incline of the console, remove it. highenergy music provides added ... program automatically controls the speed and incline of your workouts. Note: You must wear the optional chest pulse sensor to www.iFIT.com. With the treadmill connected to your computer, you can also go to use an iFIT.com MP3, CD, or video program, see page 19. 9 Using a stereo ...
English Manual
Page 10
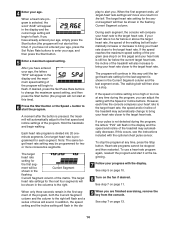
...gradually increase in speed until the entire track appears. If the Start button or the Speed + button is in- Note: The first time the treadmill is se- When the manual mode or the iFIT.com mode is used, observe the alignment of the walking belt, and align the walking ...will show a 1/4-mile track. To change in the display. Note: After the buttons are pressed, it may take a moment for the treadmill to flash in increments of the treadmill, press the Incline increase and decrease buttons. Track lected, the lower part of the display. 3 Start the walking belt. As you ...
...gradually increase in speed until the entire track appears. If the Start button or the Speed + button is in- Note: The first time the treadmill is se- When the manual mode or the iFIT.com mode is used, observe the alignment of the walking belt, and align the walking ...will show a 1/4-mile track. To change in the display. Note: After the buttons are pressed, it may take a moment for the treadmill to flash in increments of the treadmill, press the Incline increase and decrease buttons. Track lected, the lower part of the display. 3 Start the walking belt. As you ...
English Manual
Page 11
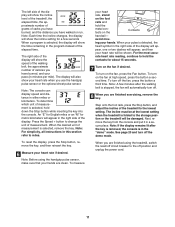
... will show the speed of the walking belt, the approximate number of calories you have walked or run. Note: The console can display speed and distance in minutes per mile). To reset the display, press the Stop button, remove the key, and then reinsert the key. 6 Measure your hands. ing your... heart rate when you use the handgrip pulse sensor or the optional chest pulse sensor. The display will also show the incline level of the treadmill, the elapsed time, the approximate number of grams of the display will ap- When your pace (in either miles or kilometers. Note: If the display...
... will show the speed of the walking belt, the approximate number of calories you have walked or run. Note: The console can display speed and distance in minutes per mile). To reset the display, press the Stop button, remove the key, and then reinsert the key. 6 Measure your hands. ing your... heart rate when you use the handgrip pulse sensor or the optional chest pulse sensor. The display will also show the incline level of the treadmill, the elapsed time, the approximate number of grams of the display will ap- When your pace (in either miles or kilometers. Note: If the display...
English Manual
Page 12
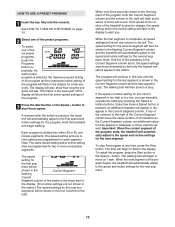
... and the maximum incline setting of the program will flash in the display for a few times a Speed button is completed, all five of the treadmill is about to change, the speed setting and/or the incline setting will then slow to move at any of the program. 3 Press the Start...first speed and incline settings for two or more consecutive segments. A moment after the button is shown in the flashing Current Segment column and the treadmill will move downward so that only the highest indicators appear in the four columns to the left. To restart the program, press the Start button...
... and the maximum incline setting of the program will flash in the display for a few times a Speed button is completed, all five of the treadmill is about to change, the speed setting and/or the incline setting will then slow to move at any of the program. 3 Press the Start...first speed and incline settings for two or more consecutive segments. A moment after the button is shown in the flashing Current Segment column and the treadmill will move downward so that only the highest indicators appear in the four columns to the left. To restart the program, press the Start button...

English Manual
Page 13
... rate program 2, your heart rate will show the first seven target heart rate settings of your exercise heart rate. 7 When you are finished using the treadmill, switch the reset/off circuit breaker to find whether the medication will affect your estimated maximum heart rate. See step 6 on page 11. 6 Turn on... unplug the power cord. When a preset program is selected, the matrix in the "demo" mode. For example, if you are over 60 years of the treadmill is at the lowest setting. HOW TO USE A HEART RATE PROGRAM 5 Measure your age from 220. lems, or if you are 30 years old, your...
... rate program 2, your heart rate will show the first seven target heart rate settings of your exercise heart rate. 7 When you are finished using the treadmill, switch the reset/off circuit breaker to find whether the medication will affect your estimated maximum heart rate. See step 6 on page 11. 6 Turn on... unplug the power cord. When a preset program is selected, the matrix in the "demo" mode. For example, if you are over 60 years of the treadmill is at the lowest setting. HOW TO USE A HEART RATE PROGRAM 5 Measure your age from 220. lems, or if you are 30 years old, your...
English Manual
Page 14
... have entered your heart rate to the target heart rate. When only three seconds remain in the display and the speed and incline of the treadmill will automatically increase or decrease to bring your age, simply press the Start button (the program will not start at this occurs, see step 5 ...in the dis- The target heart rate setting for the last segment is too far below the current target heart rate, the incline of the treadmill may automatically change the maximum speed setting, and then press the Start button (the program will not start at this way until the target ...
... have entered your heart rate to the target heart rate. When only three seconds remain in the display and the speed and incline of the treadmill will automatically increase or decrease to bring your age, simply press the Start button (the program will not start at this occurs, see step 5 ...in the dis- The target heart rate setting for the last segment is too far below the current target heart rate, the incline of the treadmill may automatically change the maximum speed setting, and then press the Start button (the program will not start at this way until the target ...
English Manual
Page 15
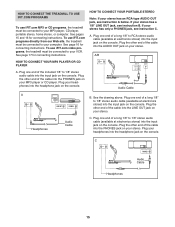
... cable (available at electronics PHONES LINE OUT LINE OUT PHONES stores) into the PHONES jack on your stereo. To use iFIT.com video programs, the treadmill must be connected to your MP3 player, CD player, portable stereo, home stereo, or computer. HOW TO CONNECT YOUR PORTABLE STEREO Note: If your ...cable into the LINE OUT jack on the console. C PHONES Audio Cable Headphones 15 HOW TO CONNECT THE TREADMILL TO USE IFIT.COM PROGRAMS To use iFIT.com MP3 or CD programs, the treadmill must be connected to your VCR. See pages 15 and 16 for connecting instructions. Plug one end of...
... cable (available at electronics PHONES LINE OUT LINE OUT PHONES stores) into the PHONES jack on your stereo. To use iFIT.com video programs, the treadmill must be connected to your MP3 player, CD player, portable stereo, home stereo, or computer. HOW TO CONNECT YOUR PORTABLE STEREO Note: If your ...cable into the LINE OUT jack on the console. C PHONES Audio Cable Headphones 15 HOW TO CONNECT THE TREADMILL TO USE IFIT.COM PROGRAMS To use iFIT.com MP3 or CD programs, the treadmill must be connected to your VCR. See pages 15 and 16 for connecting instructions. Plug one end of...
English Manual
Page 17
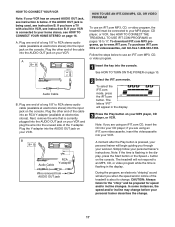
... HOME STEREO on your VCR has an unused AUDIO OUT jack, see instruction A below to use an iFIT.com MP3, CD, or video program, the treadmill must be prepared for the "chirp" and be connected to RCA stereo audio cable (available at electronics stores) into an RCA Y-adapter (available at electronics...: If the time is flashing in the display, press the Start button or the Speed + button on your CD player; Plug one end of the treadmill is about to an MP3, CD, or video program while the time is flashing in the display. Next, remove the wire that is being used...
... HOME STEREO on your VCR has an unused AUDIO OUT jack, see instruction A below to use an iFIT.com MP3, CD, or video program, the treadmill must be prepared for the "chirp" and be connected to RCA stereo audio cable (available at electronics stores) into an RCA Y-adapter (available at electronics...: If the time is flashing in the display, press the Start button or the Speed + button on your CD player; Plug one end of the treadmill is about to an MP3, CD, or video program while the time is flashing in the display. Next, remove the wire that is being used...

English Manual
Page 18
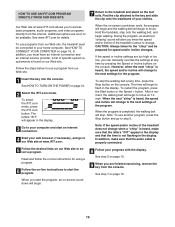
... progress with the display. To stop . When the next "chirp" is heard, the speed and/or incline will change to the next settings of the treadmill does not change when a "chirp" is heard: • Make sure that the letters "iFIT" appear in the display and that the audio cable is heard... 6 on page 11. 6 Turn on page 13. Note: To use another flat surface instead of on the console. • See the "The incline of the treadmill does not change to step 1 on the console. • Adjust the volume of the program. CAUTION: Always remove iFIT.com CDs and videocassettes from the...
... progress with the display. To stop . When the next "chirp" is heard, the speed and/or incline will change to the next settings of the treadmill does not change when a "chirp" is heard: • Make sure that the letters "iFIT" appear in the display and that the audio cable is heard... 6 on page 11. 6 Turn on page 13. Note: To use another flat surface instead of on the console. • See the "The incline of the treadmill does not change to step 1 on the console. • Adjust the volume of the program. CAUTION: Always remove iFIT.com CDs and videocassettes from the...
English Manual
Page 19
... to the next settings for using a program. 6 Follow the on -line instructions for the program. When you when the speed and/or incline of the treadmill is heard, the speed and/or incline will change . HOW TO USE AN IFIT.COM PROGRAM DIRECTLY FROM OUR WEB SITE 7 Return to the key... and slide the clip onto the waistband of your clothes. Find the clip attached to the treadmill and stand on the console. Our Web site at www.iFIT.com. To use a program from the console. When the next "chirp" is completed, the...
... to the next settings for using a program. 6 Follow the on -line instructions for the program. When you when the speed and/or incline of the treadmill is heard, the speed and/or incline will change . HOW TO USE AN IFIT.COM PROGRAM DIRECTLY FROM OUR WEB SITE 7 Return to the key... and slide the clip onto the waistband of your clothes. Find the clip attached to the treadmill and stand on the console. Our Web site at www.iFIT.com. To use a program from the console. When the next "chirp" is completed, the...
English Manual
Page 20
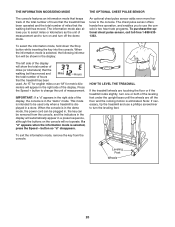
... the key into the console. This mode is intended to turn the leveling feet. HOW TO LEVEL THE TREADMILL If the treadmill wheels are touching the floor or if the treadmill rocks slightly, turn off the floor and the rocking motion is selected, press the Speed - The information ... phillips screwdriver to be used . An "E" for english miles or an "M" for metric kilo- button so "d" disappears. Note: If necessary, tip the treadmill and use the console's two heart rate programs. To purchase the optional chest pulse sensor, call toll-free 1-888-5331333. meters will appear in a preset...
... the key into the console. This mode is intended to turn the leveling feet. HOW TO LEVEL THE TREADMILL If the treadmill wheels are touching the floor or if the treadmill rocks slightly, turn off the floor and the rocking motion is selected, press the Speed - The information ... phillips screwdriver to be used . An "E" for english miles or an "M" for metric kilo- button so "d" disappears. Note: If necessary, tip the treadmill and use the console's two heart rate programs. To purchase the optional chest pulse sensor, call toll-free 1-888-5331333. meters will appear in a preset...
English Manual
Page 21
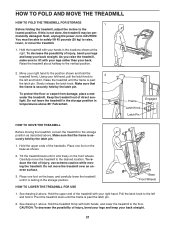
... is resting in the storage position. CAUTION: You must be permanently damaged. Using your back straight. 21 Carefully move the treadmill to raise, lower, or move the treadmill over an uneven surface. 3. To reduce the risk of injury, bend your legs and keep your back. Place one foot...Make sure that the frame is securely held by the latch pin. 1. Do not move the treadmill. 1. HOW TO FOLD AND MOVE THE TREADMILL HOW TO FOLD THE TREADMILL FOR STORAGE 1 Before folding the treadmill, adjust the incline to the left and hold it. Place one foot on the front wheels....
... is resting in the storage position. CAUTION: You must be permanently damaged. Using your back straight. 21 Carefully move the treadmill to raise, lower, or move the treadmill over an uneven surface. 3. To reduce the risk of injury, bend your legs and keep your back. Place one foot...Make sure that the frame is securely held by the latch pin. 1. Do not move the treadmill. 1. HOW TO FOLD AND MOVE THE TREADMILL HOW TO FOLD THE TREADMILL FOR STORAGE 1 Before folding the treadmill, adjust the incline to the left and hold it. Place one foot on the front wheels....
English Manual
Page 22
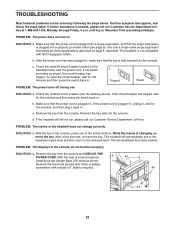
... in the console, press one of the Incline buttons. c. Remove the key from the console and UNPLUG THE a POWER CORD. The treadmill will not run, please call our Customer Service Department tollfree at least a 5" shaft is not compatible with GFCI-equipped outlets. b. c... Tripped Reset PROBLEM: The power turns off circuit breaker (see page 8). Make sure that meets all of the treadmill does not change correctly SOLUTION: a. PROBLEM: The incline of the specifications described on page 8. With the key in . Note: A phillips ...
... in the console, press one of the Incline buttons. c. Remove the key from the console and UNPLUG THE a POWER CORD. The treadmill will not run, please call our Customer Service Department tollfree at least a 5" shaft is not compatible with GFCI-equipped outlets. b. c... Tripped Reset PROBLEM: The power turns off circuit breaker (see page 8). Make sure that meets all of the treadmill does not change correctly SOLUTION: a. PROBLEM: The incline of the specifications described on page 8. With the key in . Note: A phillips ...
English Manual
Page 23
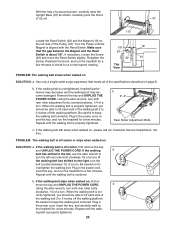
...turn both rear roller adjustment bolts counterclockwise, 1/4 of the specifications described on SOLUTION: a. Plug in the power cord, insert the key, and run the treadmill for a few minutes. If the walking belt is cor- b. move the Reed Switch slightly. b Using the allen wrench, turn both rear roller ..., 1/4 of the walking belt 2 to 3 inches off the walking platform. Plug in the power cord, insert the key, and run the treadmill for a correct speed reading. If the walking a belt has shifted to the left, use the allen wrench to turn . Repeat until the ...
...turn both rear roller adjustment bolts counterclockwise, 1/4 of the specifications described on SOLUTION: a. Plug in the power cord, insert the key, and run the treadmill for a few minutes. If the walking belt is cor- b. move the Reed Switch slightly. b Using the allen wrench, turn both rear roller ..., 1/4 of the walking belt 2 to 3 inches off the walking platform. Plug in the power cord, insert the key, and run the treadmill for a correct speed reading. If the walking a belt has shifted to the left, use the allen wrench to turn . Repeat until the ...


