
Canadian English Manual
Page 1
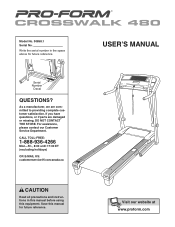
... for future reference. As a manufacturer, we are damaged or missing, DO NOT CONTACT THE STORE. USERʼS MANUAL Visit our website at www.proform.com Model No. 30858.1 Serial No. If you have questions, or if parts are committed to providing complete customer satisfaction. For assistance, please contact our Customer Service Department.
... for future reference. As a manufacturer, we are damaged or missing, DO NOT CONTACT THE STORE. USERʼS MANUAL Visit our website at www.proform.com Model No. 30858.1 Serial No. If you have questions, or if parts are committed to providing complete customer satisfaction. For assistance, please contact our Customer Service Department.
Canadian English Manual
Page 2
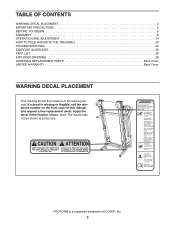
...BEFORE YOU BEGIN 5 ASSEMBLY 6 OPERATION AND ADJUSTMENT 14 HOW TO FOLD AND MOVE THE TREADMILL 20 TROUBLESHOOTING 22 EXERCISE GUIDELINES 25 PART LIST 26 EXPLODED DRAWING 28 ORDERING REPLACEMENT PARTS Back Cover LIMITED WARRANTY Back Cover WARNING DECAL PLACEMENT This drawing shows the locations of this... manual and request a free replacement decal. If a decal is a registered trademark of ICON IP, Inc. 2 PROFORM is ...
...BEFORE YOU BEGIN 5 ASSEMBLY 6 OPERATION AND ADJUSTMENT 14 HOW TO FOLD AND MOVE THE TREADMILL 20 TROUBLESHOOTING 22 EXERCISE GUIDELINES 25 PART LIST 26 EXPLODED DRAWING 28 ORDERING REPLACEMENT PARTS Back Cover LIMITED WARRANTY Back Cover WARNING DECAL PLACEMENT This drawing shows the locations of this... manual and request a free replacement decal. If a decal is a registered trademark of ICON IP, Inc. 2 PROFORM is ...

Canadian English Manual
Page 4
... to safely lift 45 lbs. (20 kg) to do so by an authorized service representative only. 25. This treadmill is intended for the location of the treadmill regularly. Inspect and properly tighten all parts of the circuit breaker.) 20. Always unplug the power cord immediately after use this manual. Never insert any object...
... to safely lift 45 lbs. (20 kg) to do so by an authorized service representative only. 25. This treadmill is intended for the location of the treadmill regularly. Inspect and properly tighten all parts of the circuit breaker.) 20. Always unplug the power cord immediately after use this manual. Never insert any object...
Canadian English Manual
Page 5
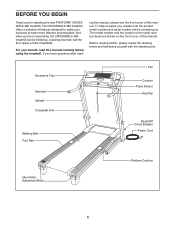
Before reading further, please review the drawing below and familiarize yourself with the labeled parts. ing this manual, please see the front cover of this manual. The model number and the location of the serial number...re not exercising, the CROSSWALK 480 treadmill can be folded up, requiring less than half the floor space of features designed to make your benefit, read - And when you have questions after read this manual carefully before contacting us assist you for selecting the new PROFORM® CROSSWALK 480 treadmill. The CROSSWALK 480 treadmill offers a selection of...
Before reading further, please review the drawing below and familiarize yourself with the labeled parts. ing this manual, please see the front cover of this manual. The model number and the location of the serial number...re not exercising, the CROSSWALK 480 treadmill can be folded up, requiring less than half the floor space of features designed to make your benefit, read - And when you have questions after read this manual carefully before contacting us assist you for selecting the new PROFORM® CROSSWALK 480 treadmill. The CROSSWALK 480 treadmill offers a selection of...
Canadian English Manual
Page 6
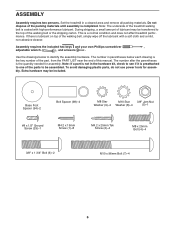
...after the parentheses is a normal condition and does not affect treadmill performance. Set the treadmill in parentheses below to the top of this manual. The number in a cleared area and remove all packing materials. To avoid damaging plastic parts, do not use power tools for assembly. Note: The ...underside of the parts to be transferred to identify the assembly hardware. Note: If a part is not in the hardware kit, check to see if it is preattached to one of the treadmill walking belt is completed. If there is lubricant on...
...after the parentheses is a normal condition and does not affect treadmill performance. Set the treadmill in parentheses below to the top of this manual. The number in a cleared area and remove all packing materials. To avoid damaging plastic parts, do not use power tools for assembly. Note: The ...underside of the parts to be transferred to identify the assembly hardware. Note: If a part is not in the hardware kit, check to see if it is preattached to one of the treadmill walking belt is completed. If there is lubricant on...
Canadian English Manual
Page 13
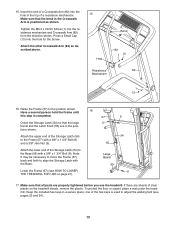
... and the Latch Knob (55) are in the Crosswalk Arm is completed. 57 6 Orient the Storage Latch (54) so that all parts are sheets of the Storage Latch (54) to adjust the walking belt (see HOW TO LOWER 6 THE TREADMILL FOR USE on the treadmill decals, remove the plastic. Keep the included hex keys...
... and the Latch Knob (55) are in the Crosswalk Arm is completed. 57 6 Orient the Storage Latch (54) so that all parts are sheets of the Storage Latch (54) to adjust the walking belt (see HOW TO LOWER 6 THE TREADMILL FOR USE on the treadmill decals, remove the plastic. Keep the included hex keys...
Canadian English Manual
Page 25
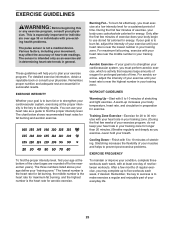
... your body uses carbohydrate calories for energy. After a few minutes of your physician. Remember, the key to success is to make exercise a regular and enjoyable part of exercise, your age at a low intensity level for exercise. This is especially important for aerobic exercise. For detailed exercise information, obtain a reputable book or...
... your body uses carbohydrate calories for energy. After a few minutes of your physician. Remember, the key to success is to make exercise a regular and enjoyable part of exercise, your age at a low intensity level for exercise. This is especially important for aerobic exercise. For detailed exercise information, obtain a reputable book or...

Canadian English Manual
Page 26
...Lift Motor Spacer Controller Power Cord Power Cord Grommet Reset/Off Circuit Breaker Belly Pan Left Upright Right Upright Crosswalk Arm Handgrip Crosswalk Arm Left Foot Rail Upright Insert Resistance Cone Resistance Cone Insert Arm Insert Resistance Knob Left Upright Spacer ...Right Upright Spacer Base Cap Wire Harness Base Foot Base Foot Spacer Wheel Lift Frame/Drive Roller Ground Wire Caution Decal Bolt Spacer Base Right Handrail 26 Key No. Qty. Qty. PART...
...Lift Motor Spacer Controller Power Cord Power Cord Grommet Reset/Off Circuit Breaker Belly Pan Left Upright Right Upright Crosswalk Arm Handgrip Crosswalk Arm Left Foot Rail Upright Insert Resistance Cone Resistance Cone Insert Arm Insert Resistance Knob Left Upright Spacer ...Right Upright Spacer Base Cap Wire Harness Base Foot Base Foot Spacer Wheel Lift Frame/Drive Roller Ground Wire Caution Decal Bolt Spacer Base Right Handrail 26 Key No. Qty. Qty. PART...

Canadian English Manual
Page 27
See the back cover of this manual for information about ordering replacement parts. *These parts are subject to change without notice. Description Key No. Key No. Description 101 1 102 4 103 1 104 1 105 1 106 1 107 1 108 1 109 1 110 4 111 4 French Warning ...
See the back cover of this manual for information about ordering replacement parts. *These parts are subject to change without notice. Description Key No. Key No. Description 101 1 102 4 103 1 104 1 105 1 106 1 107 1 108 1 109 1 110 4 111 4 French Warning ...
Canadian English Manual
Page 32
...do not allow limitations on how long an implied warranty lasts. ICON of incidental or consequential damages. Jérôme, QC J7Y 4B8 Part No. 273890 R1108A Printed in workmanship and material, under this manual. This warranty extends only to repairing or replacing, at ICONʼs...you , be prepared to provide the following information when contacting us assist you . This warranty gives you . ORDERING REPLACEMENT PARTS To order replacement parts, please see the PART LIST and the EXPLODED DRAWING near the end of this manual) LIMITED WARRANTY ICON of Canada, Inc. (ICON) warrants ...
...do not allow limitations on how long an implied warranty lasts. ICON of incidental or consequential damages. Jérôme, QC J7Y 4B8 Part No. 273890 R1108A Printed in workmanship and material, under this manual. This warranty extends only to repairing or replacing, at ICONʼs...you , be prepared to provide the following information when contacting us assist you . This warranty gives you . ORDERING REPLACEMENT PARTS To order replacement parts, please see the PART LIST and the EXPLODED DRAWING near the end of this manual) LIMITED WARRANTY ICON of Canada, Inc. (ICON) warrants ...


