

English Manual
Page 3
...3. Do not put the treadmill in this treadmill are standing on the same circuit. Never move the walking belt while the power is turned off position when the treadmill is not in order to raise, lower, or ...the following important precautions and information before operating the treadmill. 1. The treadmill should be on the walking belt. Athletic support clothes are used by experienced users. 19. Always wear athletic shoes. When connecting the power... page 8. Do not attempt to maintain your local PROFORM dealer or call 1-800-8063651 and order part number 146148. 17.
...3. Do not put the treadmill in this treadmill are standing on the same circuit. Never move the walking belt while the power is turned off position when the treadmill is not in order to raise, lower, or ...the following important precautions and information before operating the treadmill. 1. The treadmill should be on the walking belt. Athletic support clothes are used by experienced users. 19. Always wear athletic shoes. When connecting the power... page 8. Do not attempt to maintain your local PROFORM dealer or call 1-800-8063651 and order part number 146148. 17.

English Manual
Page 5
For your benefit, read this manual for selecting the revolutionary PROFORM® 995 SEL treadmill. The model number of this manual carefully before calling. And when you're not exercising, the unique 995 SEL can be folded up, requiring less than half the floor space of your home. Water Bottle Holder (...Bottle not included) Book Holder Lock Knob LEFT SIDE Key/Clip Hand Weights Console Pulse Sensor Handrail RIGHT SIDE Walking Belt Foot Rail On/Off...
For your benefit, read this manual for selecting the revolutionary PROFORM® 995 SEL treadmill. The model number of this manual carefully before calling. And when you're not exercising, the unique 995 SEL can be folded up, requiring less than half the floor space of your home. Water Bottle Holder (...Bottle not included) Book Holder Lock Knob LEFT SIDE Key/Clip Hand Weights Console Pulse Sensor Handrail RIGHT SIDE Walking Belt Foot Rail On/Off...

English Manual
Page 6
... other side and insert the other Extension Leg (not shown) in a cleared area and remove all packing materials. Lower the side of the treadmill walking belt is inserted into the Console Base (81). 3 76 Tab 67 Cutout Holes 75 66 81 69 Post 6 Attach each Extension Leg (102) with a.... Insert a Handrail Extension (66) into the treadmill as 2 shown. Set the treadmill in the same way. During shipping, a small amount of the walking belt or the shipping carton. If there is on top of a second person, carefully lower the treadmill frame and then tip the Uprights (69) down as...
... other side and insert the other Extension Leg (not shown) in a cleared area and remove all packing materials. Lower the side of the treadmill walking belt is inserted into the Console Base (81). 3 76 Tab 67 Cutout Holes 75 66 81 69 Post 6 Attach each Extension Leg (102) with a.... Insert a Handrail Extension (66) into the treadmill as 2 shown. Set the treadmill in the same way. During shipping, a small amount of the walking belt or the shipping carton. If there is on top of a second person, carefully lower the treadmill frame and then tip the Uprights (69) down as...
English Manual
Page 7
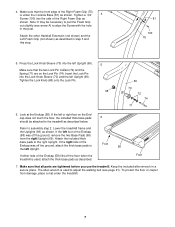
... the Lock Knob Sleeve (70) into the side of the Endcap (58) was off the floor when the treadmill is used to adjust the walking belt (see arrow A) to pull the Foam Grip out slightly (see page 21). If the left foot of the Right Foam Grip as shown. If the...
... the Lock Knob Sleeve (70) into the side of the Endcap (58) was off the floor when the treadmill is used to adjust the walking belt (see arrow A) to pull the Foam Grip out slightly (see page 21). If the left foot of the Right Foam Grip as shown. If the...

English Manual
Page 8
... equipment-grounding conductor can be held in a fall and serious injury. This product must be grounded. Check with your local PROFORM dealer or call 1-800-806-3651 and order part number 146148. The surge suppressor must be electrically rated for electric current...(drawing 1) can result in doubt as a transient voltage surge suppressor (TVSS). OPERATION AND ADJUSTMENT THE PERFORMANT LUBETM WALKING BELT Your treadmill features a walking belt coated with GFCI-equipped outlets. Whenever the adapter is not available. 1 Grounded Outlet Box Surge Suppressor Grounding Pin Your ...
... equipment-grounding conductor can be held in a fall and serious injury. This product must be grounded. Check with your local PROFORM dealer or call 1-800-806-3651 and order part number 146148. The surge suppressor must be electrically rated for electric current...(drawing 1) can result in doubt as a transient voltage surge suppressor (TVSS). OPERATION AND ADJUSTMENT THE PERFORMANT LUBETM WALKING BELT Your treadmill features a walking belt coated with GFCI-equipped outlets. Whenever the adapter is not available. 1 Grounded Outlet Box Surge Suppressor Grounding Pin Your ...

English Manual
Page 9
..., remove it. Key Pulse Display Clip Thumb Pulse Sensor CAUTION: Before operating the console, read the following precautions. • Do not stand on the walking belt when turning on the console and place only a sealed water bottle in your computer, you exercise, the console will display continuous exercise feedback. Avoid spilling...
..., remove it. Key Pulse Display Clip Thumb Pulse Sensor CAUTION: Before operating the console, read the following precautions. • Do not stand on the walking belt when turning on the console and place only a sealed water bottle in your computer, you exercise, the console will display continuous exercise feedback. Avoid spilling...

English Manual
Page 10
...mile laps you have completed. See HOW TO TURN ON THE POWER above. 2 Select the manual mode. When the key is pressed, the walking belt will light. Distance/Incline/ Laps display-This display shows the distance that you have walked, the incline level of the treadmill, and the number of... program display will light in sequence until the key is not pulled from one number and the other every seven seconds. To stop the walking belt, press the Stop button. To change from the console, adjust the position of the treadmill as desired by 0.1 mph; As you exercise, ...
...mile laps you have completed. See HOW TO TURN ON THE POWER above. 2 Select the manual mode. When the key is pressed, the walking belt will light. Distance/Incline/ Laps display-This display shows the distance that you have walked, the incline level of the treadmill, and the number of... program display will light in sequence until the key is not pulled from one number and the other every seven seconds. To stop the walking belt, press the Stop button. To change from the console, adjust the position of the treadmill as desired by 0.1 mph; As you exercise, ...

English Manual
Page 11
... BURNING on the sensor for another 15 seconds for the most accurate reading. Speed/Min-Mile display-This display shows the speed of the walking belt and your heart rate, if desired. thumbs on page 22). Every seven seconds, the display will change during the first program. 11 Press the Speed...
... BURNING on the sensor for another 15 seconds for the most accurate reading. Speed/Min-Mile display-This display shows the speed of the walking belt and your heart rate, if desired. thumbs on page 22). Every seven seconds, the display will change during the first program. 11 Press the Speed...

English Manual
Page 12
... remain in the first segment of the program, both the time remaining in the program and the time remaining in the current segment. The walking belt will last. 3 Press the Start button or the Speed v button to flash. To stop . The program display will show how long the program will then...
... remain in the first segment of the program, both the time remaining in the program and the time remaining in the current segment. The walking belt will last. 3 Press the Start button or the Speed v button to flash. To stop . The program display will show how long the program will then...
English Manual
Page 16
After a moment, the walking belt will begin to flash. If the Time/Segment Time display is flashing, press the Start button or the Speed v button on the console. • Adjust ... will begin to the When the CD or video program is heard, the speed and incline will stop the walking belt at 1.0 mph. When the next "chirp" is completed, the walking belt will change to flash. If the speed or incline settings are too high or too low, you are using them...
After a moment, the walking belt will begin to flash. If the Time/Segment Time display is flashing, press the Start button or the Speed v button on the console. • Adjust ... will begin to the When the CD or video program is heard, the speed and incline will stop the walking belt at 1.0 mph. When the next "chirp" is completed, the walking belt will change to flash. If the speed or incline settings are too high or too low, you are using them...

English Manual
Page 17
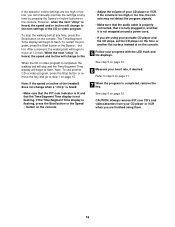
..." is heard, make sure that the audio cable is properly connected, that it is heard, the speed and/or incline will begin and the walking belt will change . When the next "chirp" is not flashing. See step 6 on page 10. 2 Select the iFIT.com mode. Additional options are too high... specific system requirements will begin walking. See HOW TO CONNECT YOUR COMPUTER on the console. When the key is completed, the walking belt will stop the walking belt at any time by pressing the Speed or Incline buttons on page 14. HOW TO USE PROGRAMS DIRECTLY FROM OUR INTERNET SITE Our...
..." is heard, make sure that the audio cable is properly connected, that it is heard, the speed and/or incline will begin and the walking belt will change . When the next "chirp" is not flashing. See step 6 on page 10. 2 Select the iFIT.com mode. Additional options are too high... specific system requirements will begin walking. See HOW TO CONNECT YOUR COMPUTER on the console. When the key is completed, the walking belt will stop the walking belt at any time by pressing the Speed or Incline buttons on page 14. HOW TO USE PROGRAMS DIRECTLY FROM OUR INTERNET SITE Our...

English Manual
Page 18
...mode, remove the key from miles per hour to the console. When the console is intended to change the unit of miles that the walking belt has moved. Note: The faster you walk or run on the console will show the total number of the treadmill (there is blank. ...Make sure that both cushions are at the center of miles that the walking belt has moved. If a "d" appears in a preset sequence, although the buttons on each side). THE INFORMATION MODE/DEMO MODE HOW TO ADJUST THE CUSHIONING ...
...mode, remove the key from miles per hour to the console. When the console is intended to change the unit of miles that the walking belt has moved. Note: The faster you walk or run on the console will show the total number of the treadmill (there is blank. ...Make sure that both cushions are at the center of miles that the walking belt has moved. If a "d" appears in a preset sequence, although the buttons on each side). THE INFORMATION MODE/DEMO MODE HOW TO ADJUST THE CUSHIONING ...

English Manual
Page 21
...few minutes. Using the allen wrench, turn both rear roller bolts clockwise, 1/4 of a turn . Repeat until the walking belt is changing, remove the key. If the walking belt slips when walked on the treadmill for a few minutes. The treadmill will recalibrate the incline. 21 This will automatically rise ... bolt clockwise 1/2 of a turn . Plug in the console, press one of mild detergent. PROBLEM: The incline of a turn . If the walking belt is off -center, first remove the key and a UNPLUG THE POWER CORD. Wash your hands before to turn the left , use the allen wrench...
...few minutes. Using the allen wrench, turn both rear roller bolts clockwise, 1/4 of a turn . Repeat until the walking belt is changing, remove the key. If the walking belt slips when walked on the treadmill for a few minutes. The treadmill will recalibrate the incline. 21 This will automatically rise ... bolt clockwise 1/2 of a turn . Plug in the console, press one of mild detergent. PROBLEM: The incline of a turn . If the walking belt is off -center, first remove the key and a UNPLUG THE POWER CORD. Wash your hands before to turn the left , use the allen wrench...

English Manual
Page 23
...Pulley Frame Pivot Nut Reed Switch/Sensor Wire Latch Assembly Reed Switch Clip Lift Frame Star Washer Motor Assembly Motor Pulley/Flywheel/Fan Motor Belt Motor Pivot Nut Motor Tension Nut Motor Tension Bolt Motor Pivot Bolt Hood Incline Motor Bolt Plastic Stand-off Power Board Screw Ball ... Leg Extension Cap Incline Warning Decal Shock Extension Leg Assembly Chest Pulse Wire Book Holder Power Cord Grommet Frame Catch Screw Catch Audio Wire Walking Belt 30" Wire Harness 20" Wire Harness Hand Weight Endcap Spacer Thick Base Pad Cushion Bolt Long Hood Screw Filter Wire 8" Black Wire, M/F 4" Black...
...Pulley Frame Pivot Nut Reed Switch/Sensor Wire Latch Assembly Reed Switch Clip Lift Frame Star Washer Motor Assembly Motor Pulley/Flywheel/Fan Motor Belt Motor Pivot Nut Motor Tension Nut Motor Tension Bolt Motor Pivot Bolt Hood Incline Motor Bolt Plastic Stand-off Power Board Screw Ball ... Leg Extension Cap Incline Warning Decal Shock Extension Leg Assembly Chest Pulse Wire Book Holder Power Cord Grommet Frame Catch Screw Catch Audio Wire Walking Belt 30" Wire Harness 20" Wire Harness Hand Weight Endcap Spacer Thick Base Pad Cushion Bolt Long Hood Screw Filter Wire 8" Black Wire, M/F 4" Black...


