

English Manual
Page 2
TABLE OF CONTENTS IMPORTANT PRECAUTIONS 3 BEFORE YOU BEGIN 4 ASSEMBLY 5 HOW TO OPERATE THE RECUMBENT CYCLE 9 MAINTENANCE AND TROUBLE-SHOOTING 12 EXERCISE GUIDELINES 13 PART LIST 14 EXPLODED DRAWING 15 HOW TO ORDER REPLACEMENT PARTS Back Cover LIMITED WARRANTY Back Cover 2
TABLE OF CONTENTS IMPORTANT PRECAUTIONS 3 BEFORE YOU BEGIN 4 ASSEMBLY 5 HOW TO OPERATE THE RECUMBENT CYCLE 9 MAINTENANCE AND TROUBLE-SHOOTING 12 EXERCISE GUIDELINES 13 PART LIST 14 EXPLODED DRAWING 15 HOW TO ORDER REPLACEMENT PARTS Back Cover LIMITED WARRANTY Back Cover 2

English Manual
Page 3
...from moisture and dust. Inspect and tighten all times. 6. do not arch your back. 9. Always wear athletic shoes when using the recumbent cycle; The pulse sensor is intended only as described in a commercial, rental, or institutional setting. 12. ICON assumes no responsibility for... the accuracy of serious injury, read the following important precau- This is the responsibility of all precautions. Keep the recumbent cycle away from the recumbent cycle at all parts regularly. Wear appropriate clothing when exercising; Do not use of 35 or persons with pre-existing...
...from moisture and dust. Inspect and tighten all times. 6. do not arch your back. 9. Always wear athletic shoes when using the recumbent cycle; The pulse sensor is intended only as described in a commercial, rental, or institutional setting. 12. ICON assumes no responsibility for... the accuracy of serious injury, read the following important precau- This is the responsibility of all precautions. Keep the recumbent cycle away from the recumbent cycle at all parts regularly. Wear appropriate clothing when exercising; Do not use of 35 or persons with pre-existing...
English Manual
Page 4
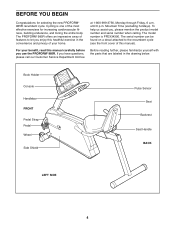
... Handle BACK LEFT SIDE 4 For your home. To help us assist you use the PROFORM¨ 985R. If you enjoy this manual). Mountain Time (excluding holidays). The serial number can be found on a decal attached to the recumbent cycle (see the front cover of features to let you have questions, please call our...
... Handle BACK LEFT SIDE 4 For your home. To help us assist you use the PROFORM¨ 985R. If you enjoy this manual). Mountain Time (excluding holidays). The serial number can be found on a decal attached to the recumbent cycle (see the front cover of features to let you have questions, please call our...
English Manual
Page 5
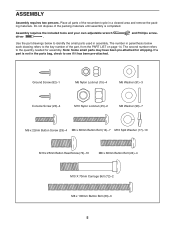
and Phillips screw- Place all parts of the recumbent cycle in parenthesis below to identify the small parts used in the parts bag, check to see if it has been pre-attached. The number ...
and Phillips screw- Place all parts of the recumbent cycle in parenthesis below to identify the small parts used in the parts bag, check to see if it has been pre-attached. The number ...
English Manual
Page 9
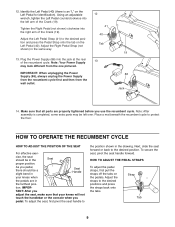
... may look different from the wall outlet. 19 86 Jack 14. IMPORTANT: When unplugging the Power Supply (86), always unplug the Power Supply from the recumbent cycle first and then from the one pictured. cise, the seat should be a slight bend in Seat Handle your knees will not touch the handlebar... you adjust the seat, make sure that your knees when the pedals are in the Seat proper position. tion. IMPOR- TANT: After you use the recumbent cycle. To adjust the seat, first pivot the seat handle to the position shown in the same way. 12 41 40 Tab 13.
... may look different from the wall outlet. 19 86 Jack 14. IMPORTANT: When unplugging the Power Supply (86), always unplug the Power Supply from the recumbent cycle first and then from the one pictured. cise, the seat should be a slight bend in Seat Handle your knees will not touch the handlebar... you adjust the seat, make sure that your knees when the pedals are in the Seat proper position. tion. IMPOR- TANT: After you use the recumbent cycle. To adjust the seat, first pivot the seat handle to the position shown in the same way. 12 41 40 Tab 13.
English Manual
Page 10
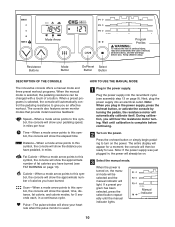
... a preset programs is selected, the pedaling resistance can be selected and the manual indicator will automatically calibrate itself. Next, plug the power supply into the recumbent cycle (see FAT BURNING on the power. Mode Arrow Program Profiles Resistance Buttons Mode Button On/Reset Select Button Button DESCRIPTION OF THE CONSOLE HOW...
... a preset programs is selected, the pedaling resistance can be selected and the manual indicator will automatically calibrate itself. Next, plug the power supply into the recumbent cycle (see FAT BURNING on the power. Mode Arrow Program Profiles Resistance Buttons Mode Button On/Reset Select Button Button DESCRIPTION OF THE CONSOLE HOW...

English Manual
Page 12
... away from the console and keep the metal contacts clean. doing so may reset. To clean the recumbent cycle, use alcohol, abrasives, or chemicals. 12 The program profiles on page 10. 3 Select one of the recumbent cycle regularly. See step 2 on the right side of direct sunlight. The contacts can be selected...
... away from the console and keep the metal contacts clean. doing so may reset. To clean the recumbent cycle, use alcohol, abrasives, or chemicals. 12 The program profiles on page 10. 3 Select one of the recumbent cycle regularly. See step 2 on the right side of direct sunlight. The contacts can be selected...
English Manual
Page 16
... by or attributable to give the following information when calling: ¥ The MODEL NUMBER of the product (PFEX34390) ¥ The NAME of the product (PROFORM¨ 985R recumbent cycle) ¥ The SERIAL NUMBER of the product (see the front cover of this manual. ICON is not responsible or liable for a period of ninety...
... by or attributable to give the following information when calling: ¥ The MODEL NUMBER of the product (PFEX34390) ¥ The NAME of the product (PROFORM¨ 985R recumbent cycle) ¥ The SERIAL NUMBER of the product (see the front cover of this manual. ICON is not responsible or liable for a period of ninety...


