

English Manual
Page 2
... have other rights which vary from the date of charge. This warranty does not apply when the TREADMILL EXERCISER is attached in the center of this SEARS TREADMILL EXERCISER, contact the nearest SEARS Service Center throughout the United States and SEARS will repair or replace the...FULL 90 DAY WARRANTY 2 IMPORTANT PRECAUTIONS 3 BEFORE YOU BEGIN 5 SET-UP 6 OPERATION AND ADJUSTMENT 7 HOW TO FOLD AND MOVE THE TREADMILL 10 MAINTENANCE AND TROUBLE-SHOOTING 12 CONDITIONING GUIDELINES 14 PART LIST 15 ORDERING REPLACEMENT PARTS Back Cover Note: An EXPLODED DRAWING is used commercially or...
... have other rights which vary from the date of charge. This warranty does not apply when the TREADMILL EXERCISER is attached in the center of this SEARS TREADMILL EXERCISER, contact the nearest SEARS Service Center throughout the United States and SEARS will repair or replace the...FULL 90 DAY WARRANTY 2 IMPORTANT PRECAUTIONS 3 BEFORE YOU BEGIN 5 SET-UP 6 OPERATION AND ADJUSTMENT 7 HOW TO FOLD AND MOVE THE TREADMILL 10 MAINTENANCE AND TROUBLE-SHOOTING 12 CONDITIONING GUIDELINES 14 PART LIST 15 ORDERING REPLACEMENT PARTS Back Cover Note: An EXPLODED DRAWING is used commercially or...

English Manual
Page 3
... intended only as a transient voltage surge suppressor (TVSS). Use only a single-outlet surge suppressor that is turned off. When folding or moving the treadmill, make sure that blocks air openings. suppressor must have a UL suppressed voltage rating of 400 volts or less and a minimum surge dissipation of carrying..., wearing only stockings, or in use an extension cord. 16. Do not attempt to safely lift 65 pounds (30 kg) in the treadmill. Place the treadmill on page 10.) You must be used or where oxygen is fully closed. 3 Keep the power cord and the surge suppressor away from...
... intended only as a transient voltage surge suppressor (TVSS). Use only a single-outlet surge suppressor that is turned off. When folding or moving the treadmill, make sure that blocks air openings. suppressor must have a UL suppressed voltage rating of 400 volts or less and a minimum surge dissipation of carrying..., wearing only stockings, or in use an extension cord. 16. Do not attempt to safely lift 65 pounds (30 kg) in the treadmill. Place the treadmill on page 10.) You must be used or where oxygen is fully closed. 3 Keep the power cord and the surge suppressor away from...
English Manual
Page 4
Servicing other than the procedures in this treadmill in this or any exercise program, consult your treadmill. Do not use this manual should be performed by an authorized service representative only. 23. If the decal is missing, or if it...do so by or through the use only. WARNING: Before beginning this manual. Apply the decal in -home use of the treadmill every three months. 22. This treadmill is especially important for personal injury or property damage sustained by an authorized service representative. Inspect and tighten all instructions before performing the...
Servicing other than the procedures in this treadmill in this or any exercise program, consult your treadmill. Do not use this manual should be performed by an authorized service representative only. 23. If the decal is missing, or if it...do so by or through the use only. WARNING: Before beginning this manual. Apply the decal in -home use of the treadmill every three months. 22. This treadmill is especially important for personal injury or property damage sustained by an authorized service representative. Inspect and tighten all instructions before performing the...
English Manual
Page 5
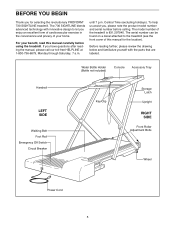
... exercise in the convenience and privacy of your benefit, read this manual for selecting the revolutionary PROFORM¨ 730 SIGHTLINE treadmill. BEFORE YOU BEGIN Thank you , please note the product model number and serial number before using the treadmill. Central Time (excluding holidays). The serial number can be found on a decal attached to let you...
... exercise in the convenience and privacy of your benefit, read this manual for selecting the revolutionary PROFORM¨ 730 SIGHTLINE treadmill. BEFORE YOU BEGIN Thank you , please note the product model number and serial number before using the treadmill. Central Time (excluding holidays). The serial number can be found on a decal attached to let you...
English Manual
Page 6
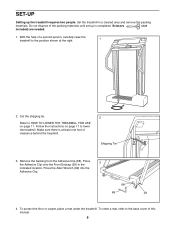
... (29) in a cleared area and remove the packing materials. Refer to HOW TO LOWER THE TREADMILL FOR USE on page 11 to the back cover of the packing materials until set-up the treadmill requires two people. Scissors (not included) are needed. 1. Press the Allen Wrench (69) into... the Adhesive Clip. 68 69 29 4. To order a mat, refer to lower the treadmill. Do not dispose of this manual. 6 Set the treadmill in the indicated location. Make sure there is completed. SET-UP Setting up is at the right. 2. Cut the shipping tie...
... (29) in a cleared area and remove the packing materials. Refer to HOW TO LOWER THE TREADMILL FOR USE on page 11 to the back cover of the packing materials until set-up the treadmill requires two people. Scissors (not included) are needed. 1. Press the Allen Wrench (69) into... the Adhesive Clip. 68 69 29 4. To order a mat, refer to lower the treadmill. Do not dispose of this manual. 6 Set the treadmill in the indicated location. Make sure there is completed. SET-UP Setting up is at the right. 2. Cut the shipping tie...
English Manual
Page 7
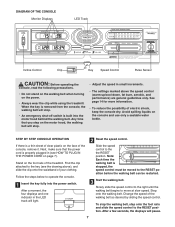
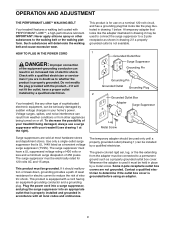
... the walking belt begins to the RESET position. Avoid spilling liquids on the power. ¥ Always wear the clip while using the treadmill. Stand on the face of the treadmill. After a moment, the four displays and one indicator in small increments. ¥ The settings marked above ), and slide the clip onto the...
... the walking belt begins to the RESET position. Avoid spilling liquids on the power. ¥ Always wear the clip while using the treadmill. Stand on the face of the treadmill. After a moment, the four displays and one indicator in small increments. ¥ The settings marked above ), and slide the clip onto the...

English Manual
Page 8
track represents a distance of the treadmill, if desired. The pulse sensor is shown. A new lap will light when the number of measurement, Make sure that will light one number to the ... for a TrackÑThe LED moment and then light. If the ing. Remember to the other slightly until the desired incline level is ing the treadmill, adjust the in kilometers; of the incline con- The FAT reached. Note: If the walking belt is positioned as shown, press the START/RESET button...
track represents a distance of the treadmill, if desired. The pulse sensor is shown. A new lap will light when the number of measurement, Make sure that will light one number to the ... for a TrackÑThe LED moment and then light. If the ing. Remember to the other slightly until the desired incline level is ing the treadmill, adjust the in kilometers; of the incline con- The FAT reached. Note: If the walking belt is positioned as shown, press the START/RESET button...
English Manual
Page 9
...always use on or off. Do not modify the plug provided with all local codes and ordinances. To decrease the possibility of your treadmill being turned on a nominal 120-volt circuit, and has a grounding plug that is used it should be used to connect the ...malfunction or break down, grounding provides a path of electric shock. Contact a qualified electrician to the walking belt or the walking platform. Your treadmill, like the plug illustrated in an increased risk of least resistance for use a surge suppressor with PERFORMANT LUBETM, a high-performance lubricant. Some ...
...always use on or off. Do not modify the plug provided with all local codes and ordinances. To decrease the possibility of your treadmill being turned on a nominal 120-volt circuit, and has a grounding plug that is used it should be used to connect the ...malfunction or break down, grounding provides a path of electric shock. Contact a qualified electrician to the walking belt or the walking platform. Your treadmill, like the plug illustrated in an increased risk of least resistance for use a surge suppressor with PERFORMANT LUBETM, a high-performance lubricant. Some ...
English Manual
Page 10
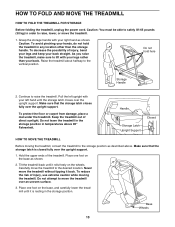
...the upper ends of direct sunlight. Base Wheels 10 To decrease the possibility of injury, use extreme caution while moving the treadmill, convert the treadmill to the desired location. Pull the left upright with your legs rather than the storage handle. Make sure that the storage... To avoid pinching your left hand until it back. Raise the treadmill about halfway to raise the treadmill. Do not hold the treadmill in temperatures above . Keep the treadmill out of the treadmill. Do not leave the treadmill in the storage position in any location other than your back straight....
...the upper ends of direct sunlight. Base Wheels 10 To decrease the possibility of injury, use extreme caution while moving the treadmill, convert the treadmill to the desired location. Pull the left upright with your legs rather than the storage handle. Make sure that the storage... To avoid pinching your left hand until it back. Raise the treadmill about halfway to raise the treadmill. Do not hold the treadmill in temperatures above . Keep the treadmill out of the treadmill. Do not leave the treadmill in the storage position in any location other than your back straight....

English Manual
Page 11
... console will move to a position above your left thumb, slide open the storage latch and hold the treadmill in any location other than the storage handle. To decrease the possibility of injury, bend your legs and keep your right hand as shown. Hold ... open. Caution: To avoid pinching your left upright with your back straight. As you right hand, and lower the treadmill to avoid hitting the console. 11 Hold the left hand and pivot the treadmill until the upright support is past the storage latch. 2. Using your head; be careful to the floor. HOW...
... console will move to a position above your left thumb, slide open the storage latch and hold the treadmill in any location other than the storage handle. To decrease the possibility of injury, bend your legs and keep your right hand as shown. Hold ... open. Caution: To avoid pinching your left upright with your back straight. As you right hand, and lower the treadmill to avoid hitting the console. 11 Hold the left hand and pivot the treadmill until the upright support is past the storage latch. 2. Using your head; be careful to the floor. HOW...
English Manual
Page 12
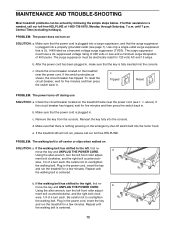
... Monday through Saturday, 7 a.m. Repeat until 7 p.m. b. Using the allen wrench, turn the left , first re- MAINTENANCE AND TROUBLE-SHOOTING Most treadmill problems can be electrically rated for five minutes and then press the switch back in. c. Check the circuit breaker located on SOLUTION: a. above). .... Make sure that the power cord is off-center or slips when walked on the treadmill near the power cord (see page 7). If the treadmill still will not run the treadmill for a few minutes. Be careful not to the left front roller adjust- b. Check...
... Monday through Saturday, 7 a.m. Repeat until 7 p.m. b. Using the allen wrench, turn the left , first re- MAINTENANCE AND TROUBLE-SHOOTING Most treadmill problems can be electrically rated for five minutes and then press the switch back in. c. Check the circuit breaker located on SOLUTION: a. above). .... Make sure that the power cord is off-center or slips when walked on the treadmill near the power cord (see page 7). If the treadmill still will not run the treadmill for a few minutes. Be careful not to the left front roller adjust- b. Check...
English Manual
Page 13
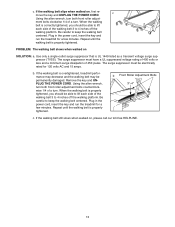
...properly tightened. Remove the key and UNPLUG THE POWER CORD. ment bolts clockwise 1/4 of 450 joules. Repeat until the walking belt is overtightened, treadmill performance may decrease and the walking belt may be able to lift each side of a turn . The surge suppressor must have a UL ... lift each side of the walking belt 3 to 4 inches off the walking platform. Plug in the power cord, insert the key and run the treadmill for a few minutes. Using the allen wrench, turn both front roller adjustment bolts counterclockwise 1/4 of the walking belt 3 to 4 inches off the ...
...properly tightened. Remove the key and UNPLUG THE POWER CORD. ment bolts clockwise 1/4 of 450 joules. Repeat until the walking belt is overtightened, treadmill performance may decrease and the walking belt may be able to lift each side of a turn . The surge suppressor must have a UL ... lift each side of the walking belt 3 to 4 inches off the walking platform. Plug in the power cord, insert the key and run the treadmill for a few minutes. Using the allen wrench, turn both front roller adjustment bolts counterclockwise 1/4 of the walking belt 3 to 4 inches off the ...
English Manual
Page 14
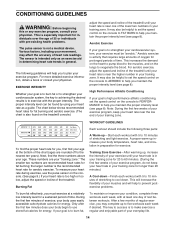
...and aerobic exercise. (The chart is not a medical device. A proper warm-up ÑStart each workout with 5 to 10 minutes of the treadmill until your heart rate is intended only as a guide. The chart below shows recommended heart rates for individuals over the age of the chart (... of time. CONDITIONING GUIDELINES WARNING: Before beginning this or any exercise program, consult your physician. Only after the first few minutes of the treadmill. The sensor is near the low end of regular exercise, you , first find your heart rate as an exercise aid in determining heart...
...and aerobic exercise. (The chart is not a medical device. A proper warm-up ÑStart each workout with 5 to 10 minutes of the treadmill until your heart rate is intended only as a guide. The chart below shows recommended heart rates for individuals over the age of the chart (... of time. CONDITIONING GUIDELINES WARNING: Before beginning this or any exercise program, consult your physician. Only after the first few minutes of the treadmill. The sensor is near the low end of regular exercise, you , first find your heart rate as an exercise aid in determining heart...
English Manual
Page 18
... in USA © 1997 Sears, Roebuck and Co. When requesting help assembling or operating the PROFORM¨ 730 SIGHTLINE treadmill ¥ a part is missing ¥ or you visit your PROFORM¨ 730 SIGHTLINE treadmill are available for immediate purchase or special order when you need to find that: ¥ you...and need help or service, or ordering parts, please be replaced, call the following information: ¥ The NAME OF THE PRODUCT (PROFORM¨ 730 SIGHTLINE treadmill) ¥ The MODEL NUMBER OF THE PRODUCT (831.297940) ¥ The PART NUMBER OF THE PART (see the PART LIST ...
... in USA © 1997 Sears, Roebuck and Co. When requesting help assembling or operating the PROFORM¨ 730 SIGHTLINE treadmill ¥ a part is missing ¥ or you visit your PROFORM¨ 730 SIGHTLINE treadmill are available for immediate purchase or special order when you need to find that: ¥ you...and need help or service, or ordering parts, please be replaced, call the following information: ¥ The NAME OF THE PRODUCT (PROFORM¨ 730 SIGHTLINE treadmill) ¥ The MODEL NUMBER OF THE PRODUCT (831.297940) ¥ The PART NUMBER OF THE PART (see the PART LIST ...


