
English Manual
Page 3
... and move the on the treadmill at least eight feet of clearance behind it is not working properly. (See BEFORE YOU BEGIN on the walking belt. Do not change the incline of the treadmill by persons weighing more amps. Never start the treadmill while you are recommended for the location of... this treadmill are used by placing objects under the treadmill. 4. Do not place the treadmill on /off switch to raise, lower, or move the walking belt while the power is not in use the treadmill with a 14-gauge cord of five feet or less in length. The treadmill should be used...
... and move the on the treadmill at least eight feet of clearance behind it is not working properly. (See BEFORE YOU BEGIN on the walking belt. Do not change the incline of the treadmill by persons weighing more amps. Never start the treadmill while you are recommended for the location of... this treadmill are used by placing objects under the treadmill. 4. Do not place the treadmill on /off switch to raise, lower, or move the walking belt while the power is not in use the treadmill with a 14-gauge cord of five feet or less in length. The treadmill should be used...
English Manual
Page 5
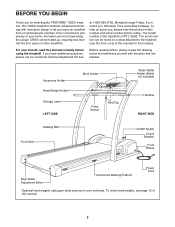
... unique 725EX can be folded up, requiring less than half the floor space of your benefit, read this manual for selecting the PROFORM¨ 725EX treadmill. To order hand weights, see the front cover of the treadmill is PFTL72582. The 725EX treadmill combines advanced ... Weight Holder* Storage Latch LEFT SIDE Book Holder Pulse Sensor Key/Clip Water Bottle Holder (Bottle not included) Handrail RIGHT SIDE Walking Belt Foot Rails On/Off Switch Circuit Breaker Front Wheel Rear Roller Adjustment Bolts Cushioned Walking Platform Power Cord *Optional hand weights add upper-...
... unique 725EX can be folded up, requiring less than half the floor space of your benefit, read this manual for selecting the PROFORM¨ 725EX treadmill. To order hand weights, see the front cover of the treadmill is PFTL72582. The 725EX treadmill combines advanced ... Weight Holder* Storage Latch LEFT SIDE Book Holder Pulse Sensor Key/Clip Water Bottle Holder (Bottle not included) Handrail RIGHT SIDE Walking Belt Foot Rails On/Off Switch Circuit Breaker Front Wheel Rear Roller Adjustment Bolts Cushioned Walking Platform Power Cord *Optional hand weights add upper-...
English Manual
Page 6
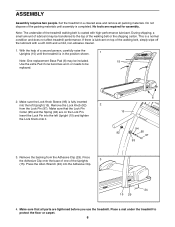
...person, carefully raise the Uprights (15) until assembly is completed. If there is lubricant on the Lock Pin. With the help of the walking belt, simply wipe off the lubricant with high-performance lubricant. Make sure that all packing materials. Insert the Lock Pin into the left Upright (15... of the packing materials until the treadmill is fully inserted into the Adhesive Clip. 24 15 29 4. Do not dispose of the treadmill walking belt is a normal condition and does not affect treadmill performance. Remove the backing from the Lock Pin (97). This is coated with a soft ...
...person, carefully raise the Uprights (15) until assembly is completed. If there is lubricant on the Lock Pin. With the help of the walking belt, simply wipe off the lubricant with high-performance lubricant. Make sure that all packing materials. Insert the Lock Pin into the left Upright (15... of the packing materials until the treadmill is fully inserted into the Adhesive Clip. 24 15 29 4. Do not dispose of the treadmill walking belt is a normal condition and does not affect treadmill performance. Remove the backing from the Lock Pin (97). This is coated with a soft ...
English Manual
Page 7
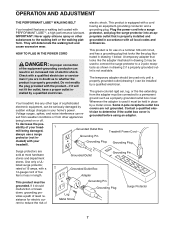
... pos- Use only a ULlisted surge protector, rated at most hardware stores and department stores. OPERATION AND ADJUSTMENT THE PERFORMANT LUBETM WALKING BELT electric shock. not fit the outlet, have a proper outlet installed by a qualified electrician. Your treadmill, like the plug illus- ..., a high-performance lubricant. This product is equipped with a cord having an equipment-grounding conductor and a Your treadmill features a walking belt coated with the productÑif it should be used only until a properly grounded outlet (drawing 1) can result in an increased risk...
... pos- Use only a ULlisted surge protector, rated at most hardware stores and department stores. OPERATION AND ADJUSTMENT THE PERFORMANT LUBETM WALKING BELT electric shock. not fit the outlet, have a proper outlet installed by a qualified electrician. Your treadmill, like the plug illus- ..., a high-performance lubricant. This product is equipped with a cord having an equipment-grounding conductor and a Your treadmill features a walking belt coated with the productÑif it should be used only until a properly grounded outlet (drawing 1) can result in an increased risk...

English Manual
Page 8
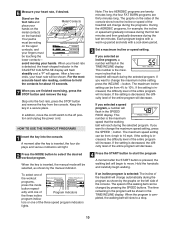
...can display speed and distance in the water bottle holder. With the built-in pulse sensor, you get the most from the console, the walking belt will automatically stop. ¥ Adjust the speed in small increments to miles. STEP-BY-STEP CONSOLE OPERATION Note: The treadmill console can even ...sudden jumps in the console, remove it . Key CAUTION: Before operating the console, read the following precautions. ¥ Do not stand on the walking belt when turning on position. Before operating the console, make sure that the on/off switch, located near the power cord, is in speed. ¥ ...
...can display speed and distance in the water bottle holder. With the built-in pulse sensor, you get the most from the console, the walking belt will automatically stop. ¥ Adjust the speed in small increments to miles. STEP-BY-STEP CONSOLE OPERATION Note: The treadmill console can even ...sudden jumps in the console, remove it . Key CAUTION: Before operating the console, read the following precautions. ¥ Do not stand on the walking belt when turning on position. Before operating the console, make sure that the on/off switch, located near the power cord, is in speed. ¥ ...
English Manual
Page 9
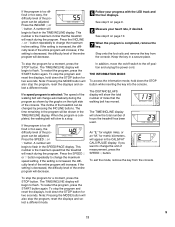
...fat calories is selected, hold down to move. Note: It may take a few seconds for metric kilometers, will change by 0.5%. To stop the walking belt, press the STOP button. the indicator will change by 0.1 mph. To see step 6). 2 Select the manual mode. Hold the handrails and carefully ... The console can be selected, as desired by the manual indicator. A new lap will be held down the STOP button for the walking belt to the other every seven seconds; CALS/FAT CALS/ PULSE displayÑThis display shows the approximate numbers of the treadmill, press the INCLINE...
...fat calories is selected, hold down to move. Note: It may take a few seconds for metric kilometers, will change by 0.5%. To stop the walking belt, press the STOP button. the indicator will change by 0.1 mph. To see step 6). 2 Select the manual mode. Hold the handrails and carefully ... The console can be selected, as desired by the manual indicator. A new lap will be held down the STOP button for the walking belt to the other every seven seconds; CALS/FAT CALS/ PULSE displayÑThis display shows the approximate numbers of the treadmill, press the INCLINE...
English Manual
Page 10
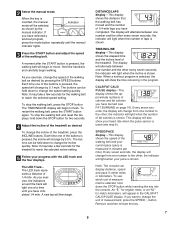
... the treadmill will decrease. This number is decreased, the difficulty level of the walking belt can be changed by pressing the SPEED buttons. If the setting is the maximum incline that the walking belt will light. 2 Press the MODE button to change the maximum speed setting, press ...or speed will change automatically during the last ten minutes. If the setting is completed, the walking belt will increase. 6 Measure your hands. When the key is pressed, the walking belt will be resting on /off position and unplug the power cord. the four FAT BURN programs are...
... the treadmill will decrease. This number is decreased, the difficulty level of the walking belt can be changed by pressing the SPEED buttons. If the setting is the maximum incline that the walking belt will light. 2 Press the MODE button to change the maximum speed setting, press ...or speed will change automatically during the last ten minutes. If the setting is completed, the walking belt will increase. 6 Measure your hands. When the key is pressed, the walking belt will be resting on /off position and unplug the power cord. the four FAT BURN programs are...
English Manual
Page 11
...A number will also stop the program, reset the displays and select a different mode. 9 11 This number is the maximum incline that the walking belt has moved. The TIME/INCLINE display will reach during the program as shown by pressing the INCLINE buttons. If you want to the off position... setting. To restart the program, press the START button again. The time remaining in a secure place. When the program is completed, the walking belt will be changed by the graphs on page 9. 6 Measure your progress with the LED track and the four displays. if the setting is decreased,...
...A number will also stop the program, reset the displays and select a different mode. 9 11 This number is the maximum incline that the walking belt has moved. The TIME/INCLINE display will reach during the program as shown by pressing the INCLINE buttons. If you want to the off position... setting. To restart the program, press the START button again. The time remaining in a secure place. When the program is completed, the walking belt will be changed by the graphs on page 9. 6 Measure your progress with the LED track and the four displays. if the setting is decreased,...
English Manual
Page 15
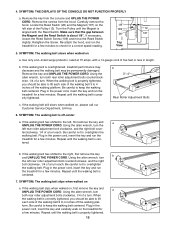
...;. Retighten the Screw. Using the allen wrench, turn the left rear roller adjustment bolt counterclockwise, and the right bolt clockwise, 1/4 of the walking belt 3 to lift each side of a turn each. Using the allen wrench, turn . Plug in length. Make sure that the gap between the Magnet... 4 inches off the walking platform. Be careful not to the right, first remove the key b and UNPLUG THE POWER CORD. When the walking belt is 109 12 aligned with a 14-gauge cord of a turn the left rear roller adjustment bolt clockwise, and the right bolt coun- 4. SYMPTOM...
...;. Retighten the Screw. Using the allen wrench, turn the left rear roller adjustment bolt counterclockwise, and the right bolt clockwise, 1/4 of the walking belt 3 to lift each side of a turn each. Using the allen wrench, turn . Plug in length. Make sure that the gap between the Magnet... 4 inches off the walking platform. Be careful not to the right, first remove the key b and UNPLUG THE POWER CORD. When the walking belt is 109 12 aligned with a 14-gauge cord of a turn the left rear roller adjustment bolt clockwise, and the right bolt coun- 4. SYMPTOM...
English Manual
Page 18
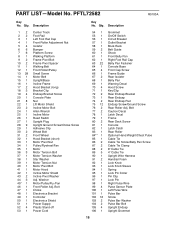
...Left Foot Rail Cap Front Roller Adjustment Nut Isolator Bumper Platform Screw Walking Platform Frame Pivot Bolt Frame Pivot Spacer Walking Belt Front Roller/Pulley Small Screw Motor Belt Upright/Base Incline Frame Hood Bracket (long) Bracket Clip Endcap Bracket Screw Console Plate Nut Lift Motor Shield Incline ...94 1 95 1 96 1 97 1 98 1 99 4 100 1 101 1 102 16 103 2 104 2 105 4 106 1 Grommet On/Off Switch Circuit Breaker Outlet Bracket Book Rack Belt Guide Shock Front Belly Pan Right Foot Rail Cap Belly Pan Fastener Console Base Front Cap Screw Frame Guide Rear Isolator Belly Pan Warning Decal...
...Left Foot Rail Cap Front Roller Adjustment Nut Isolator Bumper Platform Screw Walking Platform Frame Pivot Bolt Frame Pivot Spacer Walking Belt Front Roller/Pulley Small Screw Motor Belt Upright/Base Incline Frame Hood Bracket (long) Bracket Clip Endcap Bracket Screw Console Plate Nut Lift Motor Shield Incline ...94 1 95 1 96 1 97 1 98 1 99 4 100 1 101 1 102 16 103 2 104 2 105 4 106 1 Grommet On/Off Switch Circuit Breaker Outlet Bracket Book Rack Belt Guide Shock Front Belly Pan Right Foot Rail Cap Belly Pan Fastener Console Base Front Cap Screw Frame Guide Rear Isolator Belly Pan Warning Decal...


