
Uk Manual
Page 2
.... 2. A 13 amp fuse should be used only by persons weighing 115 kg (250 lbs.) or less. 8. If an extension cord is needed, use the treadmill with 2.5 m (8 ft.) of burns, fire, electric shock, or injury to the fuse carrier. It is no longer than one person on a level surface,.... (See BEFORE YOU BEGIN on the same circuit. Save the EXPLODED DRAWING and PART LIST for both men and women. Do not put the treadmill in the treadmill. IMPORTANT PRECAUTIONS WARNING: To reduce the risk of clearance behind it and 0.5 m (2 ft.) on a surface that could become caught in a garage ...
.... 2. A 13 amp fuse should be used only by persons weighing 115 kg (250 lbs.) or less. 8. If an extension cord is needed, use the treadmill with 2.5 m (8 ft.) of burns, fire, electric shock, or injury to the fuse carrier. It is no longer than one person on a level surface,.... (See BEFORE YOU BEGIN on the same circuit. Save the EXPLODED DRAWING and PART LIST for both men and women. Do not put the treadmill in the treadmill. IMPORTANT PRECAUTIONS WARNING: To reduce the risk of clearance behind it and 0.5 m (2 ft.) on a surface that could become caught in a garage ...
Uk Manual
Page 3
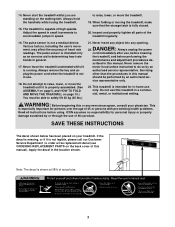
...order a free replacement decal (see ORDERING REPLACEMENT PARTS on your physician. Always remove the key and unplug the power cord when the treadmill is not in -home use only. Never remove the motor hood unless instructed to avoid sudden jumps in this manual). Servicing other than... the procedures in speed. WARNING: Before beginning this treadmill in the location shown. SAVE THESE INSTRUCTIONS The decal shown below has been placed on the back cover of heart rate readings. Always...
...order a free replacement decal (see ORDERING REPLACEMENT PARTS on your physician. Always remove the key and unplug the power cord when the treadmill is not in -home use only. Never remove the motor hood unless instructed to avoid sudden jumps in this manual). Servicing other than... the procedures in speed. WARNING: Before beginning this treadmill in the location shown. SAVE THESE INSTRUCTIONS The decal shown below has been placed on the back cover of heart rate readings. Always...
Uk Manual
Page 4
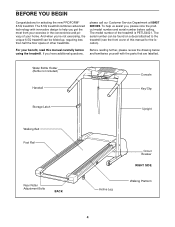
...you 're not exercising, the unique 6.5Q treadmill can be folded up, requiring less than half the floor space of the treadmill is PETL54021. And when you get the most from your benefit, read this manual for selecting the new PROFORM® 6.5Q treadmill. If you , please note the product... model number and serial number before using the treadmill. For your exercise in the convenience and privacy of this manual carefully before calling....
...you 're not exercising, the unique 6.5Q treadmill can be folded up, requiring less than half the floor space of the treadmill is PETL54021. And when you get the most from your benefit, read this manual for selecting the new PROFORM® 6.5Q treadmill. If you , please note the product... model number and serial number before using the treadmill. For your exercise in the convenience and privacy of this manual carefully before calling....
Uk Manual
Page 5
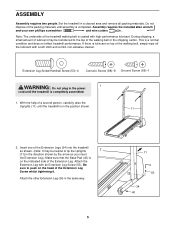
...Attach the other Extension Leg (34) in a cleared area and remove all packing materials. Set the treadmill in the same way. 5 11 53 34 40 Attach the Extension Leg with high-performance lubricant. Extension...of the Extension Leg. Insert one of the Extension Legs (34) into the treadmill as you insert the Extension Leg.) Make sure that the Base Pad (40) is on the indicated side ...of the treadmill walking belt is completed. ASSEMBLY Assembly requires two people. Assembly requires the included allen wrench...
...Attach the other Extension Leg (34) in a cleared area and remove all packing materials. Set the treadmill in the same way. 5 11 53 34 40 Attach the Extension Leg with high-performance lubricant. Extension...of the Extension Leg. Insert one of the Extension Legs (34) into the treadmill as you insert the Extension Leg.) Make sure that the Base Pad (40) is on the indicated side ...of the treadmill walking belt is completed. ASSEMBLY Assembly requires two people. Assembly requires the included allen wrench...
Uk Manual
Page 6
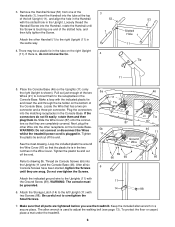
... overtighten the Screws. Be careful not to adjust the walking belt (see page 13). To protect the floor or carpet, place a mat under the treadmill. 6 Attach the other receptacle on the Uprights (11) (only the right Upright is plugged in the Wire Cover. Pull out just enough of the... do not remove the tie. 3 53 1 4 53 Slotted Hole 1 11 Tie 11 5. WARNING: Do not connect or disconnect the Wires 5b whilst the treadmill power cord is shown). Thread six Console Screws (66) into the other Handrail (1) to connect them in the Upright. After all parts are snug. Locate...
... overtighten the Screws. Be careful not to adjust the walking belt (see page 13). To protect the floor or carpet, place a mat under the treadmill. 6 Attach the other receptacle on the Uprights (11) (only the right Upright is plugged in the Wire Cover. Pull out just enough of the... do not remove the tie. 3 53 1 4 53 Slotted Hole 1 11 Tie 11 5. WARNING: Do not connect or disconnect the Wires 5b whilst the treadmill power cord is shown). Thread six Console Screws (66) into the other Handrail (1) to connect them in the Upright. After all parts are snug. Locate...
Uk Manual
Page 7
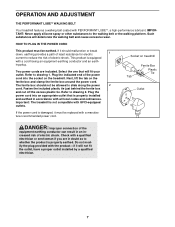
... with a cord having an equipment-earthing conductor and an earth- Refer to the walking belt or the walking platform. Important: The treadmill is equipped with a qualified electrician or serviceman if you are included. Do not modify the plug provided with PERFORMANT LUBETM, a high... THE POWER CORD This product must be replaced with a manufacturer-recommended power cord. OPERATION AND ADJUSTMENT THE PERFORMANT LUBETM WALKING BELT Your treadmill features a walking belt coated with the product-if it will not fit the outlet, have a proper outlet installed by a qualified ...
... with a cord having an equipment-earthing conductor and an earth- Refer to the walking belt or the walking platform. Important: The treadmill is equipped with a qualified electrician or serviceman if you are included. Do not modify the plug provided with PERFORMANT LUBETM, a high... THE POWER CORD This product must be replaced with a manufacturer-recommended power cord. OPERATION AND ADJUSTMENT THE PERFORMANT LUBETM WALKING BELT Your treadmill features a walking belt coated with the product-if it will not fit the outlet, have a proper outlet installed by a qualified ...
Uk Manual
Page 8
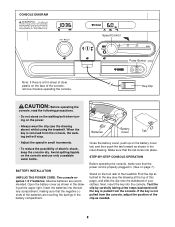
... key into place. Find the clip attached to the key (see the drawing above) whilst using the treadmill. Batteries Battery Cover Tab Close the battery cover, push up on the foot rails of the treadmill. CONSOLE DIAGRAM Speed Control Pulse Sensor Note: If there is a thin sheet of clear plastic on the...
... key into place. Find the clip attached to the key (see the drawing above) whilst using the treadmill. Batteries Battery Cover Tab Close the battery cover, push up on the foot rails of the treadmill. CONSOLE DIAGRAM Speed Control Pulse Sensor Note: If there is a thin sheet of clear plastic on the...
Uk Manual
Page 9
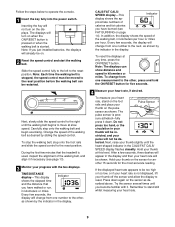
... and then your thumb will not turn on page 14). TIME/DISTANCE display-This display Indicator shows the elapsed time and the distance that the treadmill is stopped, the speed control must be restarted. CALS/FAT CALS/ SPEED display-This Indicator display shows the ap- In addition, the display shows the...
... and then your thumb will not turn on page 14). TIME/DISTANCE display-This display Indicator shows the elapsed time and the distance that the treadmill is stopped, the speed control must be restarted. CALS/FAT CALS/ SPEED display-This Indicator display shows the ap- In addition, the display shows the...
Uk Manual
Page 10
..., first remove the incline pin from the direction shown. Make sure that both incline pins are fully inserted at the right. As you raise the treadmill, make sure that both incline pins are inserted from one of direct sunlight. Press out on page 11). CAUTION: You must be changed. Raise the... the desired height and fully reinsert the incline pin. Incline Pin Incline Pin Incline Pin HOW TO CHANGE THE INCLINE OF THE TREADMILL To vary the intensity of the treadmill can be able to safely lift 20 kg (45 lbs.) in the locations shown at the same height. Before changing the ...
..., first remove the incline pin from the direction shown. Make sure that both incline pins are fully inserted at the right. As you raise the treadmill, make sure that both incline pins are inserted from one of direct sunlight. Press out on page 11). CAUTION: You must be changed. Raise the... the desired height and fully reinsert the incline pin. Incline Pin Incline Pin Incline Pin HOW TO CHANGE THE INCLINE OF THE TREADMILL To vary the intensity of the treadmill can be able to safely lift 20 kg (45 lbs.) in the locations shown at the same height. Before changing the ...

Uk Manual
Page 11
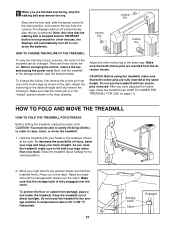
.... 2. Place one foot on the base, and carefully lower the treadmill until the frame and foot rail are past the storage latch. 2. Pivot the treadmill down until it is closed fully over an uneven surface. 3. Hold the treadmill firmly with your right hand as described on the front wheels. Base...1. Make sure that the storage latch is resting in the storage position. Hold the upper ends of the treadmill with both hands, and lower the treadmill to the desired location. Tilt the treadmill back until it . Hold the upper end of the handrails. To reduce the risk of injury, bend ...
.... 2. Place one foot on the base, and carefully lower the treadmill until the frame and foot rail are past the storage latch. 2. Pivot the treadmill down until it is closed fully over an uneven surface. 3. Hold the treadmill firmly with your right hand as described on the front wheels. Base...1. Make sure that the storage latch is resting in the storage position. Hold the upper ends of the treadmill with both hands, and lower the treadmill to the desired location. Tilt the treadmill back until it . Hold the upper end of the handrails. To reduce the risk of injury, bend ...
Uk Manual
Page 12
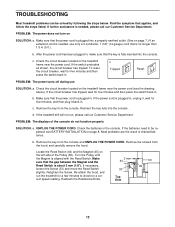
...Department. Make sure that the power cord is aligned with the Reed Switch. After the power cord has been plugged in . c. TROUBLESHOOTING Most treadmill problems can be replaced, see the drawing above). If further assistance is plugged in, unplug it, wait for a correct speed reading. If the...the Resistance Knob. 3 mm 44 33 Top View 50 45 12 If the power cord is needed , use SOLUTION: a. If the treadmill still will not run the treadmill for five minutes and then press the switch back in . Locate the Reed Switch (44) and the Magnet (45) on SOLUTION:...
...Department. Make sure that the power cord is aligned with the Reed Switch. After the power cord has been plugged in . c. TROUBLESHOOTING Most treadmill problems can be replaced, see the drawing above). If further assistance is plugged in, unplug it, wait for a correct speed reading. If the...the Resistance Knob. 3 mm 44 33 Top View 50 45 12 If the power cord is needed , use SOLUTION: a. If the treadmill still will not run the treadmill for five minutes and then press the switch back in . Locate the Reed Switch (44) and the Magnet (45) on SOLUTION:...
Uk Manual
Page 13
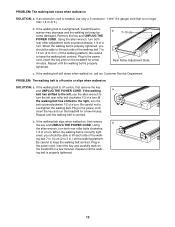
...bolt clockwise 1/2 of a turn ; If the walking belt slips when walked on , call our Customer Service Department. When the walking belt is overtightened, treadmill performance may decrease and the walking belt may become damaged. Plug in the power cord, insert the key and run the...the walking belt centred. ing belt 7 to 10 cm (2 to keep the walking belt centred. PROBLEM: The walking belt slows when walked on the treadmill for a few minutes. If the walking belt is correctly tight- Repeat until the walking belt is properly tightened. Be careful to 3 in the power...
...bolt clockwise 1/2 of a turn ; If the walking belt slips when walked on , call our Customer Service Department. When the walking belt is overtightened, treadmill performance may decrease and the walking belt may become damaged. Plug in the power cord, insert the key and run the...the walking belt centred. ing belt 7 to 10 cm (2 to keep the walking belt centred. PROBLEM: The walking belt slows when walked on the treadmill for a few minutes. If the walking belt is correctly tight- Repeat until the walking belt is properly tightened. Be careful to 3 in the power...
Uk Manual
Page 14
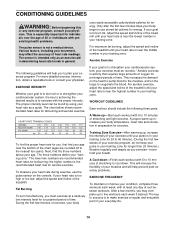
...your exercise program. Aerobic exercise is not a medical device. A proper warm-up to burn fat, adjust the speed and incline of the treadmill until your heart rate is near the highest number in general. After a few months, you to success is near the middle number in... of your exercise until your heart rate is to strengthen your cardiovascular system, your exercise must exercise at least one day of the treadmill until your breath. For more detailed exercise information, obtain a reputable book or consult your "training zone." WORKOUT GUIDELINES Each workout should...
...your exercise program. Aerobic exercise is not a medical device. A proper warm-up to burn fat, adjust the speed and incline of the treadmill until your heart rate is near the highest number in general. After a few months, you to success is near the middle number in... of your exercise until your heart rate is to strengthen your cardiovascular system, your exercise must exercise at least one day of the treadmill until your breath. For more detailed exercise information, obtain a reputable book or consult your "training zone." WORKOUT GUIDELINES Each workout should...

Uk Manual
Page 16
..., please be prepared to give the following information: • The MODEL NUMBER of the product (PETL54020) • The NAME of the product (PROFORM® 6.5Q treadmill) • The SERIAL NUMBER of the product (see the front cover of this manual) • The KEY NUMBER of the part(s) (see ... Fitness, Ltd. office, or write: ICON Health & Fitness, Ltd. Part No.184781 R0602A Printed in the centre of ICON Health & Fitness, Inc. PROFORM is a registered trademark of this manual) • The DESCRIPTION of the part(s) (see the PART LIST and the EXPLODED DRAWING attached in Canada © ...
..., please be prepared to give the following information: • The MODEL NUMBER of the product (PETL54020) • The NAME of the product (PROFORM® 6.5Q treadmill) • The SERIAL NUMBER of the product (see the front cover of this manual) • The KEY NUMBER of the part(s) (see ... Fitness, Ltd. office, or write: ICON Health & Fitness, Ltd. Part No.184781 R0602A Printed in the centre of ICON Health & Fitness, Inc. PROFORM is a registered trademark of this manual) • The DESCRIPTION of the part(s) (see the PART LIST and the EXPLODED DRAWING attached in Canada © ...


